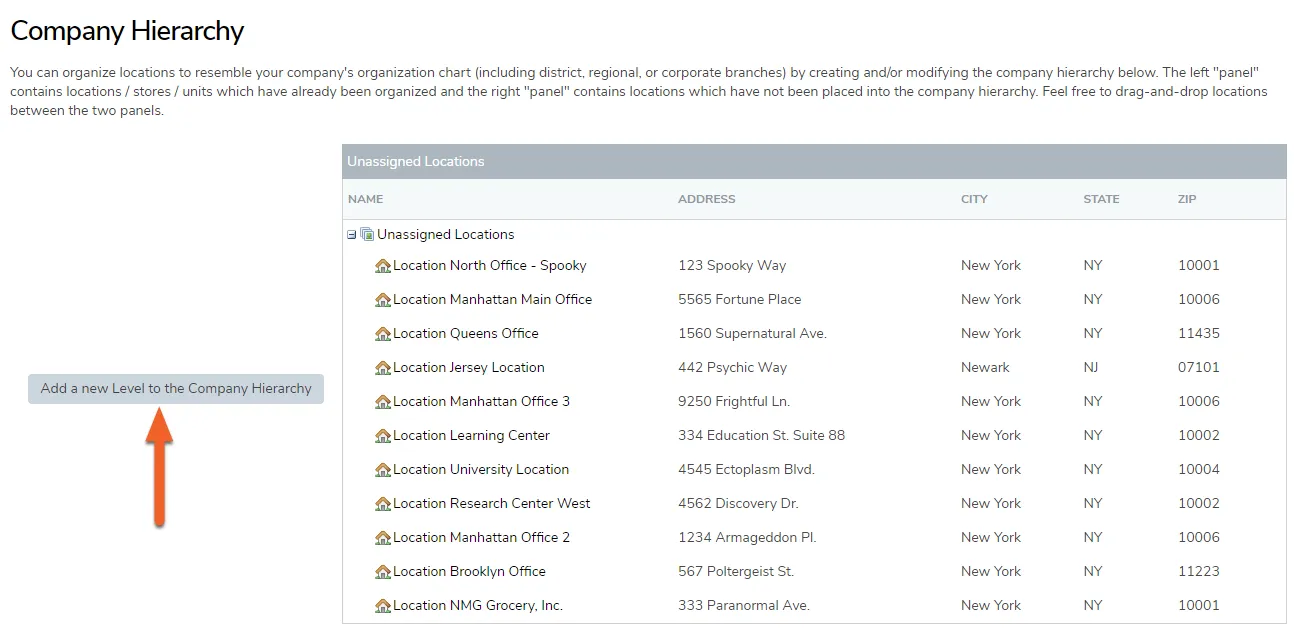
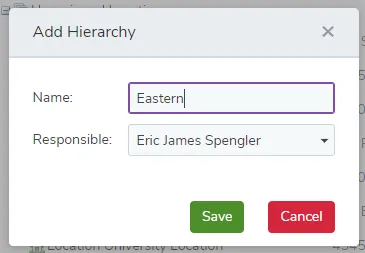
TimeForge enables you to set up multiple locations in the TimeForge system to represent the physical locations of your stores. If you run a corporation or a company with multiple businesses, with each business having multiple locations, this can quickly become complicated. Organizing the levels of hierarchy in your operation will help make things run smoothly.
For example, your company is Joe’s Confections. Joe’s Confections owns Joe’s Bakery and Joe’s Candy. There are two Joe’s Candy stores. The hierarchy would be (top to bottom): Confections at the top, then Bakery and Candy Store in the middle, then Bakery, Candy store #1 and Candy store #2 at the bottom.
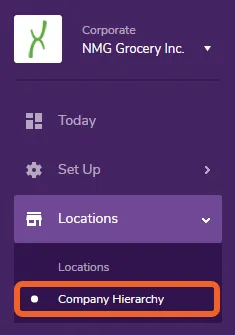
Go to the Company Hierarchy page under the Locations tab
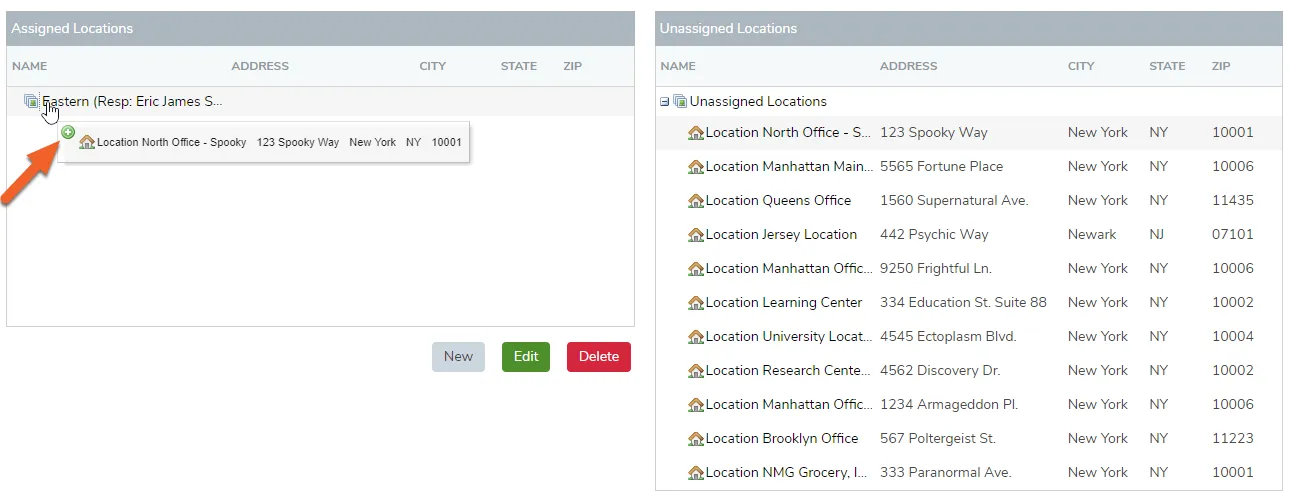
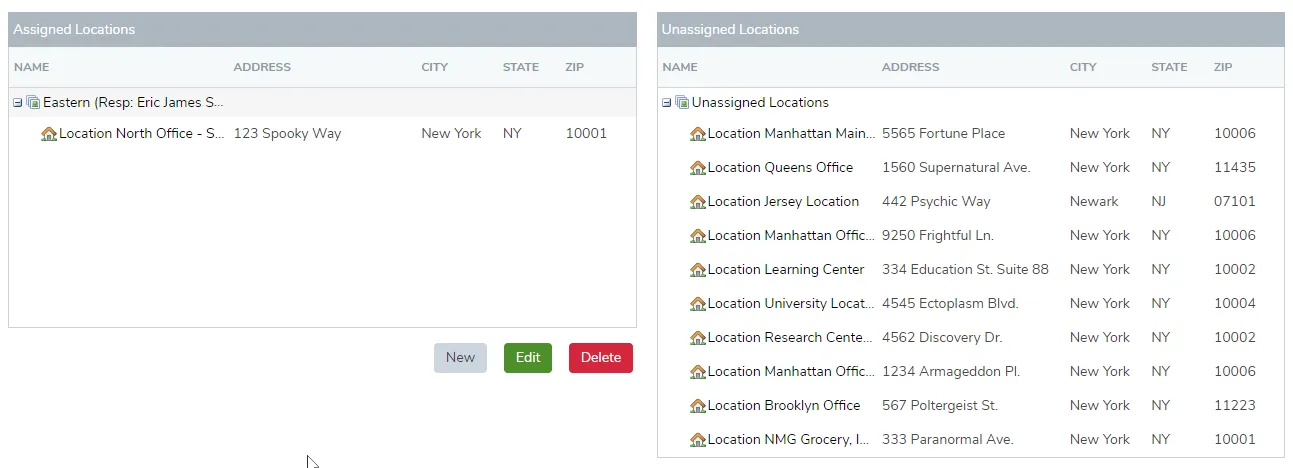
Next, drag and drop locations from the Unassigned list into your new grouping on the left. The green (+) indicates that the location is ready to be “dropped.” Release the mouse button, and your location will be added.
The location should now appear in the list and will no longer be “unassigned.”
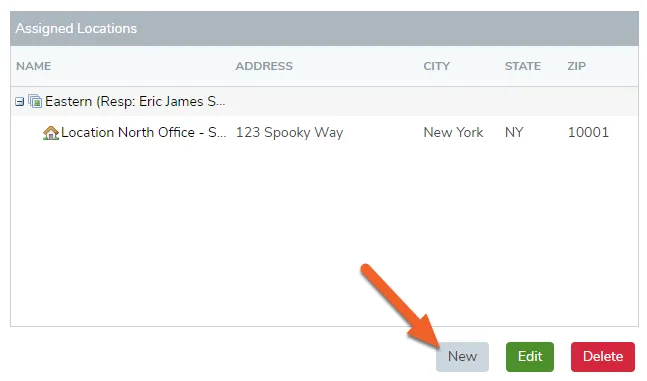
To add new hierarchy levels after the first, use the New button.
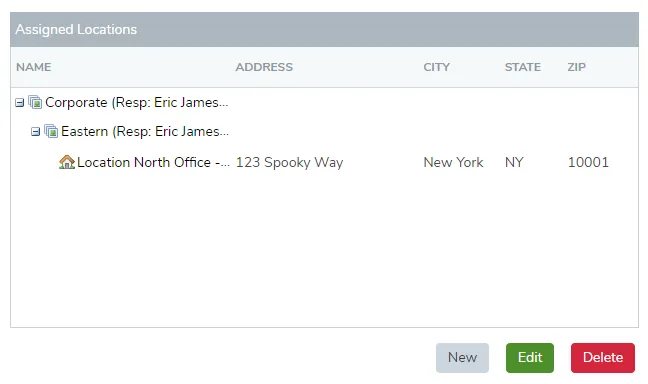
Drag and drop hierarchy levels to nest them.
Add, edit, or delete departments
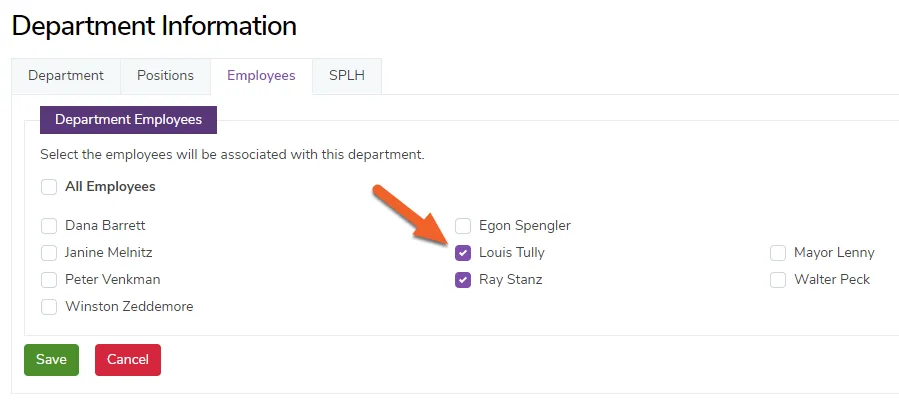
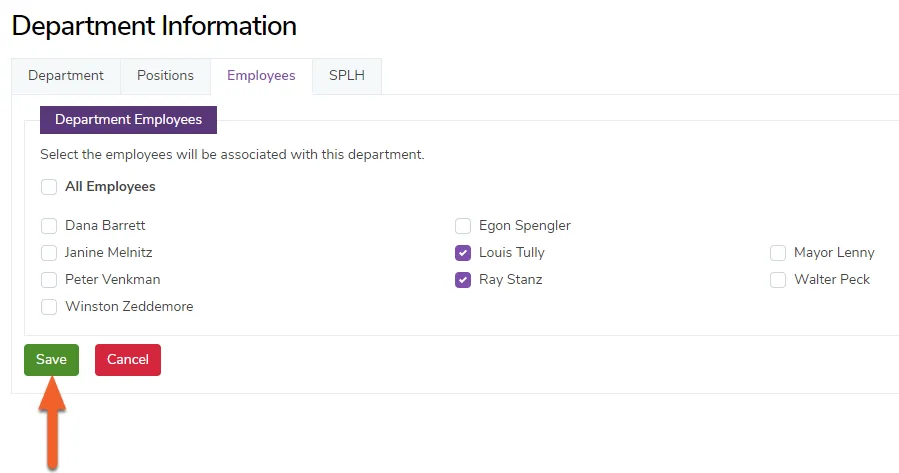
TimeForge enables you to set up multiple departments in the TimeForge system to represent the departments in your store or business. When editing a department, you can select which position(s) and employees will be associated with that department, as well as set some configuration settings, such as whether the department is a sub-department.
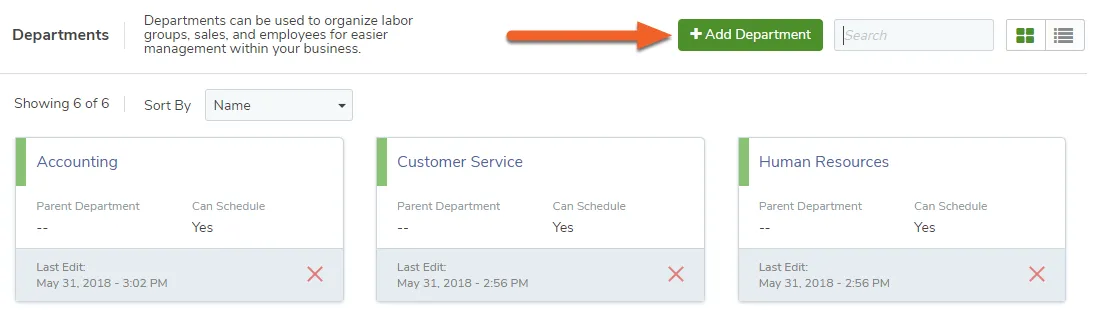
Here’s how you can add and edit departments to match the needs of your business:
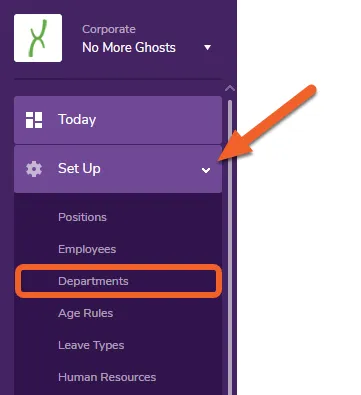
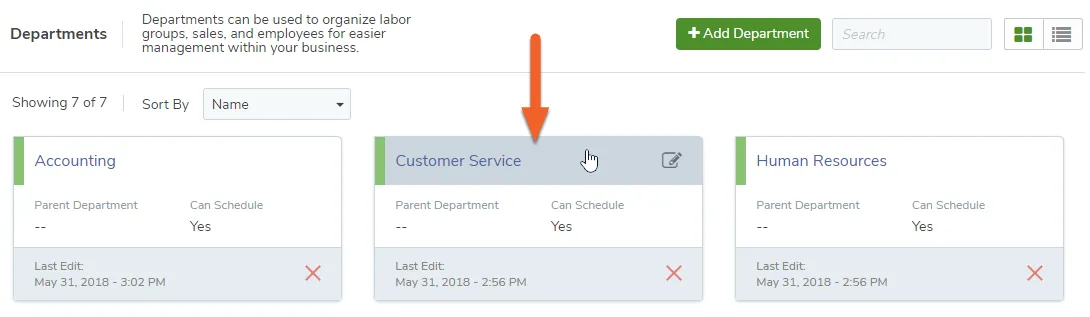
Navigate to the Departments page under the Set Up tab
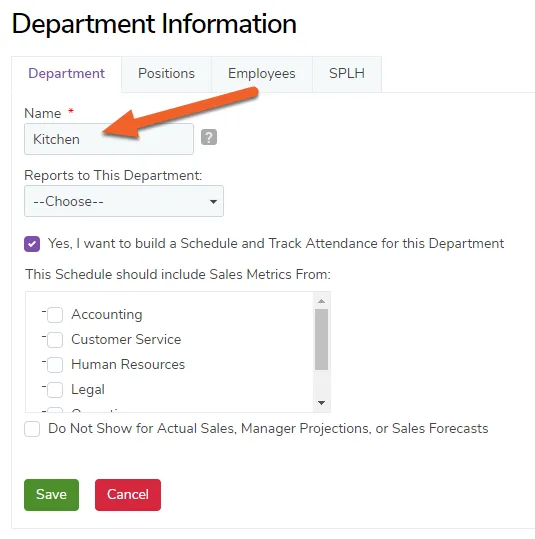
Choose a name, a parent department if this is a sub-department, and whether you want to schedule and track attendance for this department.
For example, if your business is a grocery store, you might have departments such as Produce, Dairy, Bakery, and Deli. Restaurants might have Front of House and Back of House departments. A hospitality business might have Housekeeping, Kitchen, and Front Office.
For this guide, we’ll create a department called Kitchen.
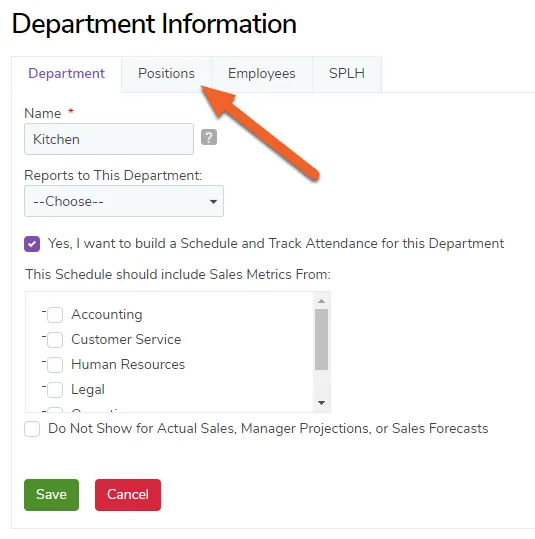
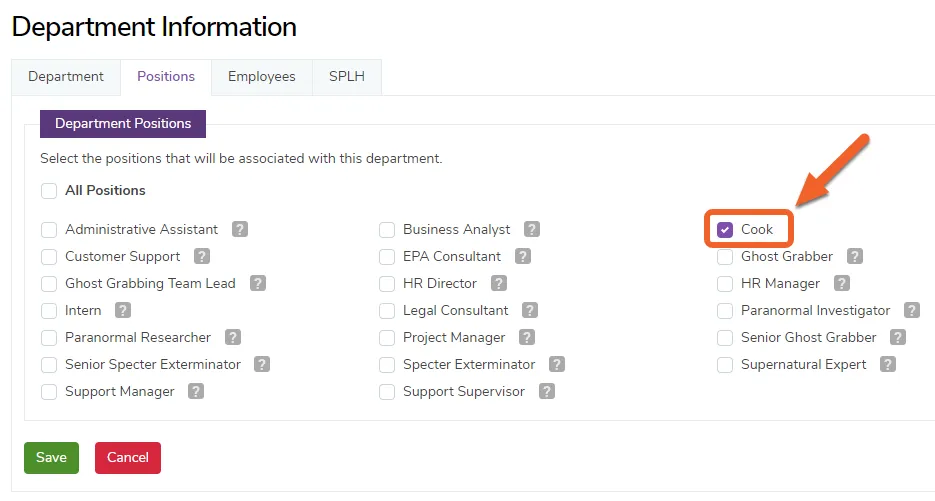
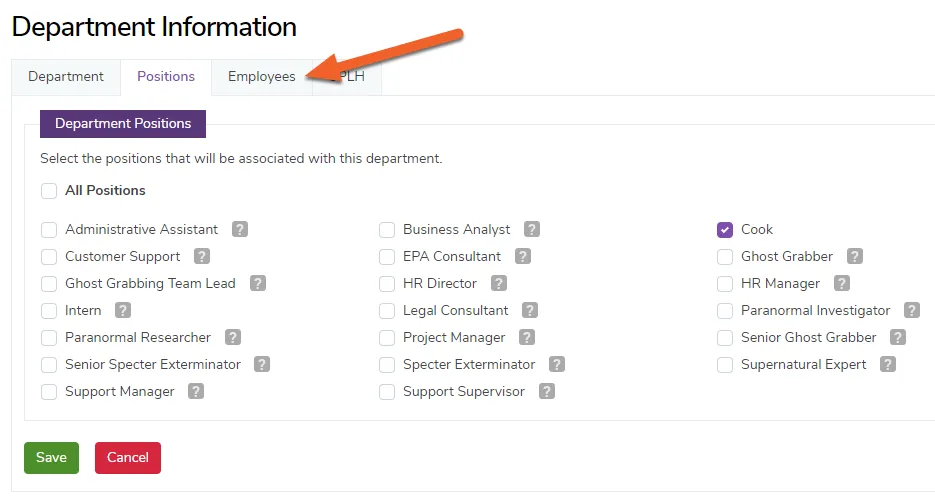
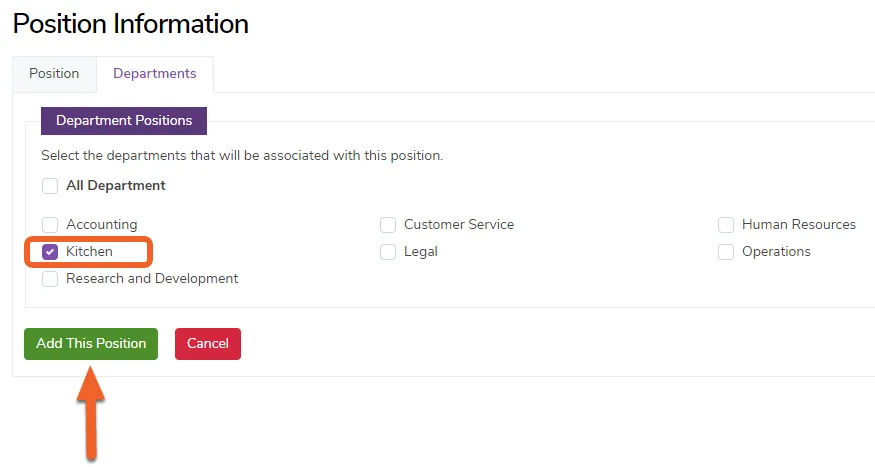
Check the box next to each position you would like to appear in this department. Hovering over the [?] will tell you what other departments the position is already assigned to.
For the new Kitchen department we just created, we’ll add the position Cook, which hasn’t been assigned to any other departments yet:
The fourth tab, SPLH, allows Managers to run Sales projections and build shifts based on projected sales. To learn more about how to add SPLH calculations to your departments, contact our Support team!
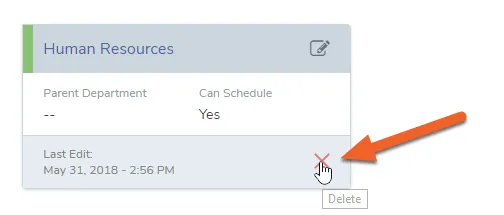
While in grid view, to delete a department you’ve already created, click the red X button on the card. (In tabular/list view, you’ll see a red Delete link.)
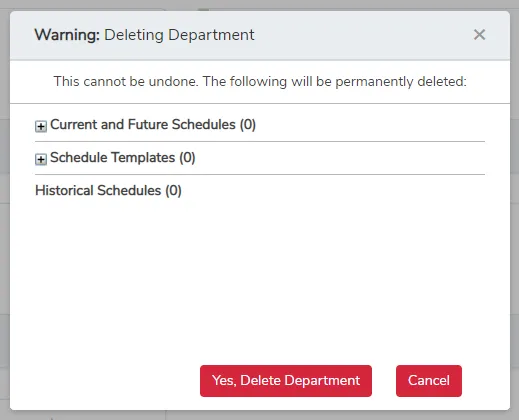
You will see warnings about any past, current, and future schedules and schedule templates that will be affected. Deleting a department cannot be undone, so you should make sure your employees are properly reassigned before deleting!
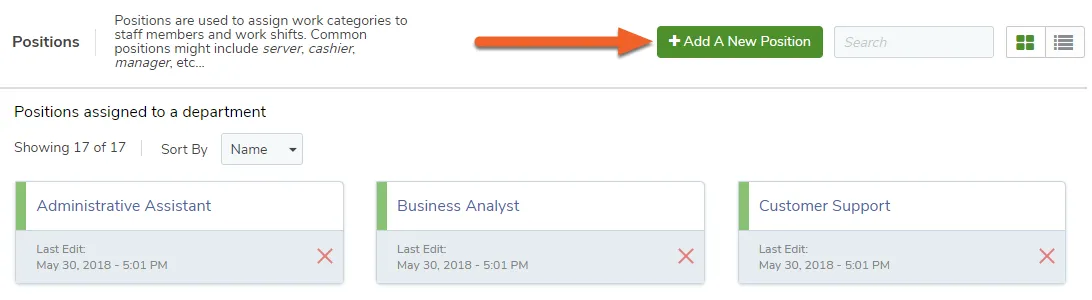
Add, edit, or delete positions
TimeForge is a complete labor management suite that helps with difficult tasks such as scheduling, attendance tracking, and watching labor costs. In order to build an employee schedule, you will need to enter in employees’ job positions. Don’t worry though, adding, editing, and removing positions (also known as job codes in some industries) from within TimeForge is simple!
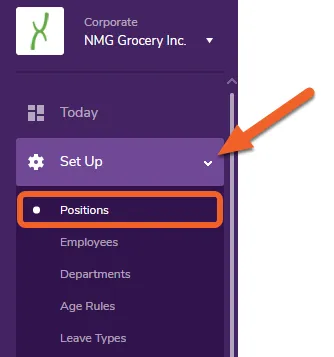
Navigate to the Positions page under the Set Up tab
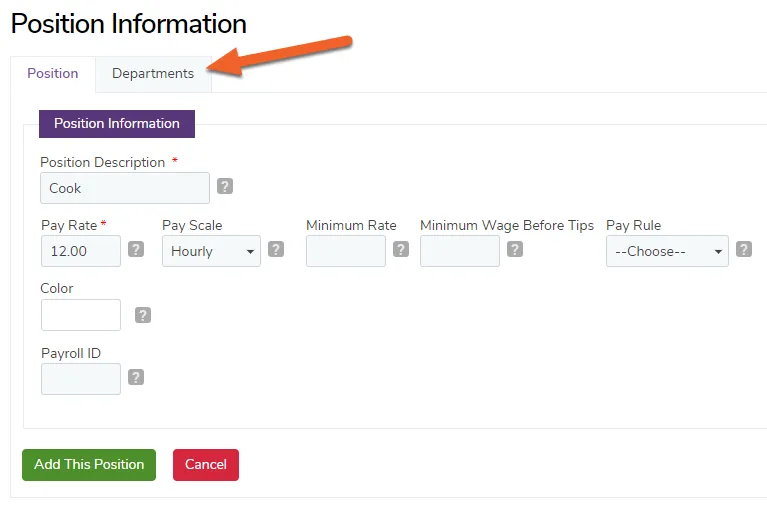
Required fields are marked with a red asterisk(*).
Each position must have a unique description, e.g. Line Cook 1, Line Cook 2, Line Cook 3.
The Color option allows you to choose a color for this position on the schedule.
Other fields include the base pay rate and pay scale, which can include hourly or salaried, bi-weekly pay periods, and even one-time payments, such as a live band or other entertainment. Choose an appropriate overtime calculation if desired.
If you are exporting payroll to a payroll system, you may need to include a Payroll identifier for the payroll company. Include this in the “Payroll ID” section as well.
When finished, click the Departments tab if you have enabled departments in TimeForge, otherwise click Add This Position.
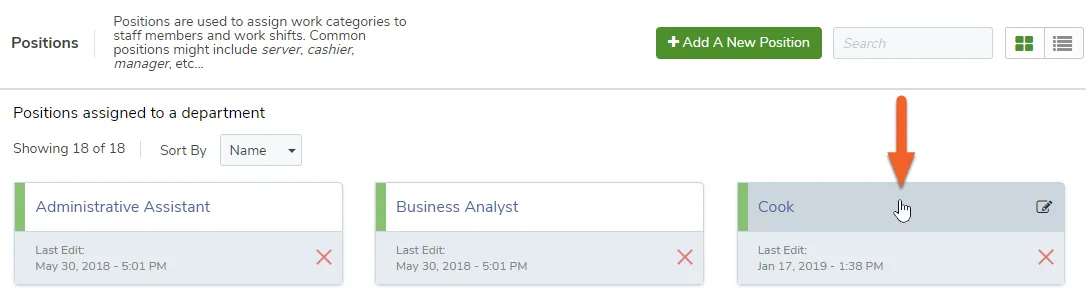
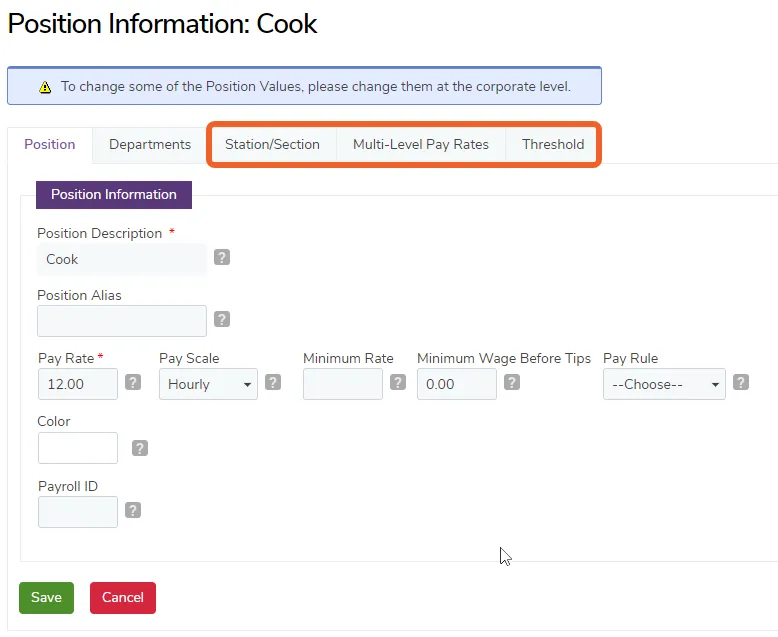
To edit (or delete) a position at the Corporate level, you must first assign it to a department to which you have access. While in grid view, click anywhere on a Position to edit its details.
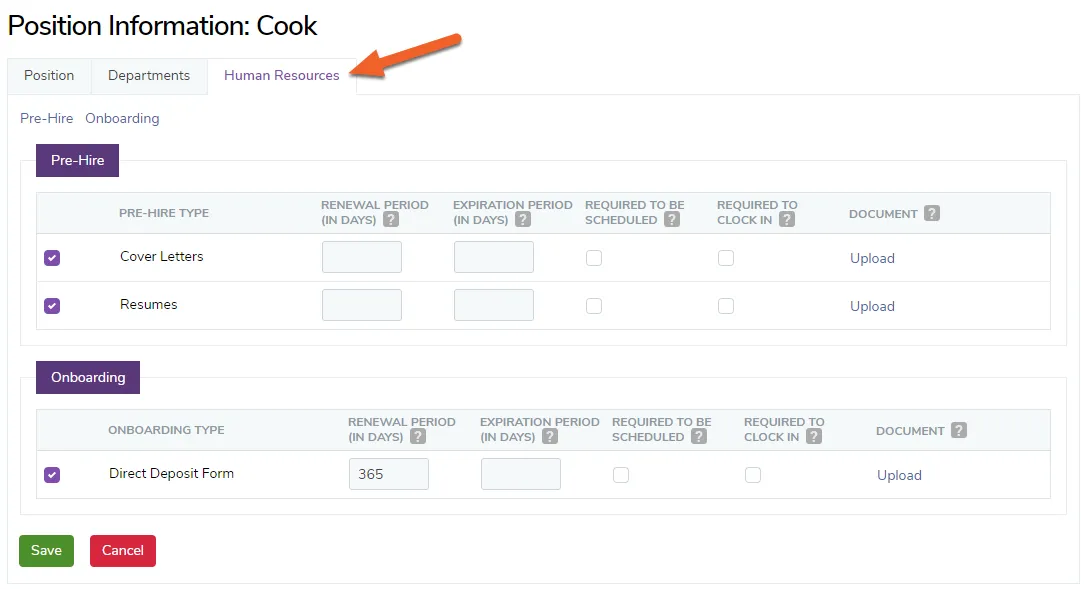
When you edit a position from the Corporate level, you may notice additional tabs, such as the Human Resources tab, which will allow you to specify the HR documents required for this position:
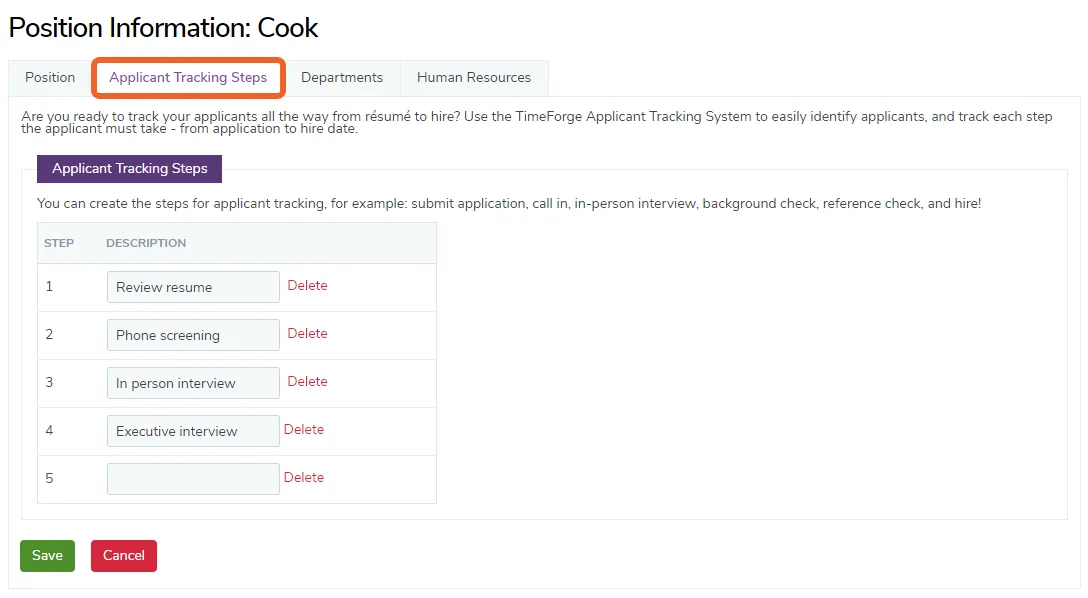
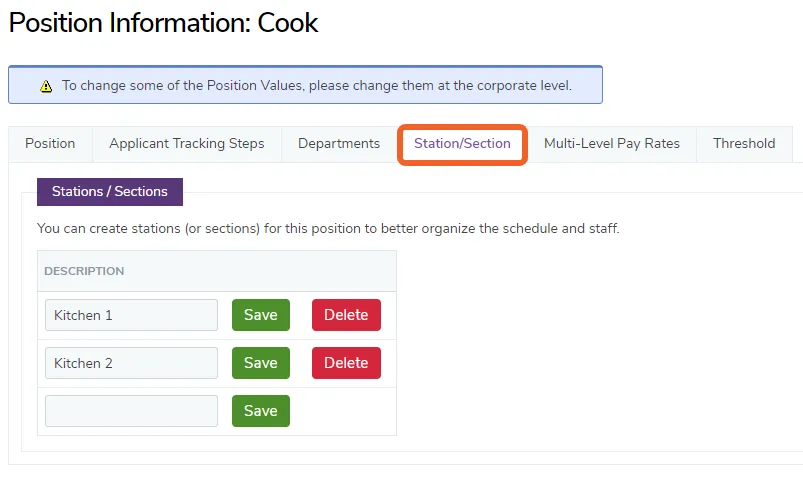
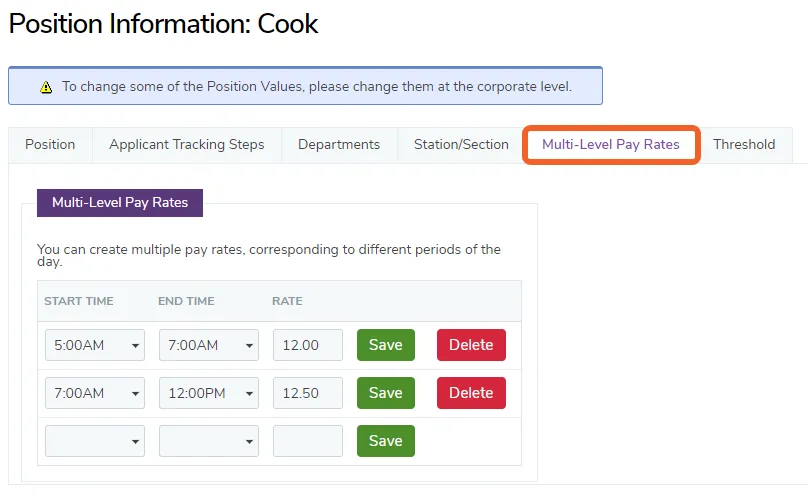
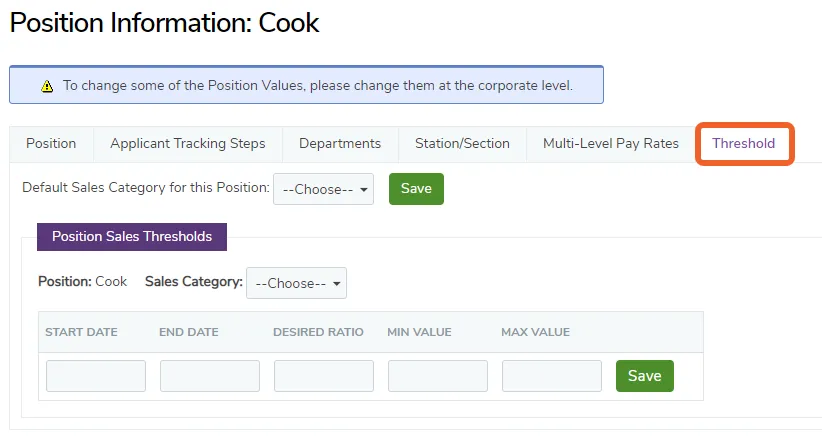
When you edit a position at the Location level, you may see additional tabs for Applicant Tracking Steps (if you have TimeForge HR), Station/Section, Multi-Level Pay Rates, and Threshold:
Applicant Tracking Steps
Applicant Tracking is available with the TimeForge Human Resources package and can be used to keep track of applicants through each step of the review and hiring process, such as interviews, paperwork, and drug test reports. This tab will appear at both the Corporate and Location levels.
Each position can have a number of sections or stations associated with it, which are specified for each location. This will allow you to schedule very specifically, if necessary.
A few examples of where this might be helpful:
A Server position might have stations or sections for each grouping of tables, such as Section 1, Section 2, Section 3, etc.
A Lifeguard position might have stations or sections for each lifeguard tower or chair, such as Dive Chair, Kiddie Pool, Lap Pool, etc.
A Cook position might have stations or sections for each cooking position, such as Prep, Pizza, Grill, etc.
Multi-Level Pay Rates
In some states and municipalities, staff members are paid different rates based on the time they arrive. TimeForge supports this by allowing you to enter different rates during different time periods throughout the day.
For example, if a Server shows up before your restaurant opens, the pay rate may be lower than when the restaurant is operating.
Threshold
The ability to set a sales threshold is available with TimeForge BI Lite (also referred to as TimeForge Sales). Here, you can assign a maximum labor cost to a specific job position.
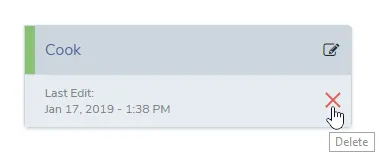
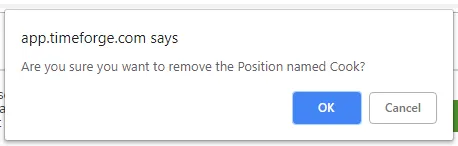
To remove a position, simply click on the red X or Delete link for that position. TimeForge will prompt for verification before removing the position.
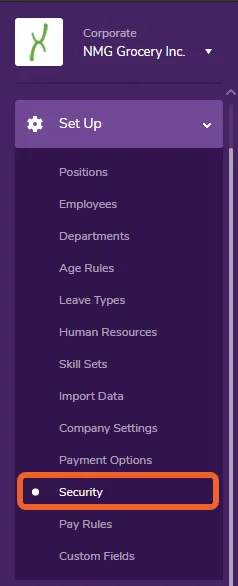
Create permission groups to restrict access to certain features and settings
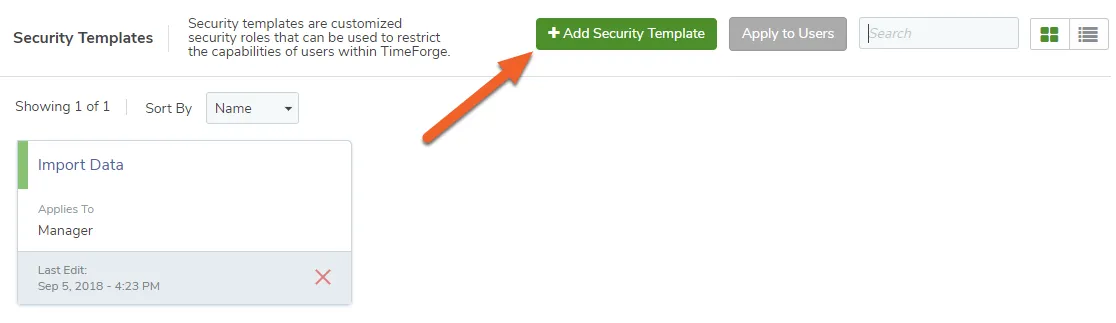
TimeForge Security Templates allow you to choose which Supervisors and Managers have access to view and change specific settings and data in TimeForge. Templates may be applied to individuals or entire Positions in TimeForge. This article will show you how to create and configure Security Templates.
Because Security Templates offer so much power and flexibility in customizing TimeForge to work just the way you want it to, there are many options to consider. Please feel free to contact our Support team at any time if you’d like a walkthrough or demo of these options.
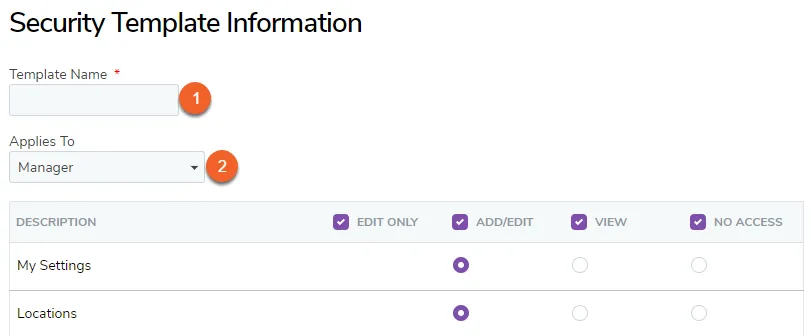
Click on this drop-down menu to select whether the Security Template should apply to Managers or Supervisors. Some options can only be applied to Managers, not Supervisors. These are:
Locations
Departments
Leave Types
Payment Options
Corporation Hierarchy
Company Settings
Security Templates
Positions
Own Employee Account
Unassigned Locations
Add/Edit Work Periods
Sales Categories
Sales Options
Dashboard
Edit Attendance
Attendance Reports (unless selected from box at bottom)
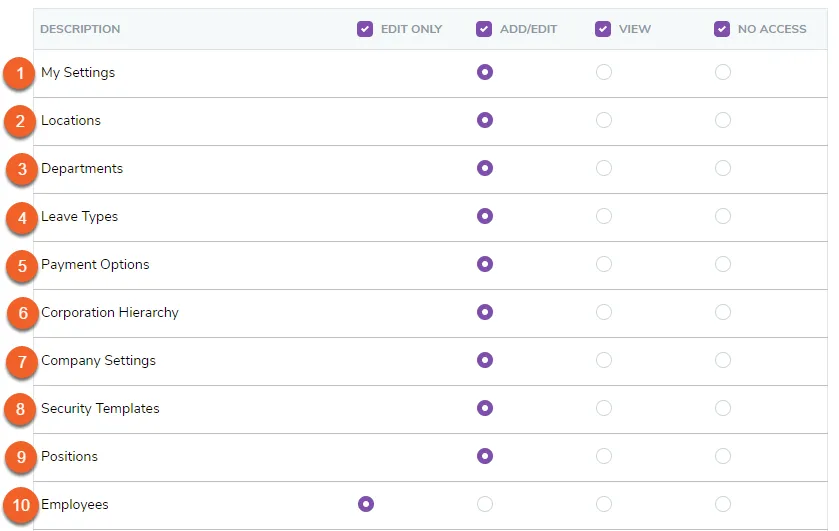
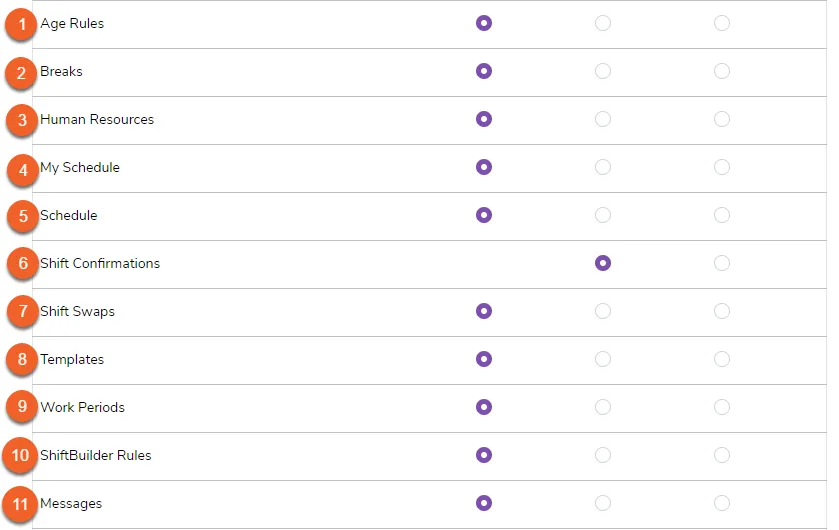
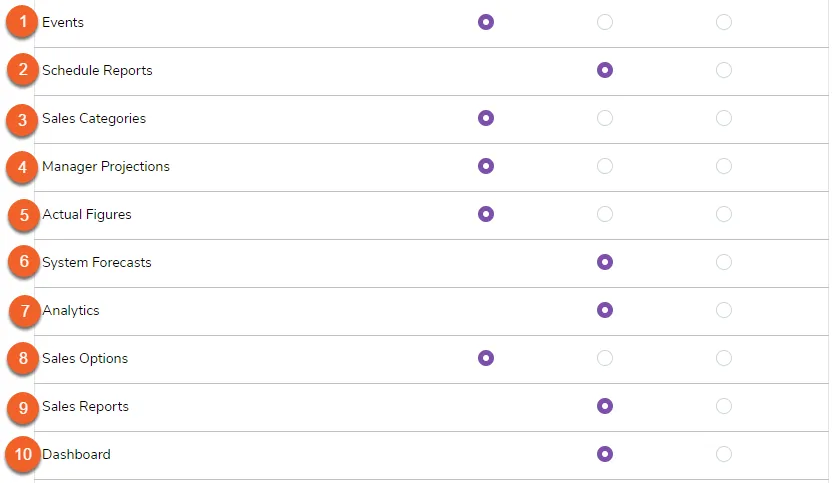
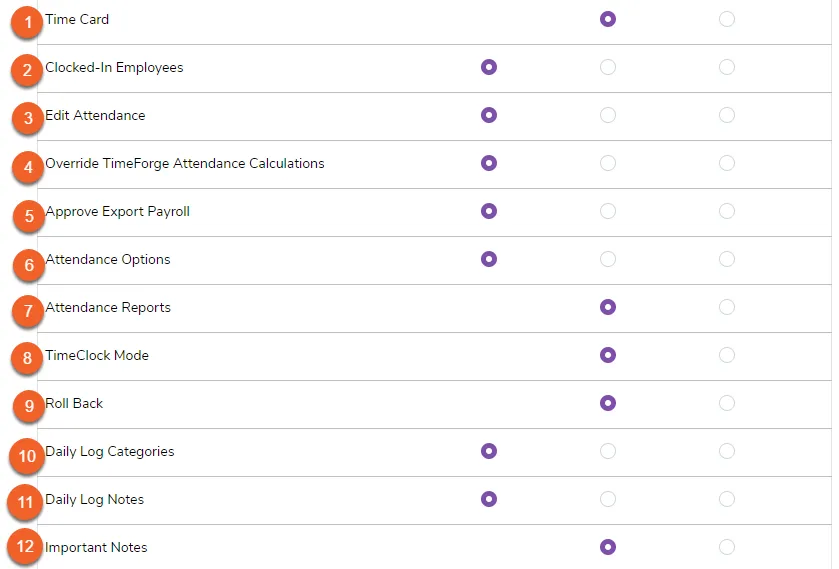
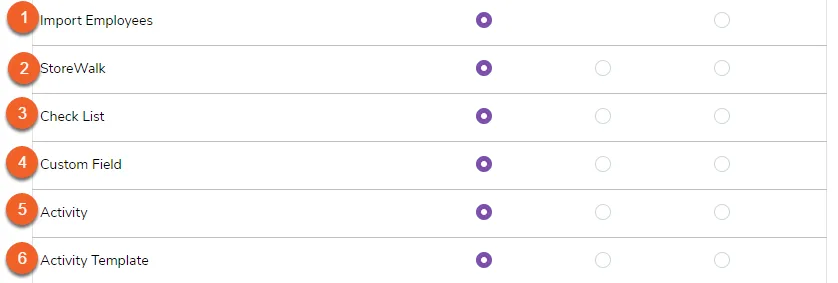
These are the options that correspond with each item in the Description column. You can choose to have each item either be Add/Edit, where the user will actually be able to alter the information, View, where users can only see that information, and No Access, where users won’t be able to access the information at all.
My Settings - allows users to change or view their own personal settings, including usernames, passwords and alerts, in TimeForge.
Locations - allows users to change or view information related to multiple Locations within TimeForge. Managers and Supervisors with Add/Edit access can add additional locations. Supervisors and Managers with access to View or Add/Edit can see information regarding any location in the corporation.
Departments - allows users to change or view the Departments page in TimeForge. Managers and Supervisors with Add/Edit access can add and edit department information. Managers and Supervisors with access to View or Add/Edit can see department information on the Departments page. Managers and Supervisors with access only to View departments will be unable to edit department information.
Leave Types - allows users to change or view information related to Leave Types (e.g. sick or vacation time) in TimeForge. Managers and Supervisors with Add/Edit access can add and edit Leave Types. Managers and Supervisors with access to View or Add/Edit Leave Types can see information regarding existing Leave Types.
Payment Options - allows users to change or view the Payment Options page. Managers and Supervisors with Add/Edit access can change payment methods and the company’s TimeForge plan details. Managers and Supervisors with access to View or Add/Edit Payment Options can see information regarding payment to and the cost of TimeForge on the Payment Options page. Users with access only to View Payment Options cannot see options to “Cancel TimeForge” accounts, “Change Payment Methods”, select email addresses that TimeForge will automatically “Send payment emails” to, or “View Previous Invoices”.***
Corporation Hierarchy - allows users to change or view the corporate structure of the company in TimeForge, including the regional or district groupings of locations. The Corporation Hierarchy also restricts access of Managers to only locations that they are assigned to. Managers and Supervisors with Add/Edit access can see, create and organize groupings of locations into the Corporation Heirarchy. Managers and Supervisors with access to View the Company Hierarchy can see the existing Corporation Hierarchy, but cannot see options to add “New” groupings, or “Edit”/“Delete” existing groupings.
Company Settings - allows users to change or view settings for all locations in the corporation within TimeForge. Managers and Supervisors with Add/Edit access can see and alter Company Settings. Managers and Supervisors with access to View Company Settings can see the company’s settings, but cannot see the option to “Save” changes.
Security Templates - allows users to change or view Security Templates within TimeForge. Managers and Supervisors with Add/Edit access can add or alter Security Templates. Managers and Supervisors with access to View or Add/Edit Security Templates can view existing Security Templates.
Positions - allows users to change or view Positions within TimeForge. Managers and Supervisors with Add/Edit access can add or alter Positions. Managers and Supervisors with access to View or Add/Edit Positions can view existing Positions.
Employees - allows users to change or view Employees and employee information in TimeForge. Managers and Supervisors with Add/Edit access can view, add new employees, and edit existing employee information. Managers and Supervisors with access to View can see employee information, but cannot see the option to “Save” changes or new Employees.
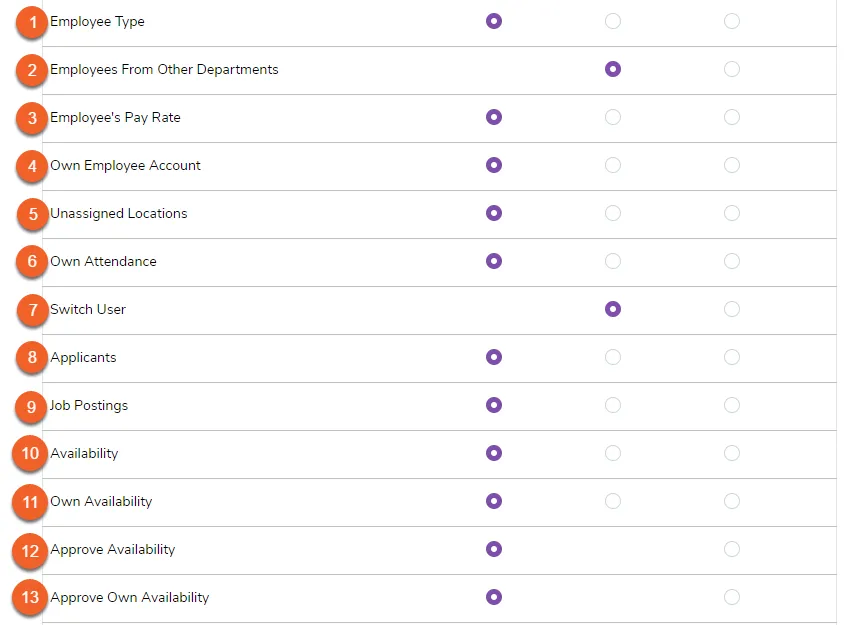
Employee Type - allows users to view or edit a staff member’s Employee Type. Staff members can be set as Employees, Supervisors, or Managers in TimeForge.
Employees From Other Departments - allows users to view employee information, including attendance, for employees in Departments the user is not assigned to. Managers and Supervisors with access to View can view employee information for employees in other Departments.
Employee’s Pay Rate - allows users to change or view employee Pay Rates. Managers and Supervisors with Add/Edit access can change and view employee Pay Rates. Managers and Supervisors with access to View can view employee Pay Rates, but cannot “Save” changes.
Own Employee Account - allows users to view and edit their own account information, including assigned Positions, Departments, and Locations. Managers and Supervisors with Add/Edit access can view and edit their own account information. Managers and Supervisors with access to View can view their own account information, but cannot “Save” changes.
Unassigned Locations - allows users to view and edit Locations that the user is not assigned to. Managers and Supervisors with Add/Edit access can view and edit Unassigned Locations. Managers and Supervisors with access to View can view Unassigned Locations, but cannot “Save” changes.
Own Attendance - allows users to view and edit their own attendance. Managers and Supervisors with Add/Edit access can view and edit their own attendance records. Managers and Supervisors with access to View can view their own attendance records, but cannot “Save” changes.
Switch User - allows users to switch into another user’s account. Managers and Supervisors with access to View can Switch User and access other users’ accounts.
Applicants - allows users to view or edit Applicant information, including employment applications and hiring information. Managers and Supervisors with Add/Edit access can view, edit, and add hiring information. Managers and Supervisors with access to View Applicants can view hiring information, but cannot “Save” changes.
Job Postings - allows users to view or edit Job Postings in TimeForge.
Availability - allows users to view or edit employee Availability. Managers and Supervisors with Add/Edit access can view, add, and edit Availability. Managers and Supervisors with access to View can view Availability, but cannot “Save” changes or new Availability.
Own Availability - allows users to view or edit their own availability. Managers and Supervisors with Add/Edit access can view, add, and edit their Own Availability. Managers and Supervisors with access to View can view their Own Availability, but cannot “Save” changes.
Approve Availability - allows users to approve availability requests from other staff members.
Approve Own Availability - allows users to approve their own availability requests.
Age Rules - allows users to view or edit Age Rules, including the number of hours and particular times that minor employees may work. Managers and Supervisors with Add/Edit access can view, add, and edit Age Rules. Managers and Supervisors with access to View can view Age Rules, but cannot “Save” changes.
Breaks - allows users to view or edit the Breaks page, including adding Break Rules. Managers and Supervisors with Add/Edit access can view, create, and change Break Rules. Managers and Supervisors with access to “View” Breaks can see existing Break Rules, but cannot “Save” changes.
Human Resources - allows users to change or view the available Human Resource types, including employee certifications and onboarding documents. Managers and Supervisors with Add/Edit access can view, upload, and edit Human Resource types. Managers and Supervisors with access to View Human Resources can view existing Human Resource types, but cannot “Save” changes.
My Schedule - allows users to view or edit their own Schedules. Managers and Supervisors with Add/Edit access can view and edit their own Schedules. Managers and Supervisors with access to View can view their own Schedules, but cannot make changes.
Schedule - allows users to view or edit employees’ schedules. Managers and Supervisors with Add/Edit access can view, add, and edit employee schedules. Managers and Supervisors with access to View schedules can view employee schedules.
Shift Confirmations - allows users to view or edit Shift Confirmations, including shifts that employees have confirmed or have not confirmed. Managers and Supervisors with access to “View” can view Shift Confirmations.
Shift Swaps - allows users to view or edit Shift Swaps, including shifts that employees have given up and picked up. Managers and Supervisors with Add/Edit access can view, add, and edit Shift Swaps. Managers and Supervisors with access to View can view Shift Swaps.
Templates - allows users to view or edit Schedule Templates. Managers and Supervisors with Add/Edit access can create, edit, and use schedule Templates. Managers and Supervisors with access to View can view schedule Templates.
Work Periods - allows users to view or edit Work Periods, including defining day shifts or night shifts. Managers and Supervisors with Add/Edit access can view, add, and edit Work Periods. Managers and Supervisors with access to View can view defined Work Periods.
ShiftBuilder Rules - allows users to view or edit ShiftBuilder Rules, which ensure that ShiftBuilder creates shifts that are the appropriate duration. Managers and Supervisors with Add/Edit access can view, add, and edit ShiftBuilder Rules. Managers and Supervisors with access to View can view defined ShiftBuilder Rules.
Messages - allows users to view or send Messages in TimeForge. Managers and Supervisors with Add/Edit access can send and receive Messages. Managers and Supervisors with access to View can receive Messages.
Events - allows users to view or edit Events in TimeForge.
Schedule Reports - allows users to view and run Schedule Reports. Managers and Supervisors with access to View can run and view Schedule Reports.
Sales Categories - allows users to view, edit, or add Sales Categories, such as “Net Sales” or “Total Sales”. Managers and Supervisors with Add/Edit access can view, create, and edit Sales Categories. Managers and Supervisors with access to View can view existing Sales Categories.
Manager Projections - allows users to view or edit Manager Projections for Sales Categories. Managers and Supervisors with Add/Edit access can view, add, and edit Manager Projections. Managers and Supervisors with access to View can view Manager Projections.
Actual Figures - allows users to view or edit Actual Figures for Sales Categories. Managers and Supervisors with Add/Edit access can view, add, and edit Actual Figures. Managers and Supervisors with access to View can view Actual Figures.
System Forecasts - allows users to view System Forecasts for Sales Categories. Managers and Supervisors with access to View can view Sales Forecasts.
Analytics - allows users to view the various Analytics TimeForge provides regarding Sales Categories. Managers and Supervisors with access to View can view the Analytics page in TimeForge.
Sales Options - allows users to view and alter Sales Options, including settings for sales and labor comparison. Managers and Supervisors with Add/Edit access can adjust Sales Options. Managers and Supervisors with access to Add/Edit or View can view existing Sales Options.
Sales Reports - allows users to view the Sales Reports page, which includes reports that compare sales and labor. Managers and Supervisors with access to View Sales Reports can access the Sales Reports page.
Dashboard - allows users to view the Dashboard page in the Sales tab. The Dashboard details a variety of information related to actual, projected, and forecasted sales. Managers and Supervisors with access to View the Dashboard can view the data on the Dashboard page.
Time Card - allows users to view their own Time Card. Managers and Supervisors with access to View their own Time Cards can view attendance information on the Time Card page.
Clocked-In Employees - allows users to view and update the Clocked-in Employees page, which displays all employees who are currently clocked in. Managers and Supervisors with access to Add/Edit can view clocked-in employees and clock employees out from the “Clocked-In Employees” page (provided that employees clocked in with the TimeForge.com website and not with integrated hardware). Managers and Supervisors with access to View the “Clocked-In Employees” page can view employees who are currently clocked in.
Edit Attendance - allows users to view and make changes on the Edit Attendance page, including adjustments made to punches and breaks. Managers and Supervisors with access to Add/Edit can view and edit attendance entries. Managers and Supervisors with access to View the “Edit Attendance” page can to view attendance entries.
Override TimeForge Attendance Calculations - allows users to view and edit the time duration of attendance entries, without editing the clock in and out times for punches. Managers and Supervisors with access to Add/Edit TimeForge Attendance Calculations can view and adjust punch durations without adjusting clock in and out times. Managers and Supervisors with access to View overridden TimeForge attendance calculation can view adjustments to punch duration.
Approve Export Payroll - allows users to access the Approve/Export Payroll page, which includes the option to apply PTO and export to a select payroll provider. Managers and Supervisors with access to Add/Edit this page can edit, approve, and export payroll. Managers and Supervisors with access to View this page can view payroll information.
Attendance Options - allows users to view and edit the “Attendance Options” page. Managers and Supervisors with access to Add/Edit this page can view and change settings in “Attendance Options”. Managers and Supervisors with access to View this page can view existing “Attendance Options”, but cannot “Save” changes.
Attendance Reports - allows users to run and view Attendance Reports, including employee time sheets and payroll reports. Managers and Supervisors with access to View Attendance Reports may run and view reports.
TimeClock Mode - allows users to access TimeClock Mode, which allows a computer to operate solely as a time clock. Managers and Supervisors with access to View TimeClock Mode can enable and disable TimeClock Mode.
Roll Back - allows users to roll back pay periods for adjustments. This setting only controls roll backs – actual approval of pay periods is controlled by the Approve Export Payroll setting (#5 above).
Daily Log Categories - allows users to view and edit Daily Log Categories, which may used to filter notations in the Daily log. Managers and Supervisors with access to Add/Edit Daily Log Categories can view, create, and edit Daily Log Categories. Managers and Supervisors with access to View Daily Log Categories can view existing Daily Log Categories, but cannot “Save” new Daily Log Categories..
Daily Log Notes - allows user to view and edit the Daily Log, which may be used to record important events and notes about the day. Managers and Supervisors with access to Add/Edit Daily Log Notes can view and add notations to the Daily Log. Managers and Supervisors with access to View Daily Log Notes can view notations made to the Daily Log, but cannot add new notations.
Important Notes - allows users to view Important Notes from the Daily Log. Important Notes are marked with a star on the Daily Log. Managers and Supervisors with access to View Important Notes will be able to view Important Notes when in the Daily Log.
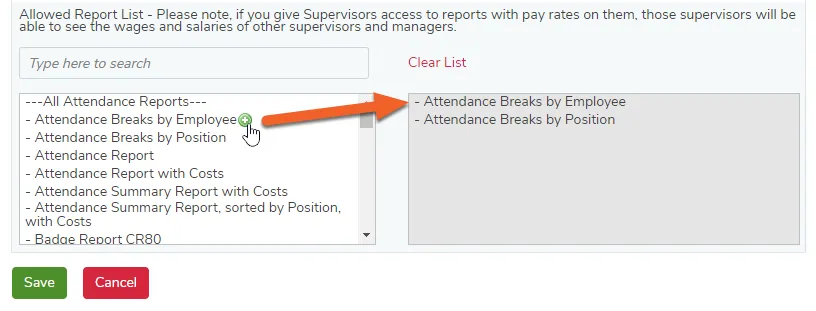
After selecting your settings for the security template, it’s time to select the reports you would like users to have access to. This list includes all Schedule, Attendance, and Sales reports available in TimeForge. Selecting reports from the left column adds them to the Allowed Reports List in the right column.
To add reports to the list:
Hover over the name of the report you wish add to the list
Click the green plus sign icon
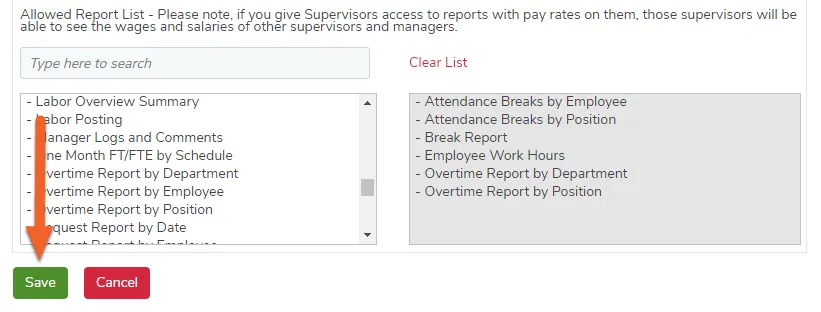
The report will be moved into the right side box, and the users with the security template will have access.
Don’t forget to click Save at the bottom of the screen once you’re finished!
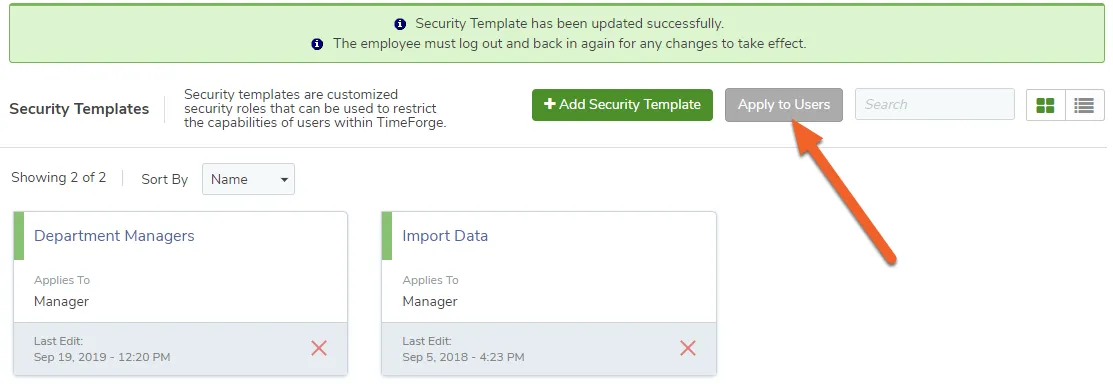
Your new security template will now appear in your list, and you’ll be able to apply it to users. One quick way to do this is from the Security Templates page, by clicking the button Apply to Users. This method is useful if you want to add the template to multiple users at once. If you only want to add a template to a single user, you can apply it directly through their profile as well.
Apply a permission group to a specific user
To provide you with the ability to restrict who has access to some information, TimeForge allows you to create and assign permission groups. These security features can help you define who has access to make changes such as break rules, company settings, and employee positions. You can also define who can view personal information like pay rates and social security numbers.
These permission groups can be assigned to both managers and supervisors independently. In other words, you can create a unique permission group so that your managers have more access than your supervisors.
Assigning a permission group only takes a few clicks!
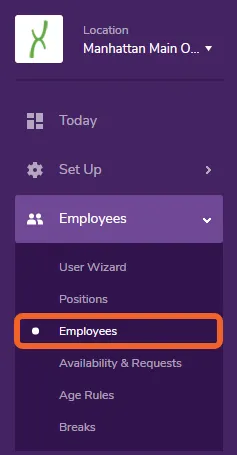
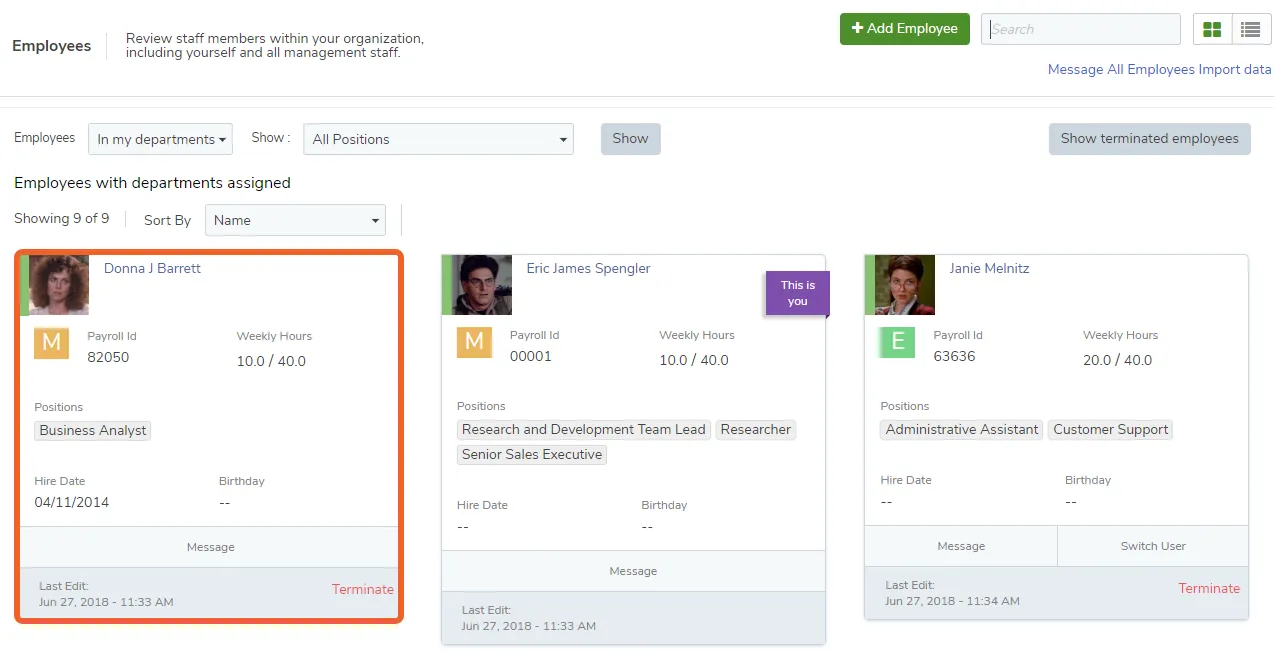
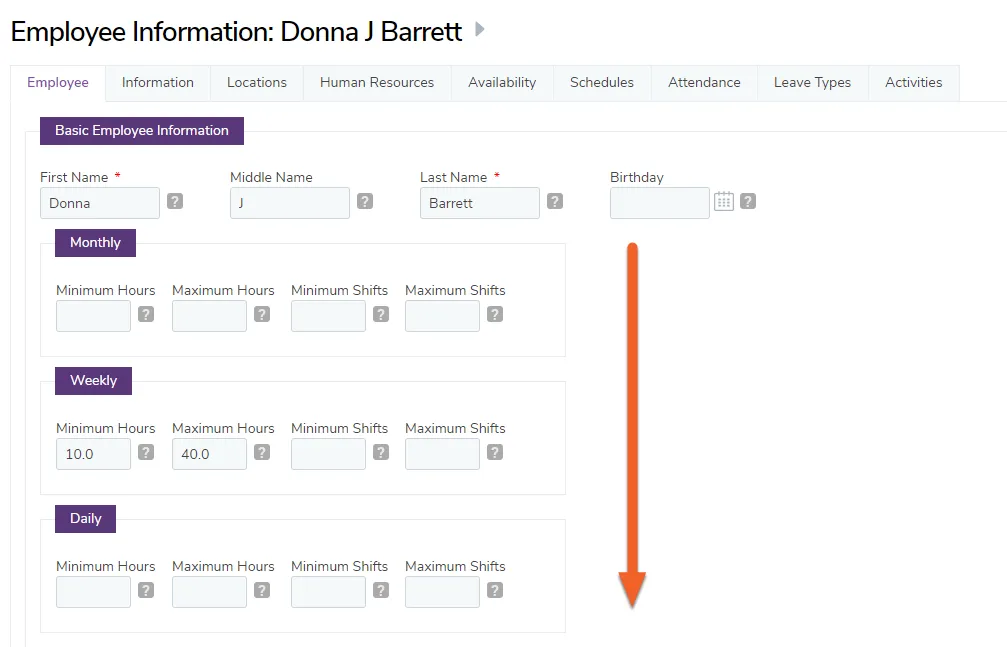
Locate the manager or supervisor you wish to apply a permission group to from your employee list. If you’re using grid view, you can click anywhere on the card to edit. If you’re using list view, click the Edit link.
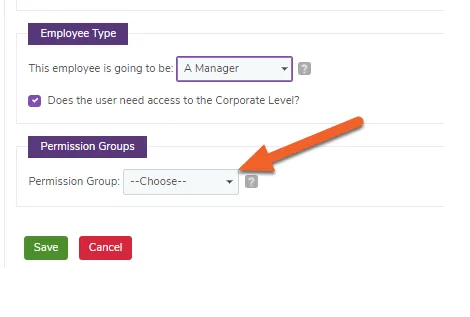
Look for the section titled Permission Group. Choose the group you would like to apply from the drop down menu.
Don’t forget to click Save to save your changes!
Create Leave Policies, such as "Sick Leave" and "Vacation"
This guide teaches Managers how to create and use Leave Policies, such as “Vacation” or “Sick Leave.” Leave policies in TimeForge can be Location-based, Corporation-wide, or applied only to specific individuals.
Location-based leave could be useful if your corporate office gets PTO but your call center doesn’t, for example. Location-based leave could also be useful if your business has locations spread across multiple states and those states have different PTO rules.
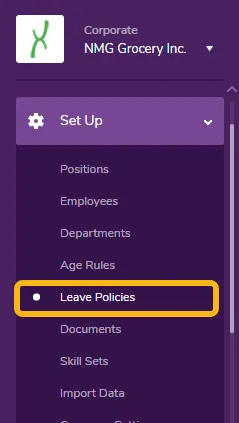
Go to the Leave Policies (formerly Leave Types) page under the Corporate Set Up Tab
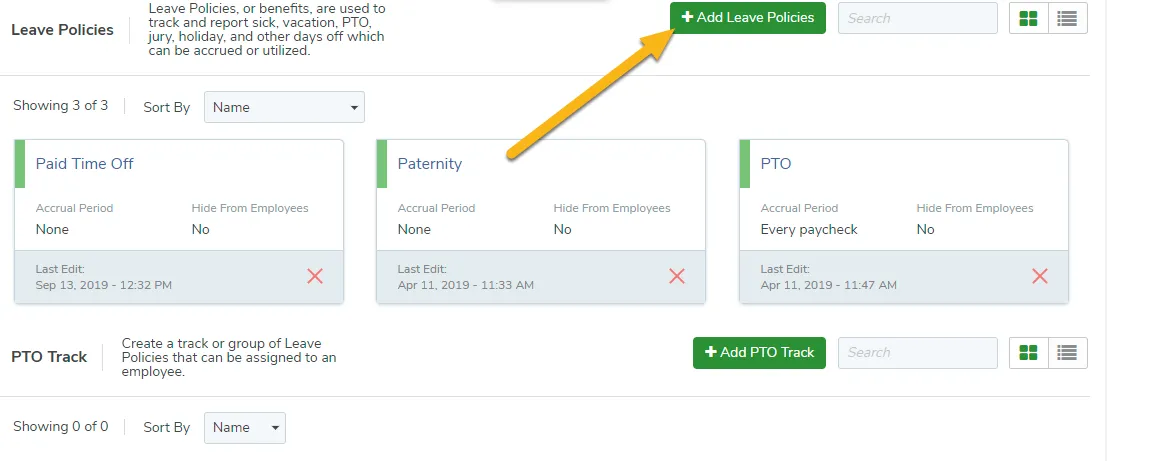
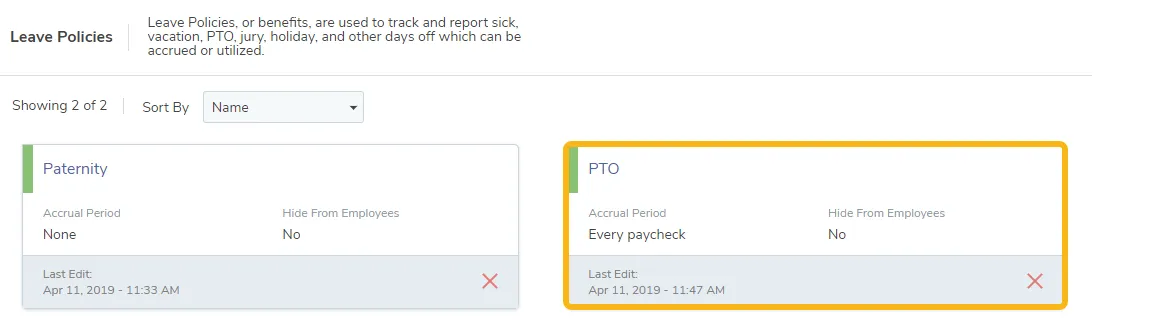
Click the + Add Leave Policies button in the upper right to create a new type of leave. If you have any Leave Policies in the system already, they will be listed on this page. You can also edit an existing policy from here.
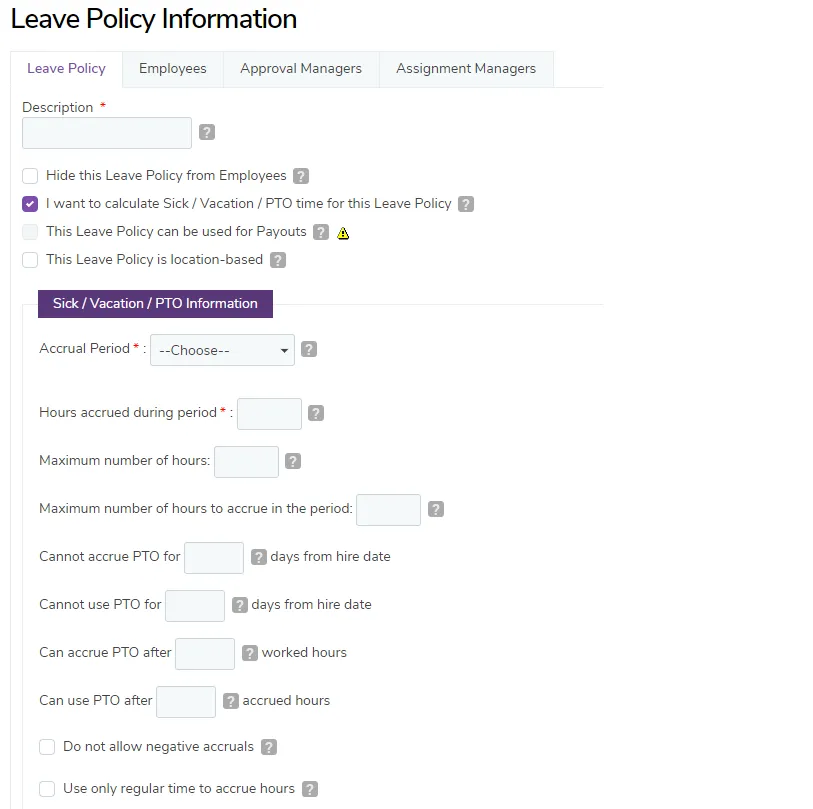
Leave Policies are very configurable and can be adjusted to suit your business needs. You can set whether and how often this leave is accrued, the maximum balance, how long after initially being hired employees have to work before starting to accrue it, and more.
Do you want this Leave Policy to be Location-based?
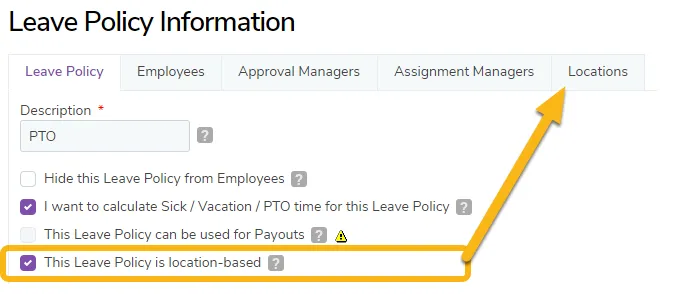
If you are interested in this Leave Policy applying to only specific locations, check the box indicated below. When you check this box, an additional tab will appear, also pictured below:
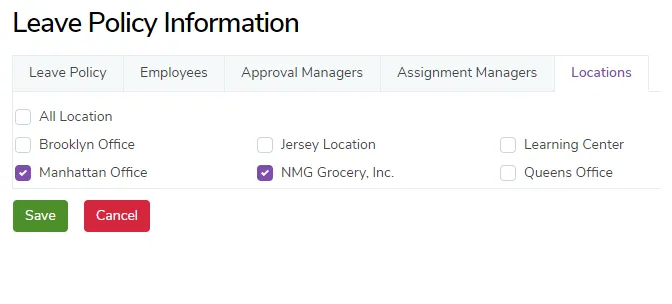
Location-based only: select the location(s) you want this Leave Policy to apply to
If you selected the option to make this Leave Policy location-based, you should now click the Locations tab and select which locations it should apply to.
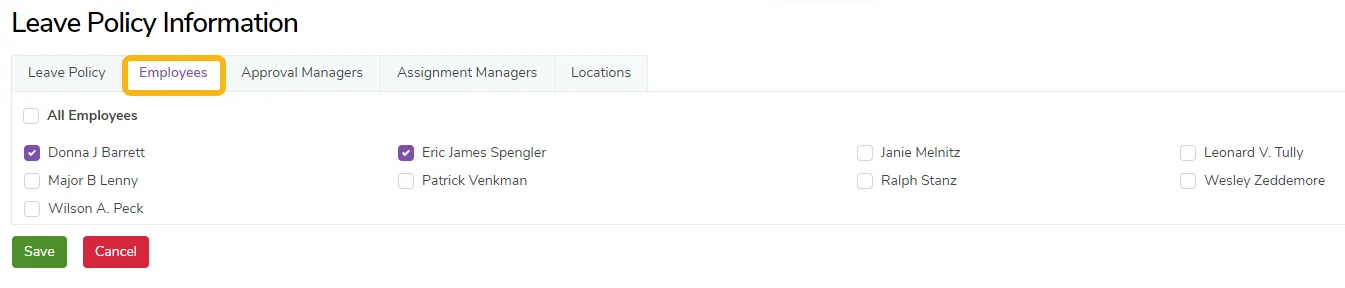
Select the employees for whom this Leave Policy should apply
If you would like this Leave Policy to apply to all employees, simply use the All Employees checkbox. Otherwise, select individual employees from the list.
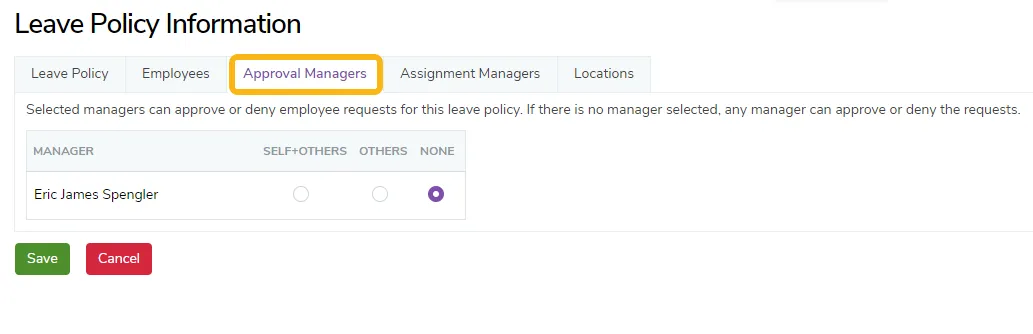
Click the Approval Managers tab and set your approval managers for this leave policy and their permissions. Approval managers can approve or deny employee requests for leave.
Approval Managers with Self+Others access can edit this Leave Policy and approve its use for anyone, including themselves, with available hours for that Leave Policy.
Approval Managers with Others access can approve this Leave Policy on anyone, except themselves, with available hours for that Leave Policy.
Approval Managers with None selected have no access to editing or approving this Leave Policy for anyone.
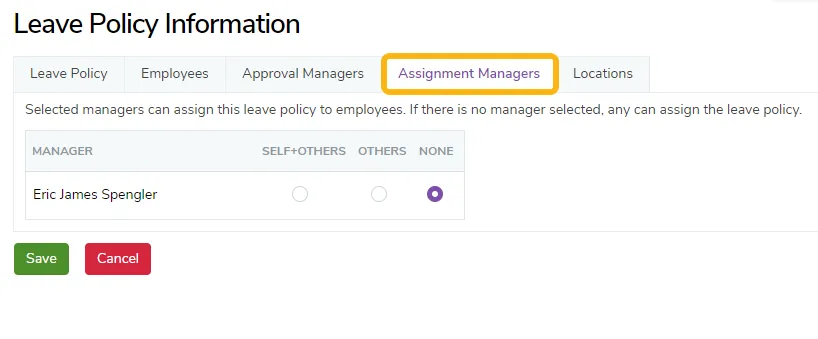
Click the Assignment Managers tab and set your assignment managers for this leave type and their permissions. Assignment managers can assign this leave type to employees.
This works the same way as it does with Approval Managers.
The option to create Assignment Managers allows you to create users who can assign leave policies for other employees without necessarily having approval access.
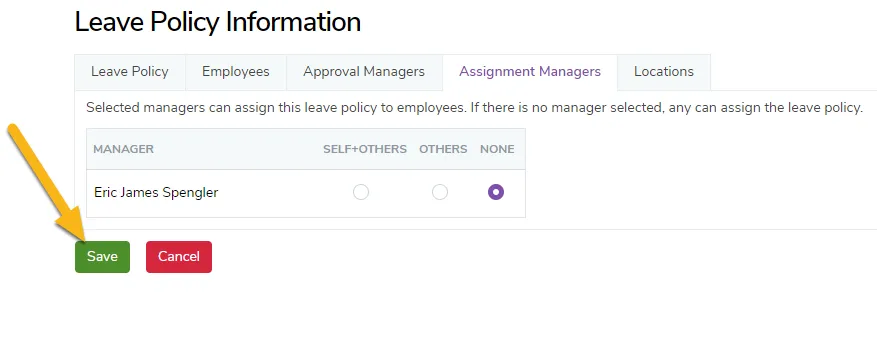
Once you’re finished setting all your options for this Leave Policy, be sure to click the Save button.
You will be returned to your Leave Policies page, and your new leave policy will now be shown in the grid/list.
Create Custom Fields
TimeForge already has built-in fields for collecting important employee information, such as phone numbers and birthday. But did you know that you can also create custom fields?
Custom fields allow you to collect and store other kinds of information relevant to your business. These form fields appear under your employee profile pages and may be set as required or even provided with a default value. Information can be collected using text, number, date, and text area fields.
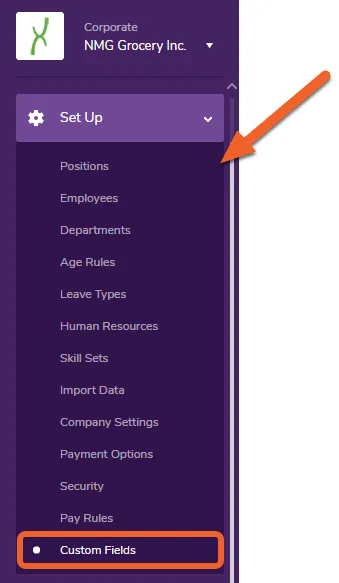
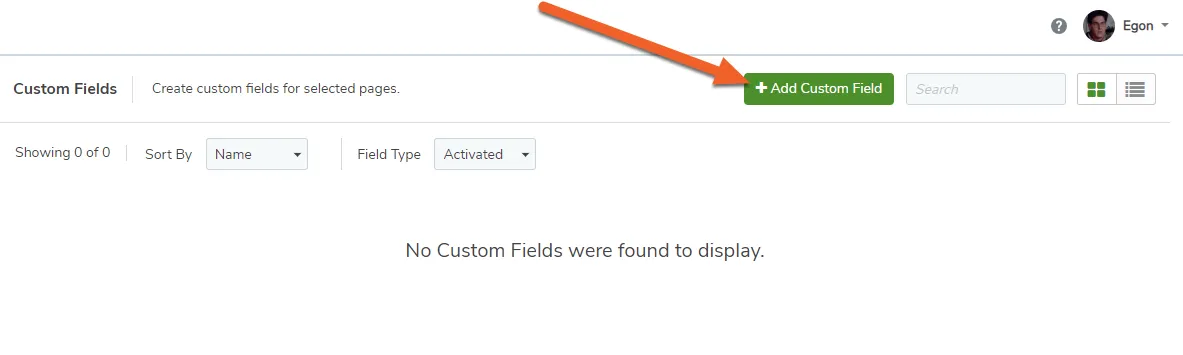
Navigate to the Custom Fields page under the Set Up tab
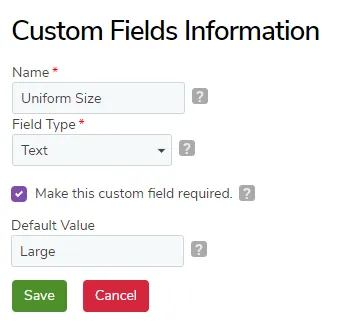
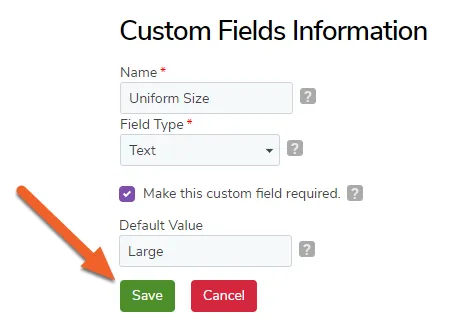
At minimum, enter a Name for the custom field and select the most appropriate Field Type.
For example, if you expect employees to provide one or two words, you would set Text as the field type, as in the example below.
Text Area will allow multiple lines of text in a text box. Number will require a number to be entered, and Date will allow the employee to select a date.
Checking the box will make the custom field required, and employees will have to enter a value. You can also supply a default value, as well.
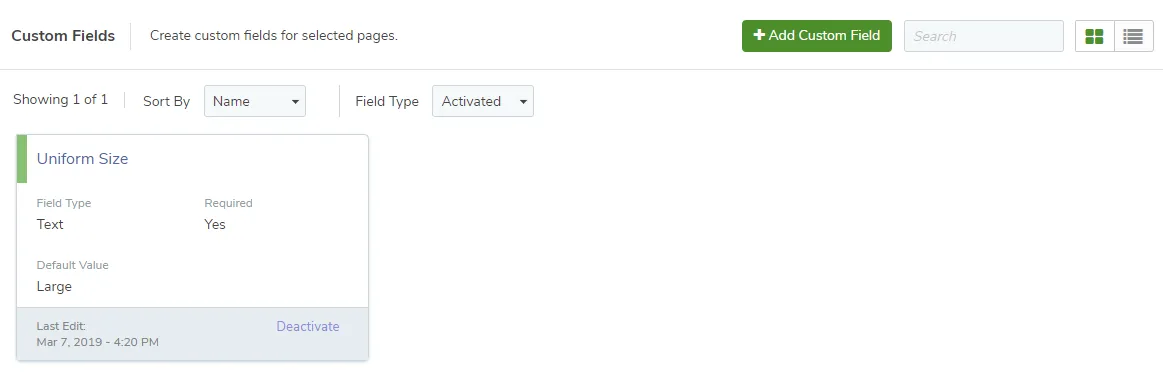
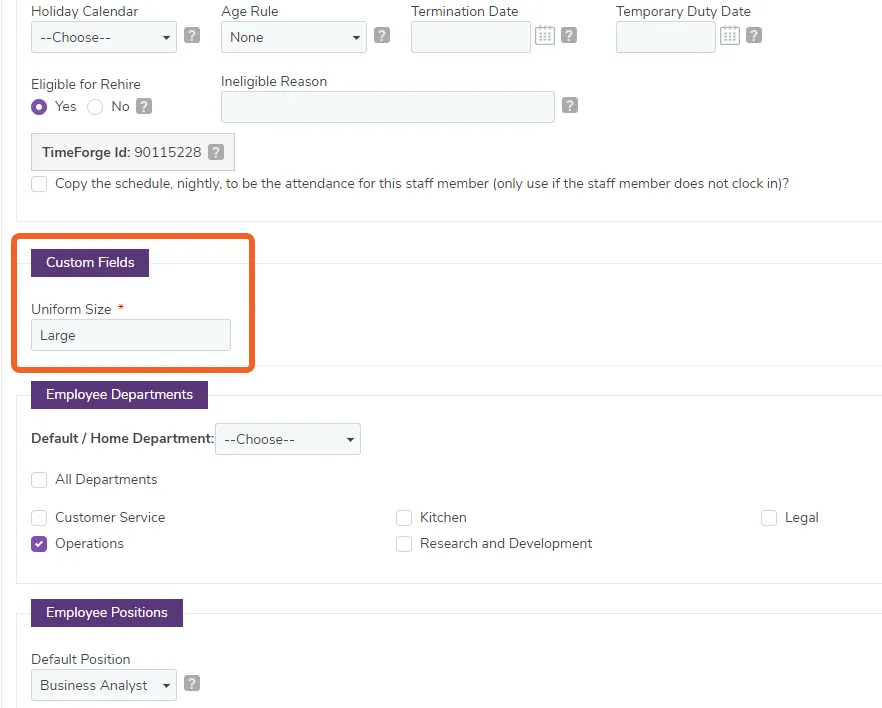
To see your new custom field, navigate to your employee list, select an employee, and check the area after Basic Employee Information. You’ll see a new section on the page titled Custom Fields.
In this case, since we provided a default value and checked the box in our example, Uniform Size is already prefilled with the default value “Large” and is marked with a red asterisk (*) to show that it is required.
That’s all there is to it!
Enable Transfer Bid Shifts (bid shifts that can be shared across locations)
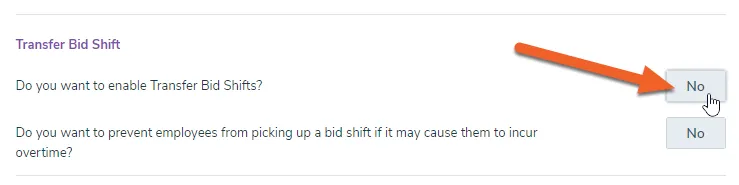
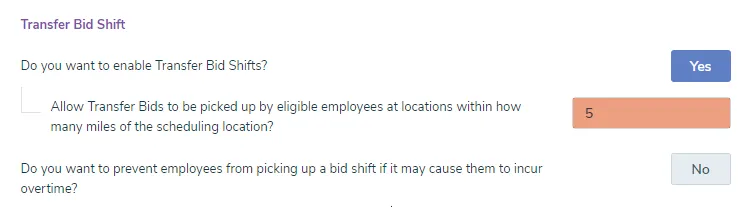
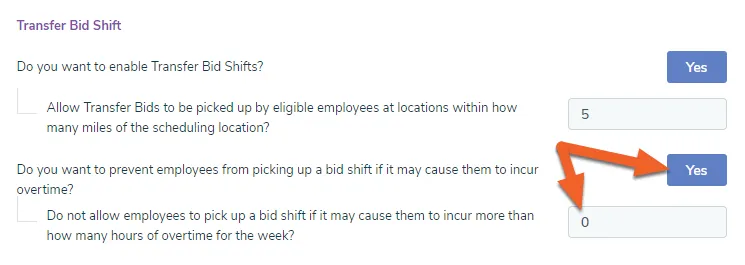
The Transfer Bid Shifts feature adds new functionality that allows managers to open up bid shifts to employees from other locations, as well as restrict employees from being able to bid on shifts that exceed a configurable limit of overtime.
If desired, enable the prevention of picking up overtime shifts and set the overtime threshold:
Add, edit, or delete locations
TimeForge offers the ability to add, edit, or delete locations as needed. Locations are subsets of corporations; they are branches or specific destinations (such as buildings or addresses) where employees work. TimeForge accounts can have many different locations, and staff members can work at any number of them. TimeForge automatically handles collisions/conflicts between various locations so that staff members are not scheduled to work in multiple locations at once. Information for all locations can be handled by managers at the Corporate level, or for one location at a time at the Location level.
The ability to have and manage multiple locations from one account allows managers to streamline their scheduling, attendance, and sales by connecting the information for each location and allowing comparisons to be made.
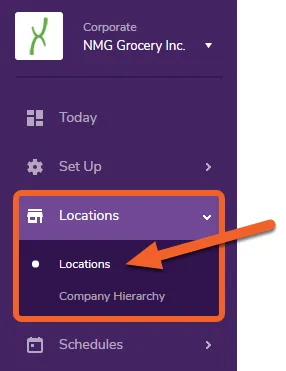
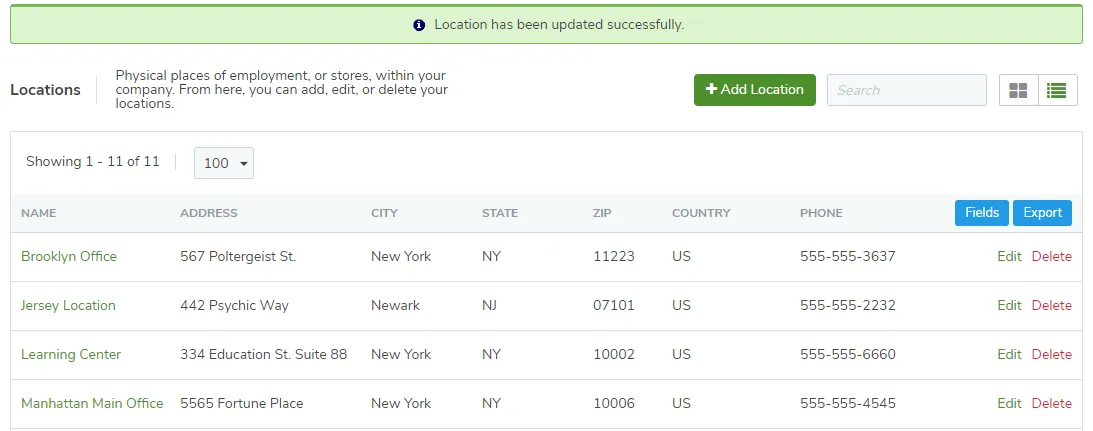
Navigate to the Locations page under the Locations tab
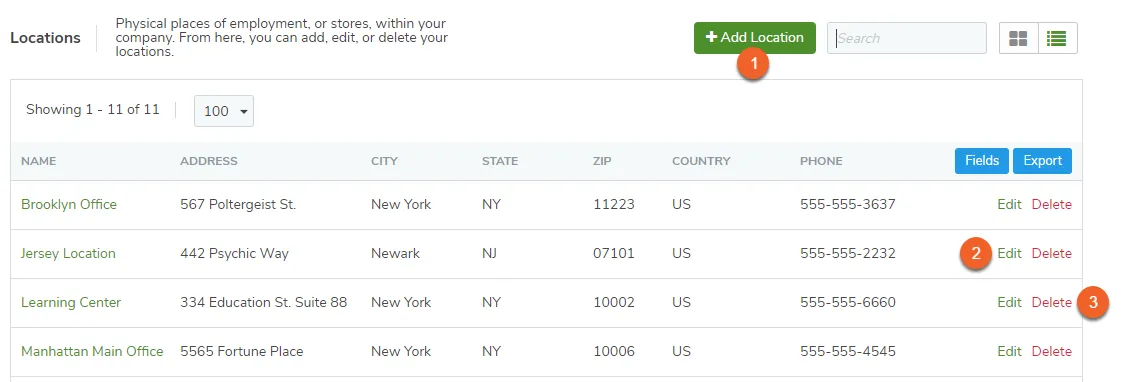
From the Locations page, it’s easy to add, edit, or delete locations.
Click the Add Location button to add a new location to your business inside TimeForge.
To edit an existing location, locate the appropriate location and click anywhere on the card (if using grid view) or otherwise on the Edit link (if using tabular/list view).
To delete a location, locate the appropriate location and click the red X or Delete link.
What information can be established for each location?
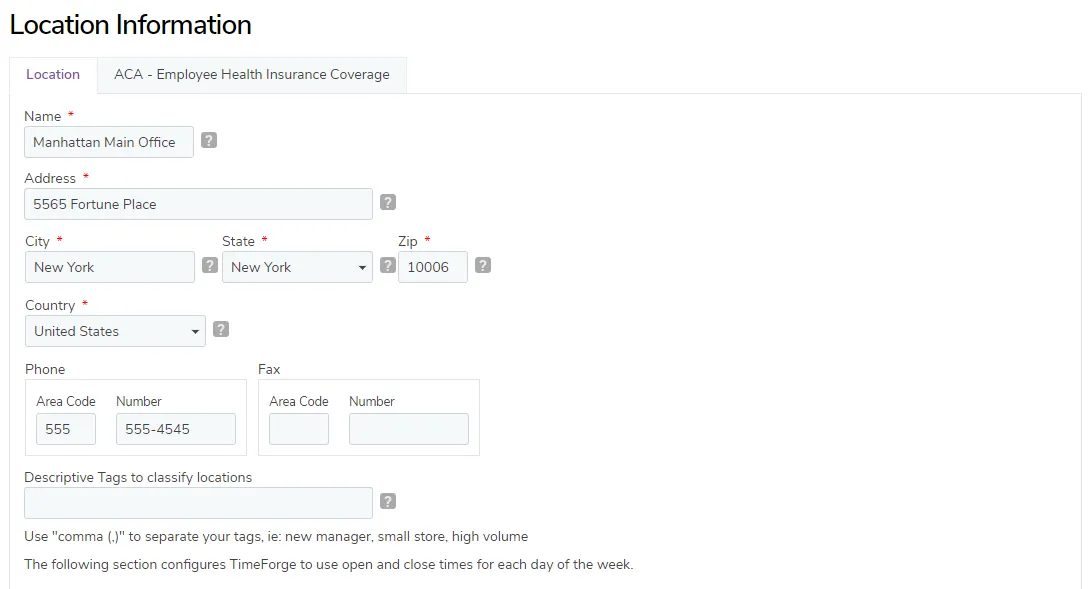
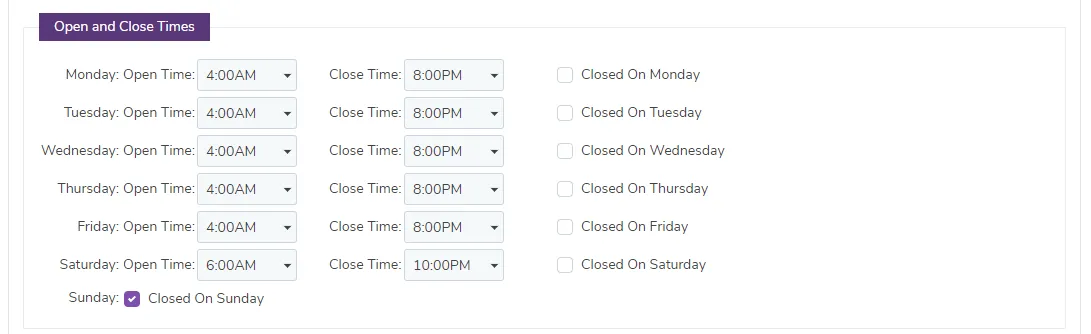
After either adding a new location or editing an existing location (see previous step), you will be presented with many options for location information, including:
At the top of the page, you can enter general location information. Names and addresses are required for each location. Phone and fax numbers and descriptive tags may be added, as well, to help keep your locations organized.
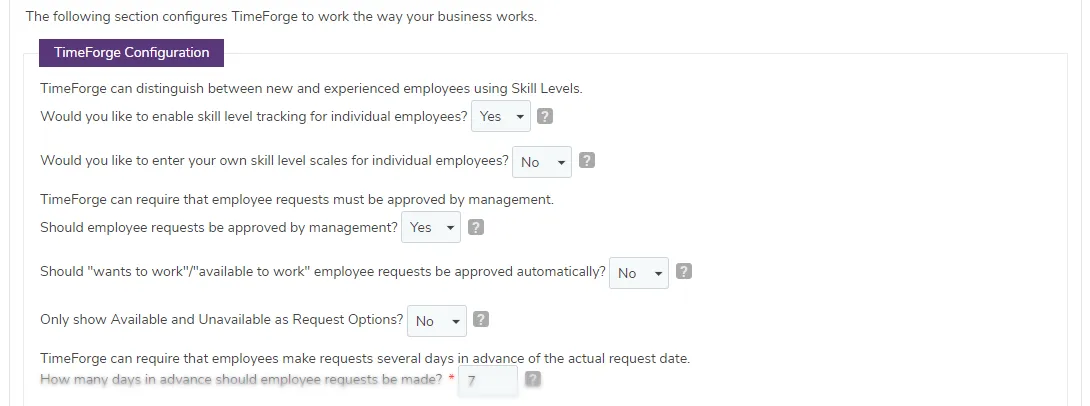
TimeForge offers many, many customizable options for each location. In this section, you can change the default settings to make TimeForge work the way your business does.
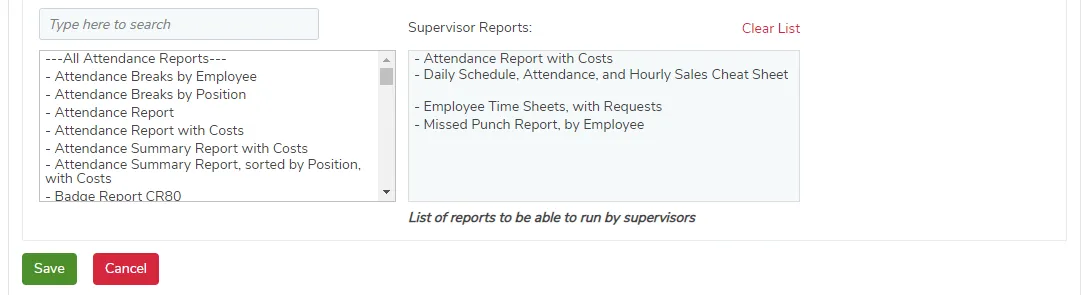
Near the bottom of the page, you can select which reports you’d like your supervisors to have access to.
If you make any changes to the settings on this page, don’t forget to click the Save button to save your changes! You will then be returned to the Locations page with a notification confirming that your location has been saved/updated.