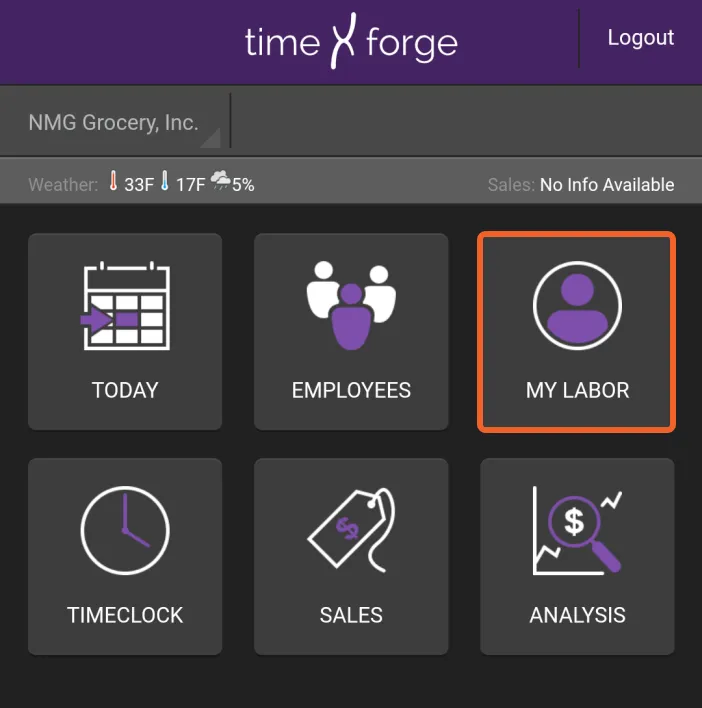
The TimeForge Manager mobile app allows managers to view schedules, bid shifts, pending requests, messages, attendance, daily logs, and even review their sales and labor metrics, all from the convenience of a mobile phone or tablet.
This guide will teach you how to use the app and its features, including how to turn a mobile device into a TimeClock that can be used to clock employees in and out.
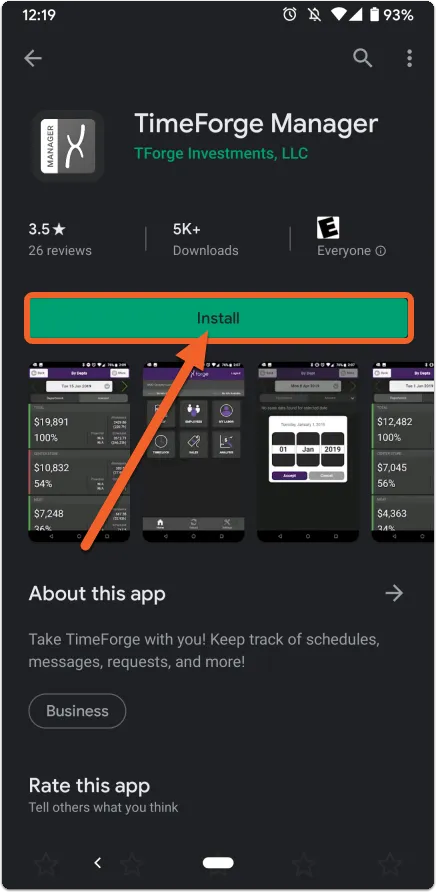
Don't have the app yet? Here's how to get it.
Search the Apple Store or Google Play store for the mobile app
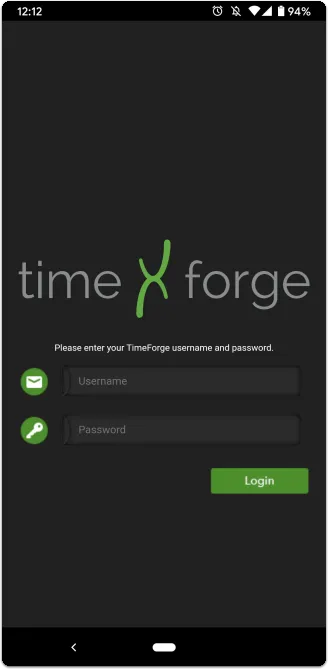
To log in to the TimeForge Manager app, you will use the same username and password that you use for your TimeForge account when you log in from a browser.
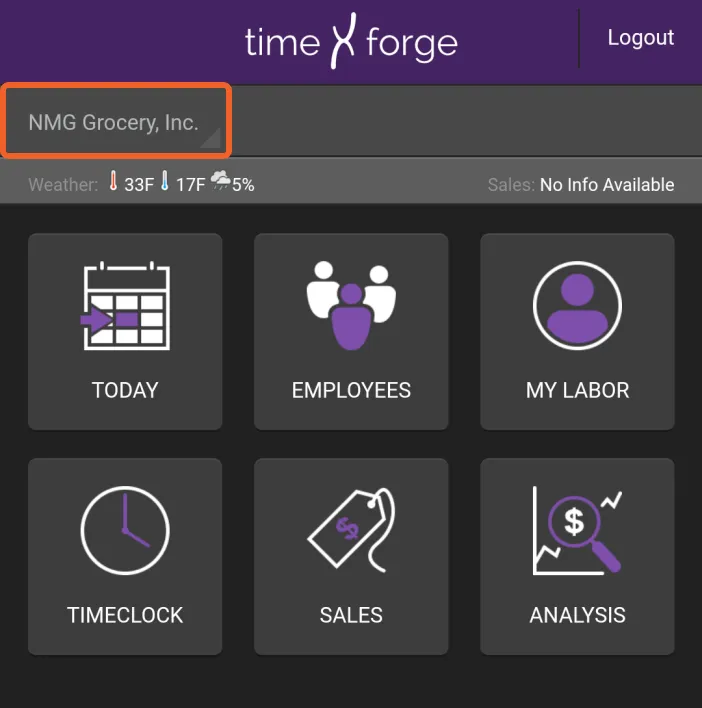
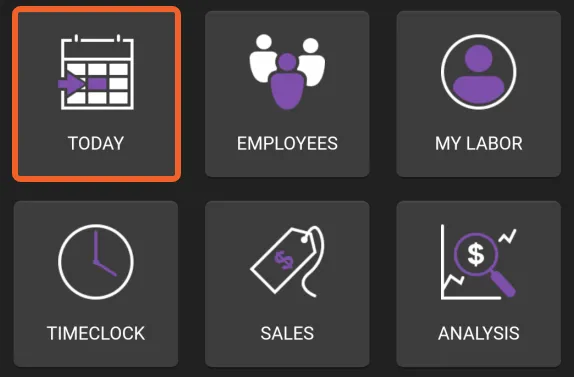
TimeClock: swap between “TimeClock mode” and “Normal mode” and edit related settings.
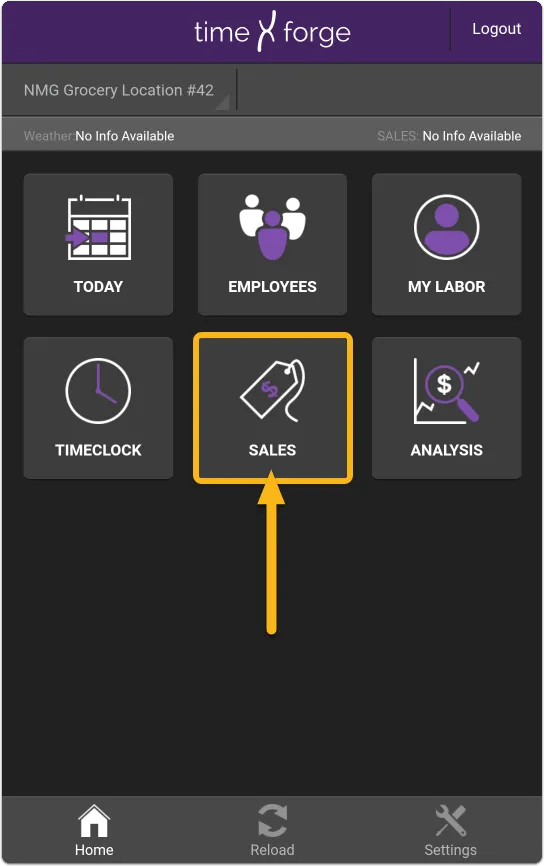
Sales: view your sales numbers versus projections and costs for each department individually or store wide.
Analysis: see various graphs breaking down your sales, projects, and costs. You can also see how departments match up based on these numbers.
The remainder of this guide is dedicated to showing you how to navigate these areas of the app to get the information you need.
Today Page Overview
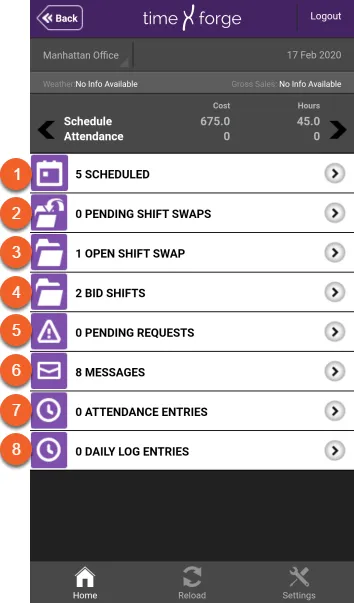
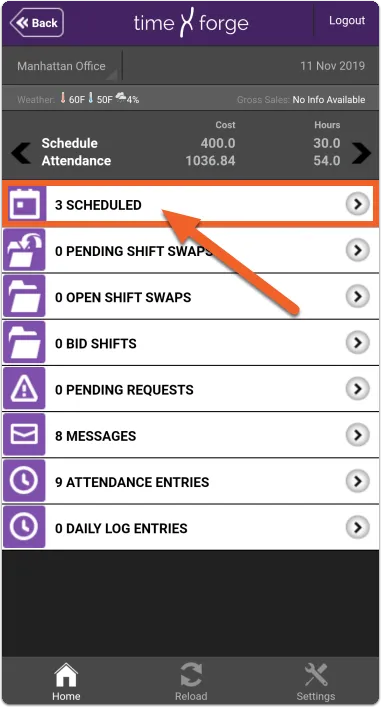
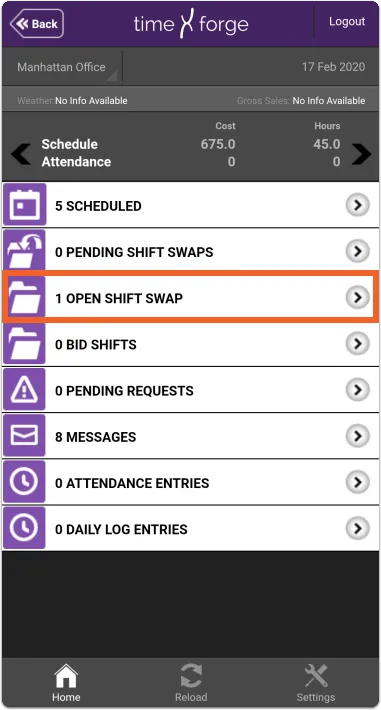
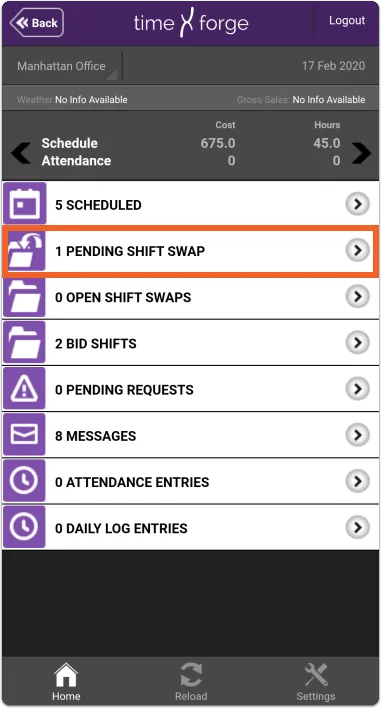
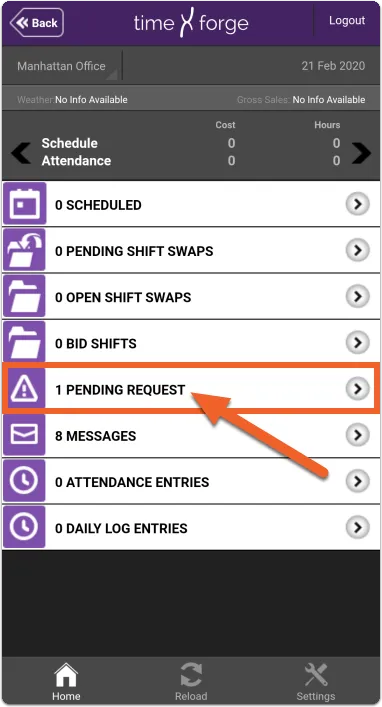
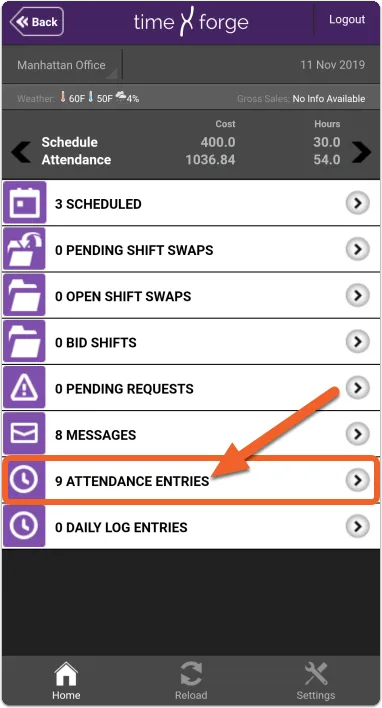
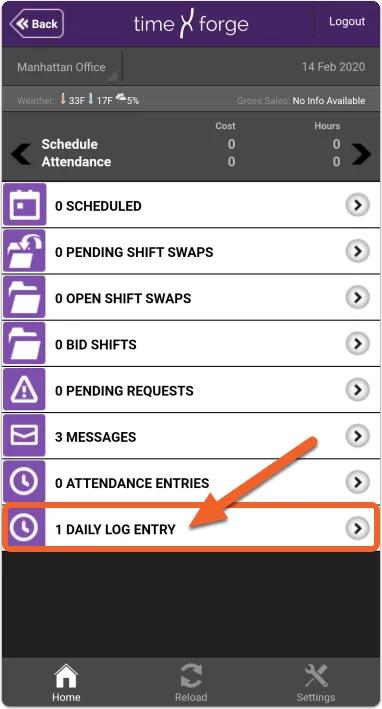
The Today screen in the TimeForge Manager app presents many of the important pieces of information normally available through the browser, such as schedules, pending shift swaps, open shift swaps, bid shifts, pending requests, messages, attendance, and daily logs.
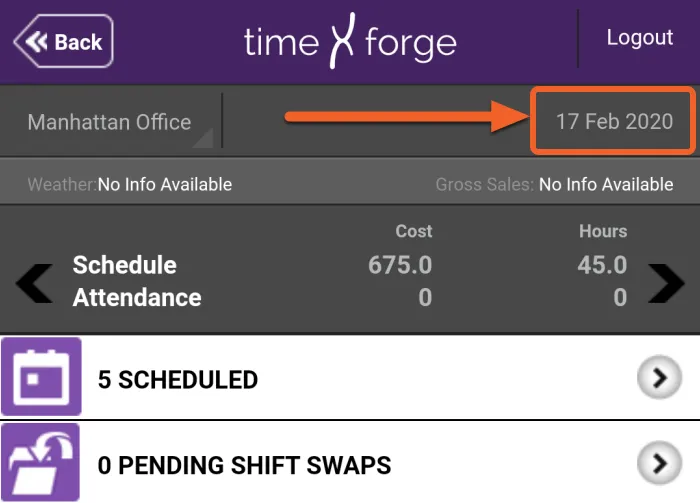
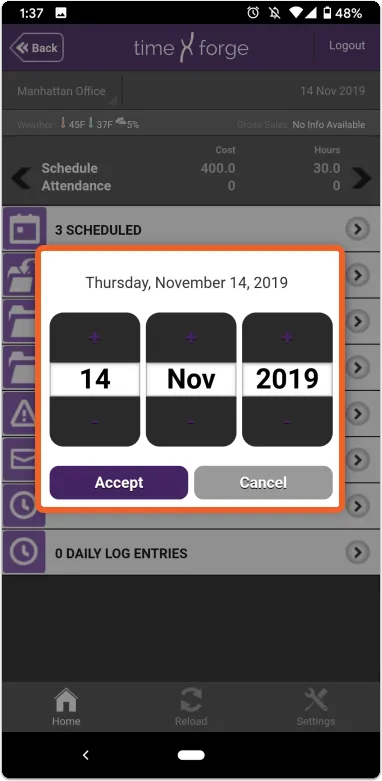
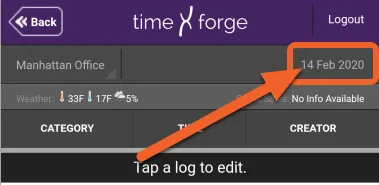
By default, the app will show the current date. To select a different day, tap on the date on the top right to bring up the slider.
Then, use the slider to select the desired date:
View, add, or edit employee shifts
The TimeForge Manager mobile app allows you to not only view shifts on your mobile device but also add new shifts, edit existing shifts, or remove them from the schedule entirely. Here’s how.
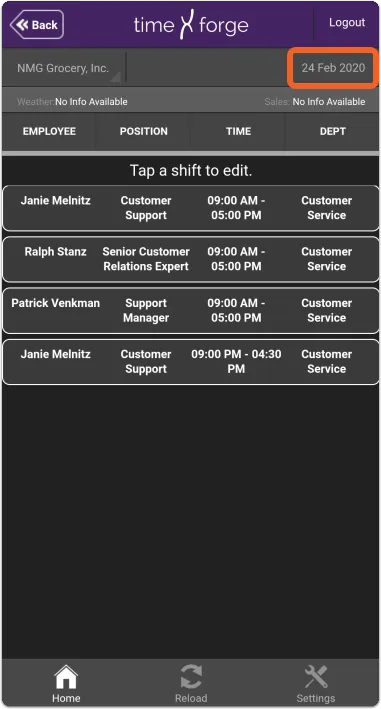
You will see a list of employees scheduled to work for the selected date. By default, the page will open to the current day, but you can tap the date in the upper right corner to select a new date.
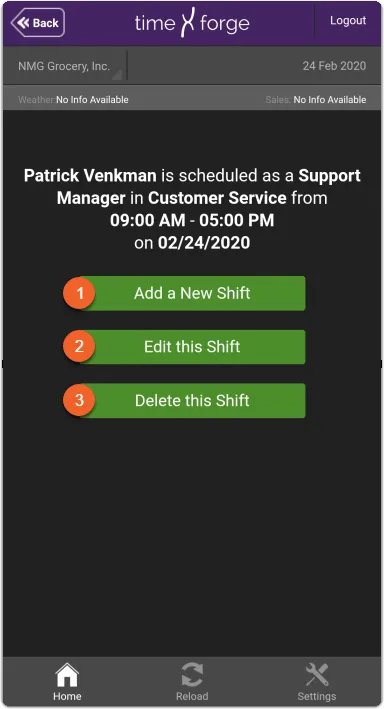
Tap on a shift to bring up a list of options. You can:
Add a New Shift (will allow you to select an employee and other shift details)
Edit this Shift
Delete this Shift
Each of these options is described in more detail below:
Add a New Shift
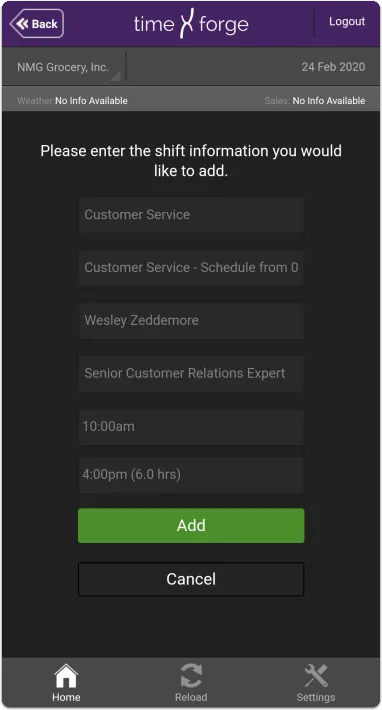
When adding a new shift, the app will prompt you to select the department and schedule you wish to add the shift to. You’ll then be able to select the appropriate employee, position, and start and end times.
In this example, we’re adding a new shift to the Customer Service schedule for employee Zeddemore:
When you’re done selecting the details for the shift, tap the Add button to add the new shift to the schedule.
Edit this Shift
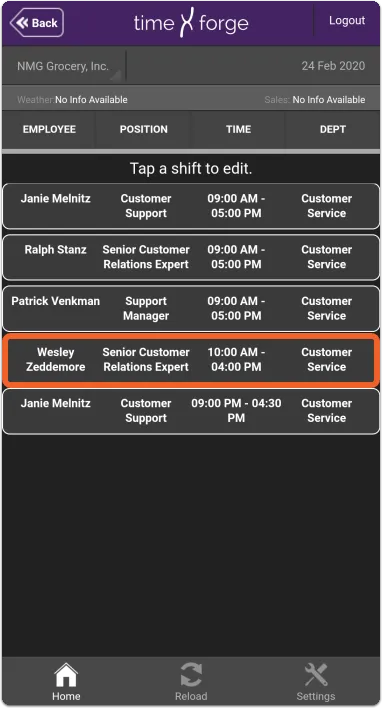
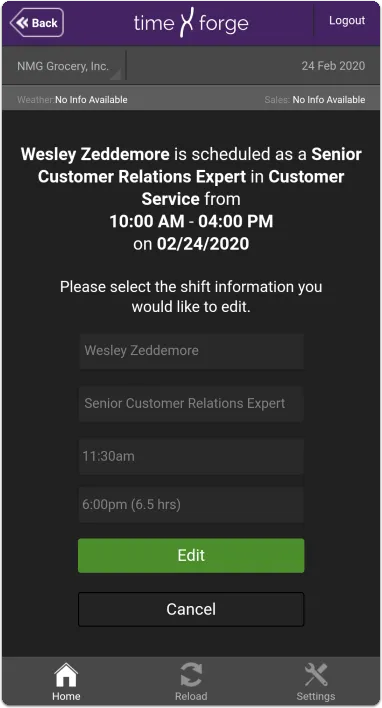
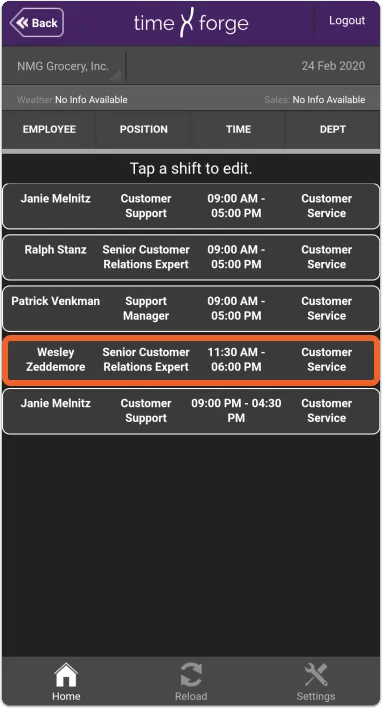
Edit allows you to select a new employee to work the shift or adjust the start or end times. For this example, we’re going to keep employee Zeddemore on the schedule, but we just need to adjust his start and end times.
First, we’ll select the new shift from the list:
Tap the Edit this Shift option, then select the appropriate details:
When done, simply tap the Edit button to commit your changes.
Delete this Shift
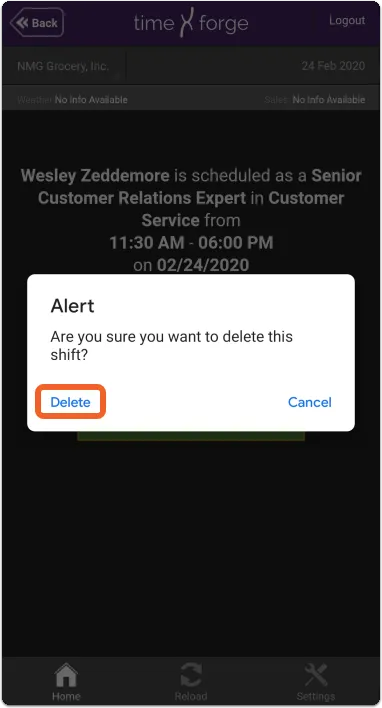
Delete will completely remove the shift from the schedule. When deleting a shift, you will be prompted to confirm this choice.
Let’s say we want to remove our new shift. First, we would select it from the list of scheduled shifts, then we would tap the Delete this Shift option.
Tap Delete to confirm your choice or Cancel to back out.
Review open and pending shift swaps
The TimeForge Manager mobile app can help you keep tabs on which shift swaps are still open and which ones are waiting on manager approval. All it takes is a few taps.
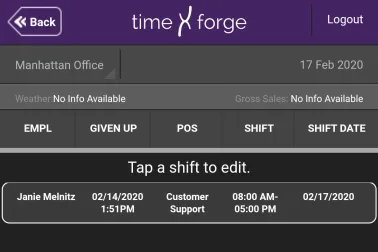
Shift Swaps are those that have been ‘given up’ and made available to be ‘picked up’ by other employees. When an employee picks up a shift swap, they are not responsible for that shift until the swap has been approved by management.
Shift swaps must be approved or denied on the TimeForge website, and employees can choose how to be notified about the approval of a swap.
When another employee picks up an open shift, you will see a notification next to Pending Shift Swaps:
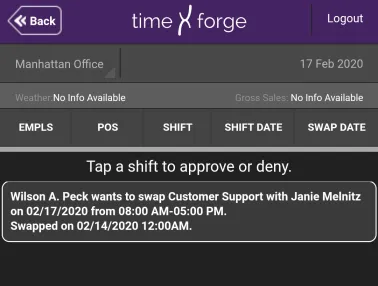
Tapping Pending Shift Swaps will show you a list of those waiting on manager approval.
Tapping a shift will redirect you to the TimeForge website where you can approve, deny, or edit the shift swap.
Review pending bid shifts
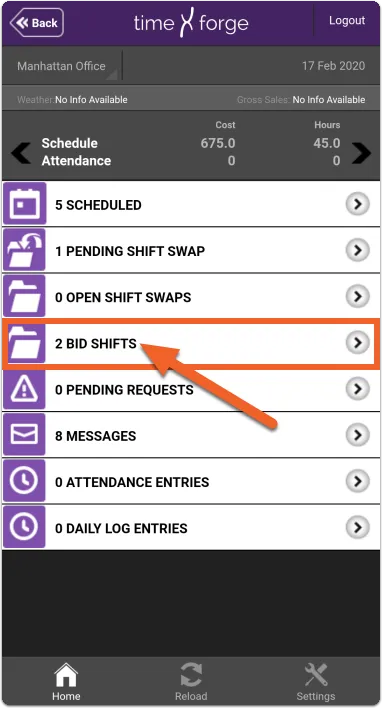
The TimeForge Manager mobile app allows you to view pending bids on any shifts you designate as Bid Shifts in TimeForge.
Bid shifts are those that can be bid on by qualified employees, allowing them some control and flexibility over their schedules. With Transfer Bids enabled, employees can even bid on and pick up shifts at nearby locations.
Bid shifts must be approved or denied on the TimeForge website, and employees can choose to be notified about the approval or denial of the shift.
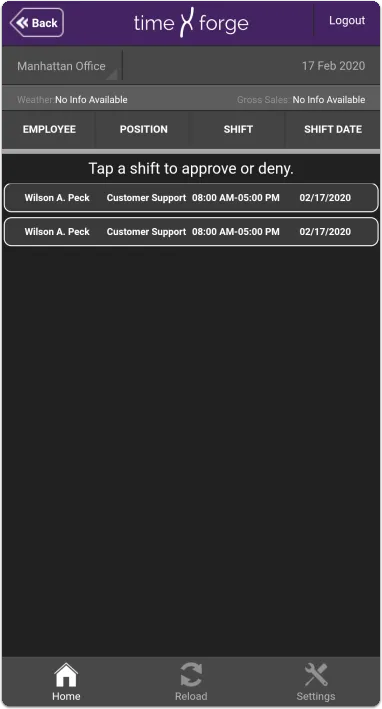
When employees bid on an available Bid Shift, you will see their bids in this list.
Tapping a shift will redirect you to the TimeForge website, where you can approve or deny a bid.
Review pending requests and availability
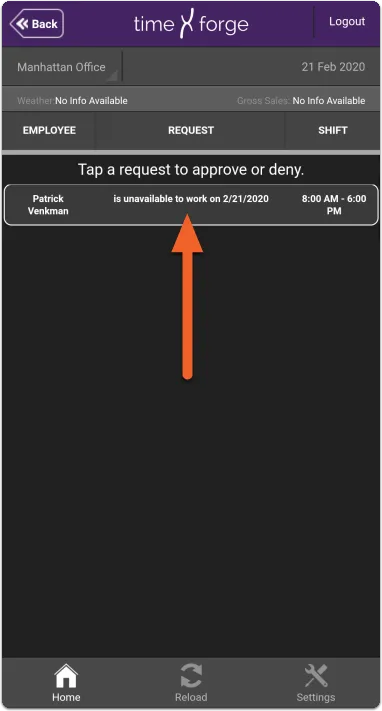
The TimeForge Manager mobile app allows managers to view employees’ pending availability and requests for time off.
At this time, requests must be approved or denied on the TimeForge website, but the ability to manage requests through the mobile app is a feature we hope to provide in the future.
Pending requests will be shown, including the name of the employee, what time of request (e.g. available to work, wants to work, does not want to work, unavailable to work), and the date and times the request applies to.
Read your messages
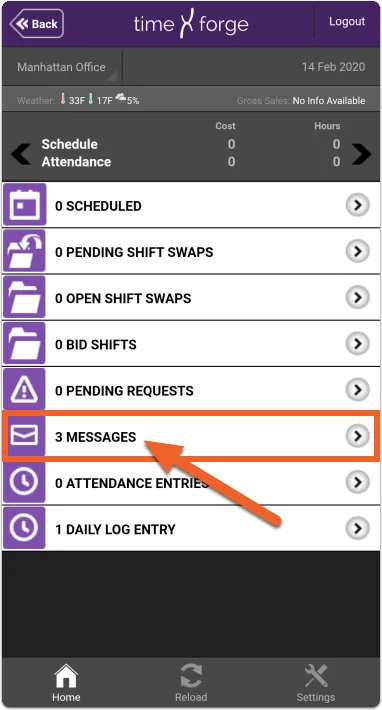
The TimeForge Manager mobile app allows you to read TimeForge messages through the app! Here’s how.
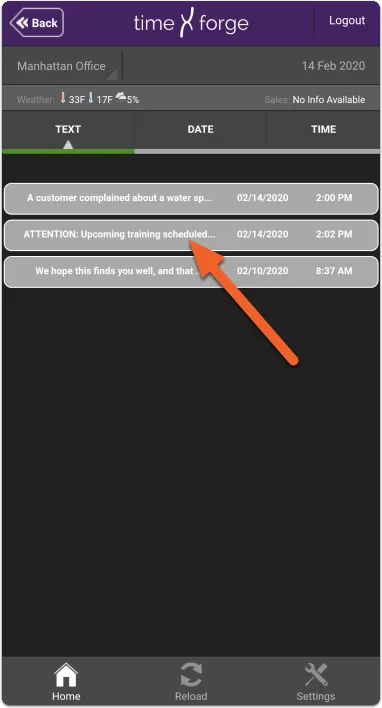
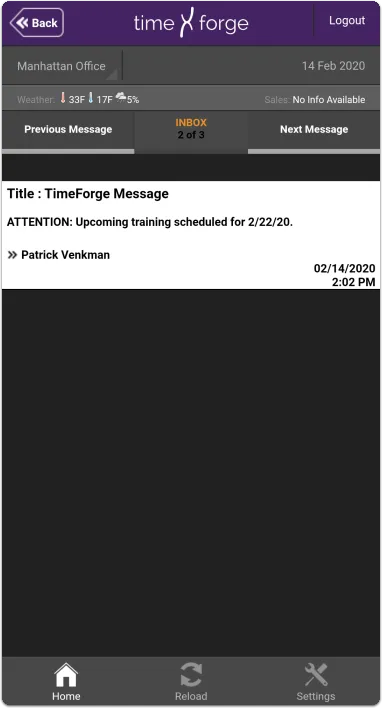
This will show you any messages you have for the selected date (by default, the current day, “today”). You can use the date selector in the upper right to choose a different date.
The message will be displayed on your mobile device. You can use the buttons to the left and right to view the Previous Message or Next Message in the list.
View employee attendance
The TimeForge Manager app allows you to view employee attendance (time punches) for a given date.
Tap the TODAY tile, then select Attendance Entries
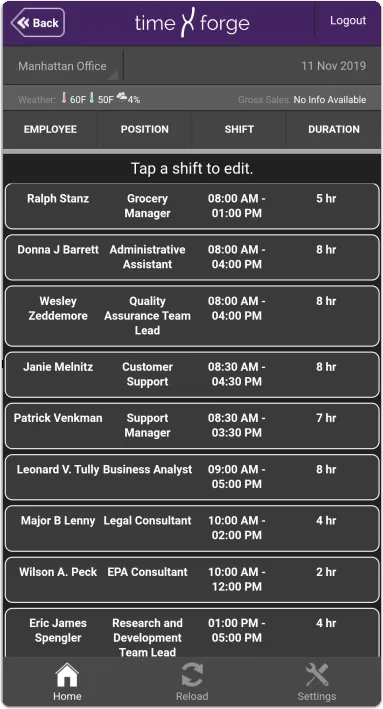
You will be shown all attendance for the selected date. If you tap an entry, you will be taken to the TimeForge website, where you can adjust attendance.
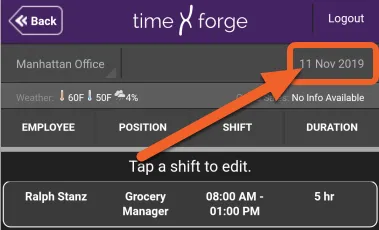
Remember, you can tap the date in the upper right corner to bring up the date selector:
View Daily Log entries
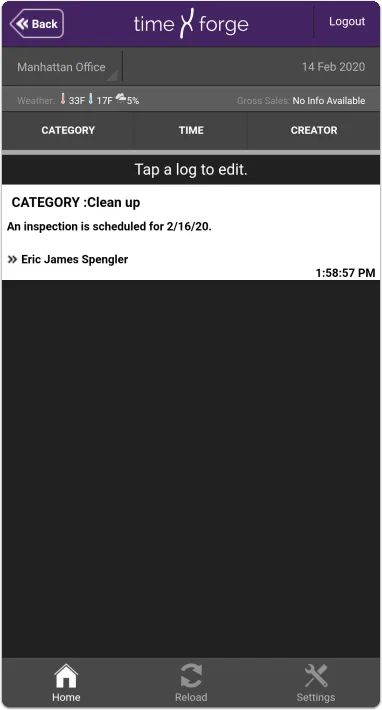
The TimeForge Manager app allows you to view Daily Log entries, such as reminders, staff notes, to-do lists, notices, training announcements, and more. Accessible from anywhere, the TimeForge Daily Log is a powerful tool for keeping track of daily notes, events, and tasks without relying on a pen-and-paper notebook, which can be lost, damaged, or stolen.
You will be shown all logs for the selected date. If you tap an entry, you will be taken to the TimeForge website, where you can add or edit entries.
Remember, you can tap the date in the upper right corner to bring up the date selector:
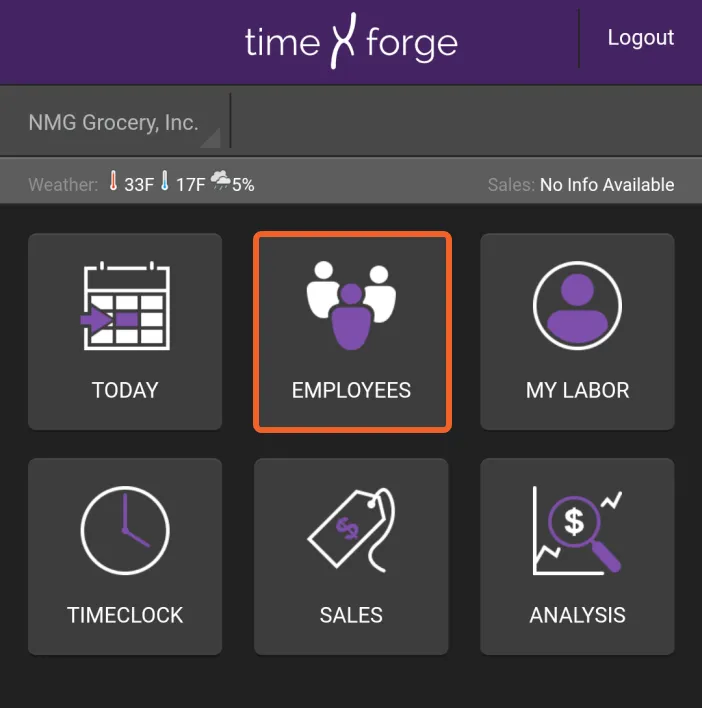
View and edit employees
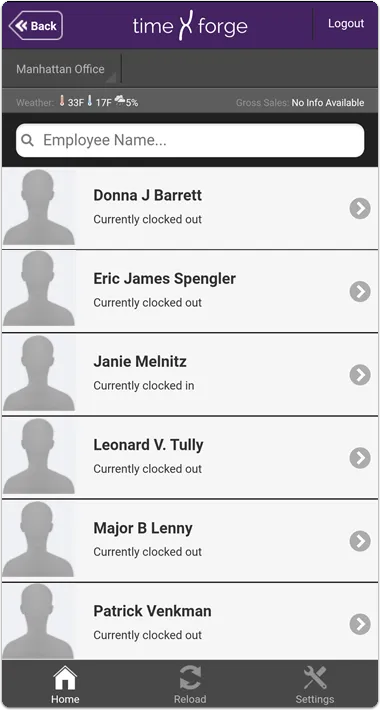
On the Employees screen, you can view who is clocked in or out. All it takes is a few taps. If the employee has an email address or phone number in TimeForge, you can also email or call/text them directly from your mobile device.
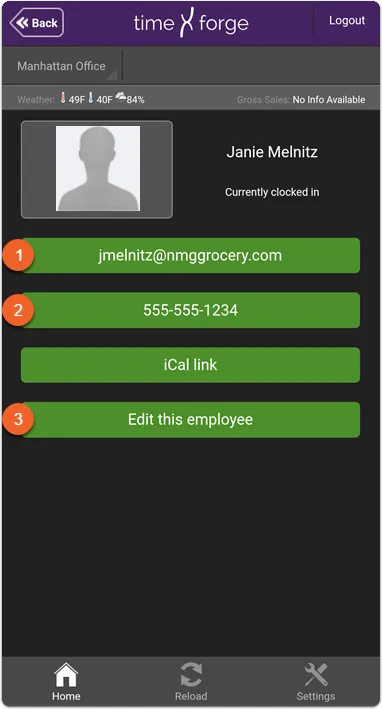
Tapping on an employee in the list will show you additional options, depending on whether the employee has an email or phone number associated with their TimeForge account:
If the employee has an email address associated with their account, you can email them using your mobile device’s preferred email application by tapping their email address.
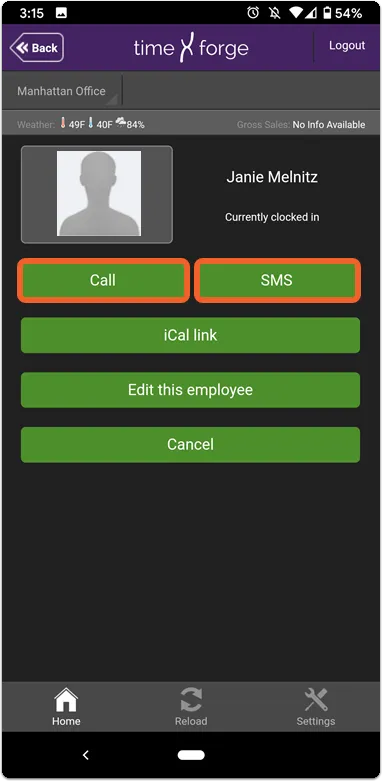
If the employee has a phone number associated with their account, you can call or send them a text message by tapping their phone number.
Tapping the Edit button will take you to the TimeForge website, where you can view and edit the employee’s information on file.
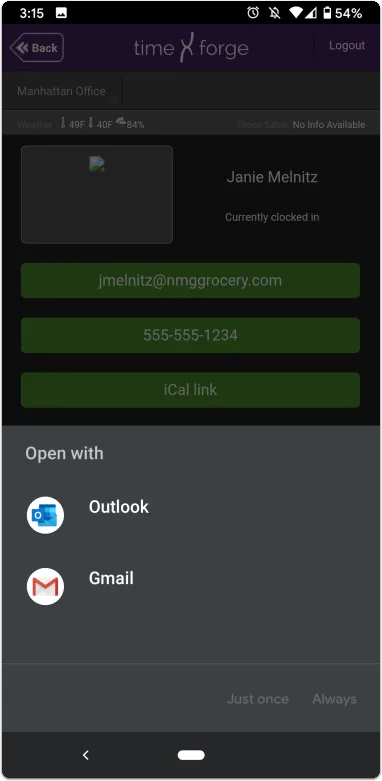
Tap the email button to send an email using your preferred email app on your device
If you have more than one email app on your device, you may be prompted to select which one you would like to use.
Tap the phone number button to call or text (SMS) using your mobile device
Review your own schedule and attendance
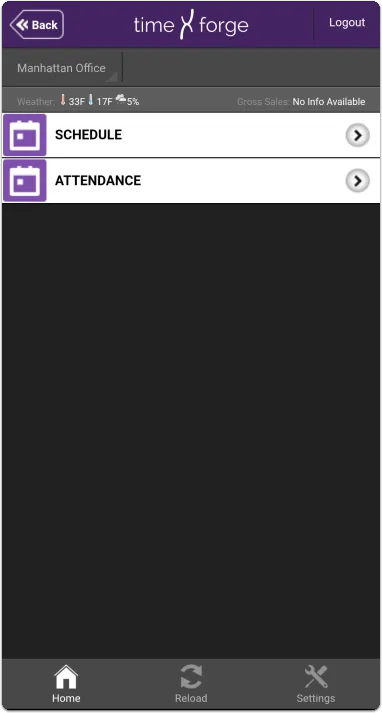
On the My Labor screen, you can view your own schedules and attendance. You can even confirm or give up shifts.
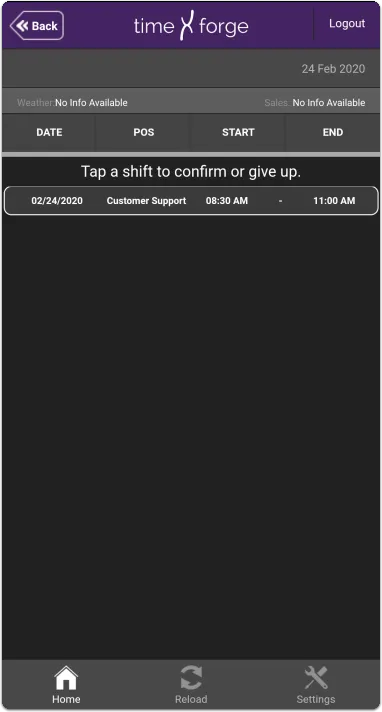
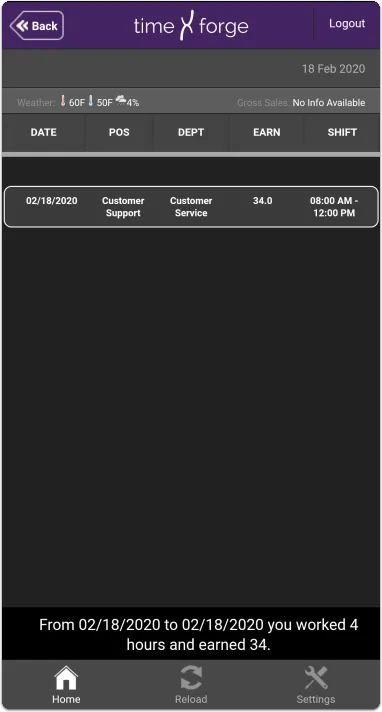
Under Schedule, you will see your shifts for the selected location and date. Remember, you can tap the date (upper right) to bring up the date selector.
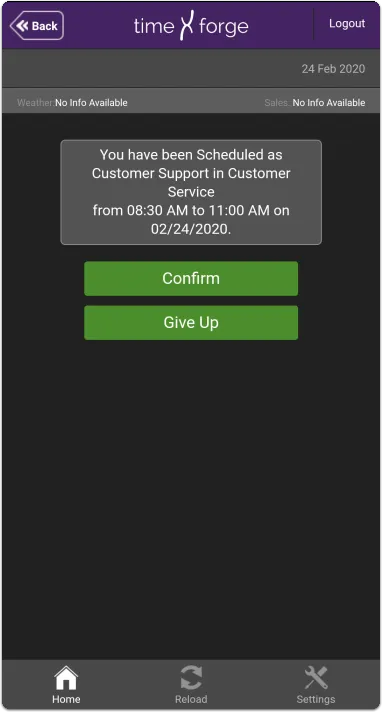
Tapping on a shift will present options to Confirm or Give Up.
Under Attendance, you will see your digital timecard.
Enable and exit TimeClock Mode
The Manager App can be used as a mobile TimeClock. This is a very handy feature if the manager wishes to use this instead of a biometric device.
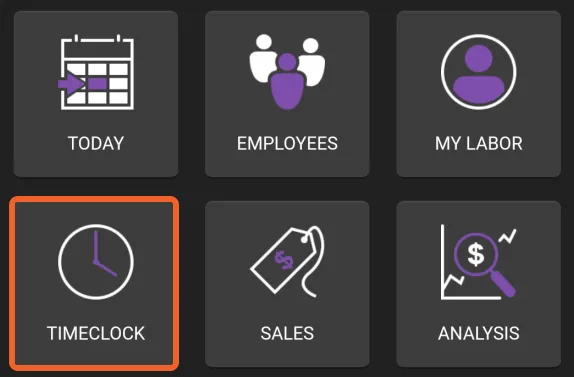
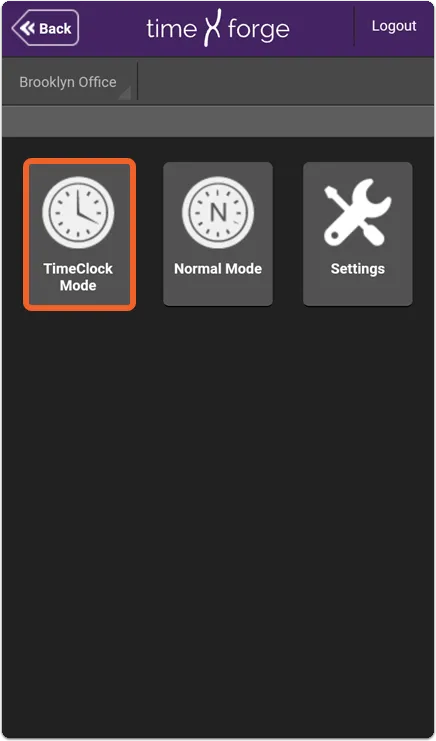
The TIMECLOCK tile has 3 buttons. These are:
TimeClock Mode - Enables TimeClock Mode. In this mode, the manager can clock employees in or out at will from a list. Read below to learn how to enable and exit this mode on your mobile device.
Normal Mode - Enables Normal Mode. In this mode, employees must use their own credentials to clock in/out.
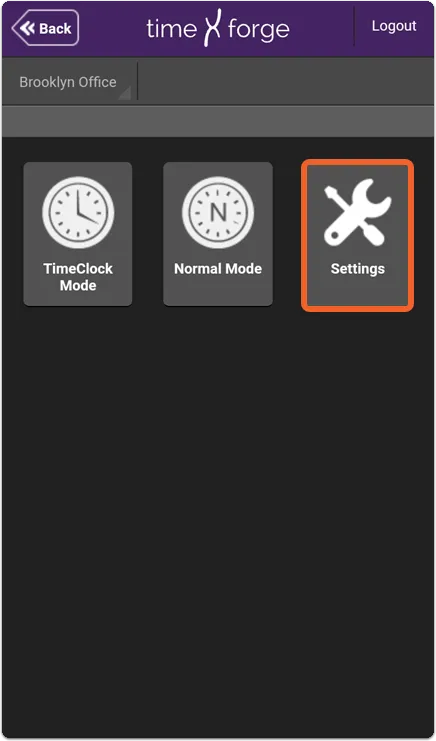
Settings - Provides a few configurable options, such as your default location and turning manager mode on or off.
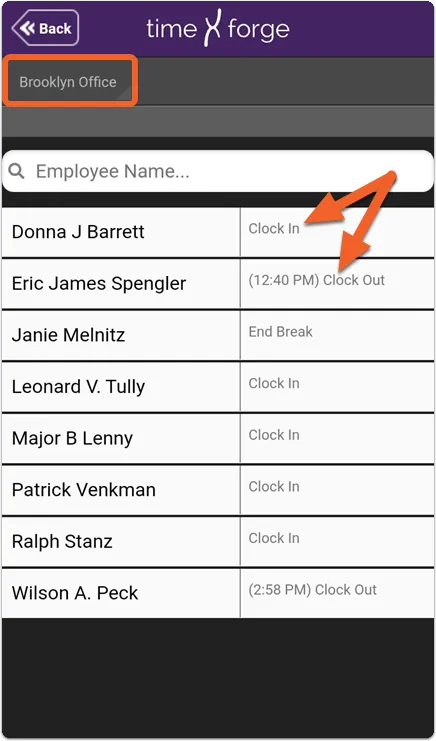
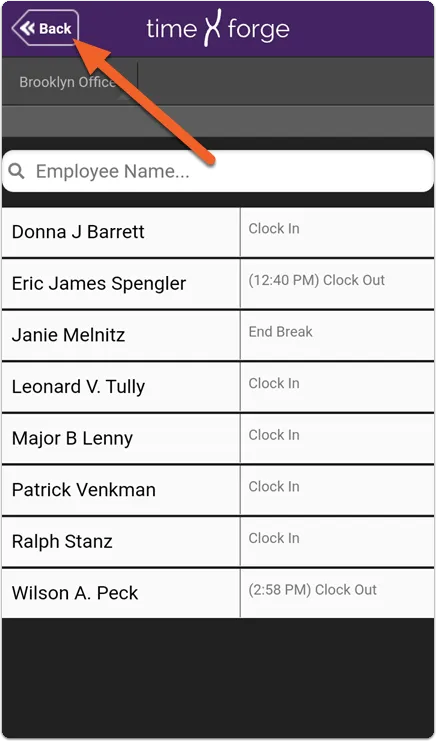
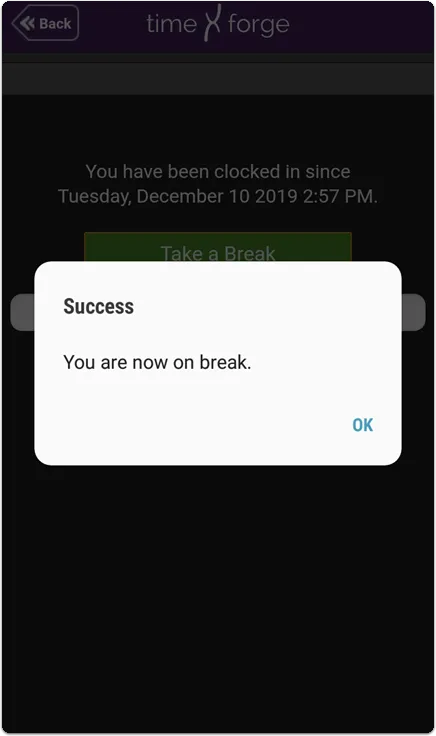
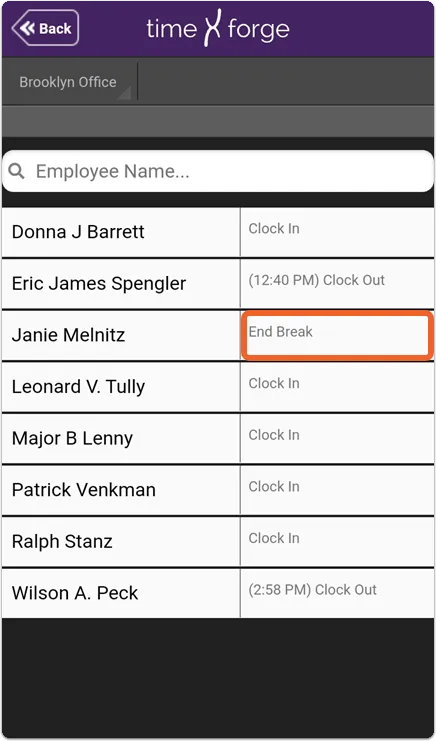
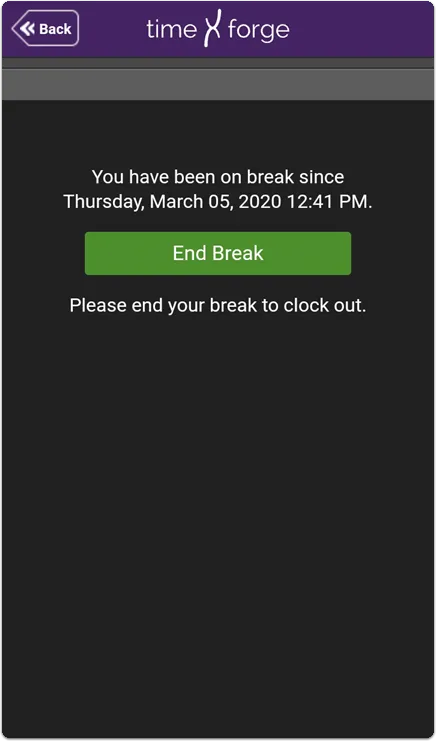
Once TimeClock Mode is entered, you will see a list of employees for that particular location and any available actions you may take, such as clocking in, clocking out, starting a break, or ending a break.
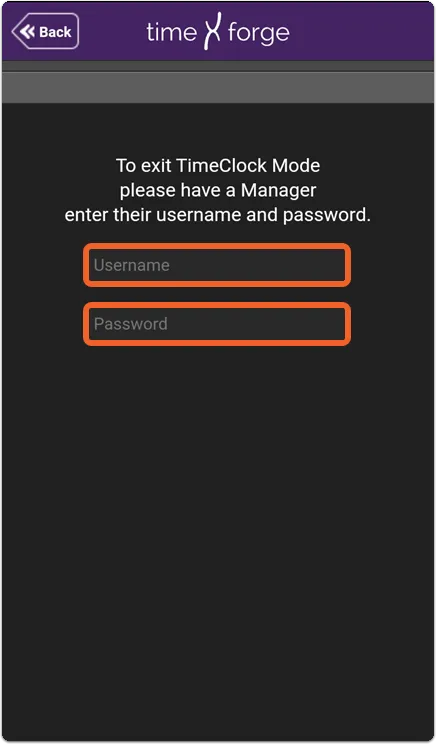
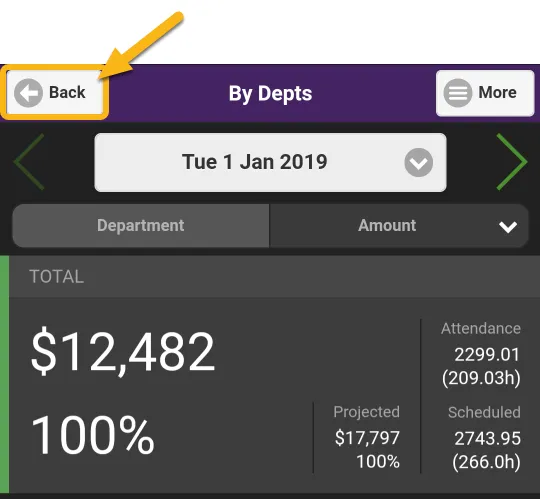
To exit the page, simply tap the Back button in the upper left corner of the app.
You will be prompted for a manager’s Username and Password to proceed.
Clock in, out, and take breaks in TimeClock Mode
While in TimeClock Mode, the Manager App acts like a mobile timeclock, allowing you to clock employees in or out at will. This article will teach you how to locate an employee, clock them in, set them as on/off break, and clock them out.
For the selected location, locate an employee to clock in
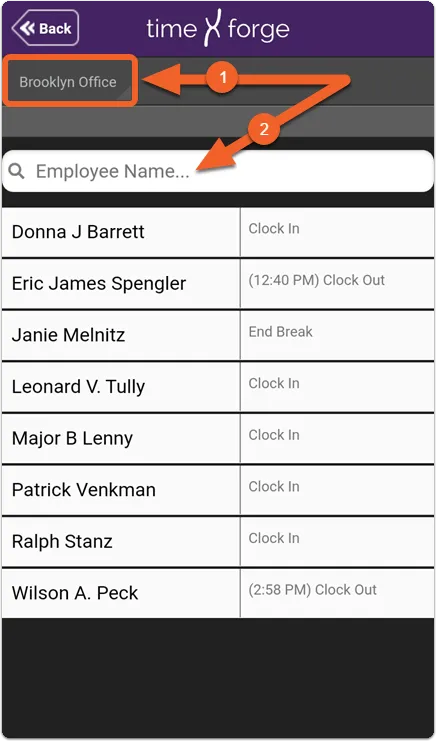
First, make sure you have the right location selected. To select a different location, use the location selector in the upper right.
Once you have the correct location selected, you can either browse the list for an employee (if your list is short) or use the search bar (great for long lists).
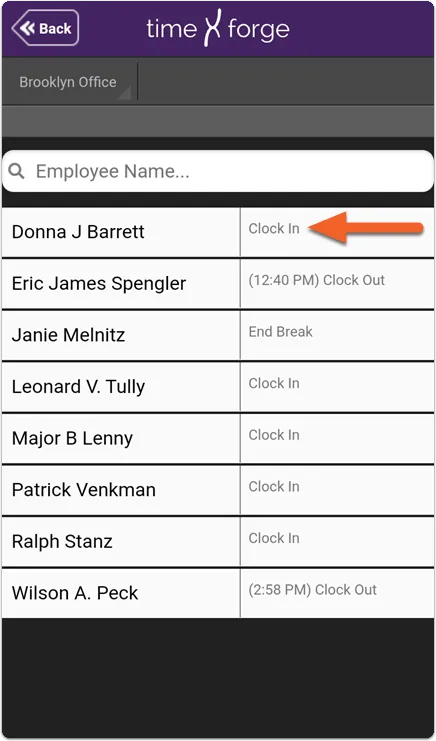
Next to the employee’s name, tap the action bar where it says Clock In.
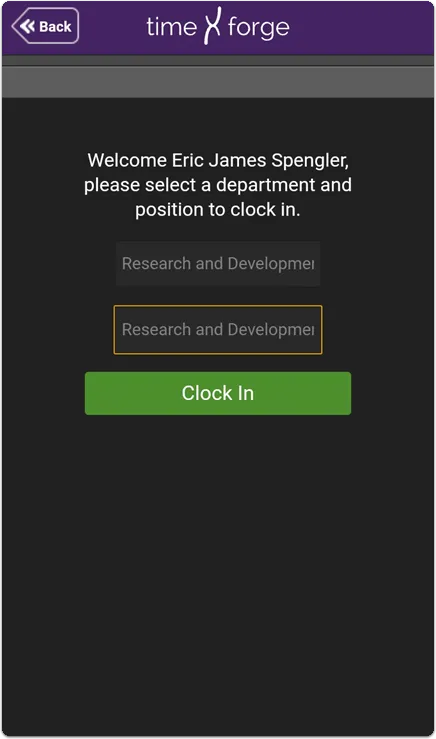
Select the department and position for this employee, then tap Clock In to complete the process.
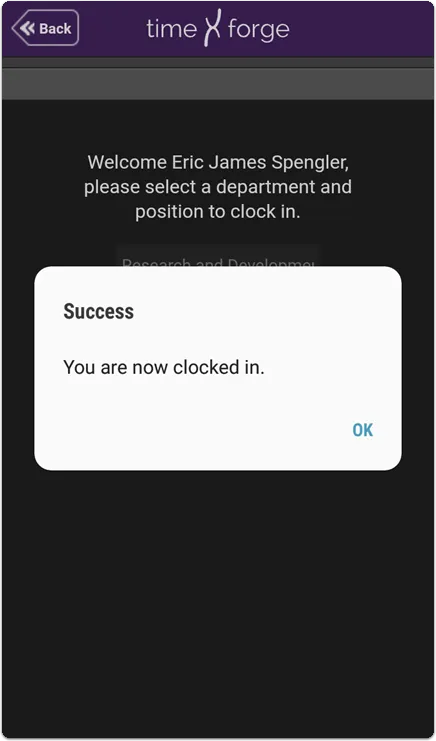
Tap OK to acknowledge the successful clock-in. You will be returned to the employee list, which should now be updated according to the employee’s new status.
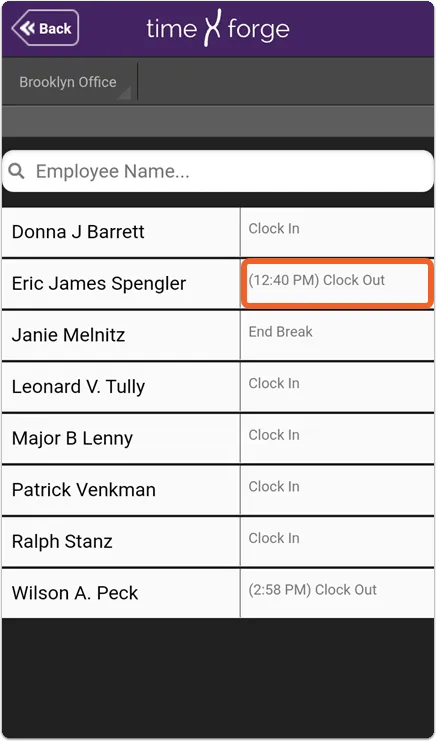
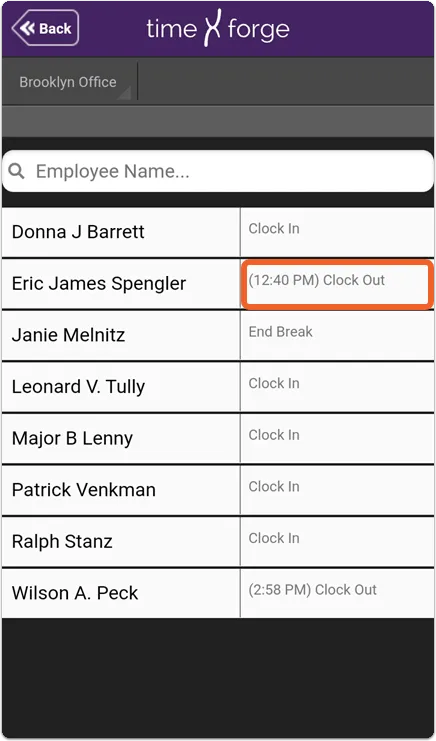
Clocking out is as easy as ending a break. Find the employee you’d like to clock out and tap the action bar (should say “Clock Out”) next to their name:
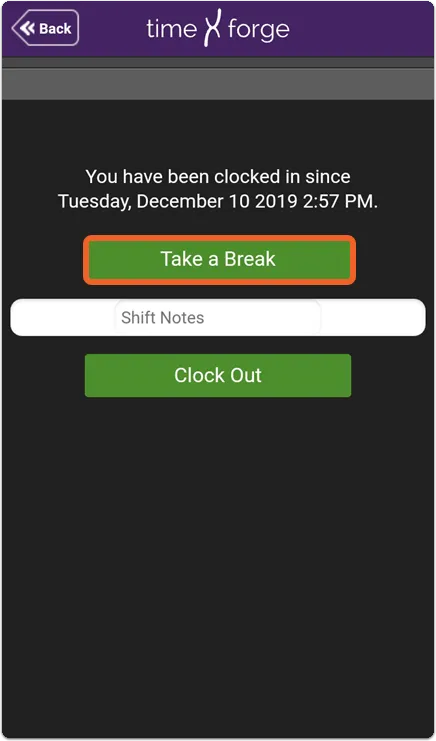
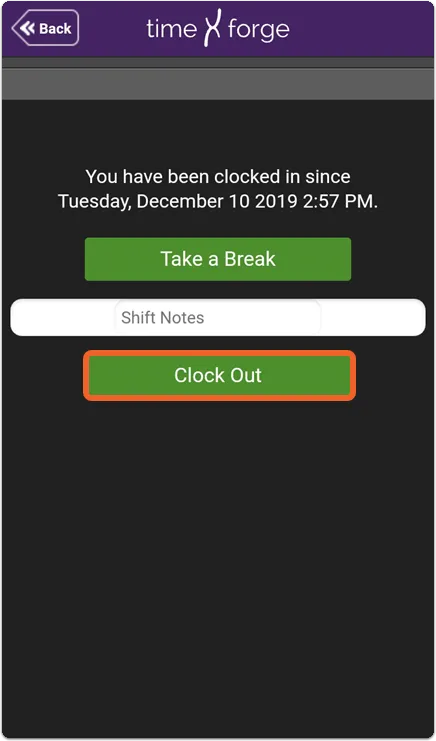
Then, type in any Shift Notes (optional), and tap the Clock Out button to complete the clock-out.
Enable and use Normal Mode
Normal Mode allows employees clock in/out individually using their own credentials. Therefore, in order to use this mode, Manager Mode must be disabled under Settings. This is because Manager Mode allows the ability to clock any employee in/out at will – which is not necessarily something most businesses want employees to be able to do. To recap:
Manager Mode - Allows a manager to log in using their own credentials and then clock employees in/out at will from a list of employees.
Normal Mode - Employees use their own credentials to clock in/out.
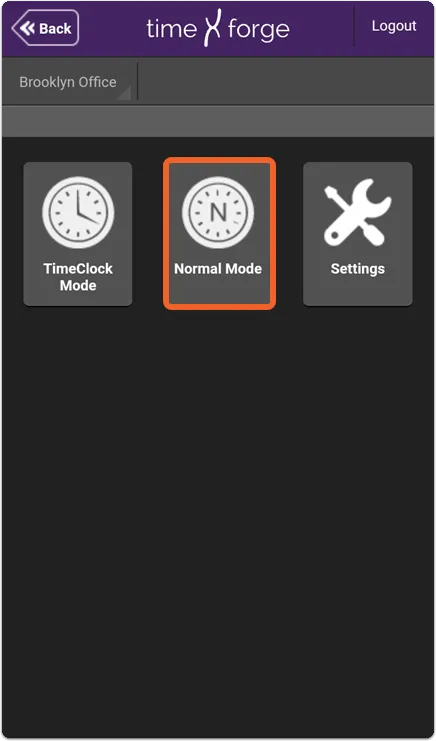
TimeClock Mode, Normal Mode, and TimeClock Settings are all accessible from the TIMECLOCK page in the app. From the home screen, tap TIMECLOCK.
Then, tap the Normal Mode button.
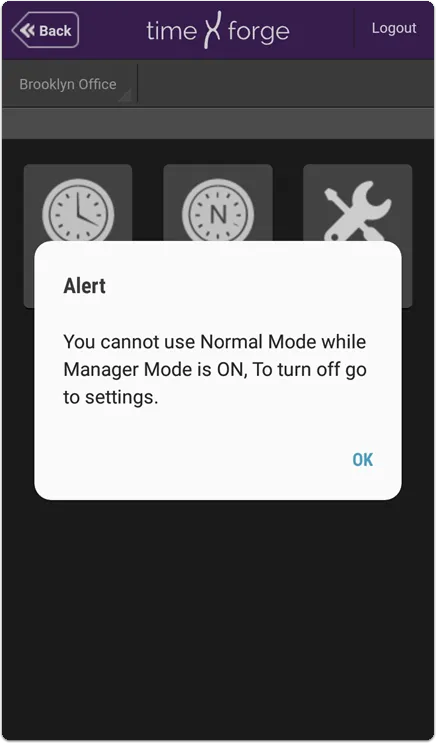
Because Normal Mode and Manager Mode are mutually exclusive settings, if you have manager functionality enabled, you will be informed that you can’t use Normal Mode:
Employees will be able to sign in/out using their own credentials. This allows the device to act as a portable timeclock that does not necessarily require manager supervision or require the manager to clock each employee in/out individually.
Adjust the TimeClock settings
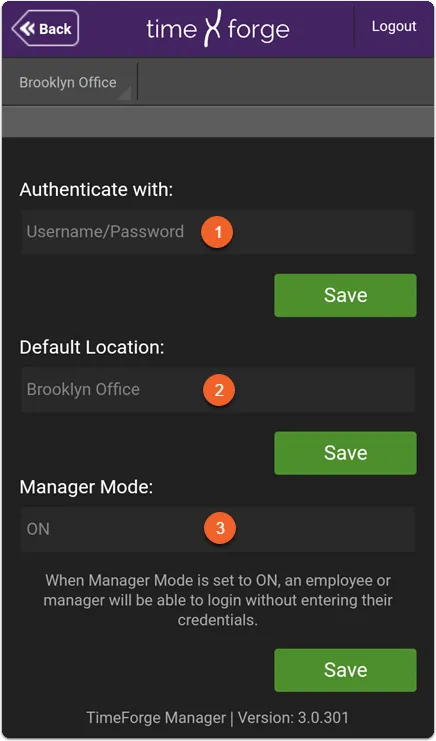
The Settings page allows you to manage 3 basic options that control the TimeClock functionality on your device. These include: whether to authenticate users with a username/password or internal number/internal password, what the default location should be in TimeClock mode, and whether to enable or disable Manager Mode.
Default Location: Sets the default location in the app. The default location is selected when you log into the app.
Manager Mode: Enables or disables “Manager Mode”. With Manager Mode on, only the manager’s username and password are needed to perform various functions within the app.
With Manager Mode disabled, you can put the app in Normal Mode and hand your mobile device to your employees, thereby allowing them to individually clock themselves in and out with their own credentials. For this reason, you can’t use Normal Mode and Manager Mode at the same time – these modes are mutually exclusive.
View your Sales and Analytics
Using the TimeForge Manager Mobile app, retailers can view real-time Sales information from anywhere with just a few simple clicks. This guide provides an overview of the sales features and functionality available using the mobile app.
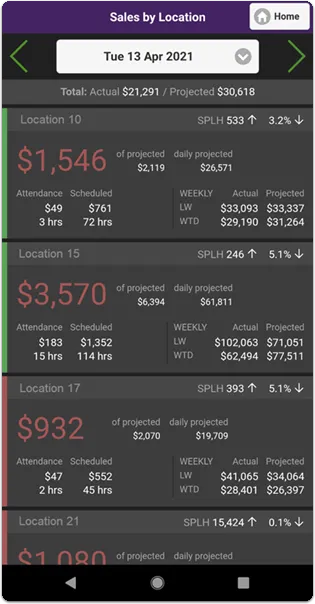
When you open the Sales page, the screen will display current sales totals by location by default. You can access additional screens by swiping left/right and by tapping a specific location to drill down into the details for that store.
Sales by Location
Also known as the Above-store Sales Dashboard, the sales by location screen provides information about multiple locations at once. This screen allows multi-unit operators to see information about all their stores at a glance.
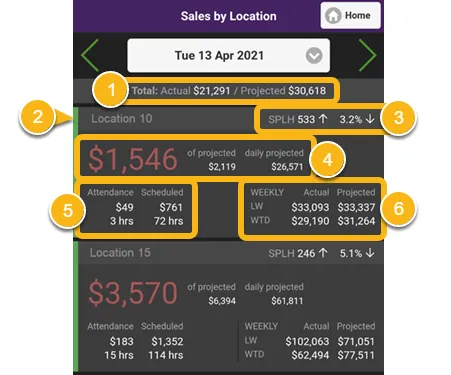
Below is a breakdown of the information shown for each location (in this example, the location is called Location 10):
Daily Actual Sales and Projected Sales totals across all locations listed
Vertical red/green bar: green means actual sales are higher than same day last week, red indicates lower.
Daily SPLH and labor percentage. Up/down arrow indicates increase/decrease over same day last week.
Daily actual sales in red or green. Green means sales are higher than projected, red means lower. To the right, the projected sales are also listed.
Daily Attendance costs/hours and daily Scheduled costs/hours.
Weekly Actual and Projected totals, up to current day of the week. LW = Last Week; WTD = Week to Date.
For comparison purposes, when viewing data for the current day, all values are as of the current hour, including projections!
Sales by Department
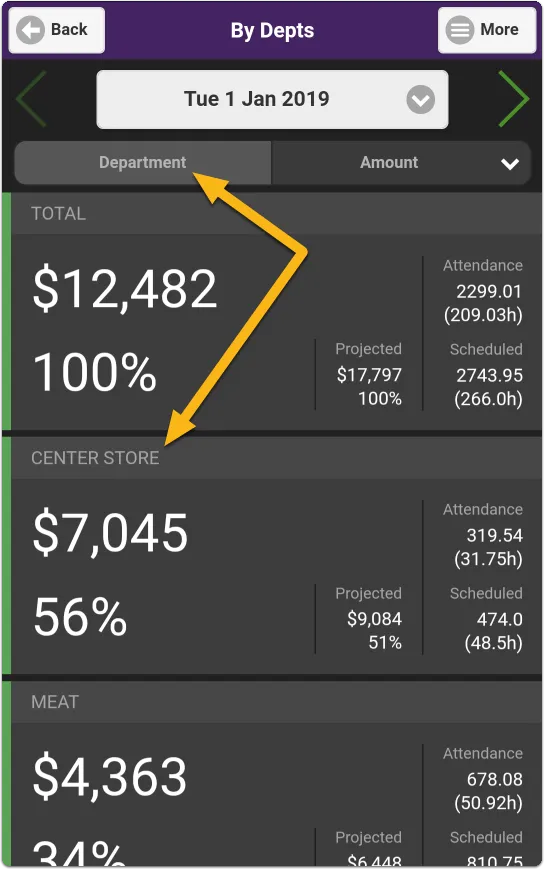
When you drill down into a location, you can view additional screens with details specific to that location by swiping to the left. Sales by department is one of several ways you can view a breakdown of your sales.
While on the Sales by Department screen, you can easily switch between sorting by Department and by Amount using the buttons just below the date.
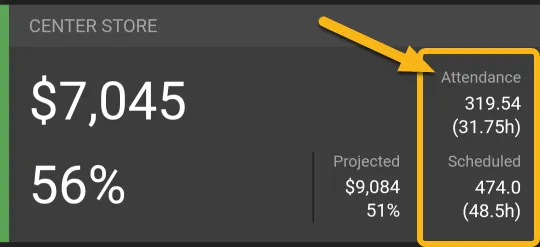
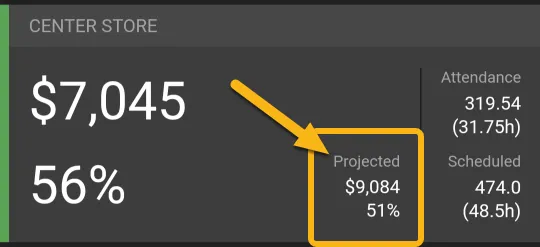
On the right side of each entry, you’ll see your total Attendance and actual labor costs. Under that will be your Scheduled labor and expected labor costs for comparison.
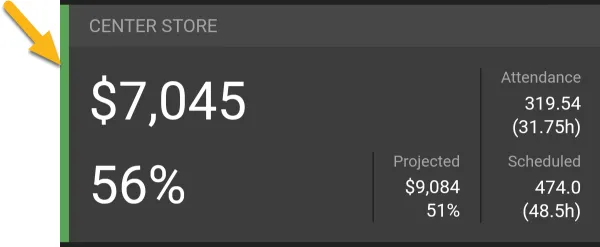
Finally, each entry has a red or green bar to the left of it, which indicates whether the figures are ahead or behind the previous week in terms of sales. In the example below, the green bar indicates that the CENTER STORE department is ahead of the previous week’s sales.
Select a different location or date (filter your results)
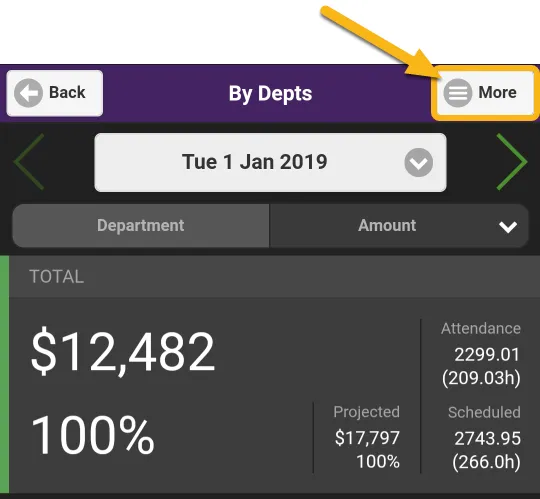
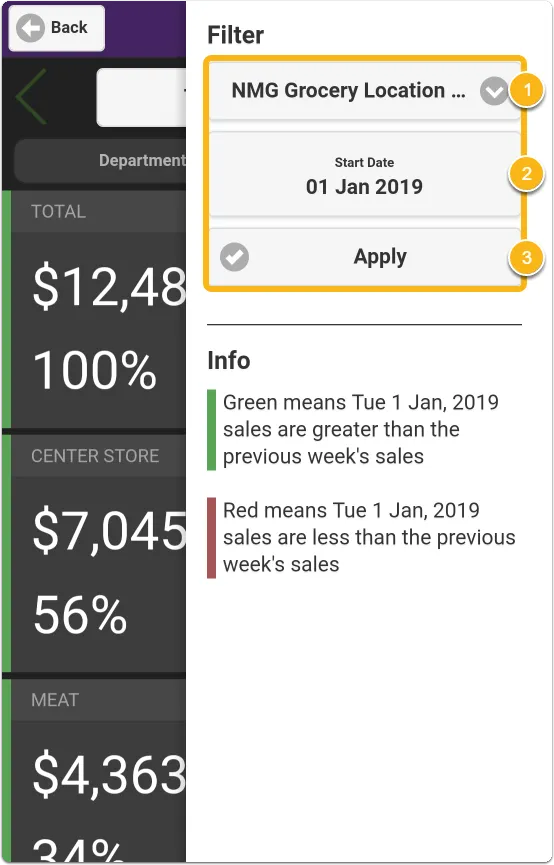
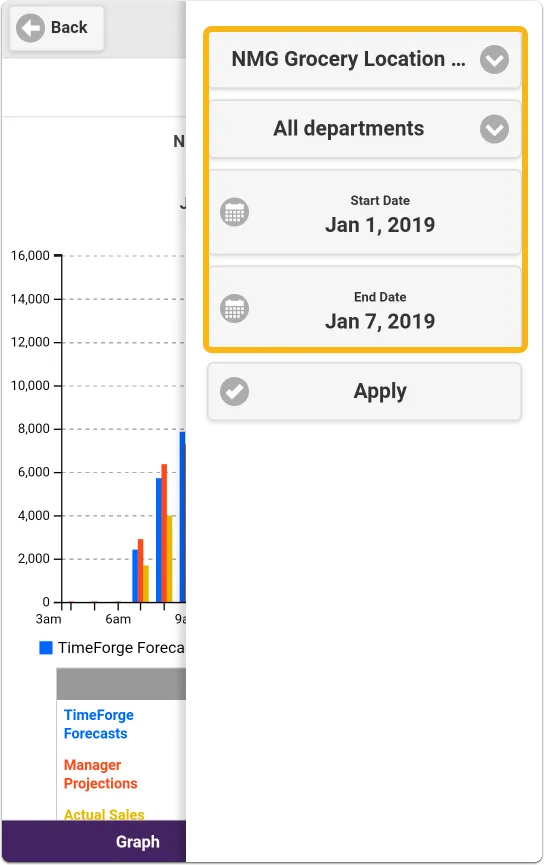
If you would like to view the sales data for a different location or different date, tap the More button in the upper right. You will be presented with a list of filters and information.
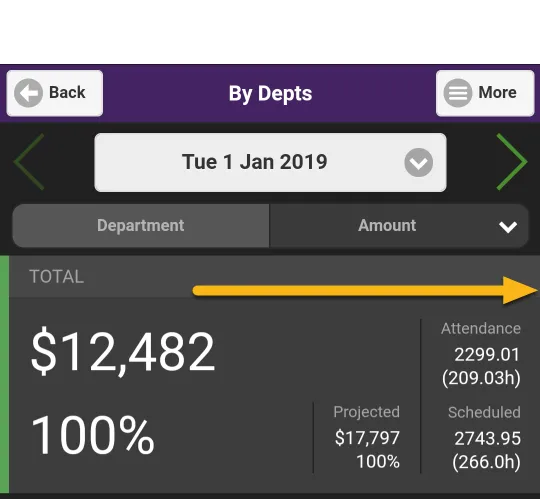
By default, drilling down to a location shows you your sales by department, but you can also see sales broken down by hour.
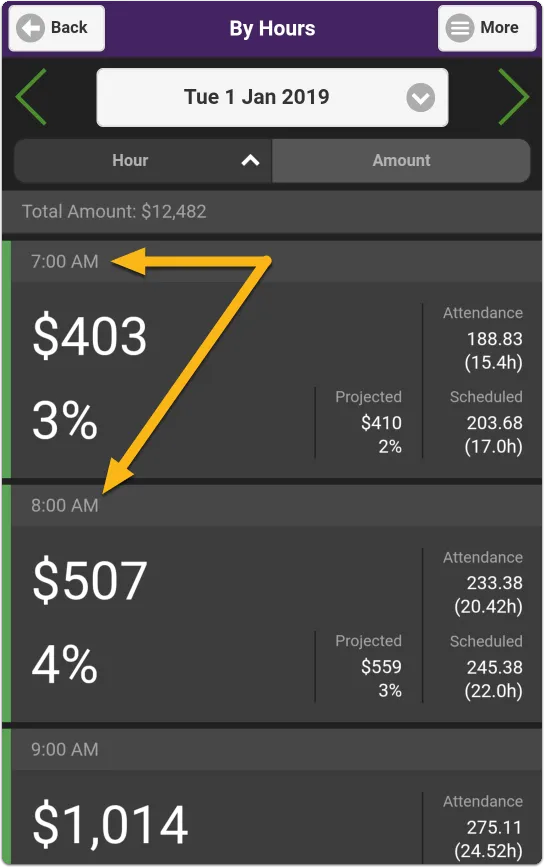
To view your sales by hour, simply swipe to the left on your screen.
The page will look almost identical, except entries will be by hour instead of department, and there will be an extra line above the list with the Total Amount of sales for the day.
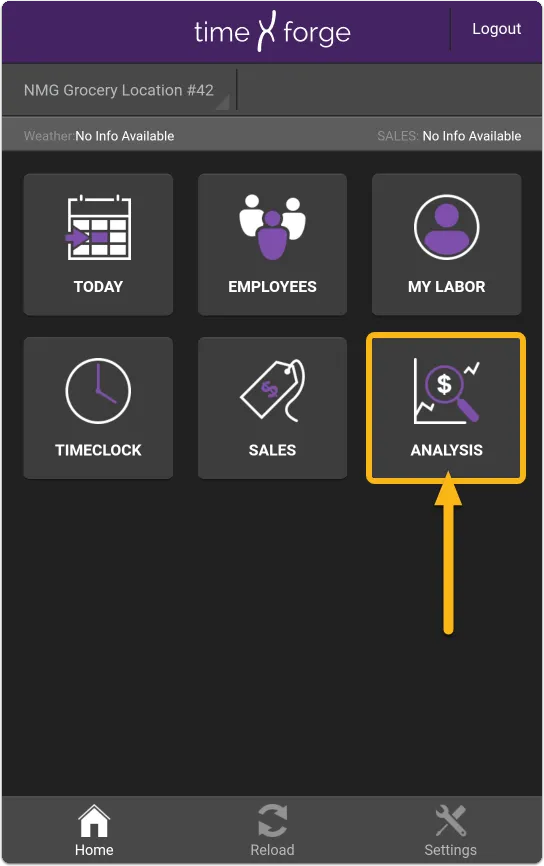
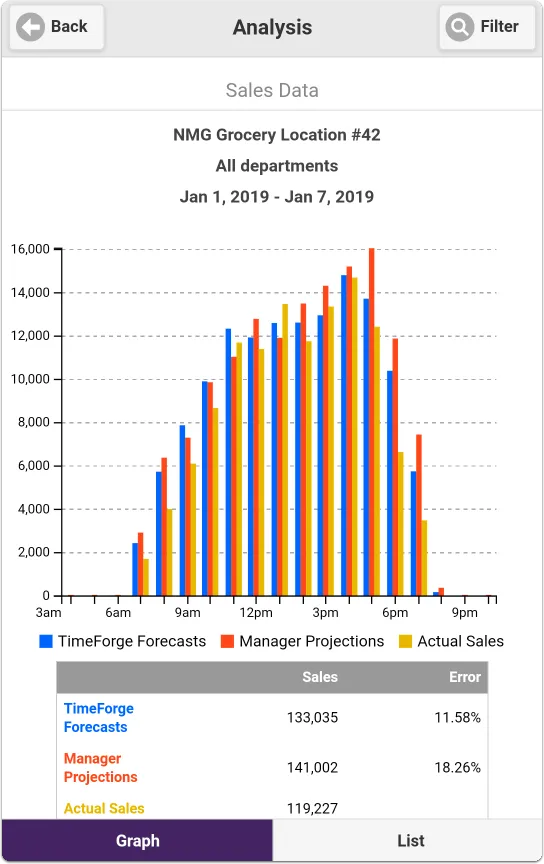
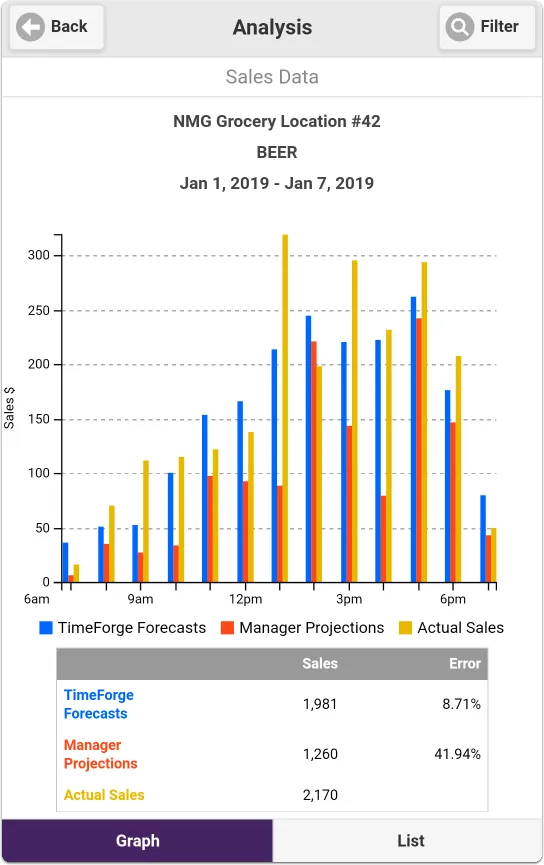
When you tap the Analysis tile, you’ll be shown a graph of your Sales Data. By default, all departments will be shown, and data will be shown for the current week.
The blue bar shows forecasted sales, the yellow bar shows actual sales, and if you input any manager projections, there will be a red bar showing projected sales. A summary and key is available below the graph to make things easy.
The buttons at the bottom of the screen allow you swap between Graph and List view. List view simply shows the data in a list format similar to what we saw in the sections above.
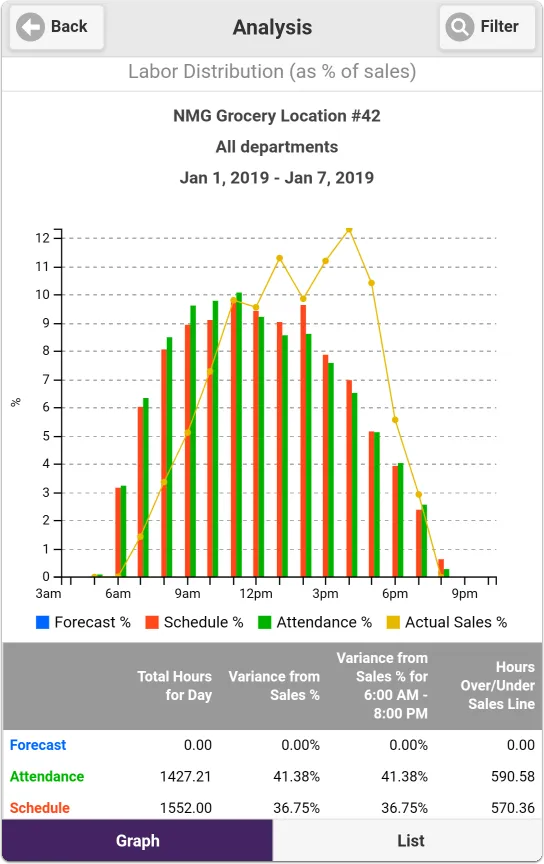
You can view additional graphs, such as Labor Distribution, by swiping left.
The Labor Distribution graph will show you real time labor costs. Here we see actual sales (represented by a yellow line) compared to our actual (green line) and scheduled (red line) labor costs.
This graph is purely percentage based, and is comparing your schedule, attendance, and TF Labor Forecast (where applicable) to your sales trends. This is most useful when limited down to departments like Front End, where we should (usually) only have labor where our sales are.
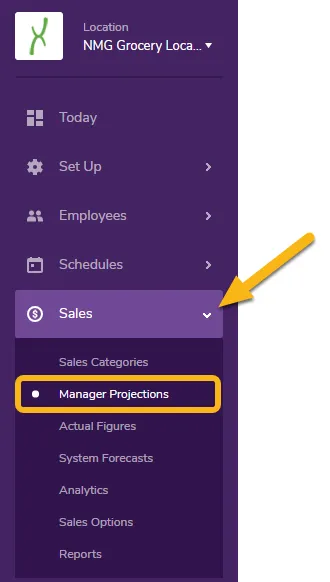
All manager projections must be entered using the online version of TimeForge. To get to the appropriate screen, open the Sales tab and select Manager Projections.
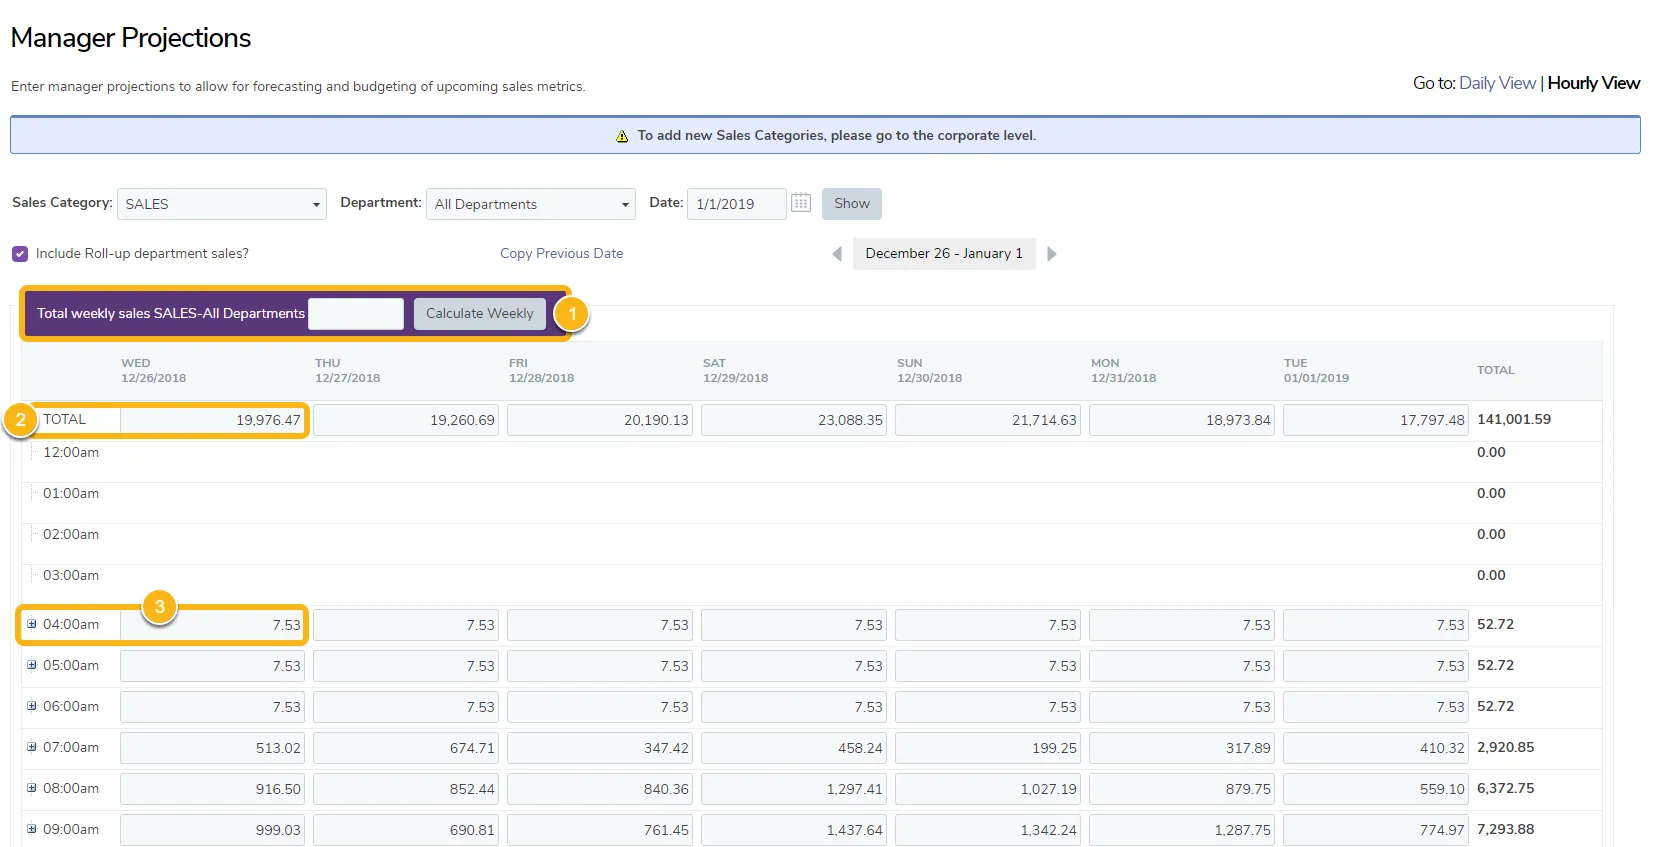
This screen is where you enter your projected sales. There are several ways to do this:
The simplest way is to input projected sales for the entire week and select Calculate Weekly. TimeForge will distribute the total based on the previous week’s sales trends.
The second way is to enter a daily projected sales total into the TOTAL column for each day. TimeForge will distribute the amount by daily sales trends for that particular day.
You can also enter projections by hour or in even smaller (quarter-hour) increments!
Adjust the Manager app settings
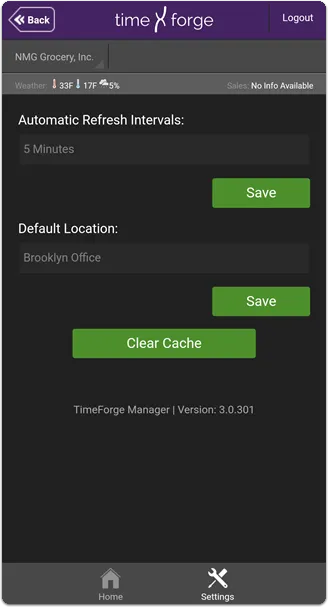
There are currently two settings available that control overall functionality within the app (separate from TimeClock Settings):
Automatic refresh intervals (how long, in minutes, the app will wait before refreshing or updating data from TimeForge).
Default location used throughout the app.
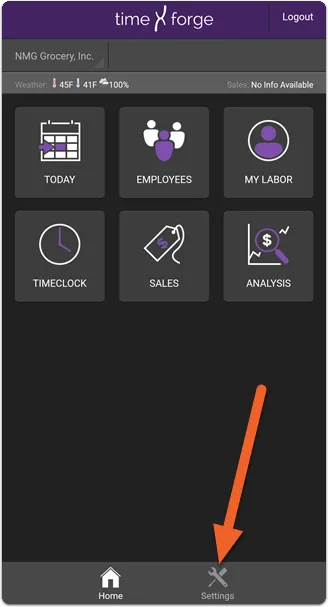
From the home screen, tap the Settings icon at the bottom of the app
The Settings icon is also available in several other areas, but when starting the app, it’s easiest to find it right here on the home screen:
You’ll be shown the available settings, and the Settings icon will now be highlighted and the Home icon will be dimmed. To get back to the home screen, just tap Home!