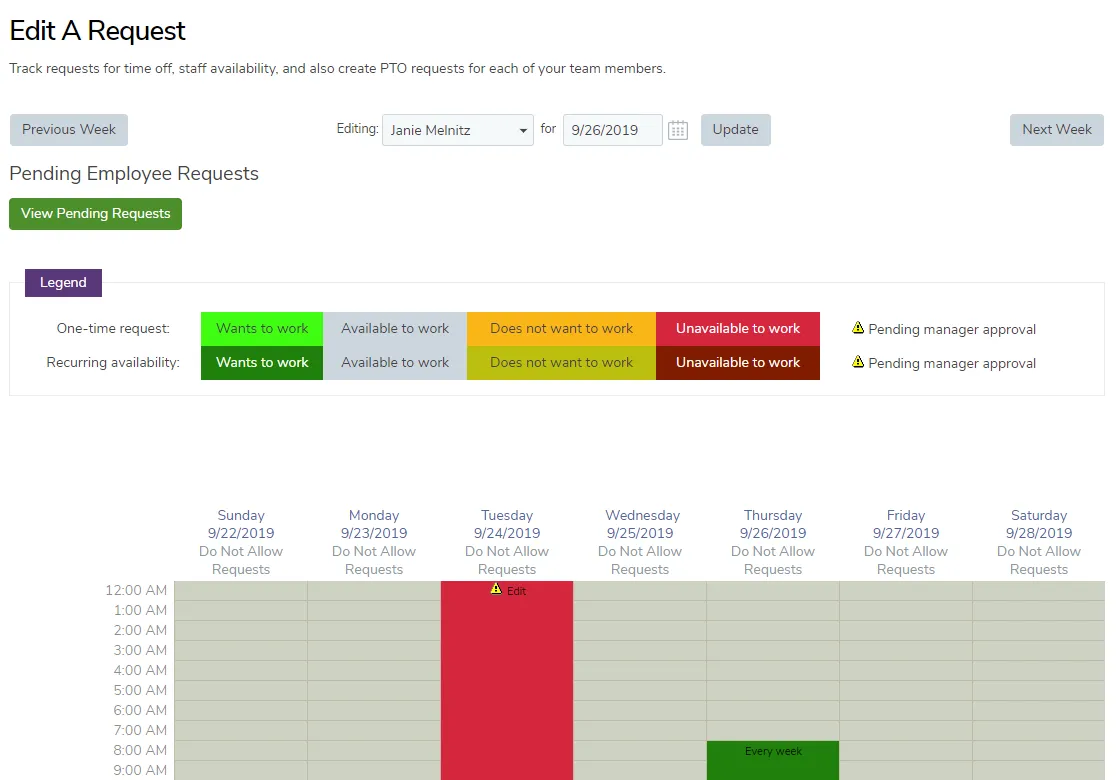
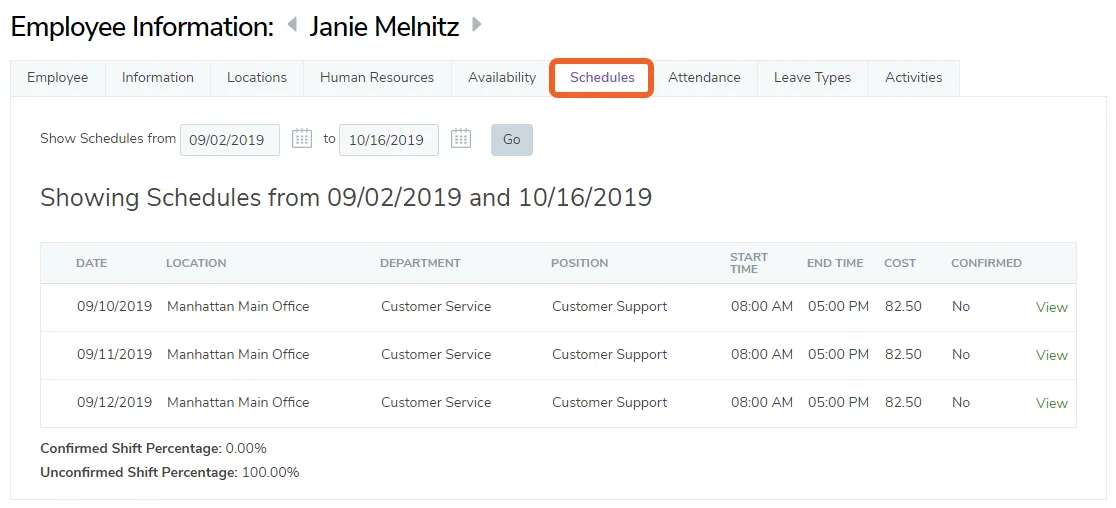
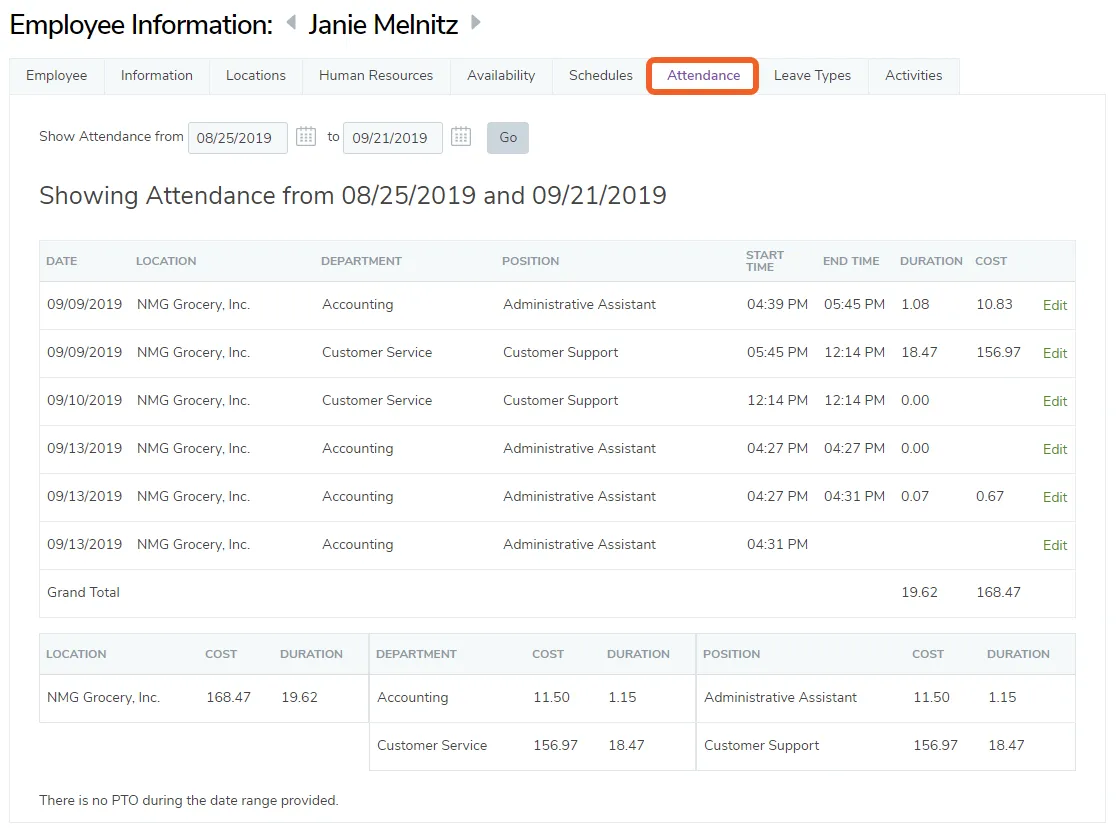
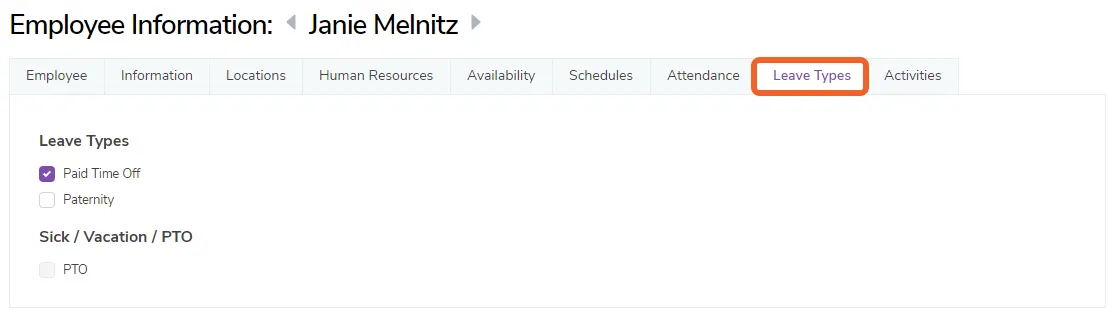
Every staff member in TimeForge, whether they are an employee, supervisor, or manager, has a unique employee profile. The employee profile is essentially a portal where you can create, edit, and store information about your employees. This includes personal information (such as name, cell phone number, and email address), as well as attendance, schedule, and availability information – all in one convenient location inside TimeForge.
Here we provide an overview of each section (tab) in the employee profile.
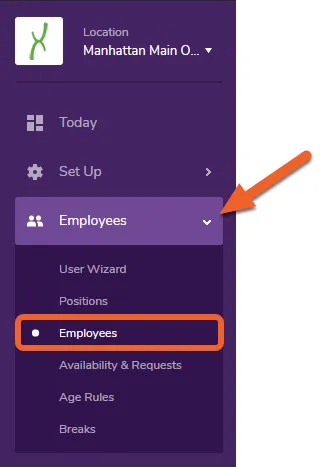
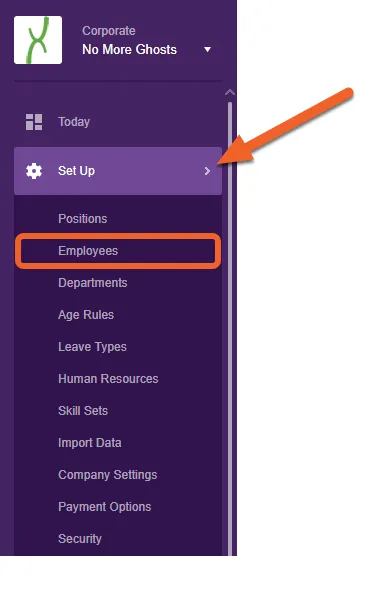
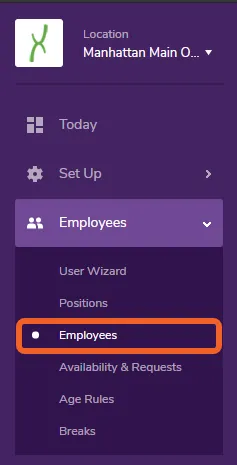
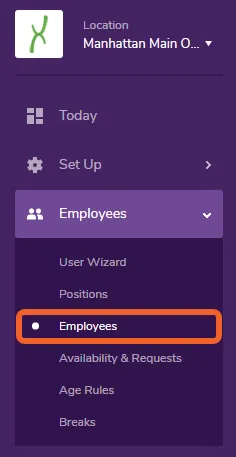
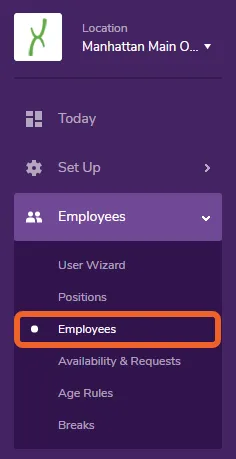
Open the Employees tab and select Employees from the dropdown menu
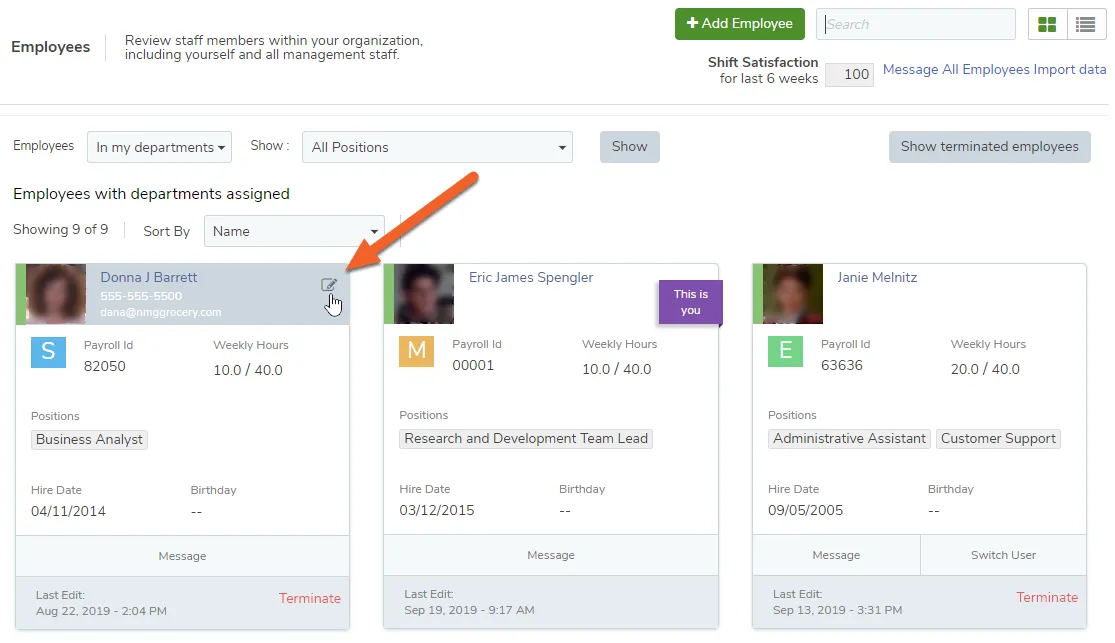
This will take you to the Employees page in TimeForge, where you can view your list of employees, edit their information, and add new staff members to the roster.
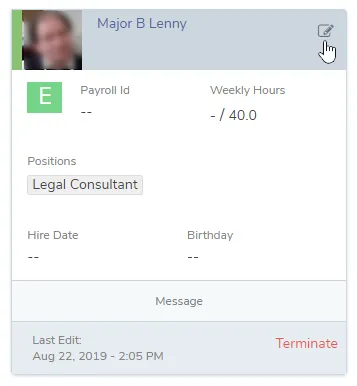
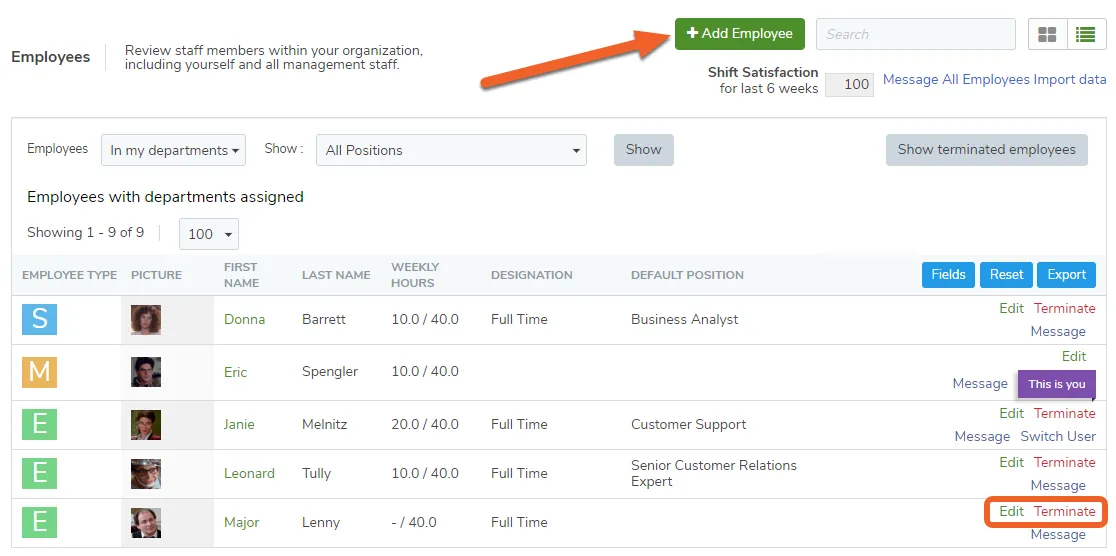
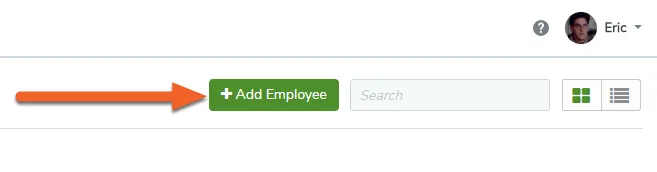
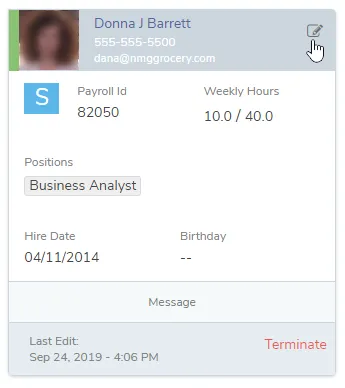
Select an employee to view or click the +Add Employee button to add a new staff member
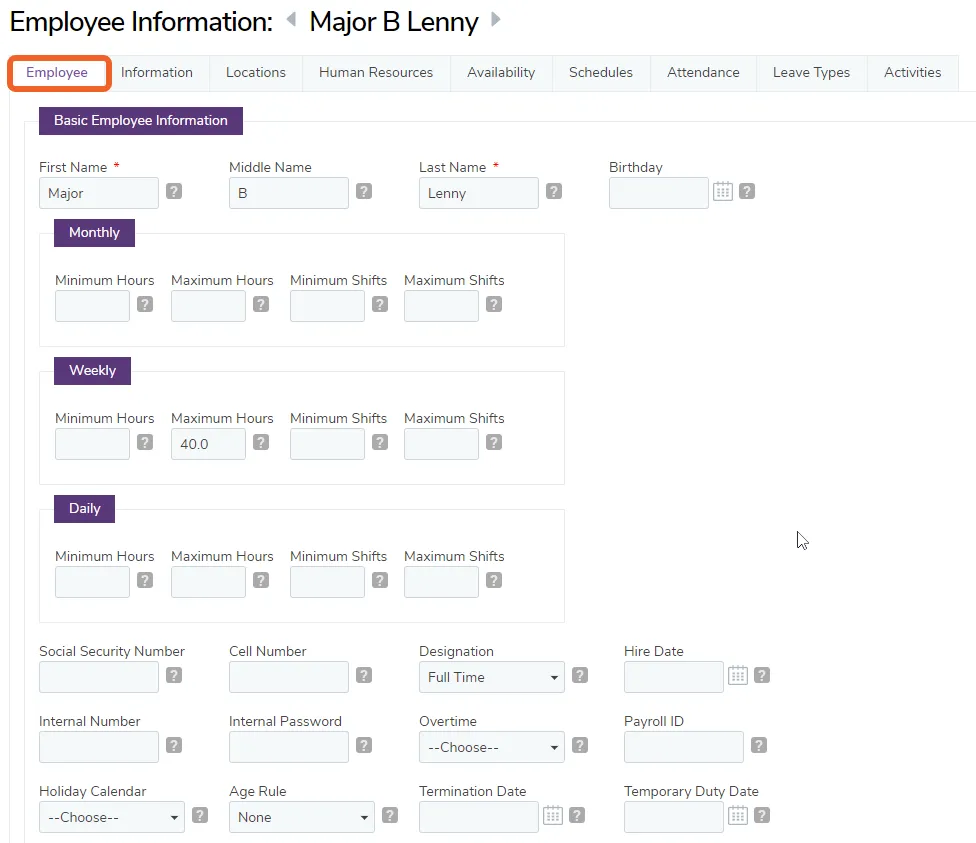
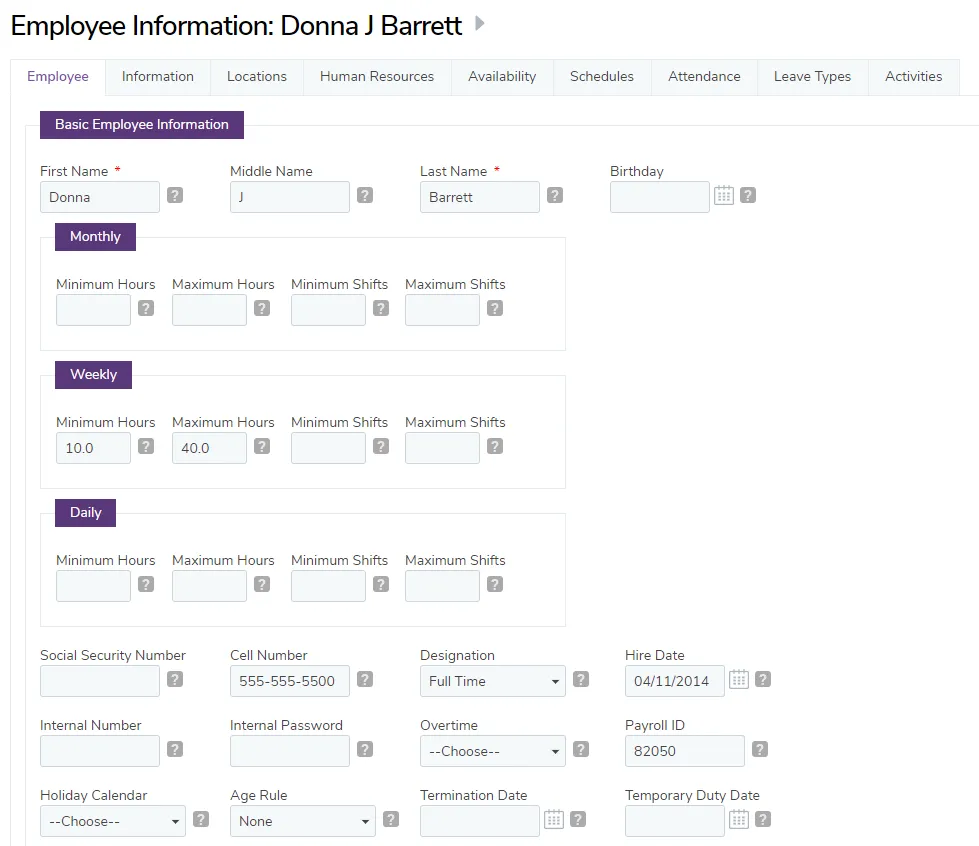
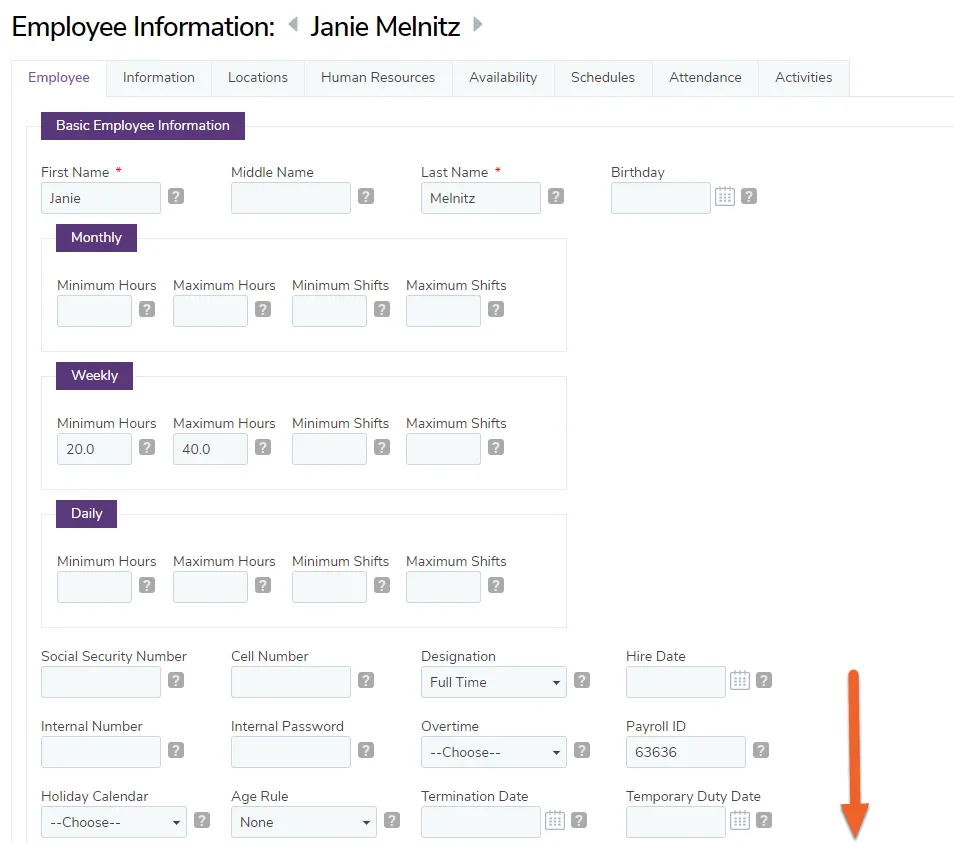
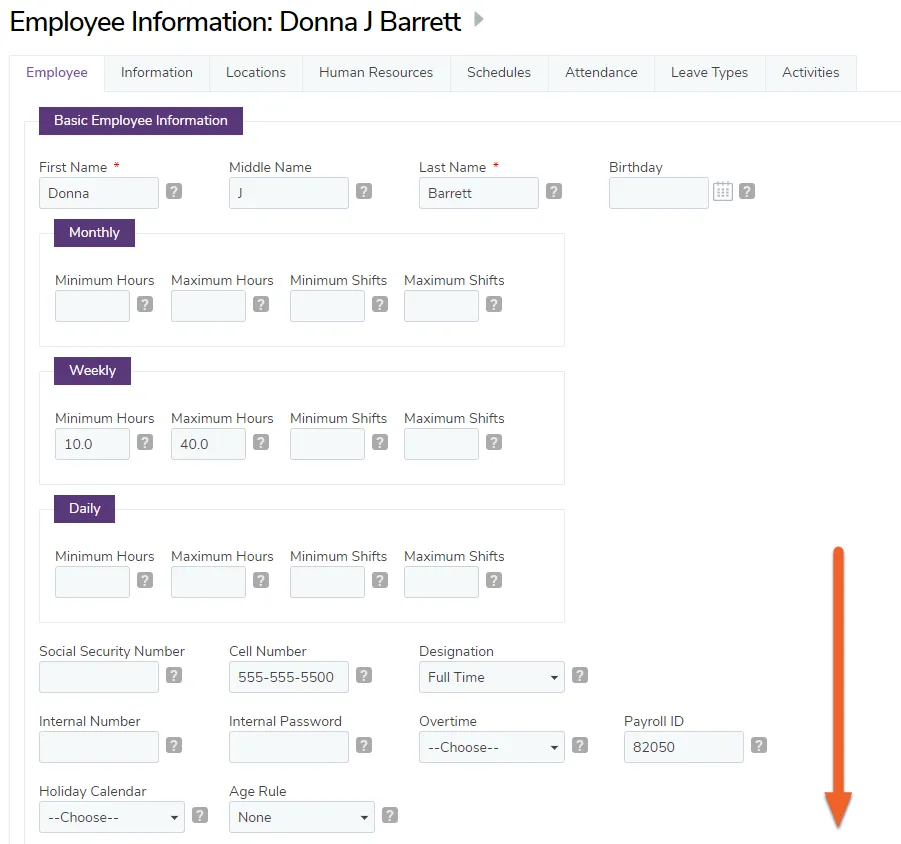
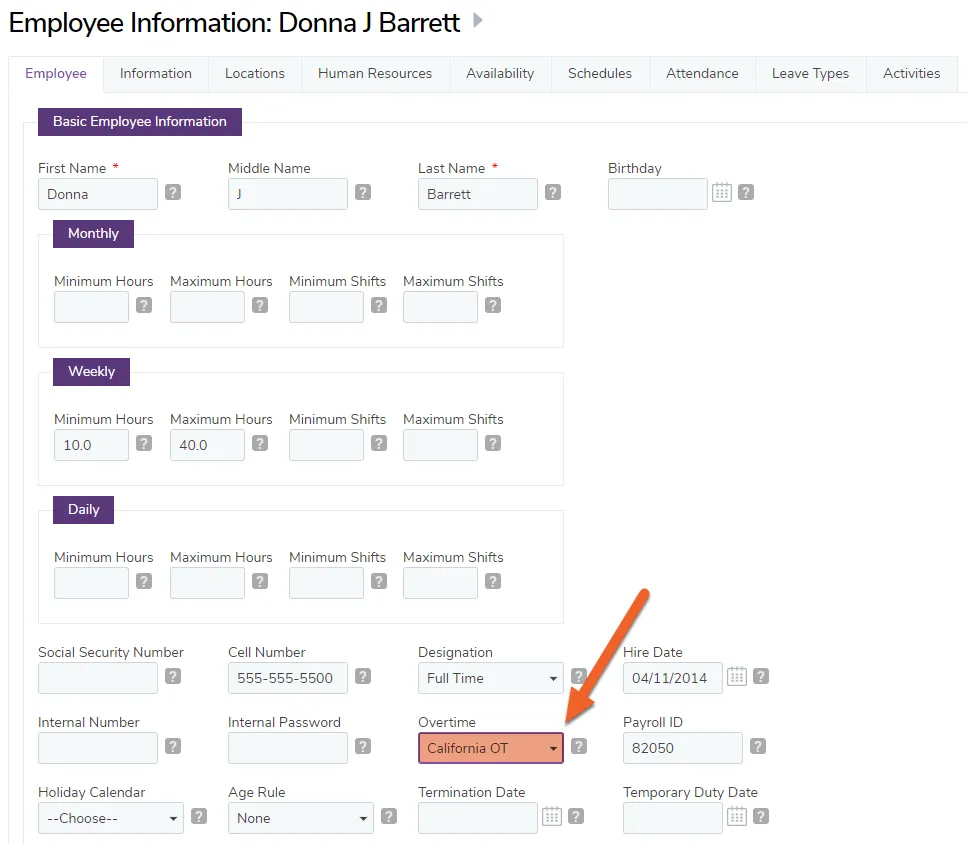
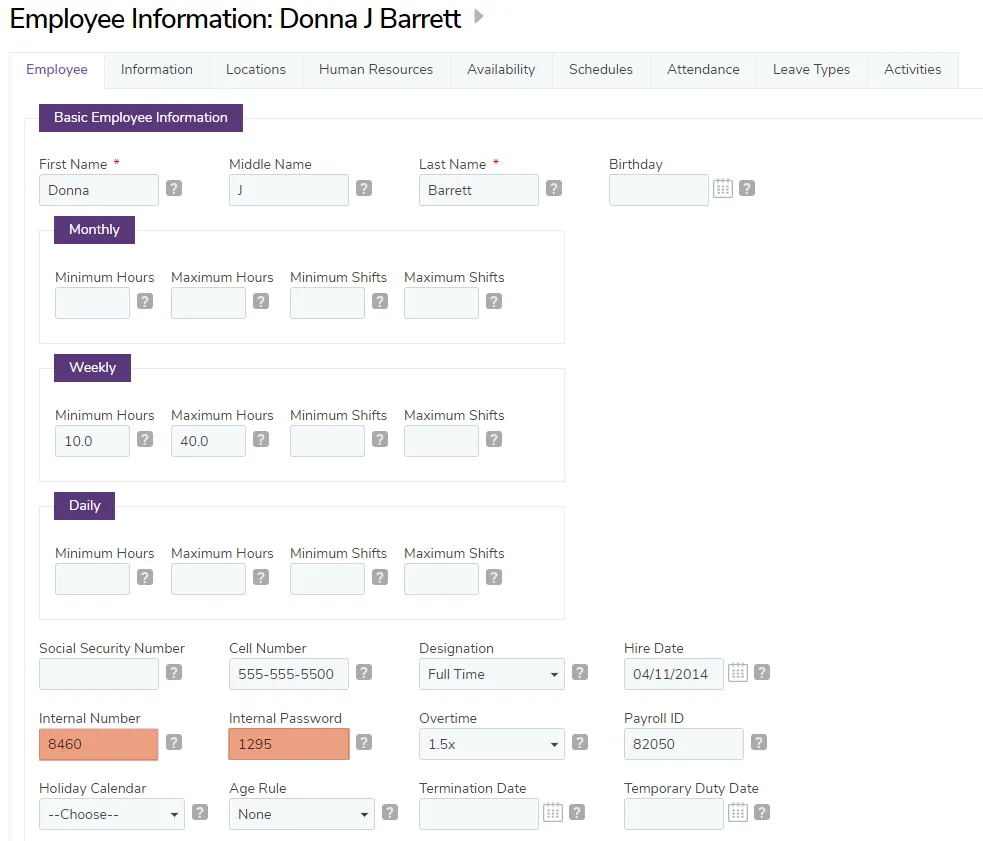
The first tab in the employee profile holds basic information about their employment. Here, you can assign minimum and maximum hours so that TimeForge can alert you when those parameters aren’t met. This is also the area where you can terminate an employee, give them an internal number and password for clocking in and out, and assign their payroll ID.
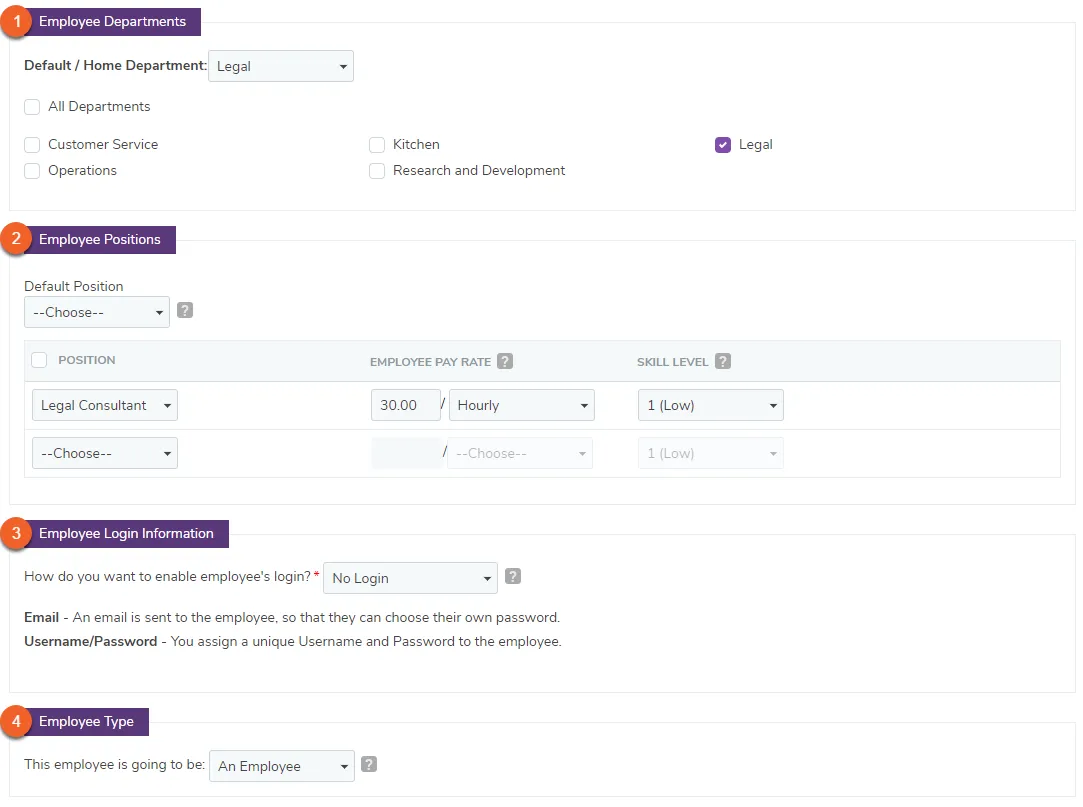
Employee Departments, Positions, Type, and Login Information
If you scroll further down the page, you will find a few more options, explained below:
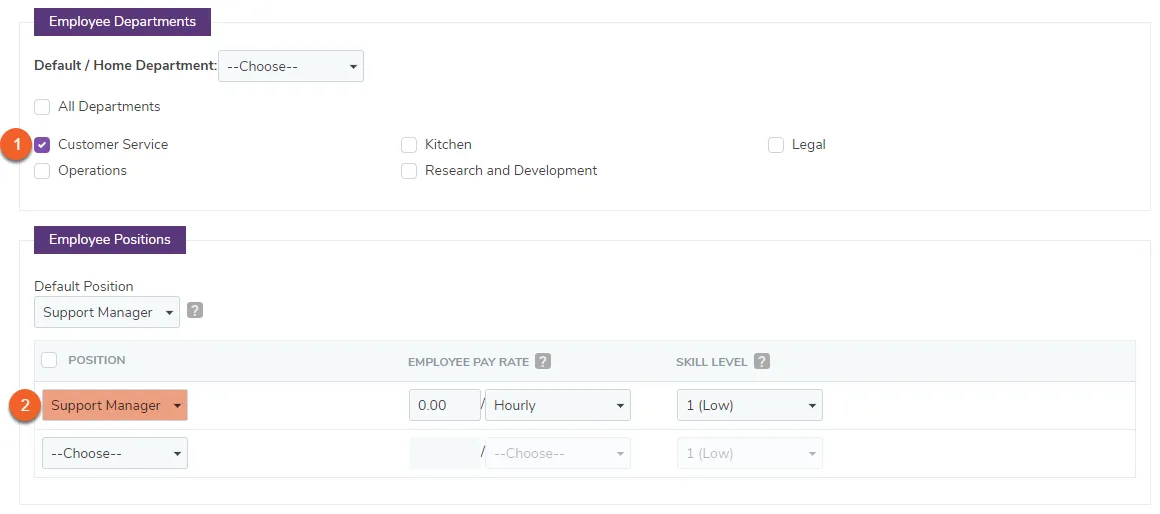
This is where you assign the employee to one or more Departments (if the business has Departments enabled in TimeForge), including a Default/Home Department.
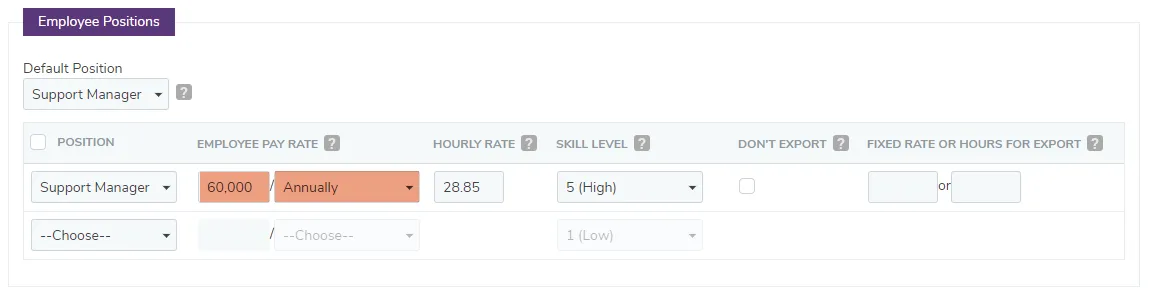
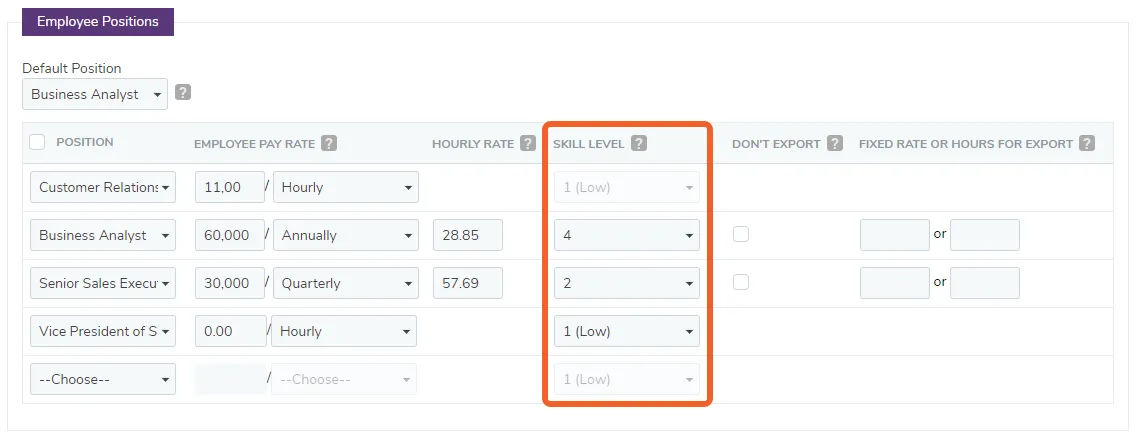
This is the area that allows you to designate an employee’s Position(s). You can also include custom pay rates for an employee and designate skill levels.
Here is where you can specify how an employee can log in to TimeForge. You can either assign a username and password, or select email. If you choose email, an employee will use that address to log in, and they will receive an email informing them how to create a password.
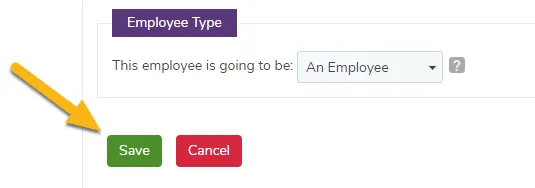
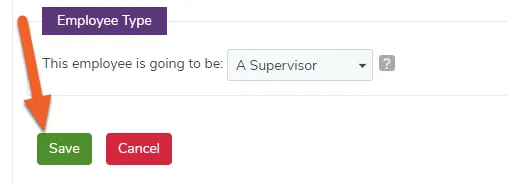
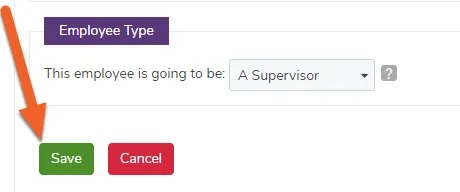
This is where you tell TimeForge what type of staff member this is, whether an employee, a supervisor or a manager.
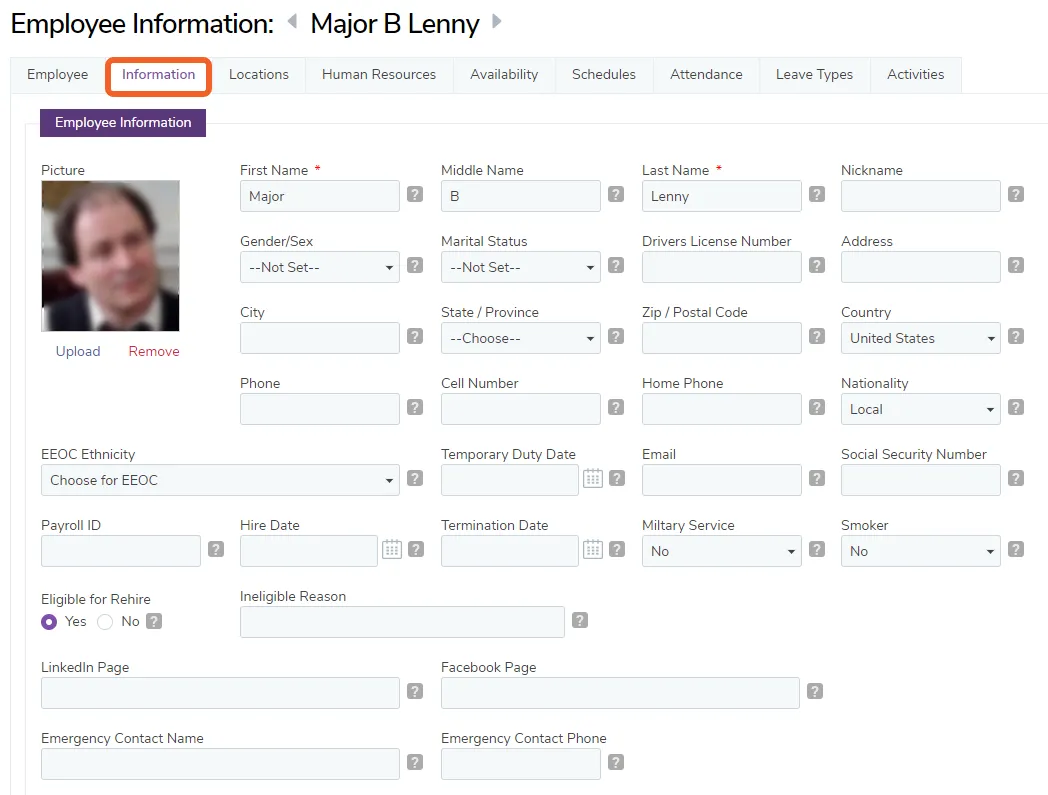
The next tab is the Information tab. This is where you can insert information that was traditionally kept in filing cabinets, saving you time and trouble from having to organize and keep track of a bunch of papers. You can even upload a picture of your employee to make everything more personable.
The page can also include information on historical pay rate and PTO changes, for reference.
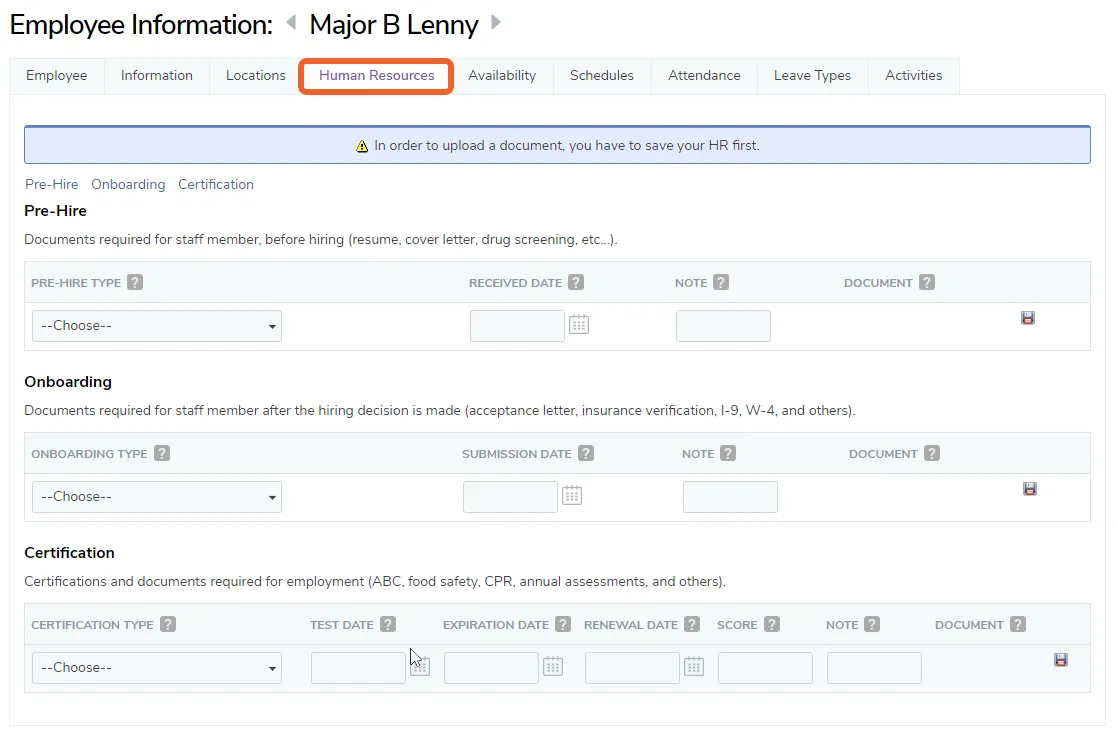
On the Human Resources tab, you can assign onboarding documents and certifications to employees. TimeForge can also store digital copies of those certifications and onboarding documents to help get rid of office clutter and keep everything in one safe, convenient platform.
Similar to the schedule tab, you can select a date range, and TimeForge will display every attendance entry for that employee during that range. You can also click “Edit” next to a certain entry to edit the attendance.
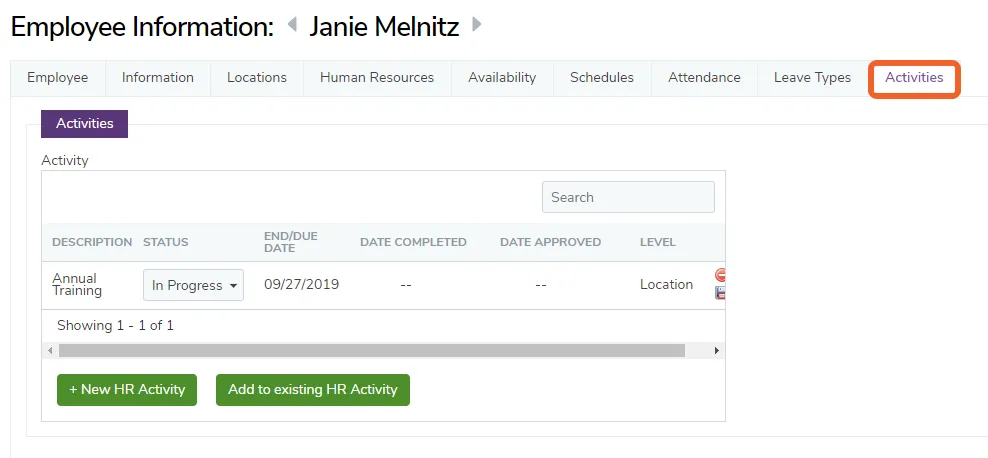
The Activities tab will show you any HR Activities assigned to the employee and their progress/status.
View an employee's information
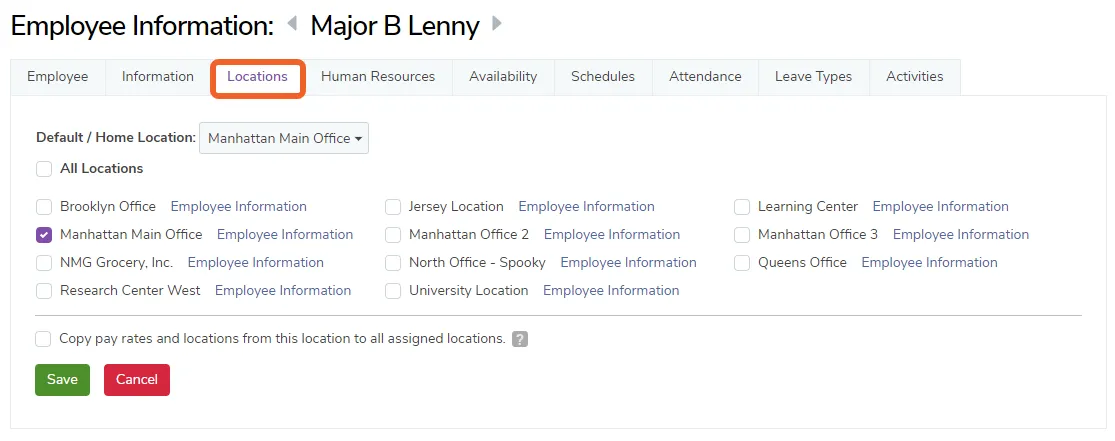
The Employees area of TimeForge houses important information about your employees, including basic info (name, address, date of birth, etc.), what departments they’re in, their job positions, login information, and security level. Additional tabs allow access to historical pay rate/wage changes, PTO changes, notes, what locations they work at, human resources documents, their availability, schedules, attendance, and more.
Employee profiles can be viewed at both the Corporate and Location levels, but the availability of certain information may differ between these levels or may be limited by security settings.
The steps below will show you how to view an employee’s details using either method.
Scroll down the page to view additional details, such as departments and positions. Switch tabs to view other areas of the employee’s account, such as HR documents attached to their record, their schedule information, and attendance.
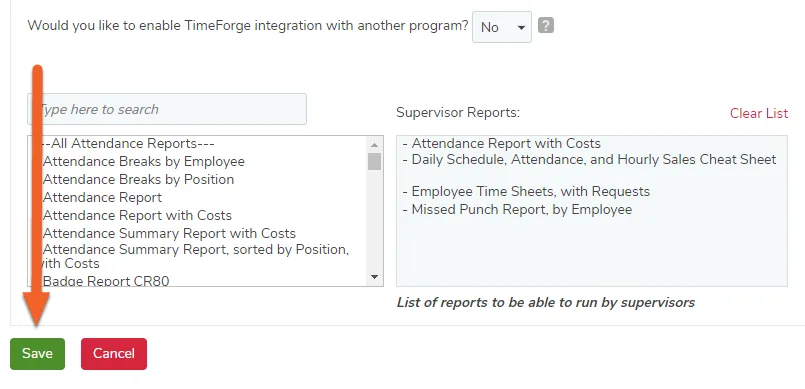
You can also make changes to the employee from some of these screens; just remember to scroll down and hit the Save button to save your changes!
Add, edit, or remove an employee
Adding, editing, and removing employees from within TimeForge is very easy to do. Employee accounts need to be created for any staff member who will be scheduling employees or who will be placed on the schedule themselves. Additionally, any staff member who will be running reports, clocking in, or receiving messages needs to have an employee account.
Employees are automatically synchronized from some Point of Sale systems that are set up to integrate with TimeForge.
Navigate to the Employees page under the Employees tab
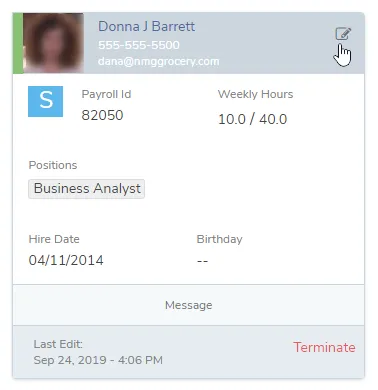
To add a new Employee, click the Add Employee button near the top of the page. You’ll also notice links to Edit or Terminate individual employees already in the system.
When you create a new employee, you will immediately be able to begin entering their information, also known as their “Employee profile.”
Each employee has a number of settings that can be configured or changed by managers and supervisors inside of TimeForge. These settings control the hours and shifts that an employee can work, the staff member’s availability, and what positions the employee can perform.
To return to this form at any time, simply edit the employee from the employee list.
Other employee settings include pay rates (which are not required), skill levels (for ranking how talented a staff member may be), and employee login information, including the employee’s email address.
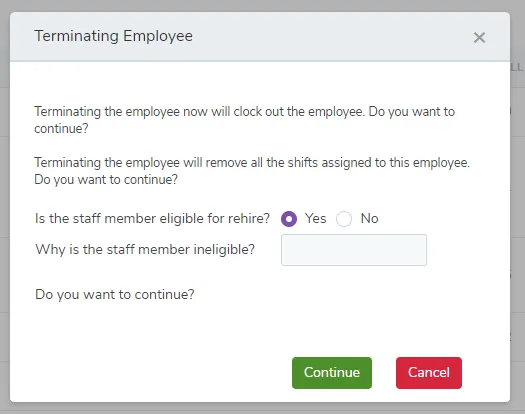
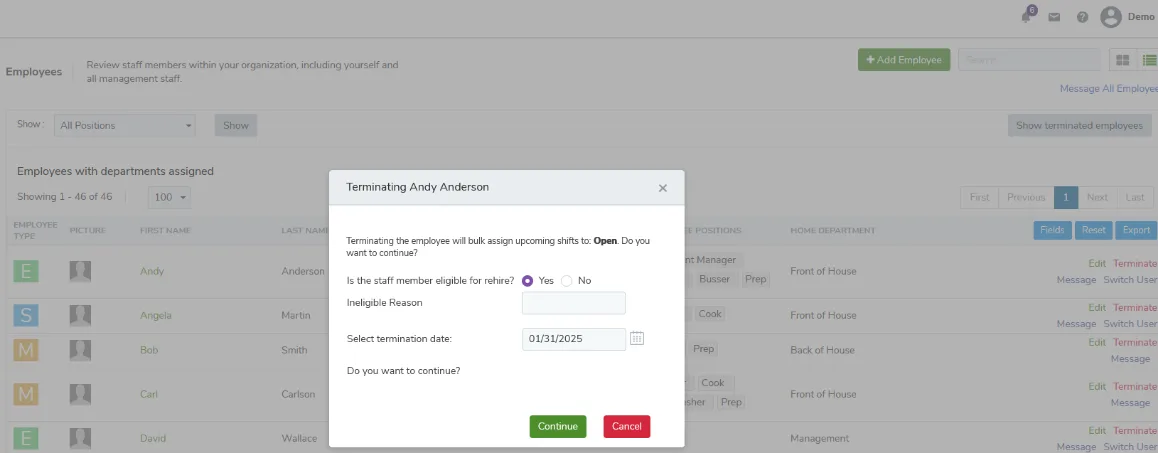
If you need to remove an employee from the system, click their Terminate link in the employee list. You’ll receive a pop-up asking you whether the employee is eligible for rehire and, if not, why. Make your selections, then select Continue to complete the termination process.
Once complete, you’ll be returned to the Employee List and the following confirmation message will be printed across the window:
“Employee has been terminated, and will no longer appear on your list of employees beginning tomorrow.”
Terminate an employee
In addition to the simple ways you can do things like create an employee profile and track attendance, TimeForge makes common HR tasks, such as hiring and terminating staff, a simple one-click process. The process involved to terminate an employee is very easy, and it is similar to how you would edit an employee’s schedule. There are two ways to terminate an employee. By clicking the “Terminate” link or through the “Edit” link on the “Employees” page. The “Terminate” link will immediately terminate the employee. The “Edit” link provides you the option of setting a terminate date.
Here is how you can easily terminate staff as necessary at your business.
Open the Employees tab and select Employees from the dropdown menu
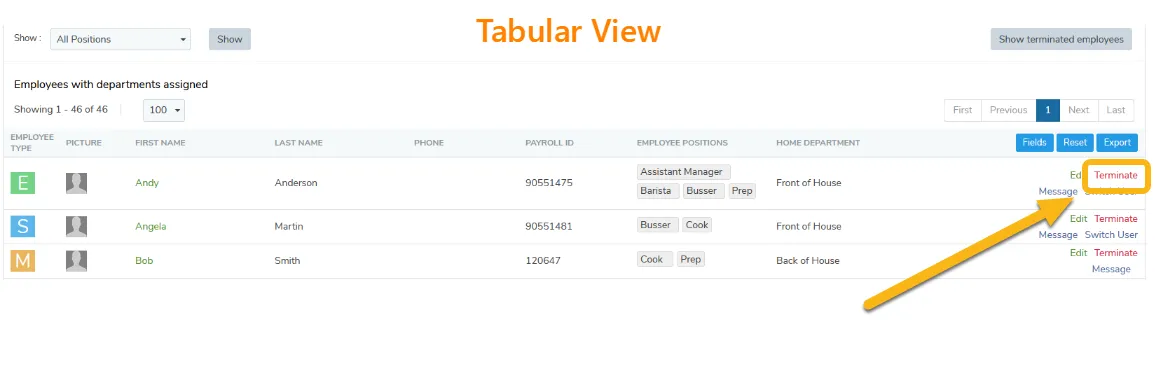
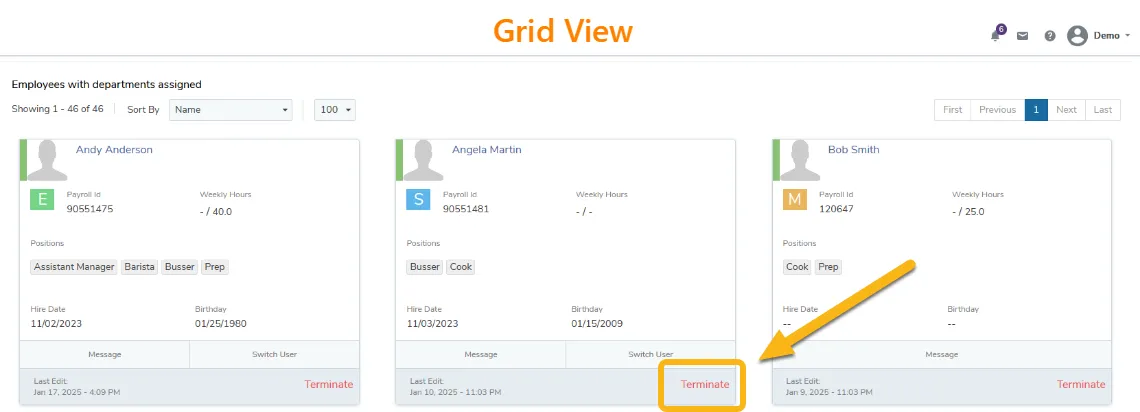
To terminate an employee, locate their profile in the Employees page and click the Terminate button next their profile. The screenshots below slows where the Terminate button appears when using the grid or tabular view of the Employees page.
After you select to terminate the employee, TimeForge requires you to review the fields shown below before finalizing the termination.
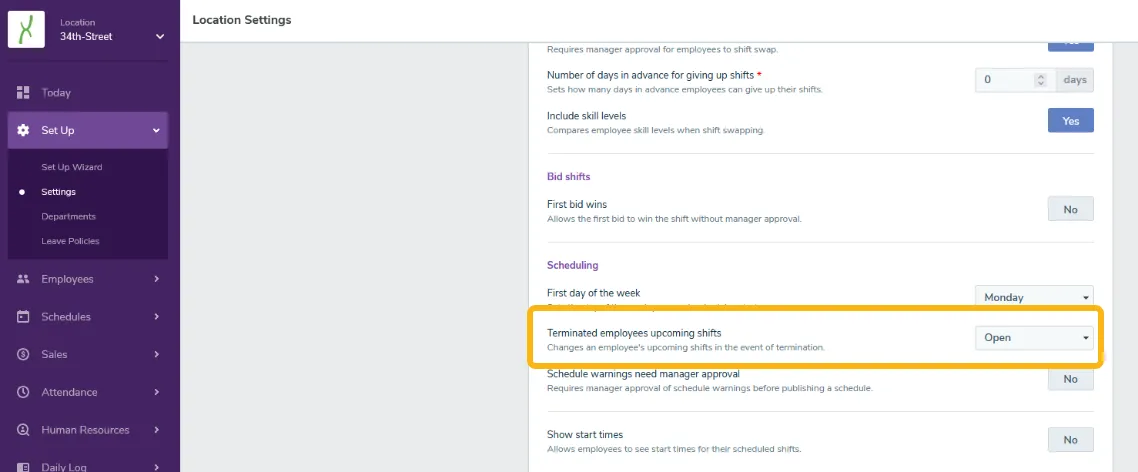
If the employee has any upcoming shifts, TimeForge displays a warning notifying you the system will delete or update upcoming shifts to either open, bid or autoschedule shifts *
If the staff member is eligible for rehire.
TimeForge does not require input in the “Ineligible Reason” field, but leaving a note can help you better document an employee’s termination.
You can set the termination date in the past or future depending on when the employee’s last day worked occurs.
Once you’ve reviewed all of the termination fields, click the Continue button to finalize terminating the employee. Note, the Employees page displays a terminated employee in the active list until their termination date is set in the past. If you assign the current date as the employee’s termination date, the employee’s name will appear in the active list until the next day.
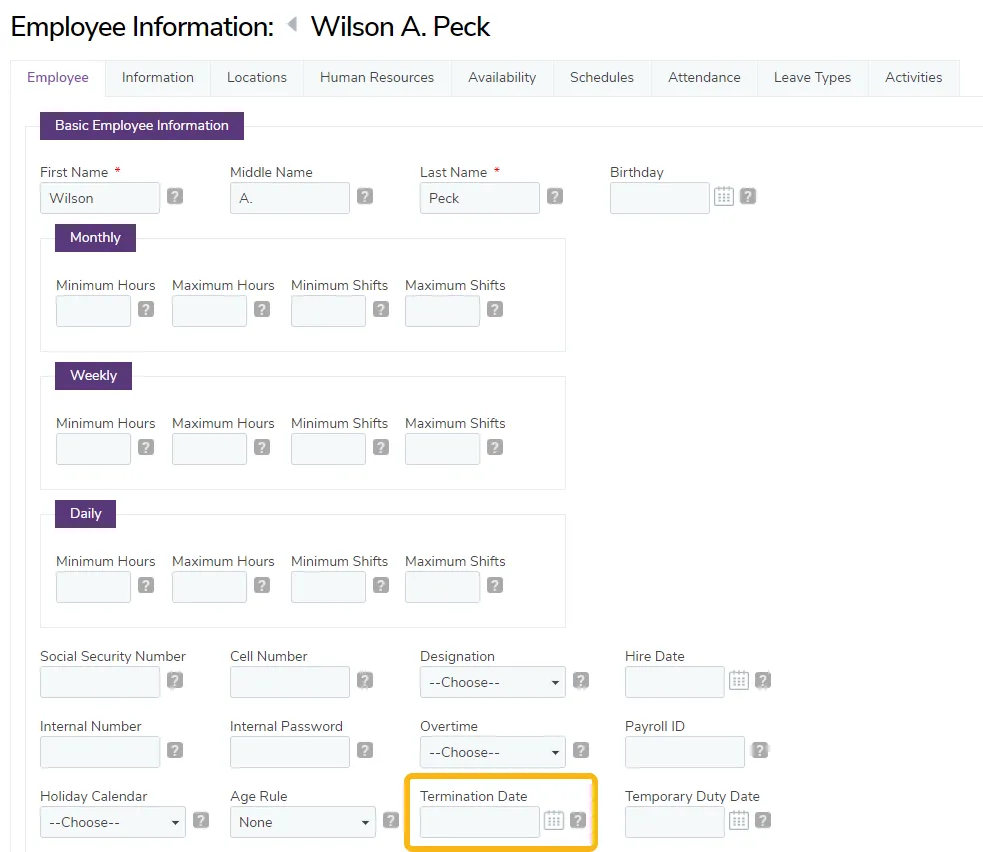
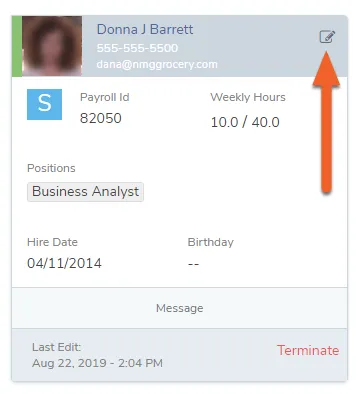
You can also terminate an employee from their profile. To access their profile, click the Edit link on the row (if in List view) or simply click the employee’s card (if in Grid view, shown here).
Look for the field titled Termination Date. Enter the date on which you wish the staff member’s employment to end.
Don’t forget to click Save at the bottom of their profile when you’re finished!
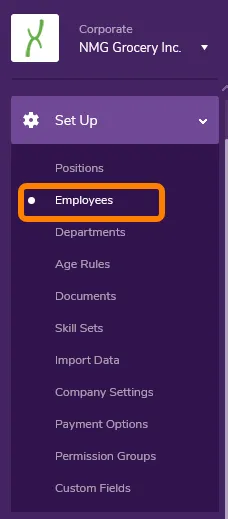
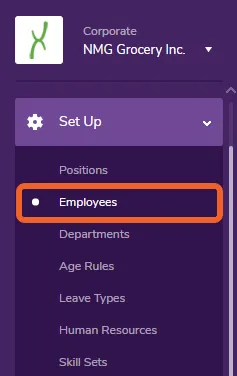
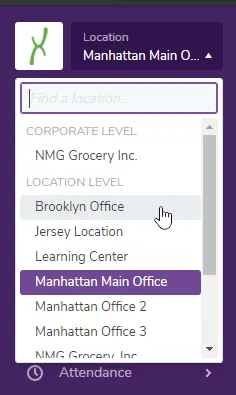
From the Corporate level, you can assign a termination date at multiple locations to an employee profile. This saves you time as you don’t have to switch into each location you want to assign a termination date. To do this, navigate to the Setup tab and select Employees.
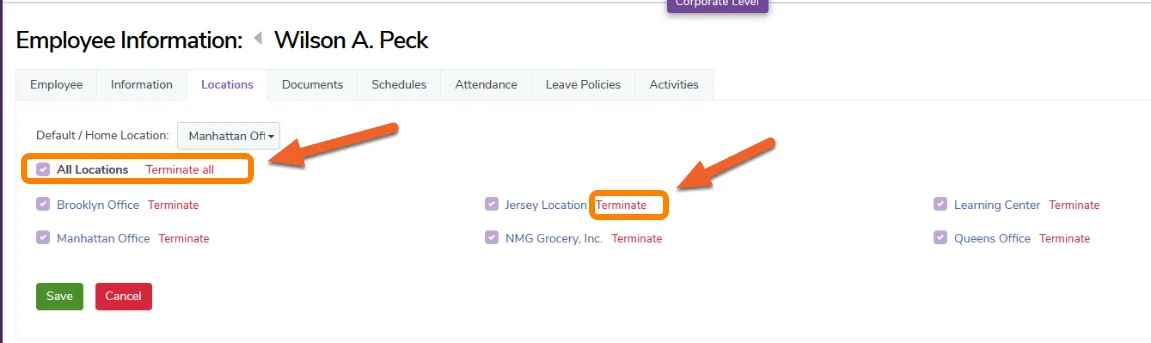
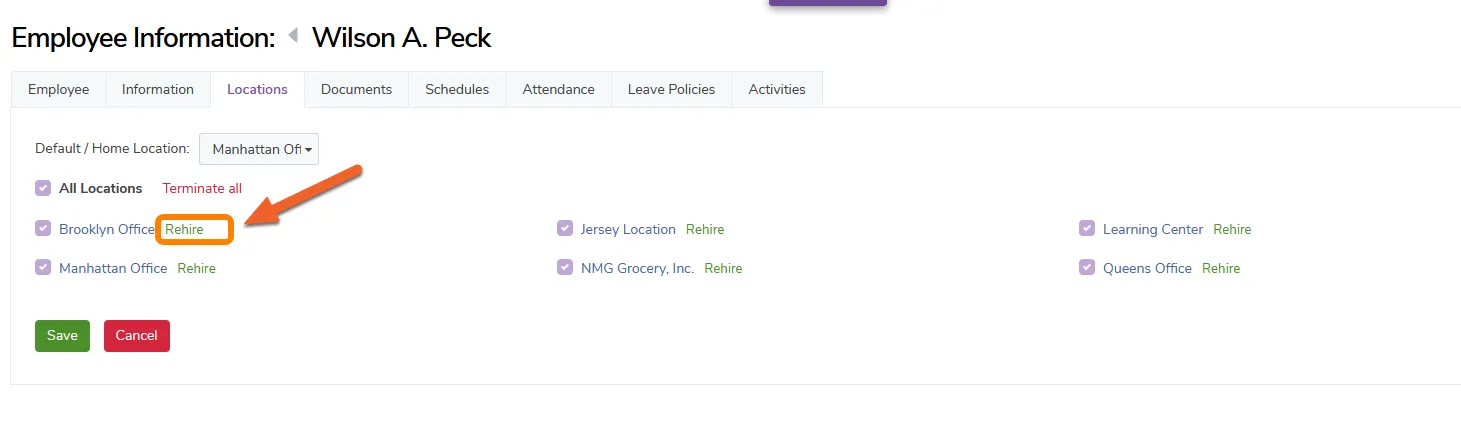
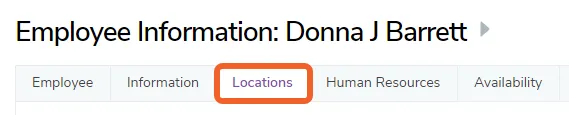
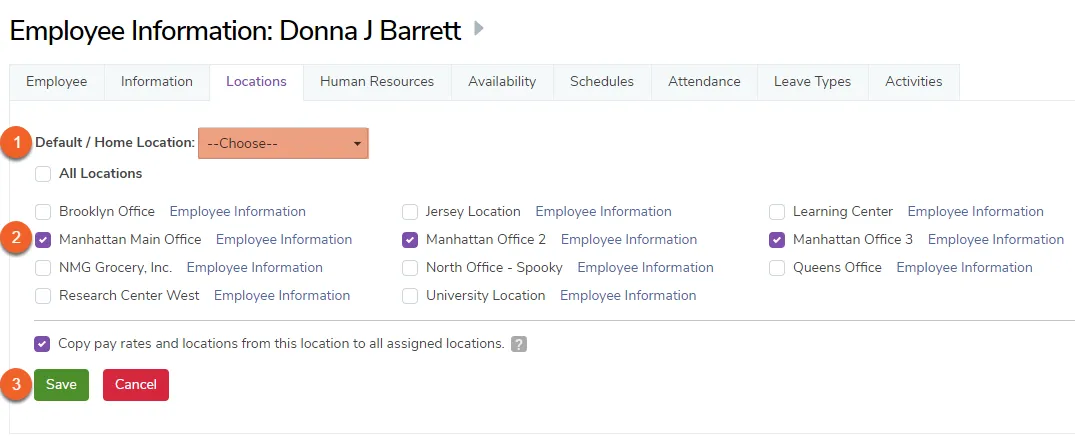
After you click on the profile you want to update, click the Locations button. If you want to terminate the employee across all locations, you can click on the Terminate All option. Clicking the Terminate option next a location’s name terminates the employee from that specific location.
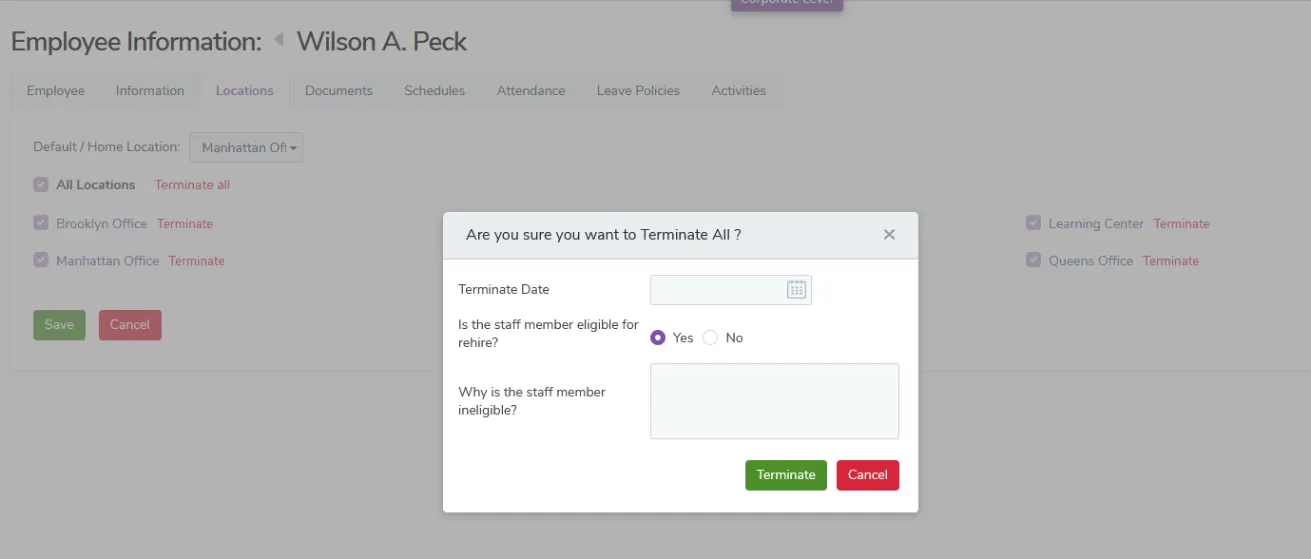
The prompt below appears when you select Terminate All or Terminate. You must complete the prompt to finalize your changes.
To rehire an employee, all you have to do is remove the termination date.
If you have multiple locations, you can navigate to the corporate level and click the Rehire option next to the locations where you want to remove the termination date.
Set a user as an Administrative User
In TimeForge, Admin users are those users who aren’t scheduled and don’t clock in our out. Typically, business owners, HR staff, and accountants fall into this category. The key thing to remember about Admin users is that they don’t appear on the employee list at the location level. You must go to the corporate level to view admin users. Here’s how to assign someone the “Admin User” role.
From the Corporate level, navigate to the Employees page
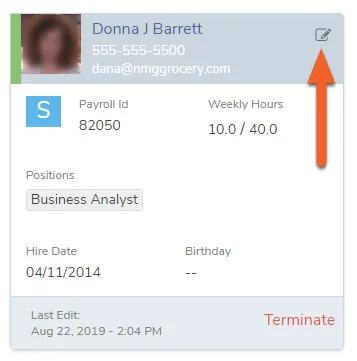
You’ll want to open up the employee’s profile in order to assign them the Admin User role. To do that, click on their card (shown), or click the Edit button the row with their name.
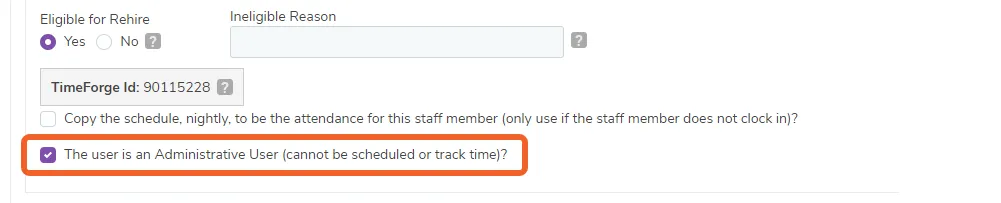
At the bottom of the Basic Employee Information section, there is a check box that reads “The user is an Administrative User (cannot be scheduled or track time)?”. If this box is checked, the user will be considered an Admin user.
If you make any changes to the employee’s information, including checking or unchecking the Admin User box, you’ll want to make sure you scroll down to the bottom of the page and hit the Save button to save your changes.
Approve or deny employee availability requests
TimeForge managers and supervisors can easily approve or deny availability requests in bulk. All TimeForge users have the ability to request time off, or change their availability. These types of requests (which can affect the hours worked, PTO, or the schedule) must first be approved or denied, by a manager or supervisor at your location.
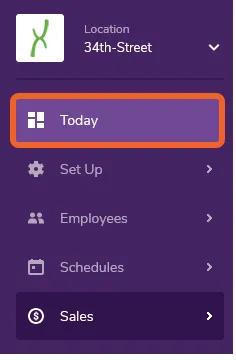
This guide will show you how to view the presence of pending requests on the TimeForge “Today” page, and then how to approve or deny those requests.
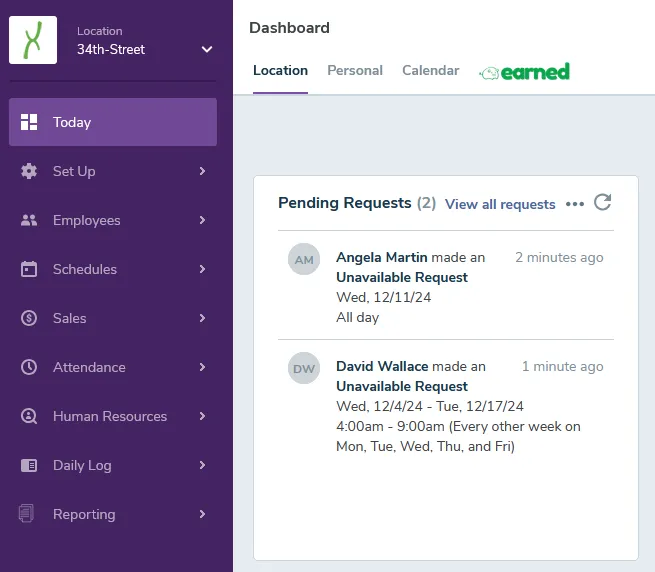
On the TimeForge Today page, managers can view their labor dashboard widgets - a screen that details the upcoming week and many key items to track. This includes shift swaps, open shifts, staff requests for time off, and messages, as well as scheduled labor, and employees that are currently on the clock.
After an employee submits a request, you an entry for their request populates in the Pending Requests widget.
Clicking on the “View all requests” link or clicking on one of the pending requests listed.
After clicking the appropriate link to view pending requests, you will be taken to a “Process Requests” page where you will see color-coded requests. Here, you can approve or deny each request.
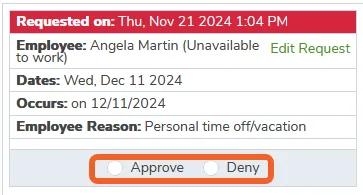
You can view the type of request and any notes about it. If other employees have had time off for the same time period approved previously, TimeForge will show these staff members and their requests. Choose “Approve” or “Deny” as you see fit.
Additionally, you will find that TimeForge has predicted your necessary staffing levels, and will let you know if you are facing a staffing shortage before you approve the time off requests.
What happens if the employee requesting time off is already scheduled to work during that time?
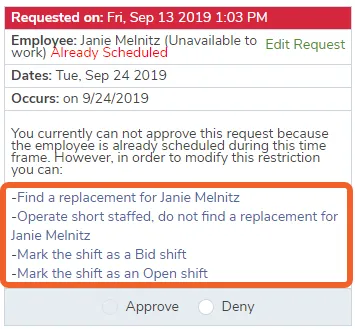
If employees request time off after they have already been scheduled, TimeForge will provide you with several options:
You can Deny the request, which will notify the staff member that they cannot have the time off.
You can find a replacement, which will approve the request, and take you to the schedule to find a new employee for the shift.
You can operate short staffed, which will remove the shift from the schedule.
You can turn the shift into a bid shift, allowing staff members to bid to work the shift.
You can mark the shift as an open shift, leaving it open to be staffed by management at a later date.
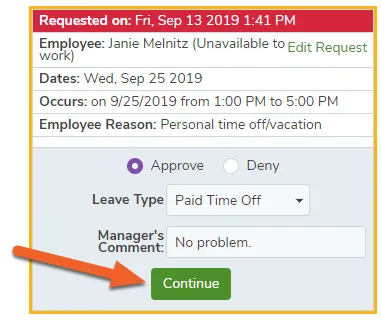
Enter a comment (optional), then click Continue to finalize your decision to approve or deny the request.
Once you click the continue button, TimeForge will automatically send a message to the staff member, letting them know of your decision.
Apply overtime to an employee
No matter how carefully you create an employee schedule and watch your labor costs, often times something comes up and your employees will accrue overtime (OT) hours. You can set the rate at which employees accrue overtime (like 1.5x, 2.0x the normal rate etc.) as well as when the overtime hours begin to accrue. There are two ways to change these settings:
Universal OT settings, which affect every employee and every position,
Or from the information page for each employee, which can override the universal settings (this is useful if you pay a few employees different overtime hours than others).
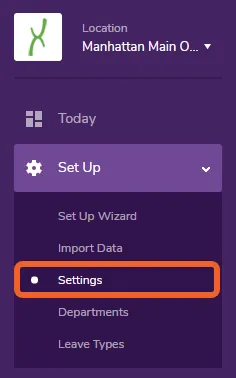
Here are the easy steps involved with both methods of applying overtime hours, beginning with the universal setting.
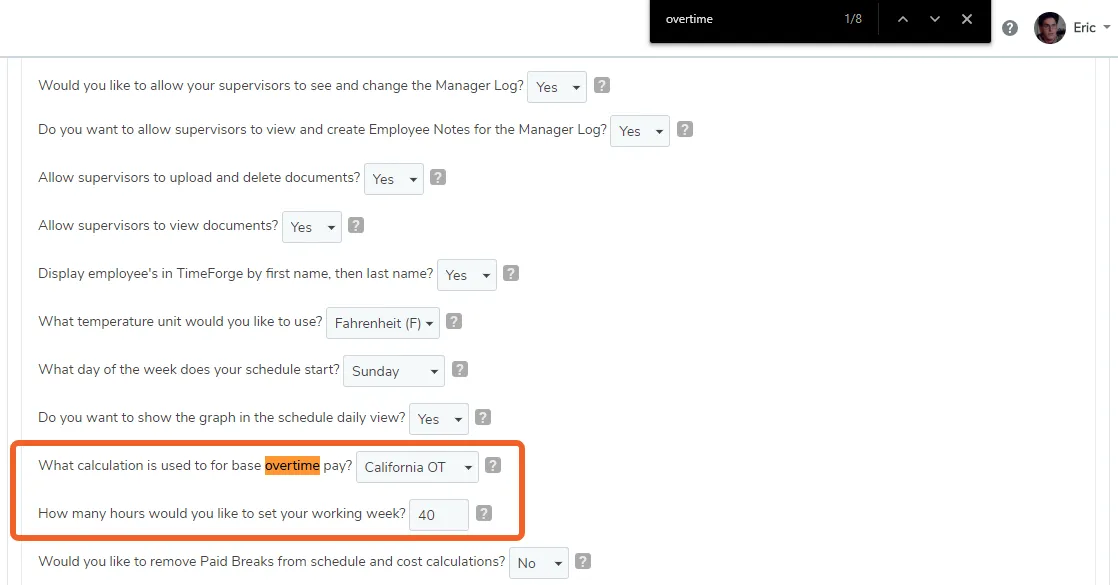
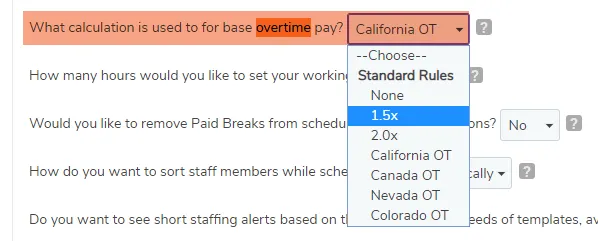
Scroll down and find the overtime options, which are near the end of the page. Alternatively, you can click CTRL-F and do a quick-find for the word “overtime”.
Choose the calculation type you want to use as a base for overtime pay. You can choose from none (default), 1.5x or 2.0x the employee’s normal rate, or state OT rules depending on the needs of your business.
Choose how many hours the employee needs to work before they can begin accruing overtime.
Locate the employee to whom you would like to apply overtime. Either click the card to edit (if in Grid view, shown) or select the Edit button on their row (if in List view).
Click the +Add Employee button to add a new salaried employee (shown below), or click a card (Grid view) or Edit link (List view) to edit an existing employee.
Select the appropriate position(s) for the salaried employee. If your business uses Departments in TimeForge, you may first need to select an applicable Department before you can choose a Position.
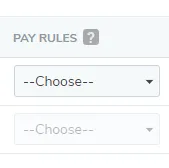
If your TimeForge configuration supports it, you may also select an established account type if you wish to group the cost of the position’s attendance. You may also need to select the established pay rules you would like to apply to the employee’s position.
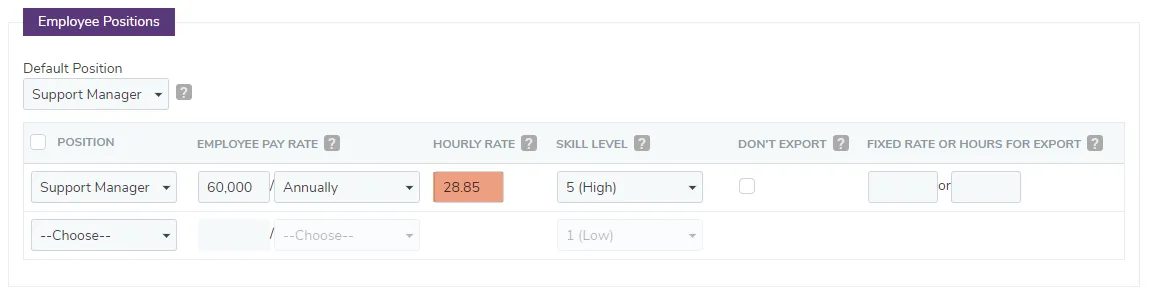
Check the Recalculate Cost box if you would like the employee’s calculated hourly rate to be recalculated according to their weekly rate, regardless of the number of hours worked.
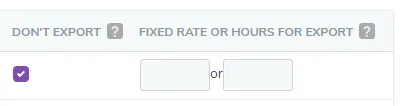
Decide whether you would like to export this employee’s salary information or not
Check the Don’t Export box if you do not want this employee’s salaried position information to be exported with the rest of payroll. Or, input a fixed pay rate or fixed number of hours to be exported for this employee’s position each pay period.
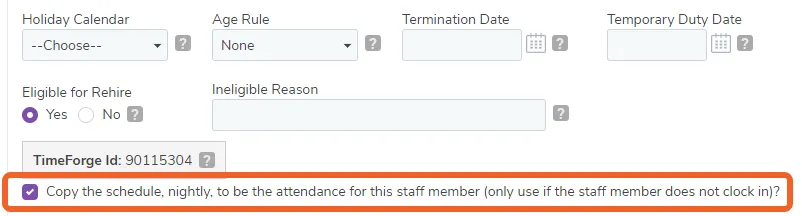
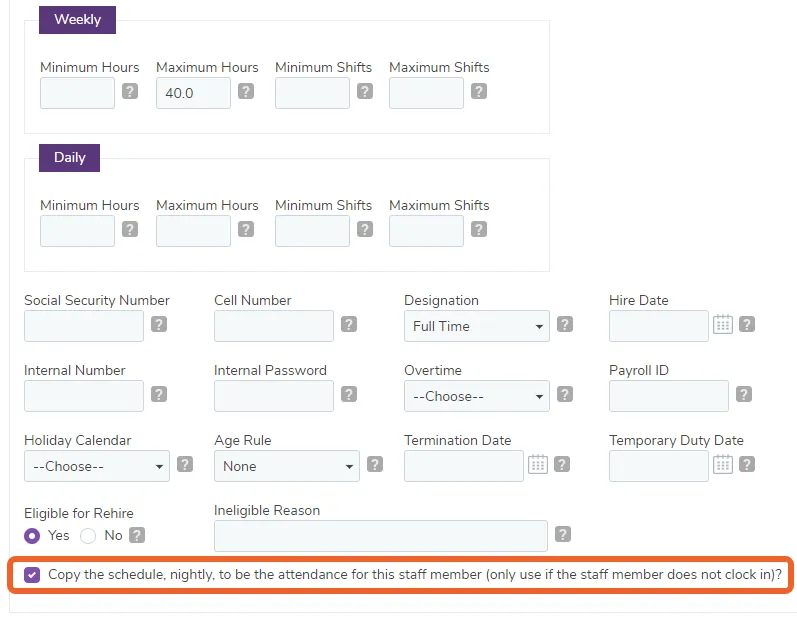
At the bottom of the Basic Employee Information sections (a little further up the page), is an option to copy the employee’s schedule directly into the attendance. This option is useful for employees that do not clock in. You can schedule them for a reasonable number of hours and have that schedule automatically copied into their attendance, which can be adjusted as needed.
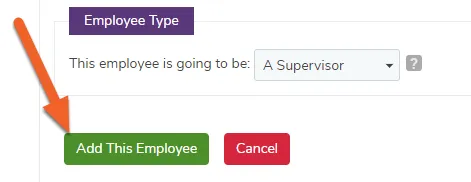
Scroll down and click Add This Employee if you are adding a new employee, or Save if you are editing an existing employee.
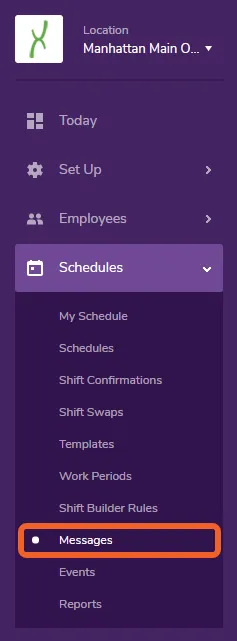
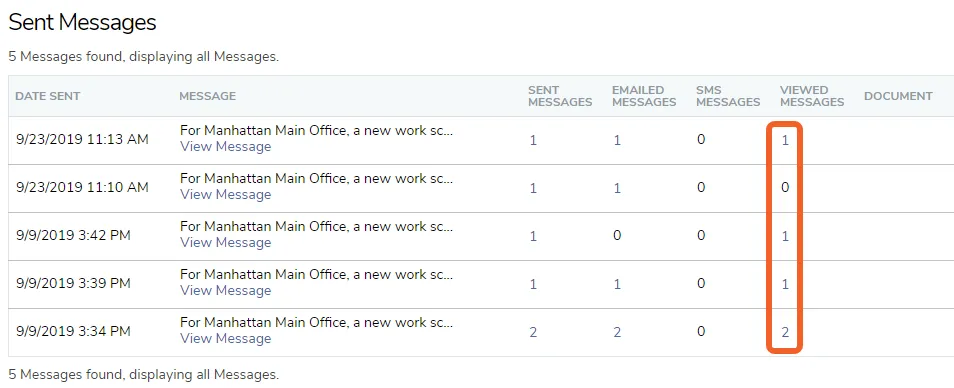
View your sent messages and see which employees have read them
TimeForge offers a built-in messaging service to provide a quick and convenient way for employees and managers to communicate. Additionally, TimeForge Messaging offers a written record of any correspondence. To see if your message has been read, and by whom, follow the steps below.
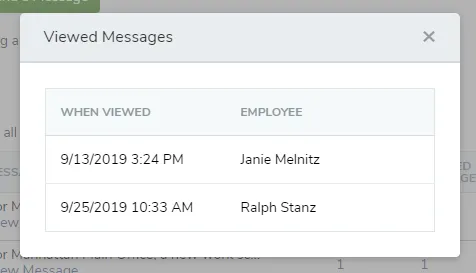
An information box will appear with the names of the employees who have read the message as well as a date and time for when it was viewed.
Assign an Internal Number and Internal Password to an employee
Internal Numbers and Internal Passwords can be used in a few different areas of TimeForge to allow users to clock in and out of the system. This can be useful in situations where an employee has difficulty clocking in on a Biometric TimeClock due to callused fingertips, for example.
Assigning an internal number and internal password for employees is simple and only takes a couple of clicks. This can be done from the employee’s profile.
Toward the bottom of the Basic Employee Information section, locate the “Internal Number” and “Internal Password” boxes. Enter a number (at least 4 digits) that is easy for your employee to remember.
You can use the same combination for both the number and the password, but for better security, we typically advise use two different combinations.
Click Save at the bottom of the page once you’ve finished.
Rank employees and restrict shifts by skill level
Skill levels in TimeForge allow managers and supervisors to rank employees based on their experience at each position. The higher the skill level, the more experienced the staff member. You can even use the skill level to help create an employee schedule.
Employees who work more than one position or job can have multiple skill levels. For example, an employee may be an excellent cashier (with a skill level of 5), but may be a manager in training (with a skill level of 2).
Employees can be ranked by skill levels for each position
Each shift may require employees of different skill levels, which can be set at the template or schedule level.
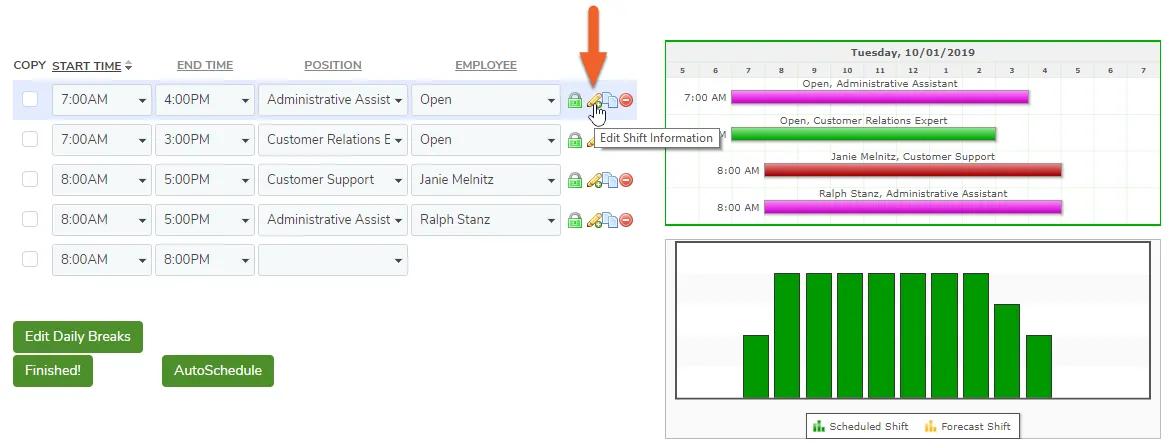
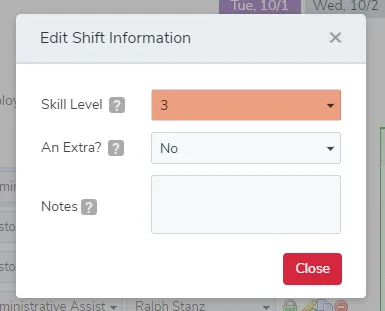
To designate a skill level requirement for a shift, click the pencil icon next to the shift you are creating.
A pop-up will appear, allowing you to edit some information associated with the shift, including required Skill Level.
Set blackout dates to prevent employee time-off requests for those days
Blackout dates can be useful if you have days that you don’t want to allow employees to request time off, like holidays or high-volume business days. You can also use blackout dates to allow a limited number of requests. Here is how to set up blackout dates with TimeForge.
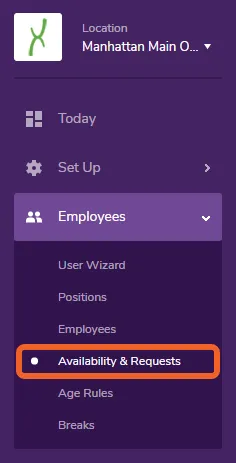
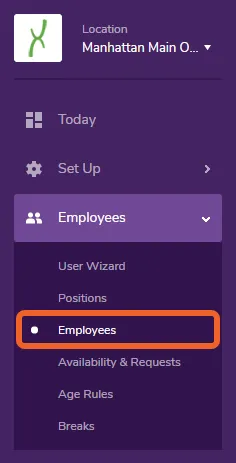
Open the Employees tab and select Availability & Requests
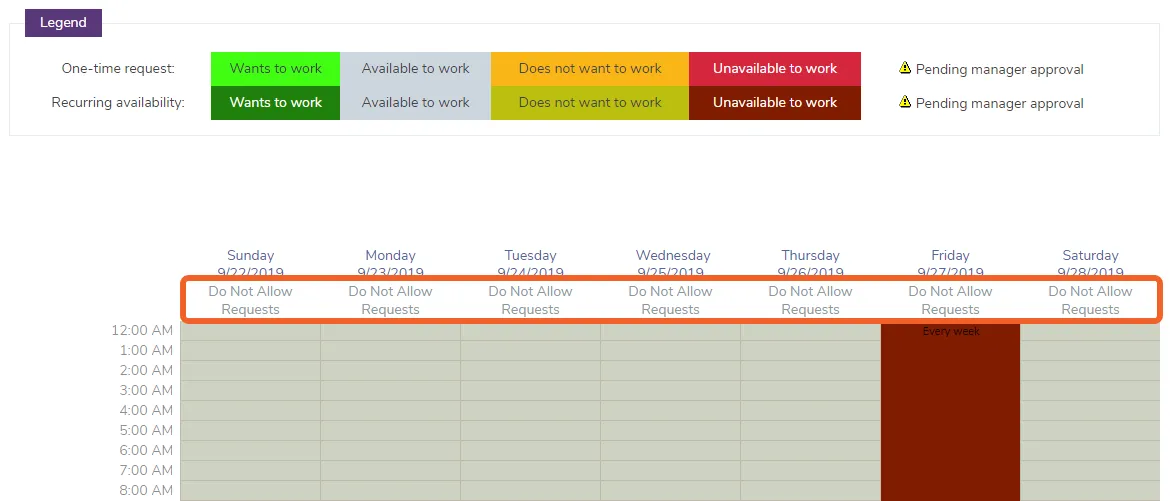
This is the Availability and Requests page. From here, you’ll be able to black out certain time frames or dates so that employees are not allowed to request time off during those dates.
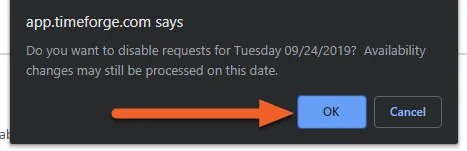
To black out an entire day, click the gray “Do Not Allow Requests” link for that day.
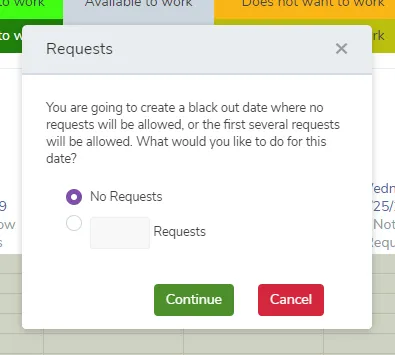
Another box will pop up, asking whether you want to allow any requests at all or if you’d only like to allow a limited number of requests for that day. If you choose No Requests, then your employees will not be able to submit a request at all.
If you choose the second option, only the number of requests you enter in the box will be allowed for that day.
When you’re finished, click Continue to finalize the black out date setup.
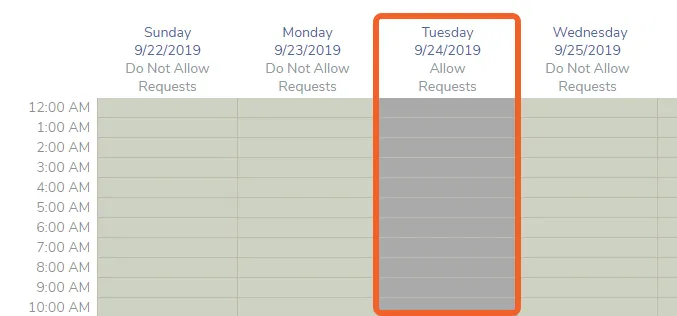
The date will be grayed out in the calendar in a darker shade of gray, indicating that it is a blackout date. Additionally, the link will read “Allow Requests” instead of “Do Not Allow Requests”:
Add an employee to multiple locations
In TimeForge, any employee can work at as many locations as you need them to. This gives you the power and flexibility of having the same employee able to clock in at any of your multiple locations, which is useful when you need to be able to divide your labor (and labor costs) across locations. It is also useful when you have employees that are frequently interchanged between different locations in a store.
Navigate to the Employees page under the Employees tab