TimeForge is a complete labor management tool, and one of the most useful features of TimeForge is the ability to quickly and easily create employee schedules. Once your employees and positions are configured in the software, creating an employee schedule is easy!
In just a few clicks, a complete employee work schedule can be assembled and posted for all staff members to view.
TimeForge allows you to build a labor schedule in different ways - depending on your exact scheduling needs. You could even choose to use the AutoScheduler and have accurate employee schedules created automatically for you. TimeForge includes a Daily View, which includes a bar/gantt chart to easily determine staffing levels, as well as a Weekly View, which resembles Microsoft Excel and allows you to work on an entire week at a time.
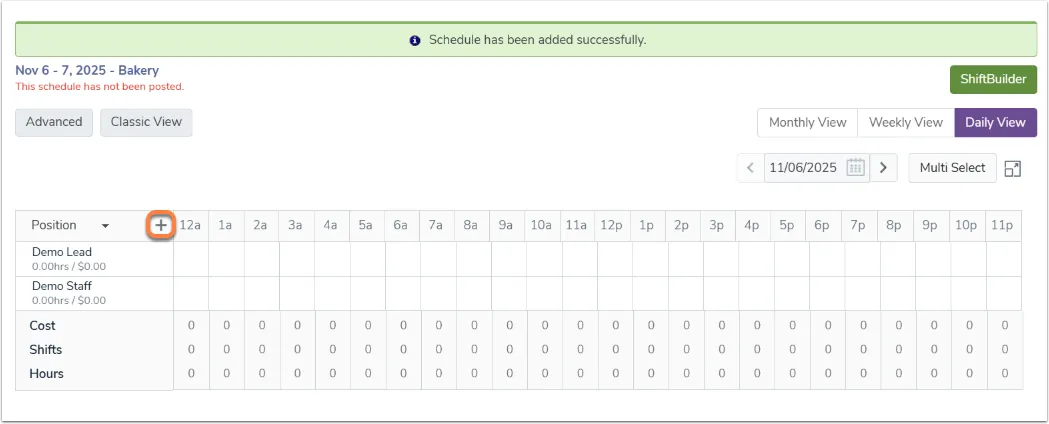
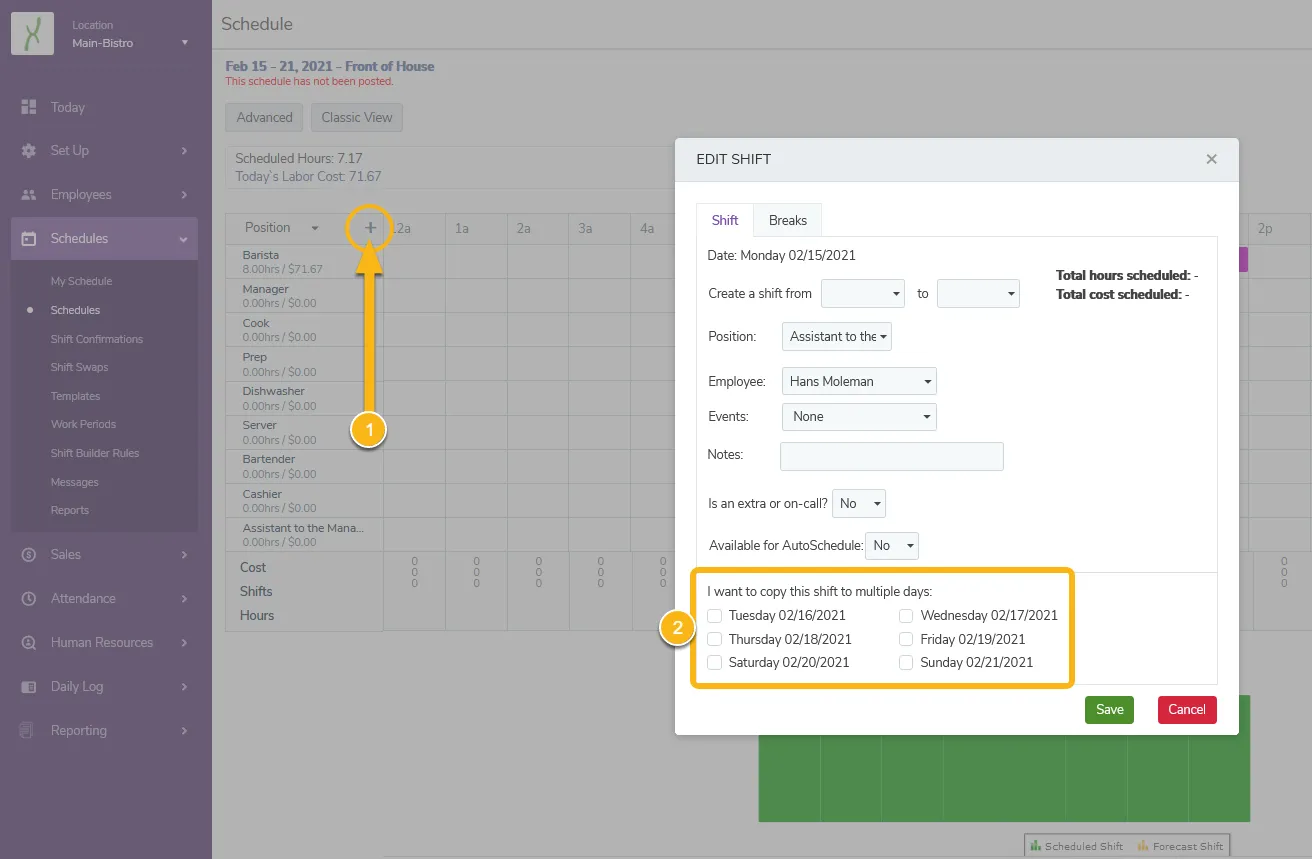
Then you’ll be able to see how the schedule looks if one already exists. If not, click the “+” icon in the Position tab to create a new one.
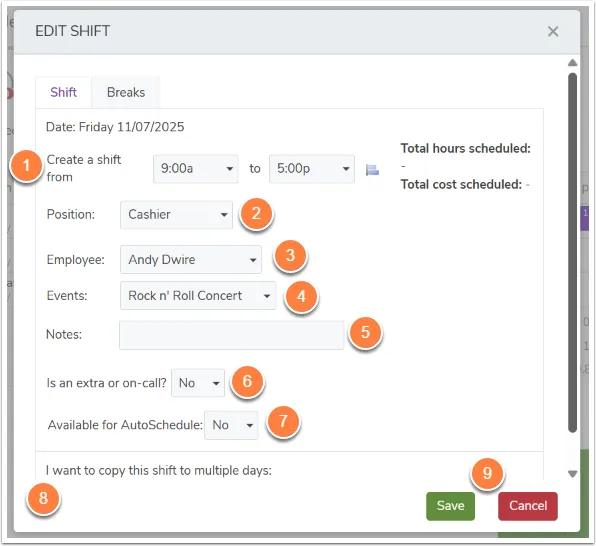
In the Edit Shift window:
Select the start and end time for the shift under Create a shift from – to.
Choose the Position (for example, Cashier).
Select the Employee assigned to the shift.
If applicable, choose an Event from the dropdown.
Add any relevant Notes (optional).
Set whether the shift is extra or on-call by selecting Yes or No.
Choose if the shift should be Available for AutoSchedule.
(Optional) If you want to duplicate this shift on other days, use the Copy this shift to multiple days option.
Click Save to confirm or Cancel to discard.
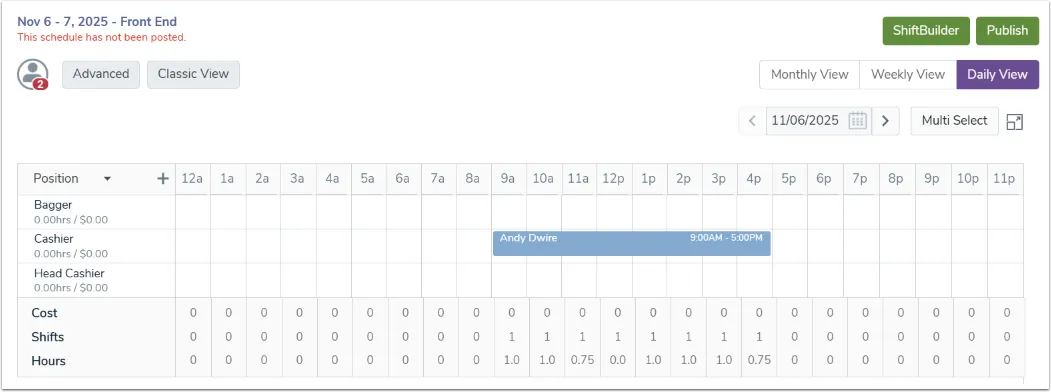
After saving, the new shift will appear in the Daily View under the assigned position. Verify the time and employee details are correct before publishing the schedule.
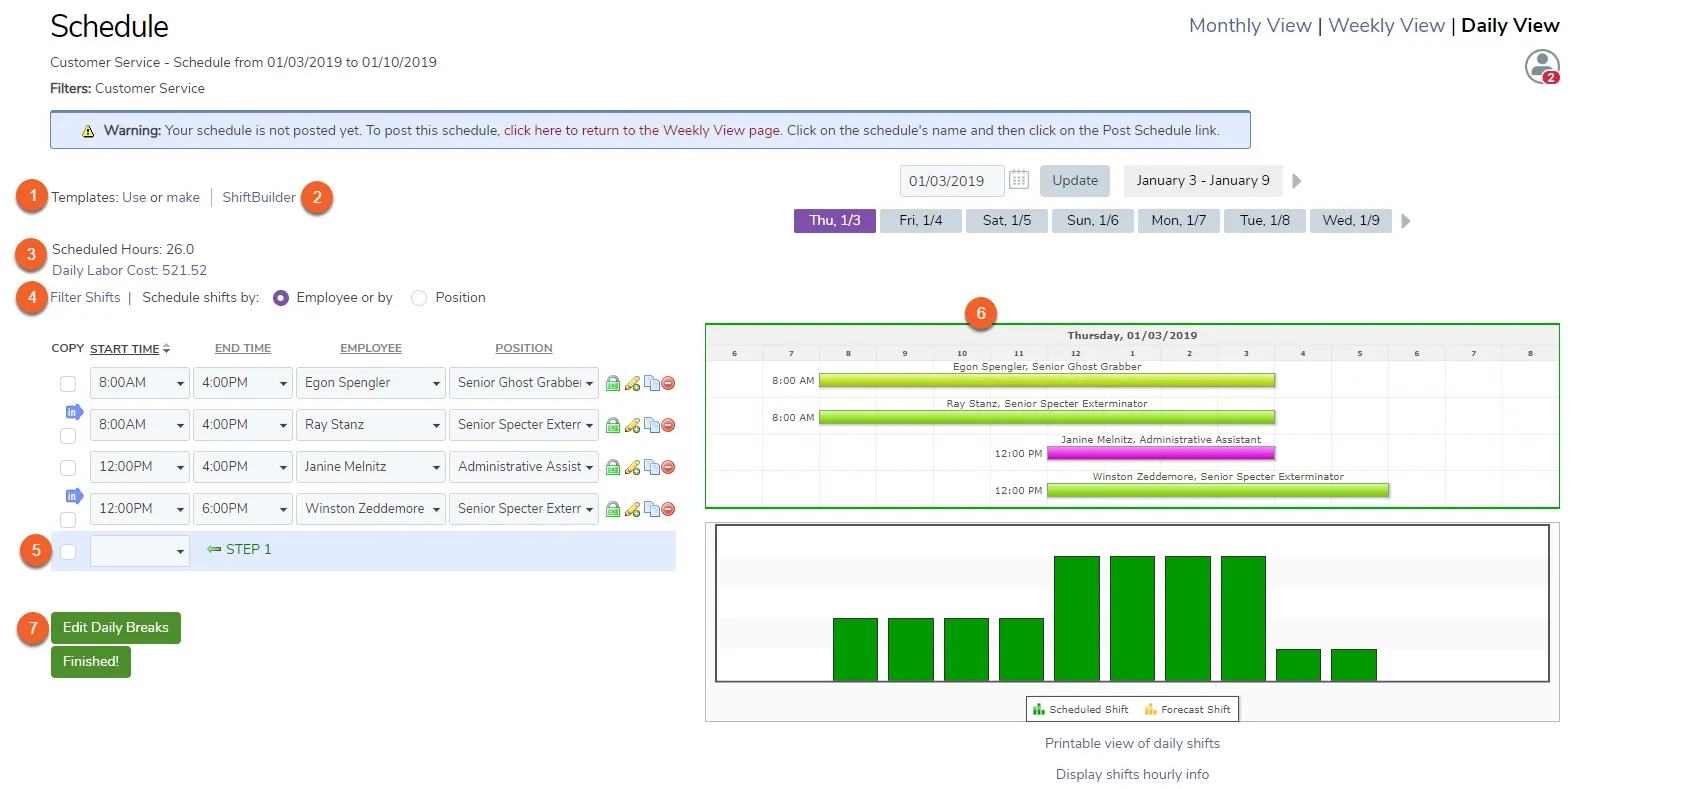
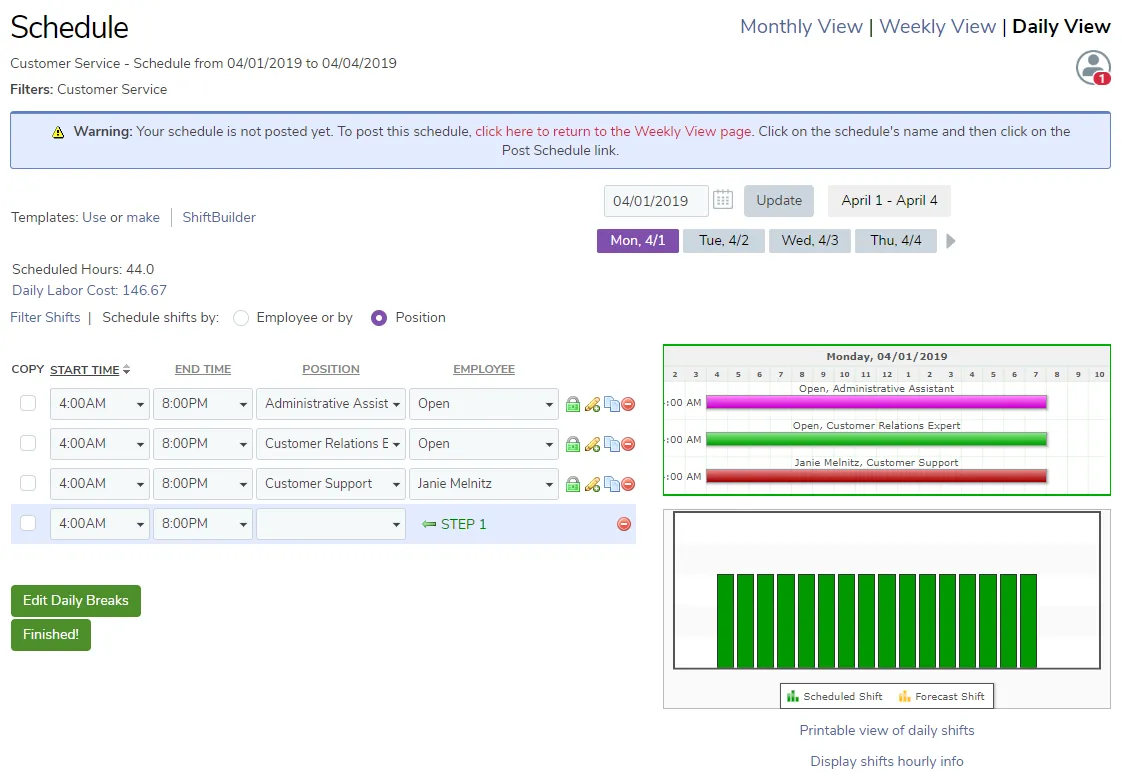
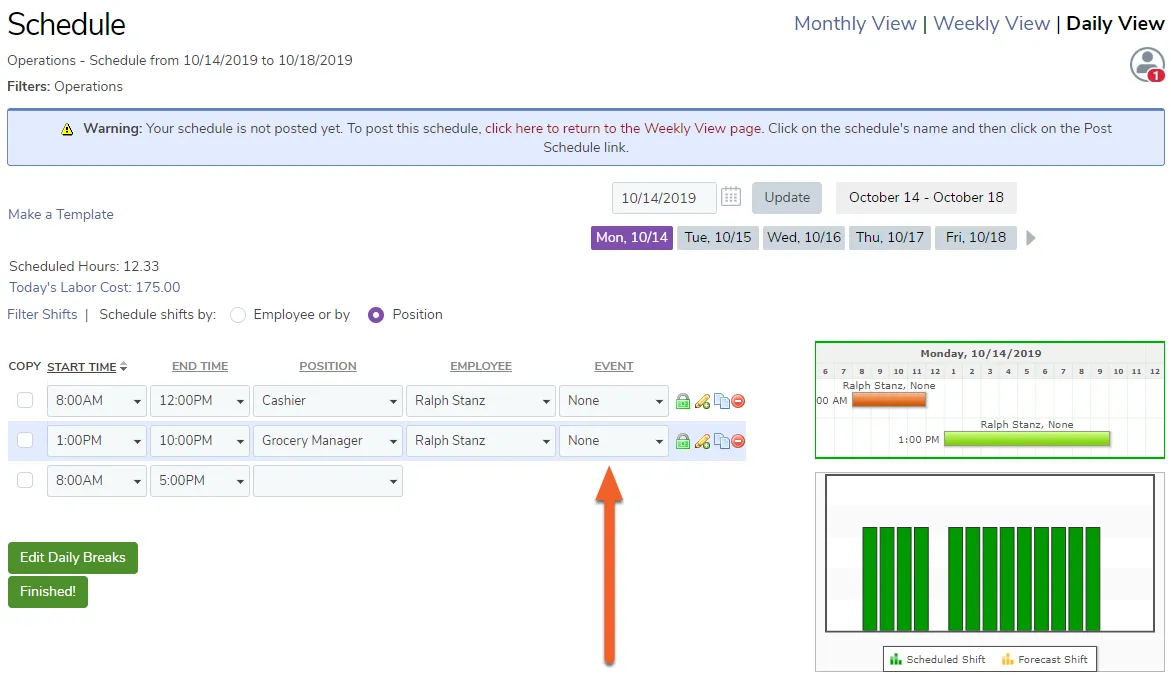
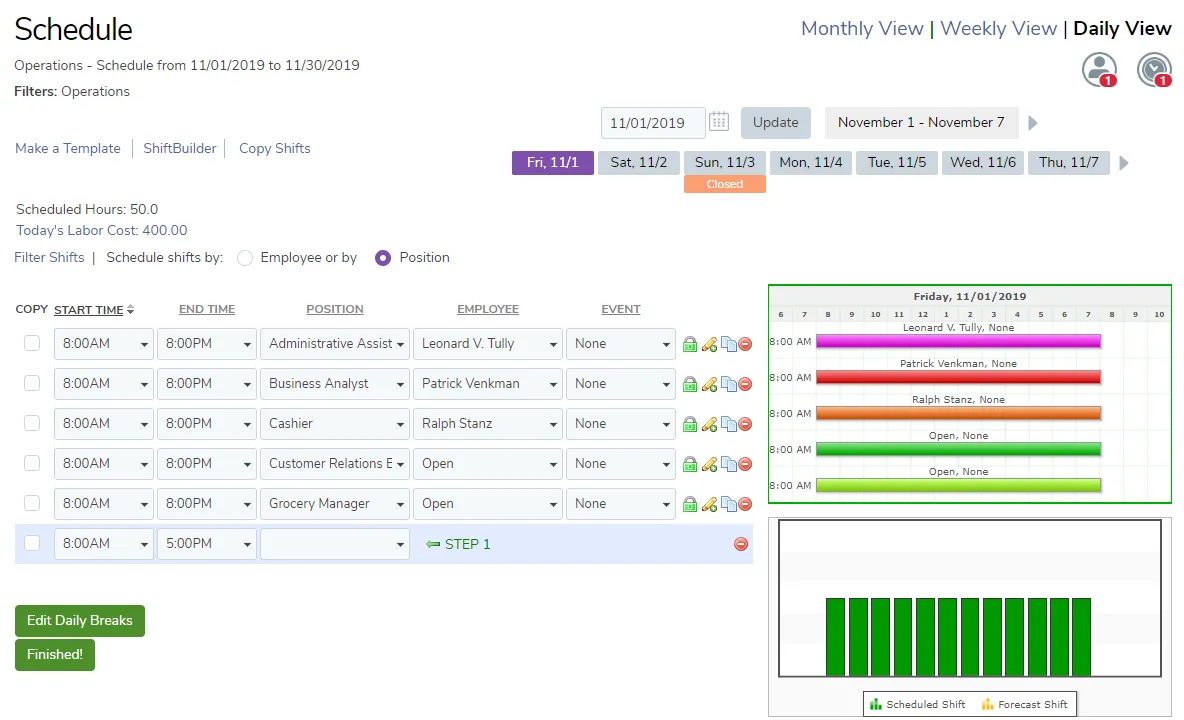
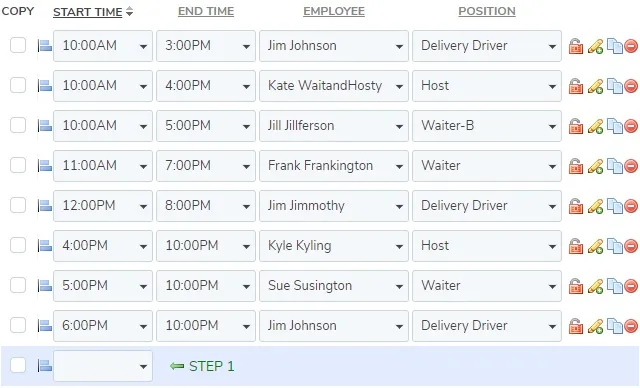
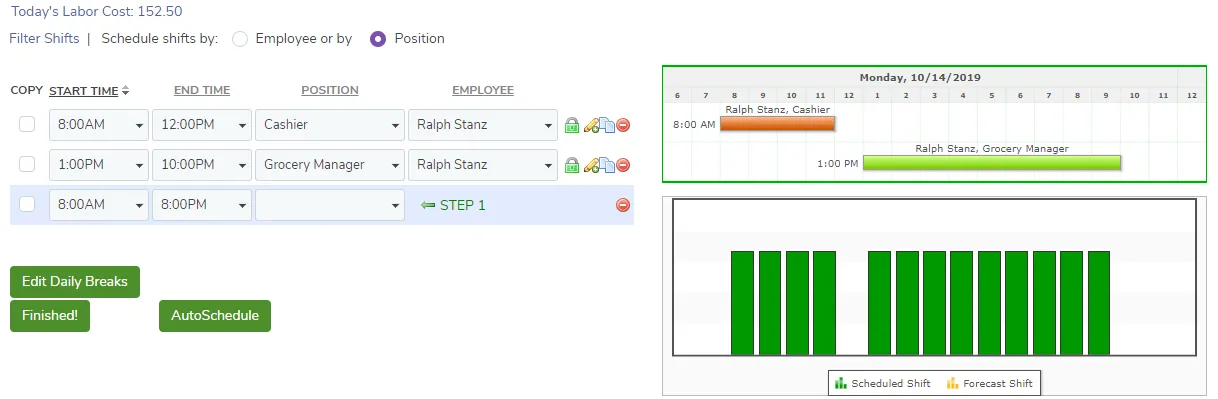
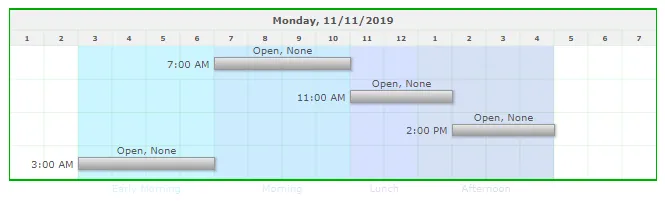
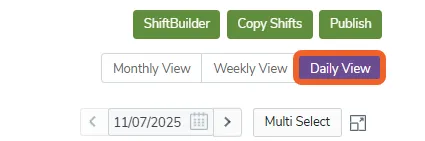
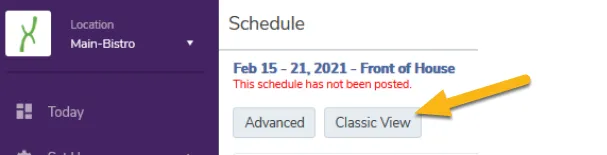
In the Classic View, TimeForge allows you to build employee schedules in different ways depending on your needs. TimeForge also allows you to switch between the Daily View, which shows a bar chart to visualize staffing levels, and the Weekly View, which looks like Microsoft Excel and lets you manage an entire week at once. The example below displays the Daily View within the Classic View, where you can create and edit schedules directly.
Some of the powerful features and benefits of the Daily View include:
Make a schedule template from the shifts you have created, or use a previously created schedule template to make a schedule fast!
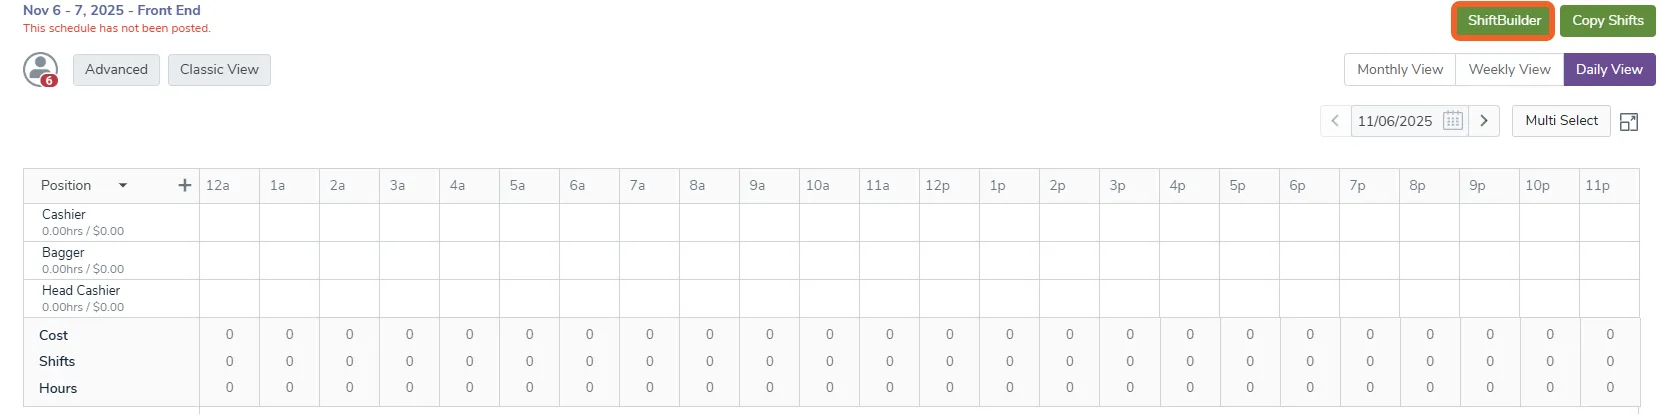
If you have at least one schedule template, you can choose to use the TimeForge ShiftBuilder to help automatically build a schedule for you.
Choose Daily Labor Costs to review a graph of labor costs by position.
The work schedule can be built by employee (Schedule By Employee), or by position (Schedule By Position). Switch back and forth with a single click.
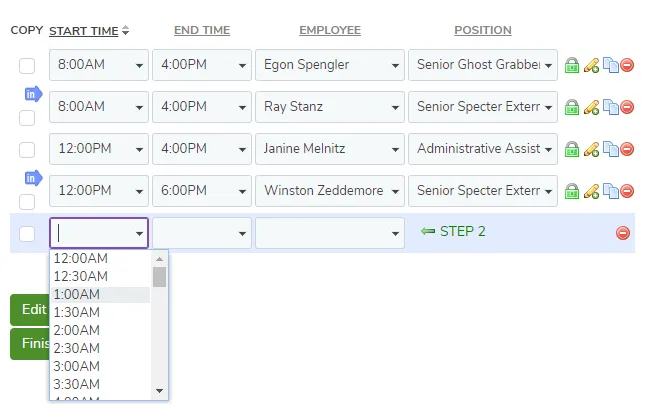
Adding a shift is easy - just pick the start and end times, then choose the employee or position from the drop-down. That’s it!
A graphical chart is shown next to each shift to allow you to easily staff your business.
If you have breaks enabled and break rules created, you can choose to edit the daily breaks that are created from your employee break rules.
Use the Daily View to Add Shifts to a date
To add shifts while using the Daily View:
Pick the appropriate Start Time (when the employee should arrive) and End Time (when the employee will likely leave) for the shift. Instead of choosing from the drop-down box, you are free to enter your own start and end times (such as 2:12pm)
Choose the job code for this shift from the Position drop-down box.
Use the Daily view to create employee schedules
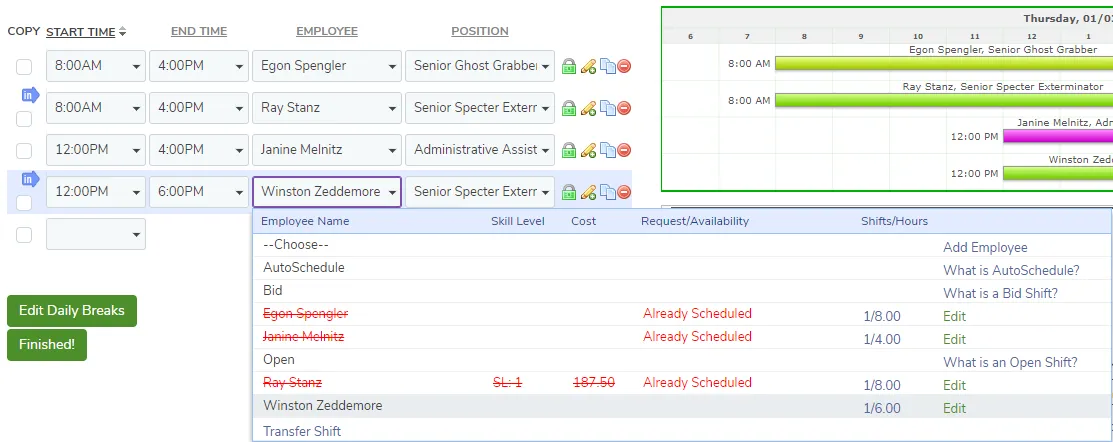
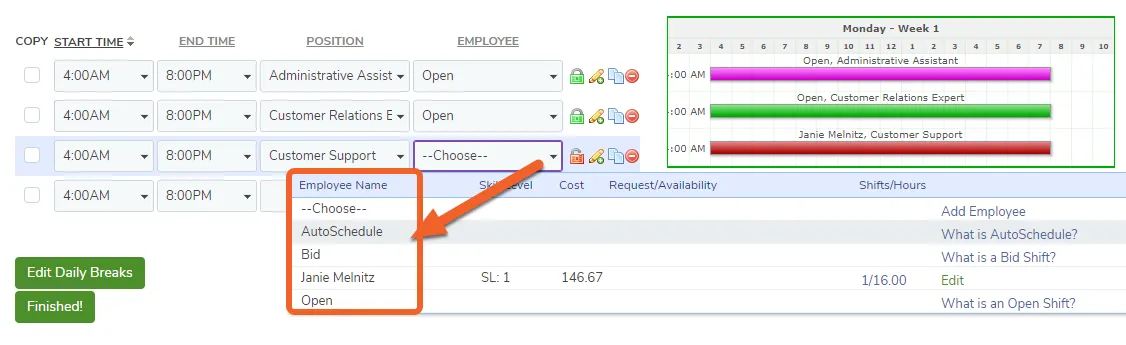
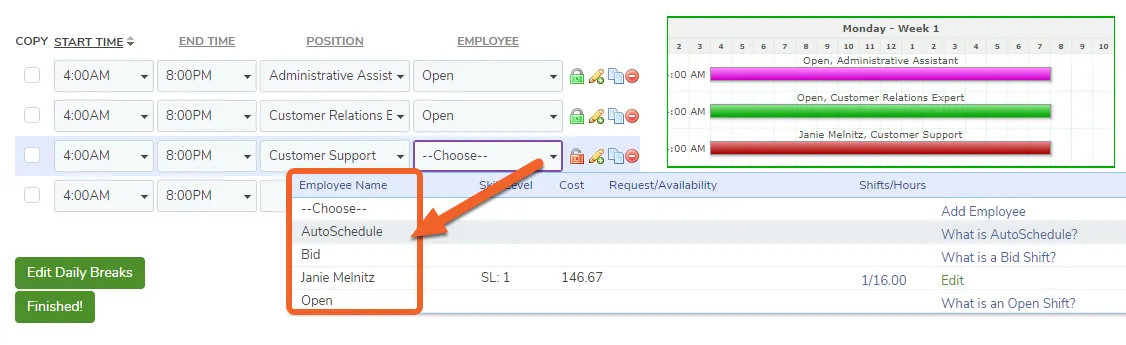
After choosing the start and end times on the Daily View, and a position for the shift, click on the Employee drop-down. TimeForge will display a listing of all possible employees that are available to fill this shift.
Information about each employee will be shown, including their name, skill level for this position, an approximate cost to have the employee work this shift, and any notes about employee availability or requests.
Additionally – the “AutoSchedule” option is available. When you choose the “AutoSchedule” option, TimeForge will automatically look for the employee that is a “best fit” for the schedule, based on available hours, employee constraints (such as their availability), cost of labor, and a number of scheduling best practices.
Create employee schedules with different views - Weekly View
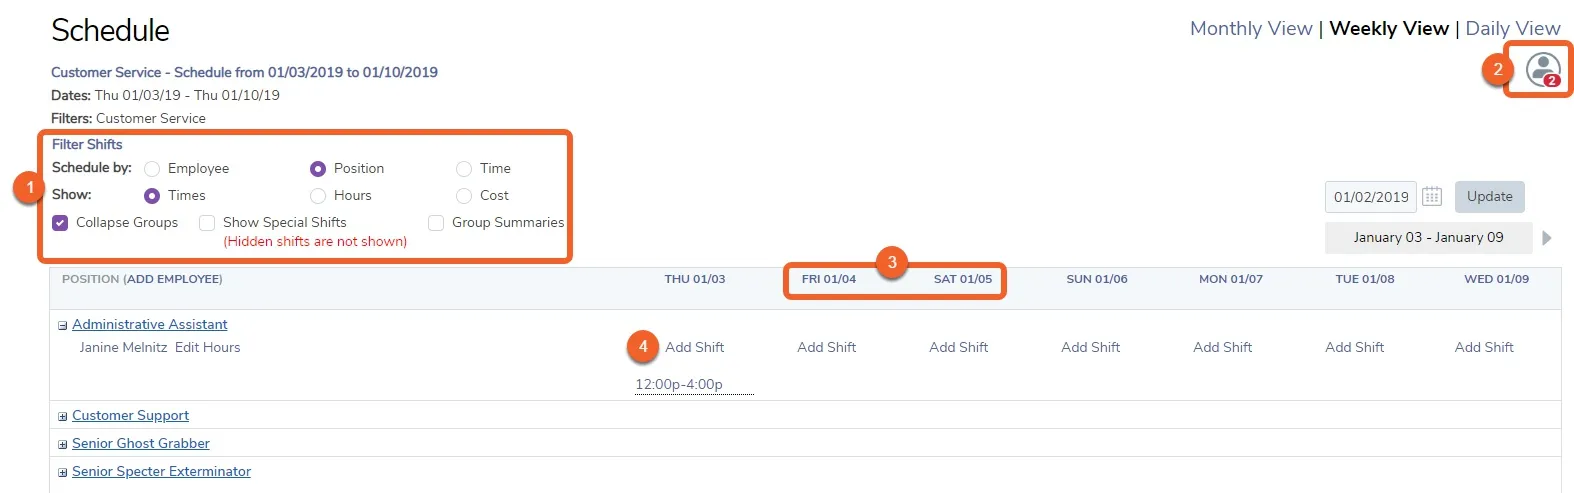
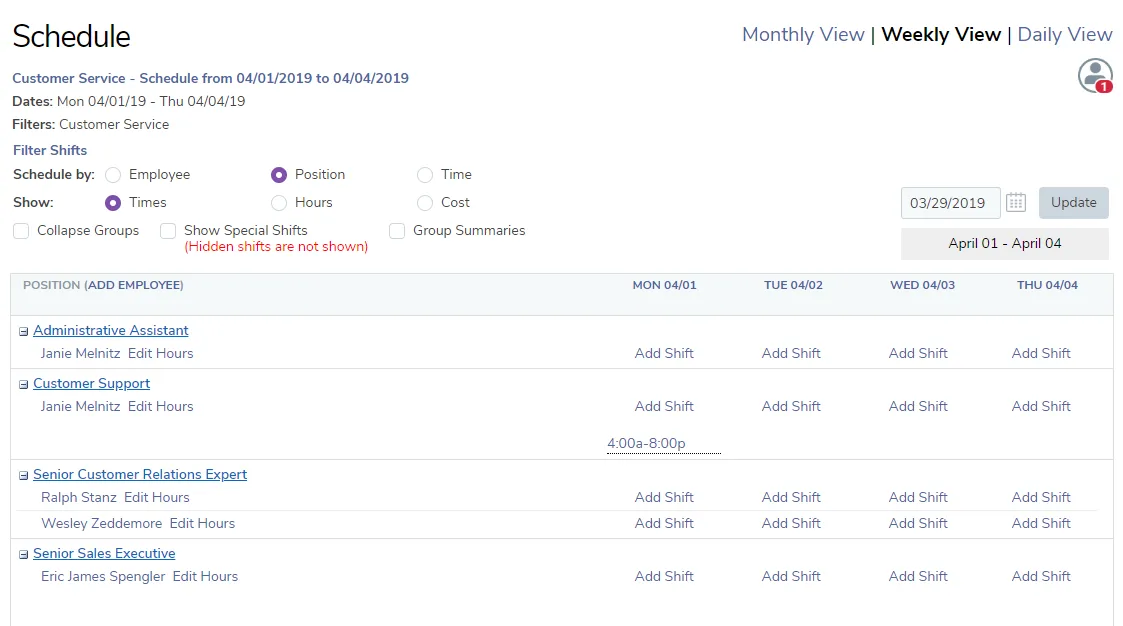
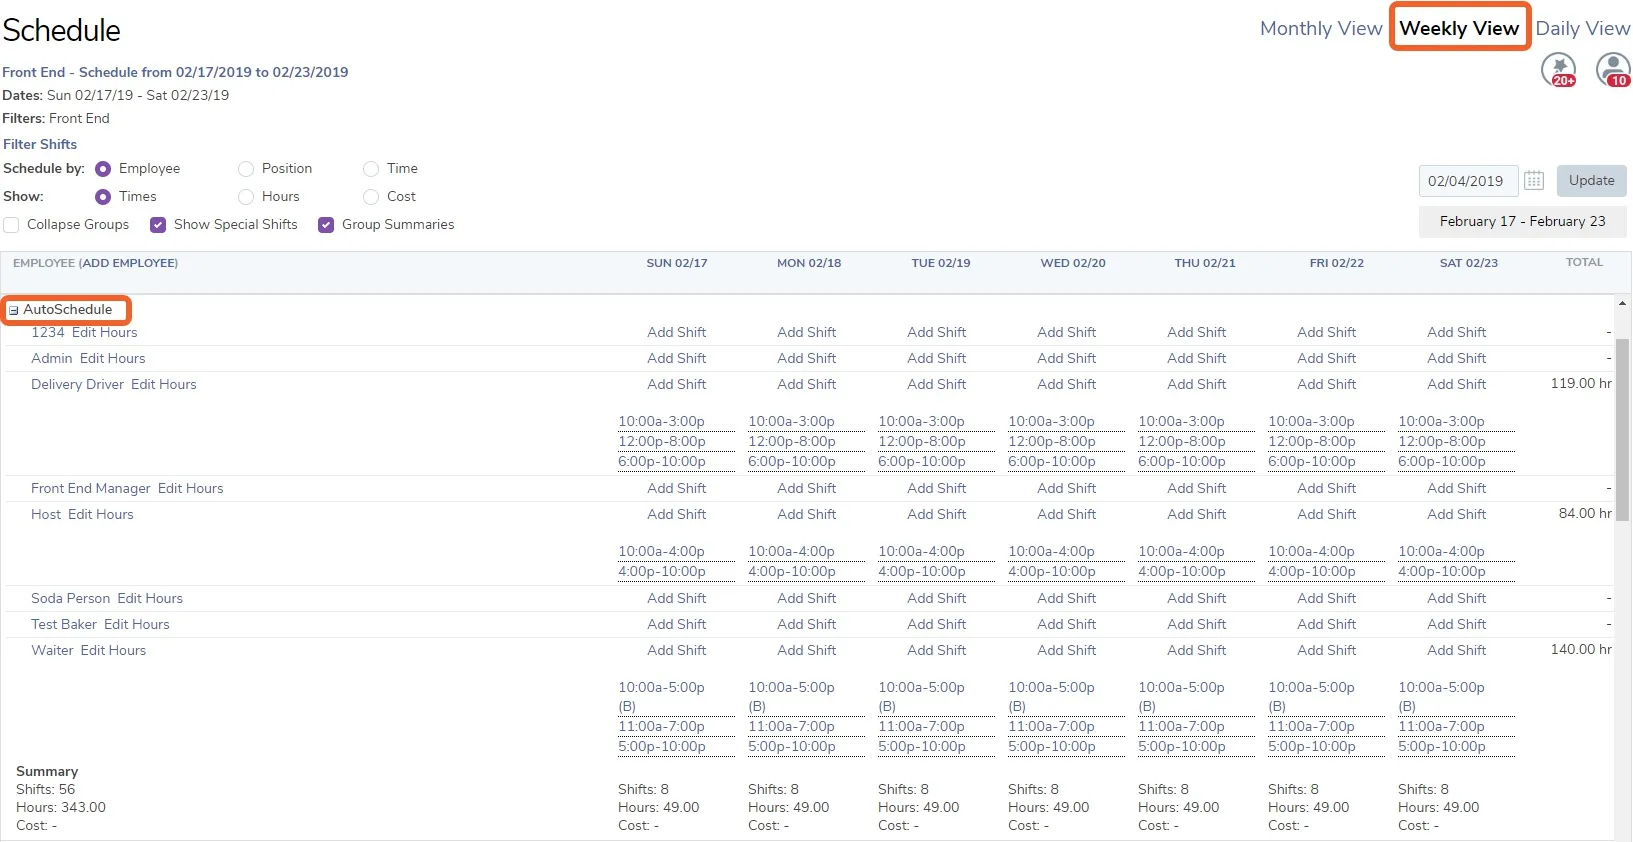
Pictured above is the Schedule Weekly View. Some of the powerful features and benefits of the Weekly View include:
The schedule can be built by employee (Schedule By Employee), or by position (Schedule By Position) or by Time.Switch back and forth with a single click. Group summaries (such as the total hours, number of shifts, and labor costs) can be switched on and off by clicking on Group Summaries. Click on Times, Hours, or Costs to quickly display each shift’s start and end times, hours of duration, or the cost of the shift. No more sorting through Excel for this data!
Important messages about the schedule, including broken scheduling rules and best practices are displayed at the top of the Weekly View.
Click on the date header (such as Sat 08/08 or Sun 08/09) to view a pop-up window of additional actions, such as switching to the “Daily View,” creating a template, copying shifts from one day to another day, and much more!
Click “Add Shift” or the start and end time of the shift to add or edit a new shift for the employee.
Create your employee schedule with the "Add/Edit Shift" pop-up in the Weekly View
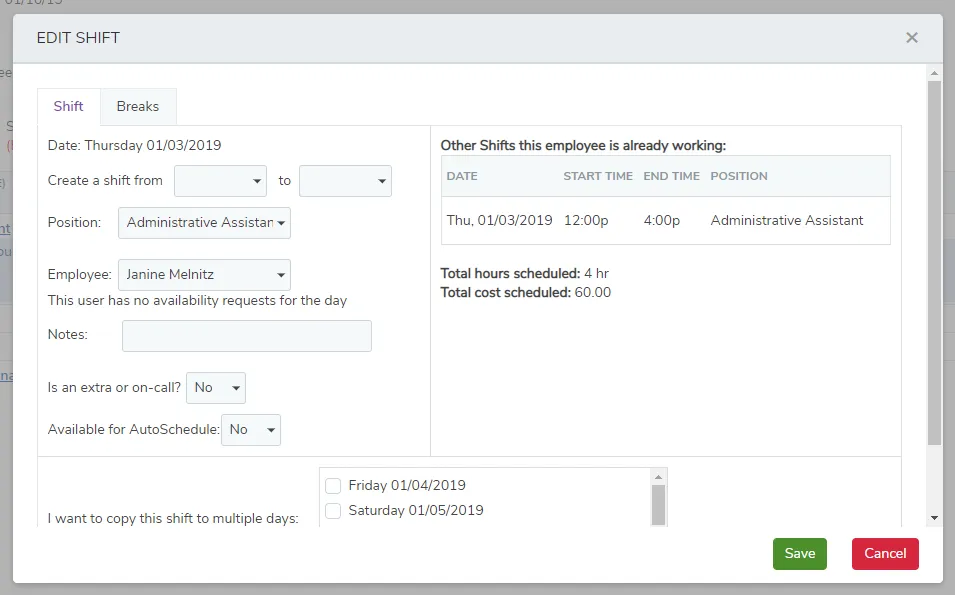
In the Weekly View, clicking Add Shift will show the window below.
This window allows you to quickly add a shift to an employee / position combination, shows any other shifts that the employee is already scheduled for, and displays any requested time off. Shifts can also be copied to other days of the schedule with a single click!
Click Save when you are finished.
Drag and drop shifts to quickly copy schedules
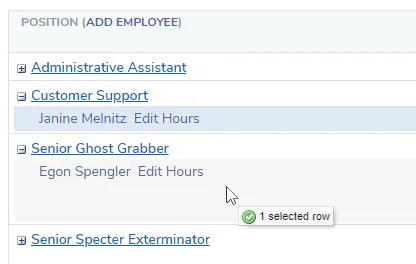
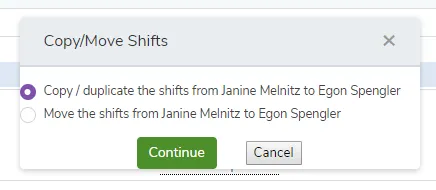
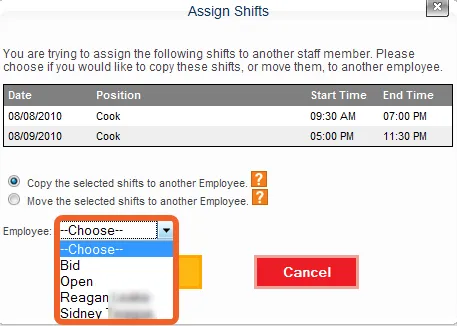
In the Weekly View, you select an employee (or position) and drag it to another employee (or position). Release your mouse button when you see a green “check” icon. You will be shown the following:
You can choose to copy (duplicate) or move the shifts from one employee to another. Copy the shifts to copy any upcoming shifts, leaving the original shifts intact. Move the shifts to transfer shifts from one staff member to another.
Post the employee schedule to be viewable by employees
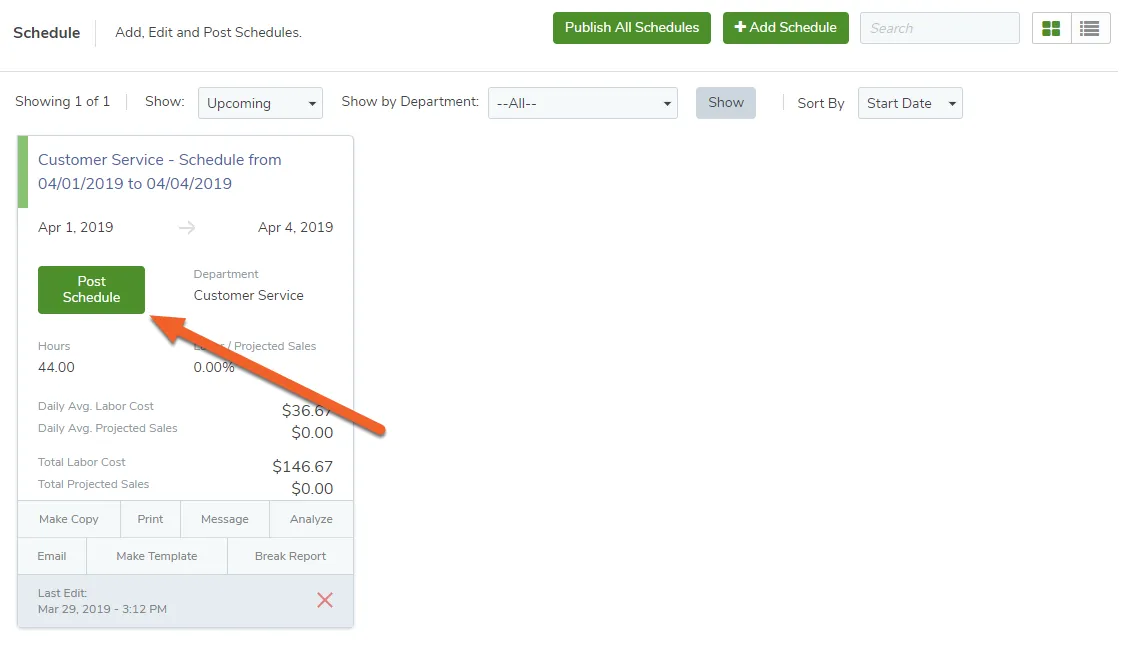
When the schedule is complete, it should be Posted. Posted schedules can be seen by all staff members that have access to TimeForge. Schedules that are not yet posted cannot be viewed by employees.
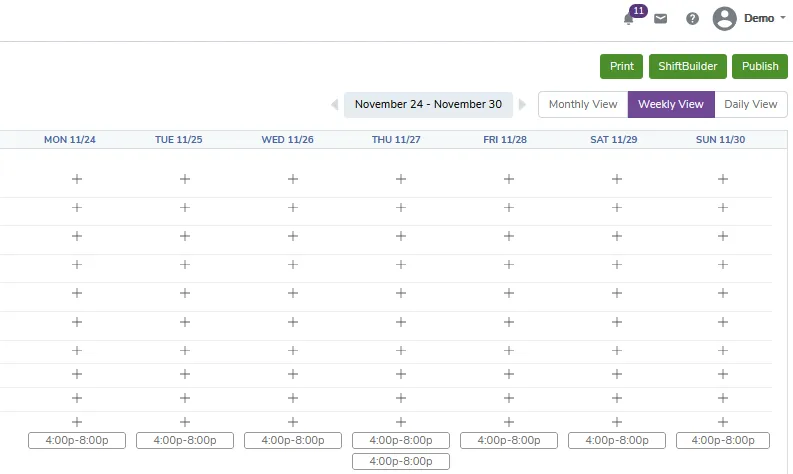
To post, simply click the Publish button found at the trop right-hand corner of the screen. Your schedule will now be viewable by your employees that log in to TimeForge.
Create and use daily or weekly schedule templates
In TimeForge, work schedule templates are 24-hour periods of time that reflect a single day of a schedule. In some industries, these are called “Master Schedules,” or “Master Work Schedules.” You can use a work schedule template to organize your labor requirements in advance of the actual schedule, allowing you to easily anticipate upcoming staffing needs. This is also helpful if you use TimeForge Sales to project your weekly sales because it can further help you control your labor costs. In other words, creating an employee schedule template will allow you to rapidly create a work schedule, as long as you spend a little time in advance thinking about your labor needs***.***
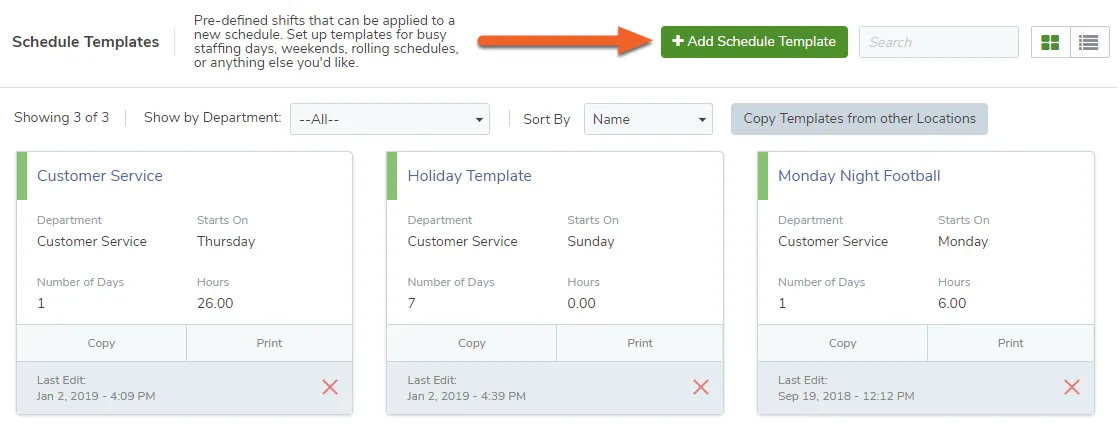
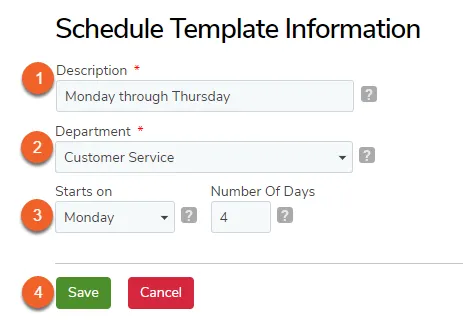
Templates can be created for any number of scenarios, and there are no limits on the number of templates that you can create in your account. For example, you might create a schedule template for staff members needed Monday through Thursday, and then separate templates for Friday and Saturday since they require more labor. Or, you might create schedule templates for each day of the week, with templates for Monday night football, holidays, or other special occasions.
Here is how you can easily build employee schedule templates for multiple staff members, and then use those templates to build a schedule.
Editing a schedule template for employees is similar to working with a staff schedule in the TimeForge Daily View.
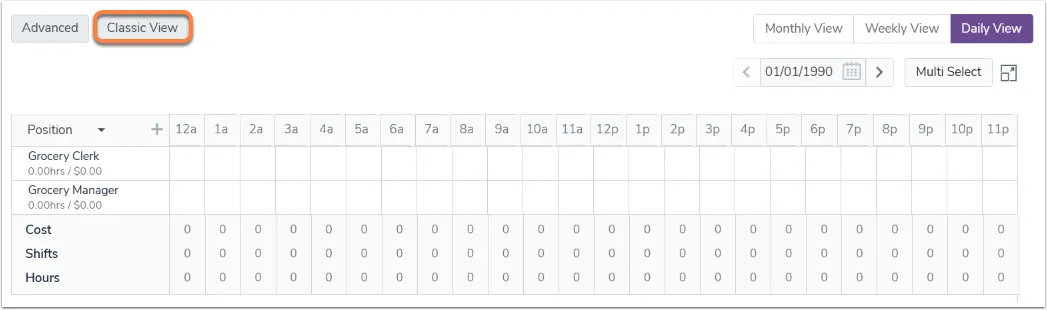
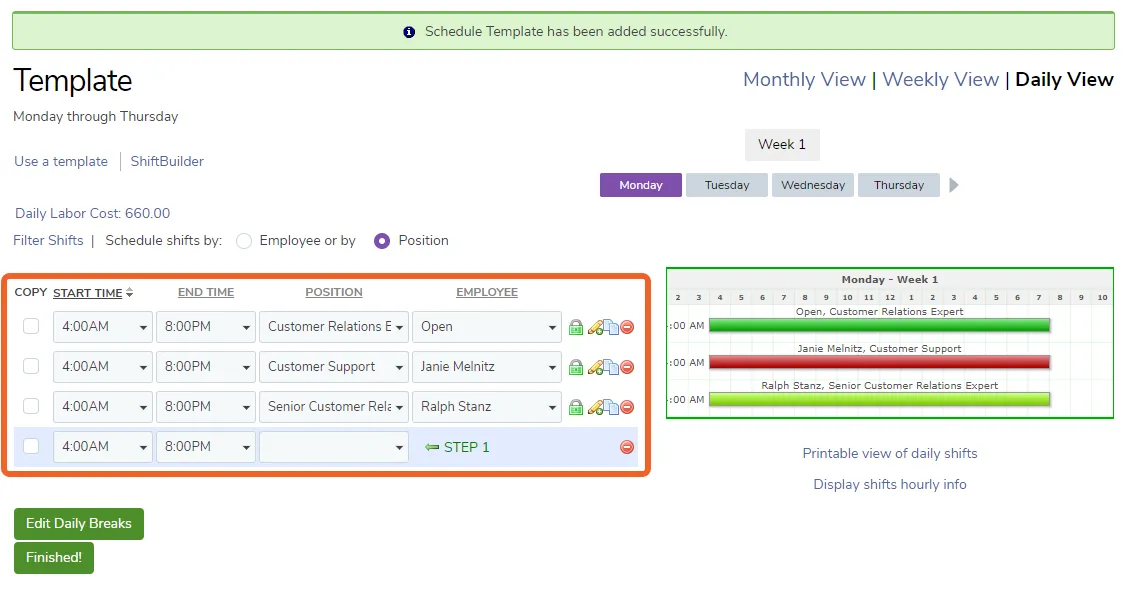
In the classic mode, select the start time, end time, and position for each shift, and then choose the employee you would like to have work the shift. Just like the schedule Daily View, templates can be built by position or by employee, based on your business’s needs.
You can also build Templates using Work Periods (commonly called Day Parts), if you would like, by clicking on the Work Period icon, which is directly next to the start time.
Shifts on a template can be assigned to an employee, to the TimeForge AutoScheduler, or as a Open or Bid Shift.
AutoSchedule shifts allow the TimeForge AutoScheduler to choose the best fitting staff member, and will replace the AutoSchedule employee with the best fitting staff member when building the schedule.
Bid shifts can be requested by multiple employees, and the manager can choose the best staff member for the job.
Any qualifying employees will also be listed and can be chosen under the Employee column.
Open shifts will allow a manager to specify the assigned employee when building the schedule.
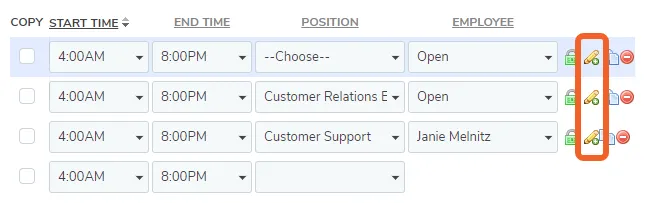
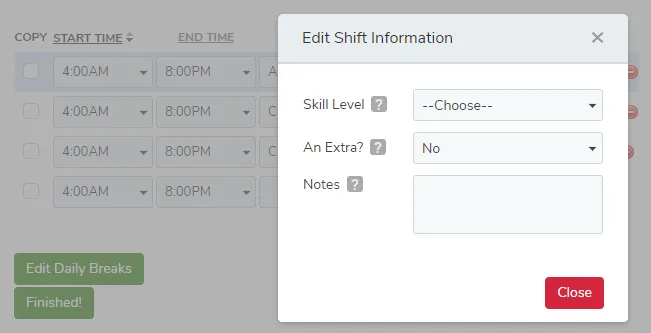
There are several options that can be chosen for each shift by selecting the shift properties icon, the small pencil, next to the shift.
Options include whether the staff member is an Extra or is On Call, the Skill level necessary to work the shift, and if the shift requires more than one employee to come in, then you can change how many staff members are needed to work.
Click the Finished! button when done.
Once you’ve created your schedule templates, it’s time to use them to build a schedule!
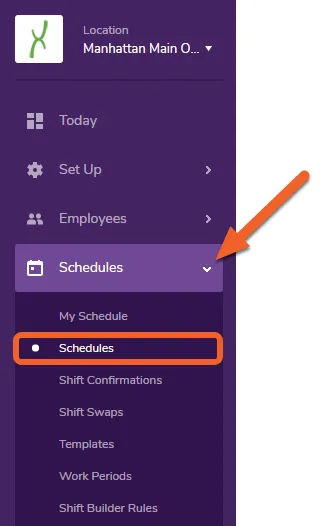
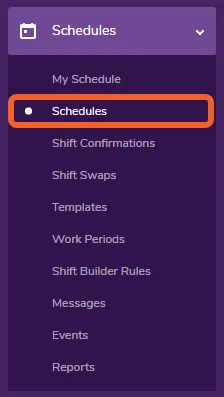
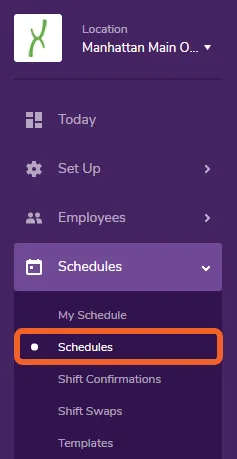
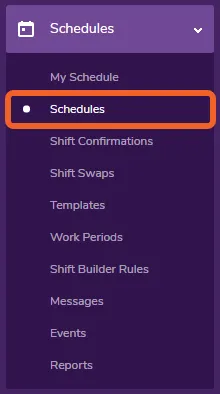
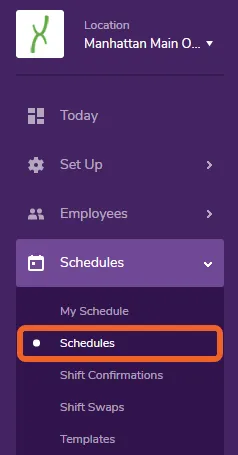
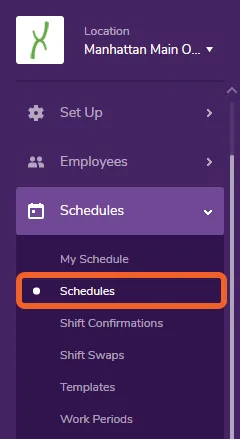
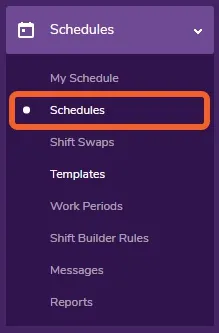
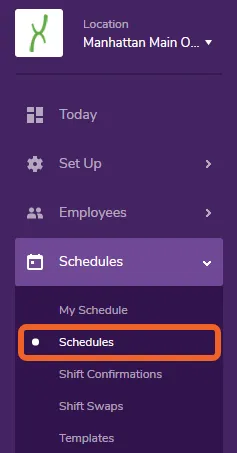
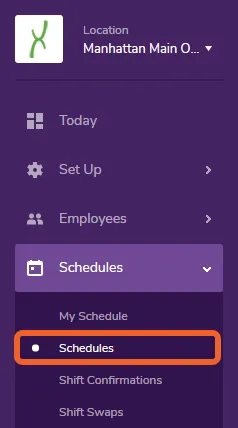
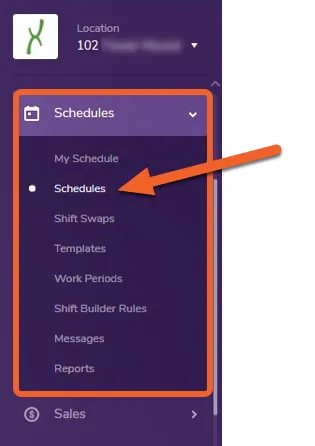
Navigate to the Schedules page under the Schedules tab
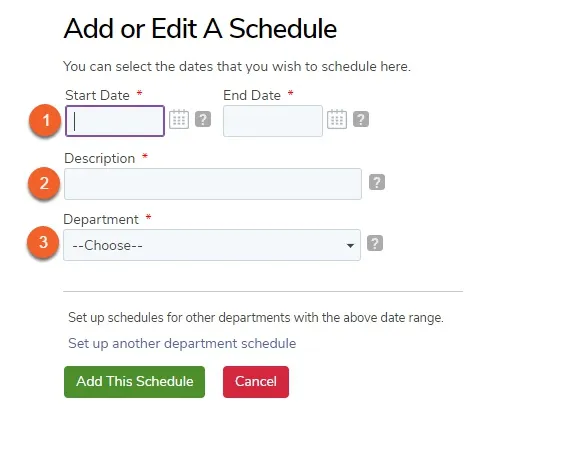
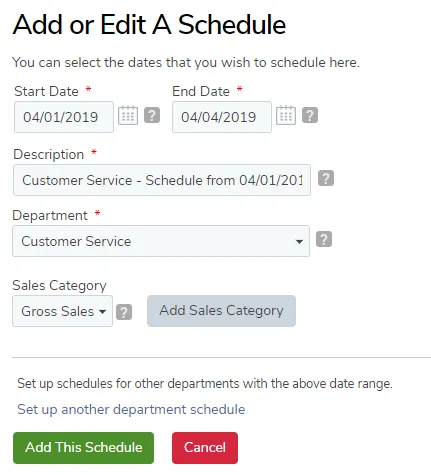
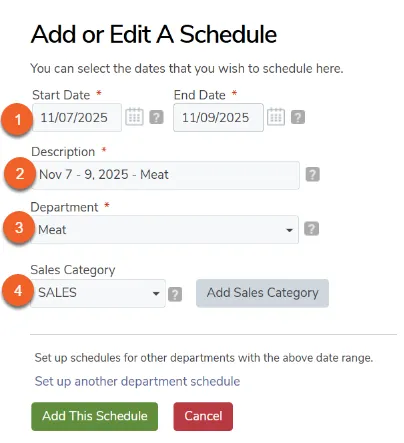
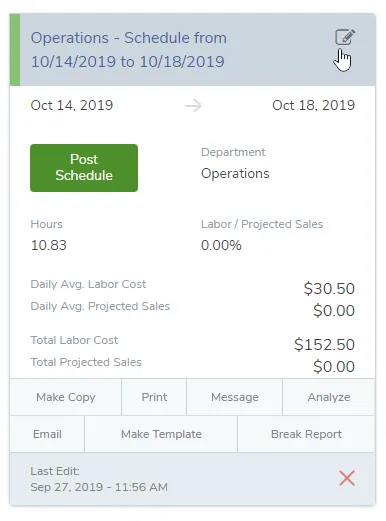
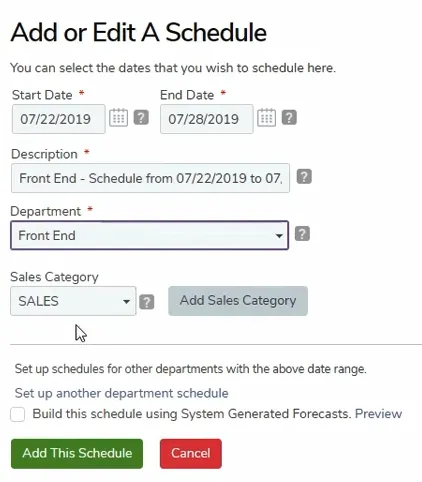
Choose the date range for the Schedule, and then name the schedule to continue. TimeForge will automatically assign a name, but you can change it to whatever makes sense for you.
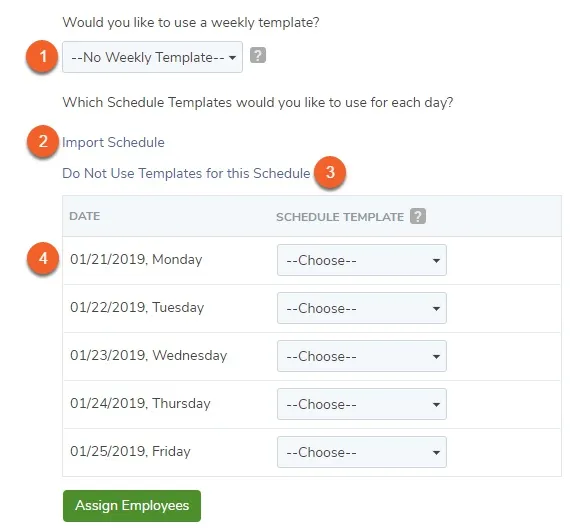
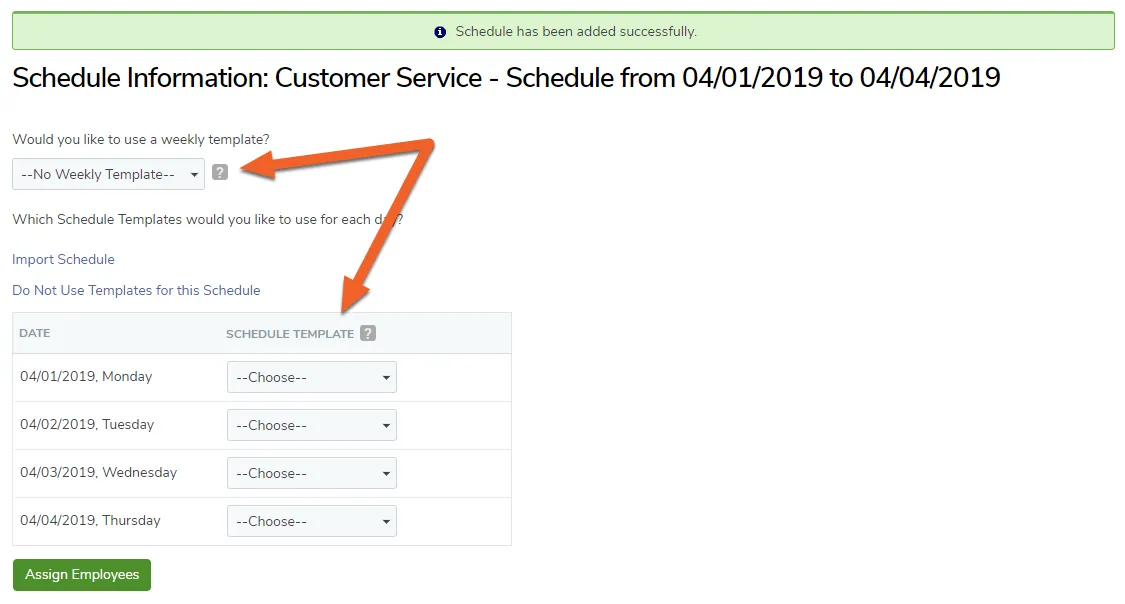
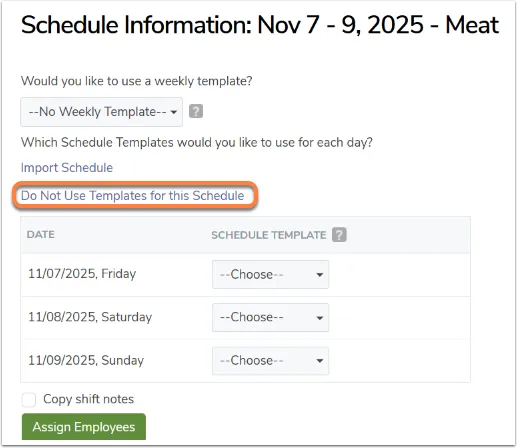
When building your schedule, you can choose a weekly template, which will prefill all the days for you, or you can select schedule templates for each day individually.
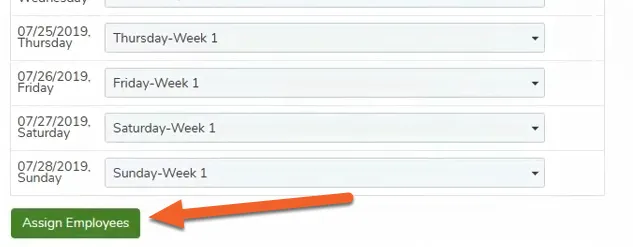
When you are ready to have TimeForge build the schedule for you, simply click Assign Employees. TimeForge will then copy the shifts inside of your templates to the schedule and will assign staff members to work if necessary.
Click Finished! to see your schedule breakdown.
Remember, you’ll need to post your schedule to put it into effect!
Return to the Schedules page to post your new schedule and make it available to employees.
Save or restore a schedule using snapshots
TimeForge schedules are saved automatically when any field is modified, but sometimes it is useful to save the current schedule before making any modifications so that you may come back to the previous employee schedule if necessary.
Schedule Snapshots allow you to archive / save the current version of the schedule, along with some quick stats about the number of shifts, and the cost of the schedule. At any point in time, you can easily restore a previously saved schedule snapshot. Simply choose which snapshot you’d like to restore, and your employee work schedule will immediately roll back to the previously saved schedule snapshot.
Employee schedule snapshots are available on the weekly schedule of the schedule, and are very useful for:
Integrating newly hired staff members (identifying which shifts can be moved around to accommodate the new employees).
Rolling back to a previous version of the current work schedule.
Identifying shifts that can be removed or modified to reduce labor costs.
Viewing the effects of a drastic schedule change or shift swaps prior to actually “doing it”.
And other “What If?” scenarios with the employee work schedule and staff members.
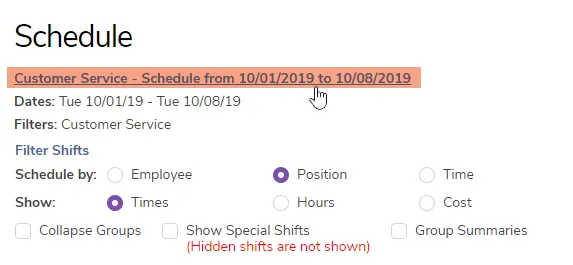
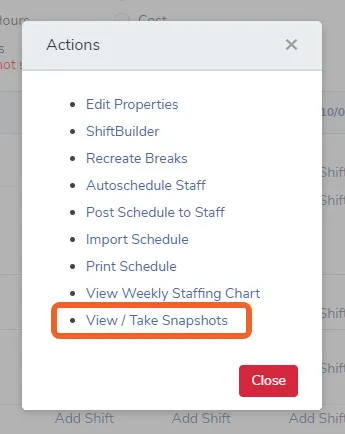
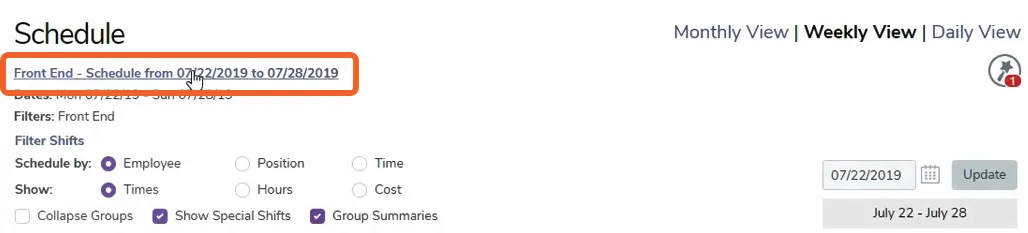
To view Schedule Snapshots, or create a new one, click on the name of the schedule for which you would like to see or create a schedule snapshot. This button is located at the top of the weekly view of the schedule.
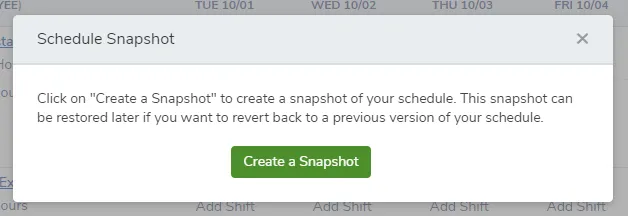
TimeForge will show a brief explanation of Schedule Snapshots. If you have already taken some snapshots, this is also where they would appear, but since this is our first time creating one, we don’t see any yet.
You can view previous Schedule Snapshots by bringing following the steps above to open up the Actions pop-up and View / Take Snapshots.
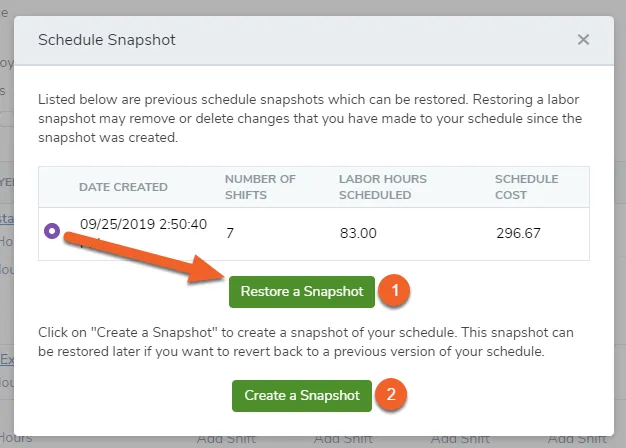
Listed with each snapshot is the date and time the snapshot was created, the number of shifts in the schedule, the total number of labor hours scheduled, and the estimated labor cost (schedule cost).
To restore a schedule snapshot, simply click on the button next to the desired snapshot, and then click on “Restore a Snapshot.” After a few seconds, your schedule will be restored to the selected snapshot.
To create a new snapshot of the schedule you are working on, click Create a Snapshot. You can create as many schedule snapshots as you need.
Create a sales-driven schedule
TimeForge gives you the flexibility to create an employee schedule several different ways. Part of this flexibility is the ability to create a schedule while using sales forecasts and projections. Depending on the specific needs of your business, you can compare your schedule to any key performance indicator (KPI) that you have set up.
After Manager Projections have been input into the TimeForge “Sales Module,” the Manager Projections can be displayed on the labor schedules, providing instant feedback on how each day of the schedule will compare to the manager projections. System Generated Forecasts can also be displayed on the employee schedule.
Creating a schedule and comparing it to projected sales is easy. This overview explains how to use the daily and weekly views in TimeForge to stay within your thresholds.
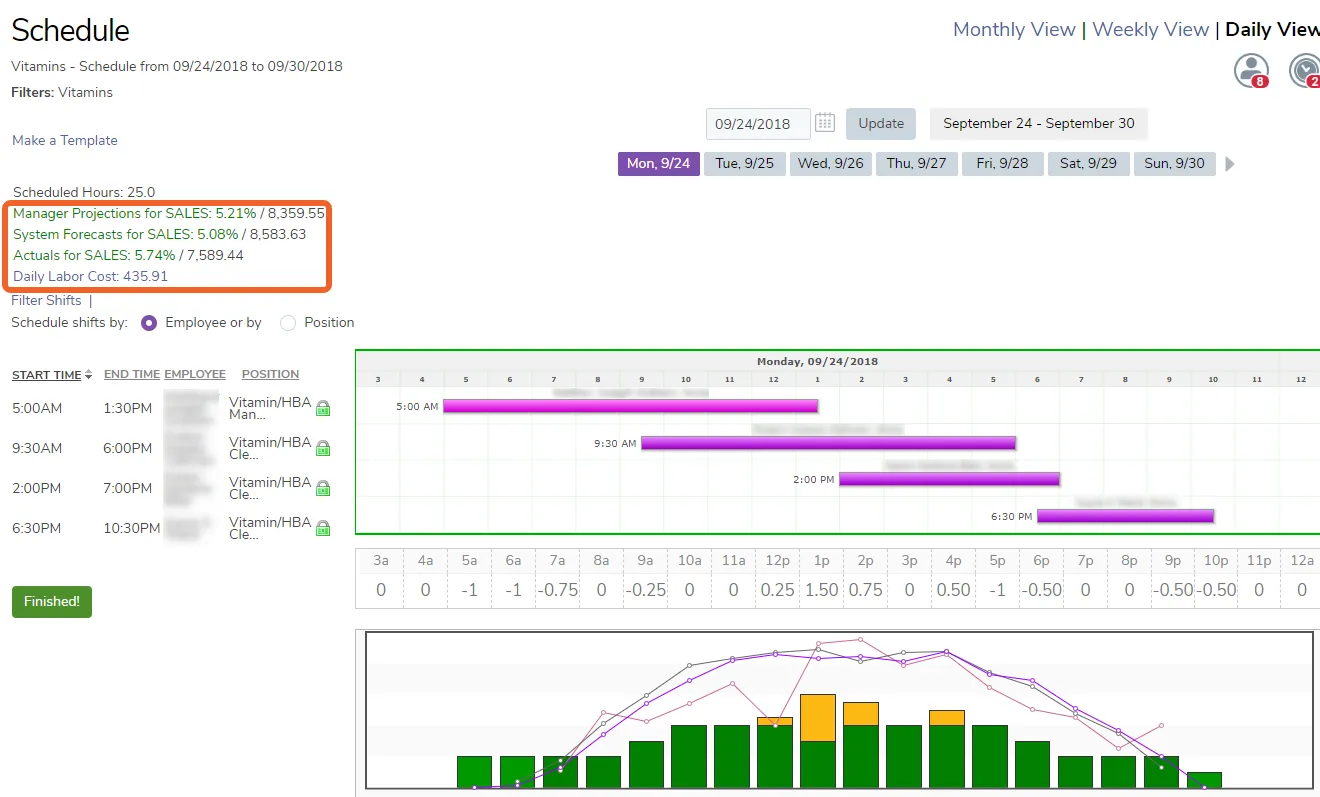
As the schedule is changed, the Manager Projections in the “Daily View” are updated automatically, displaying the ratio between the schedule and the Sales Category (e.g. SALES, Gross Sales, Net Sales) chosen for this schedule.
Here’s an example for a Vitamins department, in which the schedule has already passed (otherwise we would not see Actuals):
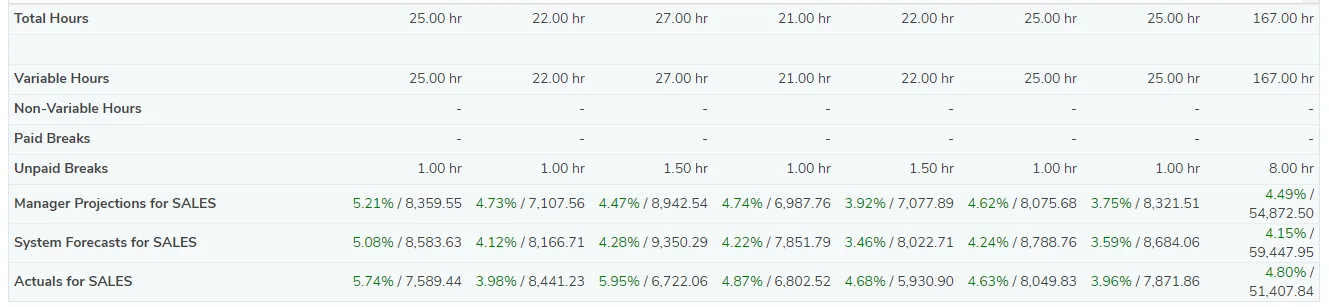
The Weekly View of the labor schedule will display critical statistics about the schedule, including the Variable Hours (hours scheduled for regular employees), Non-Variable Hours (hours scheduled for managers or supervisors), paid and unpaid breaks, as well as Manager Projections.
If the ratio is shown in green, then the ratio is beneath the desired ratio.
If the ratio is shown in red, then the ratio is too high.
Here we can see that the Manager Projections, System Forecasts, and Actuals were all within limits:
Define your ShiftBuilder Rules
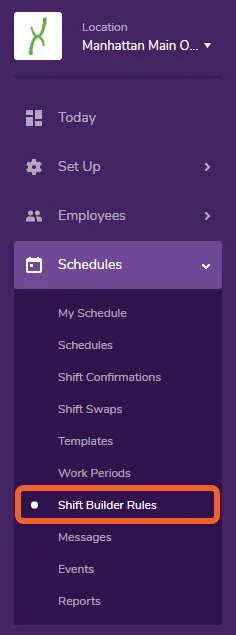
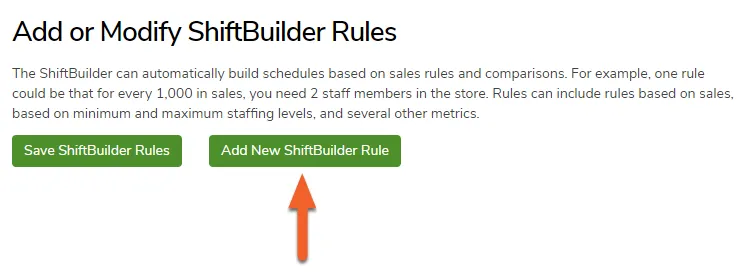
In TimeForge, the shiftbuilder can automatically generate coverage and build shifts for you based on sales rules and comparisons. For example, one rule could be set up in a way that for every $1,000 in sales, you need 2 staff members in the store. Rules can be based on sales, based on minimum and maximum staffing levels, and more. Setting up ShiftBuilder Rules is one of the first steps to configuring your account to be able to generate schedules based on your sales projections/forecasts.
You’ll also need to configure your sales categories so that you can start viewing things like Net/Gross sales and labor percentages.
Here is how to configure ShiftBuilder Rules. However, don’t hesitate to contact us if you would like some extra help!
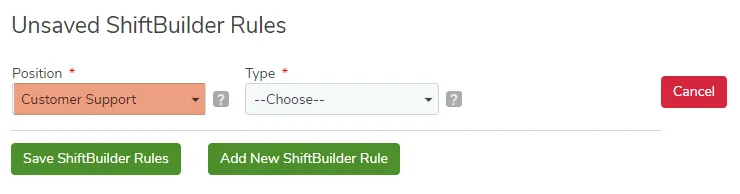
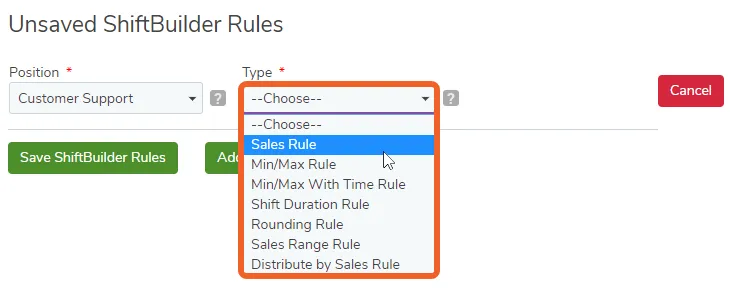
Select the Type of ShiftBuilder Rule you want to use. You’ll need to mix and match to determine which rules work for each position in your business.
Sales Rule: You’ll select the amount of sales (in dollars), and the amount of employees needed for that amount of sales. For instance, “For every $200 in sales, I need 1 Server on the schedule.” So, if you have $612 in sales that hours, the ShiftBuilder will generate coverage of 3 servers that hour.
Min/Max Rule: This is fundamentally how many employees you need for a given shift. For example, “No matter what my sales are, I always need at least 1 Server, and I never need more than 7 Servers.”
Shift Duration Rule: This lets you set up the minimum and maximum length for a shift. For example, “My Servers shouldn’t be scheduled for less than 4 hours or more than 8 hours.”
Rounding Rule is used for rounding in conjunction with Sales Rules. For example, “If I’m within fifty percent (0.5) of the next Server being called in, according to my existing Sales Rule, I want the ShiftBuilder to go ahead and pull in the next Server.”
Sales Range Rule Lets you build shifts based on a range of sales data. For example, “If my sales are between $0 and $150, I need 1 Server.” If you use a Sales Range Rule, you’ll need to either (1) add several Sales Range Rules to cover any realistic amount in sales you might expect, to make sure you have the proper coverage, or (2) also use a Sales Rule. (See example in next step.)
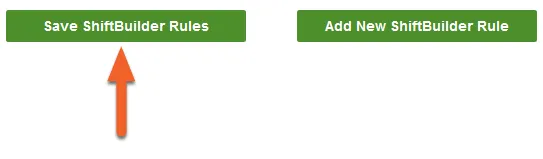
Click “Save ShiftBuilder Rules” once you’ve finished
Add as many ShiftBuilder rules as you need. Once you’re finished, click Save ShiftBuilder Rules at the bottom of the page.
Create and assign shifts using the ShiftBuilder
There are many ways that you can build an employee schedule in TimeForge. Whether you want to build shifts yourself, use templates to expedite the scheduling process, have the AutoSchdeduler automatically assign shifts for you, or have the ShiftBuilder automatically create employee shifts, TimeForge will save you time and headaches when creating a work schedule.
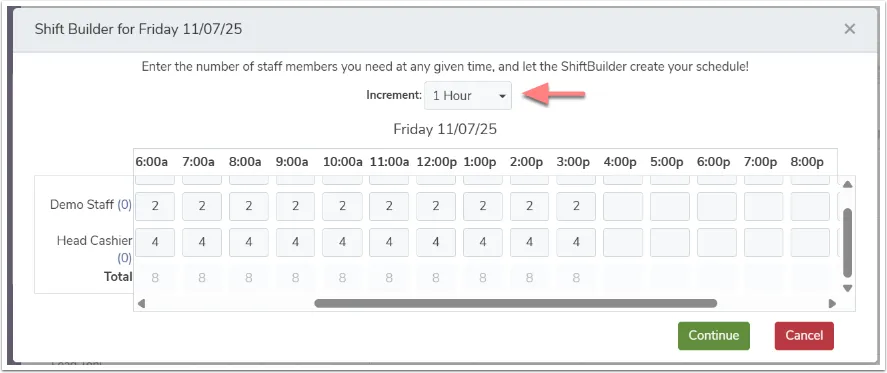
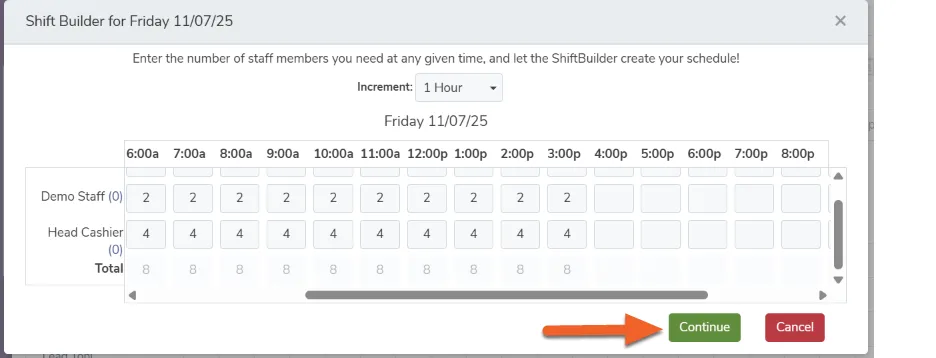
One unique feature to the already powerful ShiftBuilder is the ability to generate shifts based on manager projections. Doing this is easy and will better control your labor costs by essentially putting your work schedule on a budget.
The first thing you’ll need to do is set up some Manager Projections. Then, follow these steps to use the ShiftBuilder to generate shifts based on those projections.
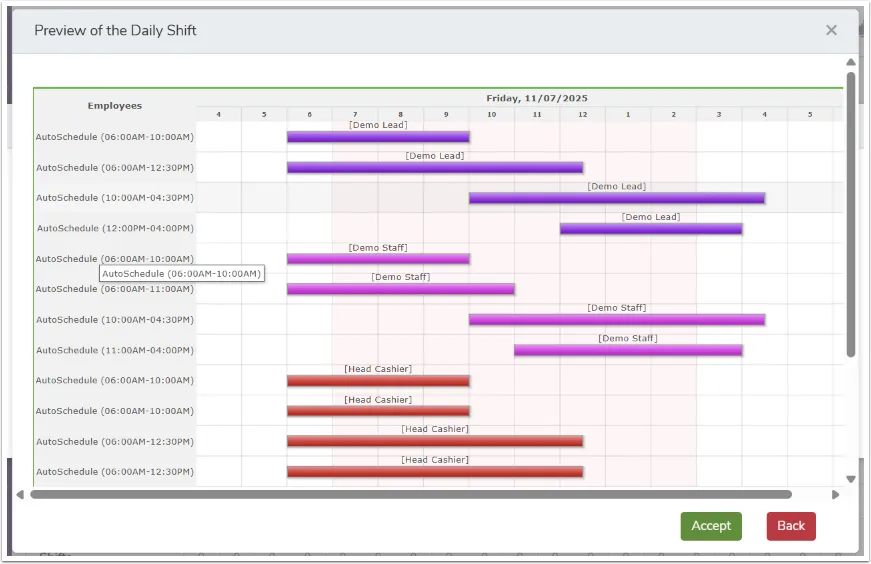
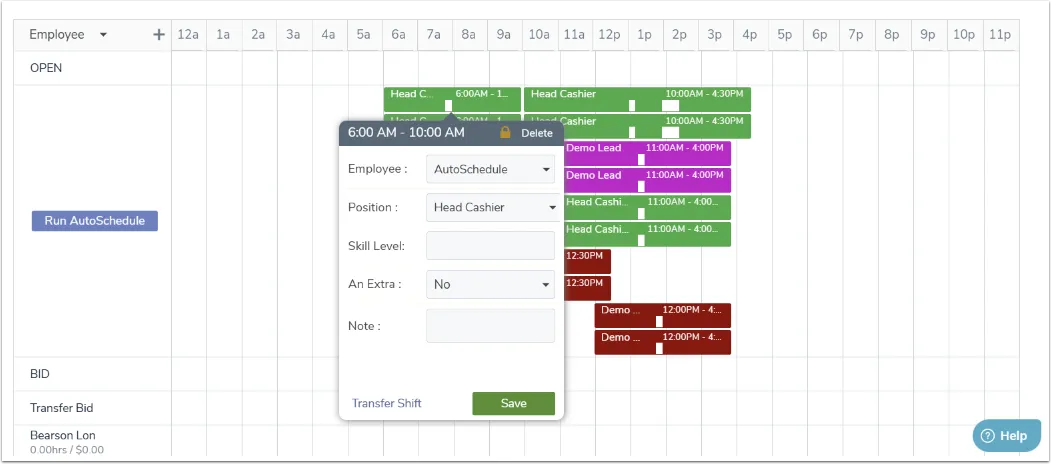
You can now assign an employee to each shift or let the AutoScheduler find the best fit.
Add a break to a schedule, such as a lunch or meal break
In TimeForge, the employee breaks module is a powerful and flexible part of scheduling and attendance tracking in regards to scheduling employee breaks and meal periods. TimeForge breaks are controlled using Break Rules, and after you create an employee schedule, these Break Rules become scheduled employee breaks that can be controlled and monitored using TimeForge Attendance, or with a worksheet and signatures by staff members.
If you are using TimeForge Scheduling, you can add new schedules and breaks for staff members. Setting up employee breaks on your schedule is easy, and here’s how it’s done.
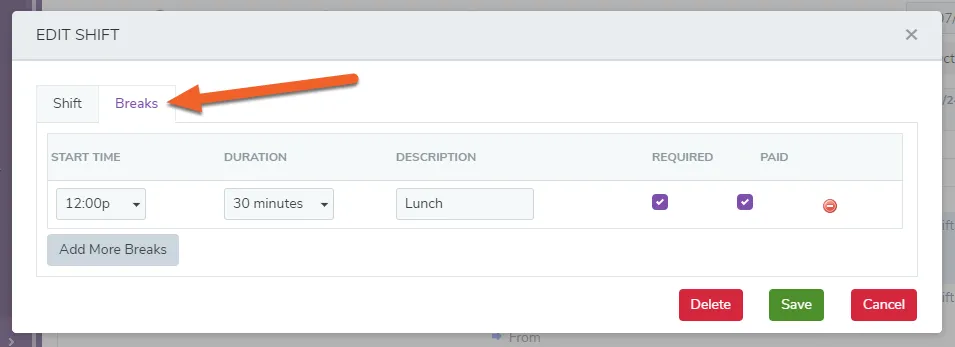
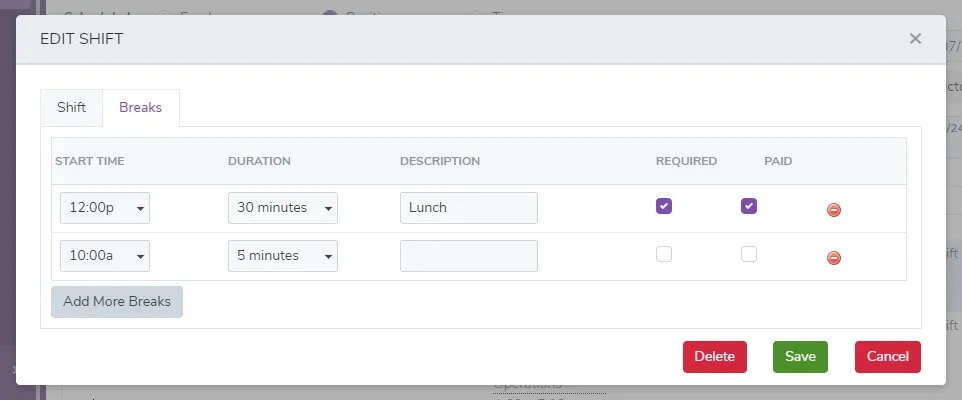
At the top of the add-edit shift screen, there is a Shift tab and a Breaks tab. Choose the Breaks tab to display scheduled breaks, or schedule new breaks.
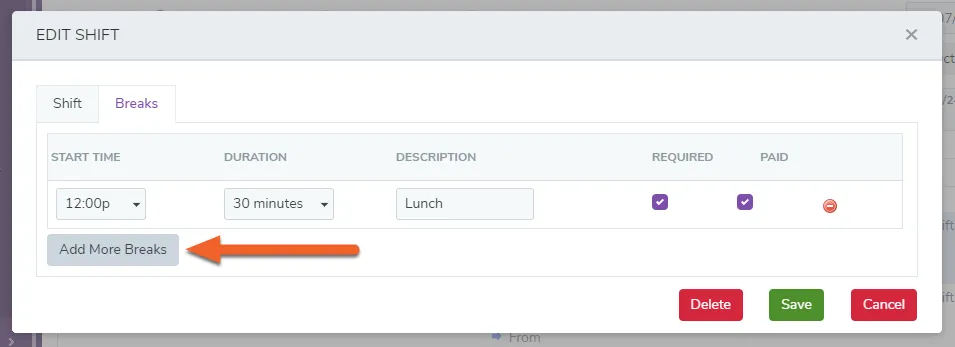
Configure the time, the duration, and the type of break that you want for this shift. When you are finished adding breaks for this shift, click the Save button.
TimeForge can save you time scheduling breaks while you’re creating employee schedules. You can set up break rules so that breaks will automatically be created when you’re building a schedule. Sometimes you may need to add a break rule, or make changes to a break rule, even after you’ve already created a schedule. TimeForge allows you to easily update the schedule to reflect your new rules without having to start a new schedule.
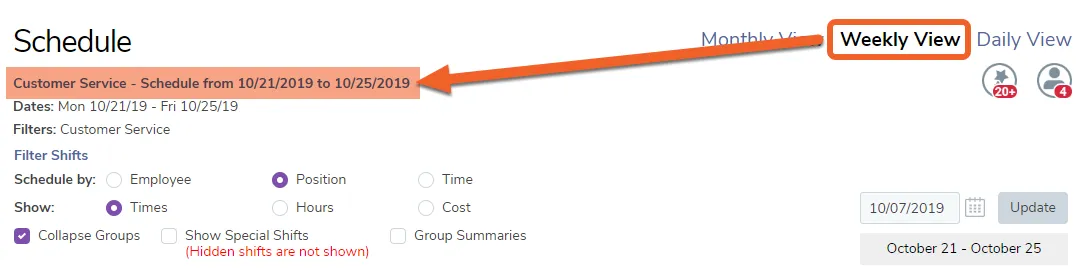
Go to the Weekly View and click the title of the schedule.
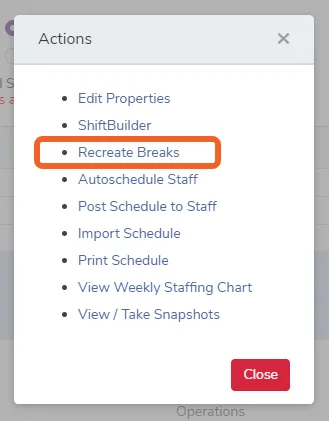
Then click the Recreate Breaks option.
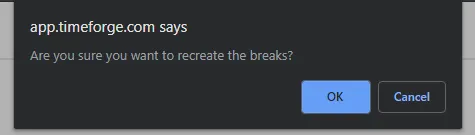
Click OK when prompted.
Recreating your breaks will undo any manual breaks you added. Only
Track or enforce employee breaks
In TimeForge, the employee breaks module is a powerful and flexible part of the scheduling and attendance tracking in regards to scheduling employee breaks and meal periods. TimeForge breaks are controlled using the “Break Rules,” and after you create an employee schedule, these “Break Rules” become scheduled employee breaks that can be controlled and monitored using TimeForge Attendance, or with a worksheet and signatures by staff members.
TimeForge “Break Rules” are designed to allow management to specify the language and requirements of paid, unpaid, optional, and required breaks, similar to how they might be specified by federal, state, or local authorities. For example, in some states, it may be required to provide a 15-minute optional and unpaid break to staff members who work at least 6 hours.
Setting up the “Break Rules” is easy, and here are the steps you need to take in order to schedule breaks for staff members.
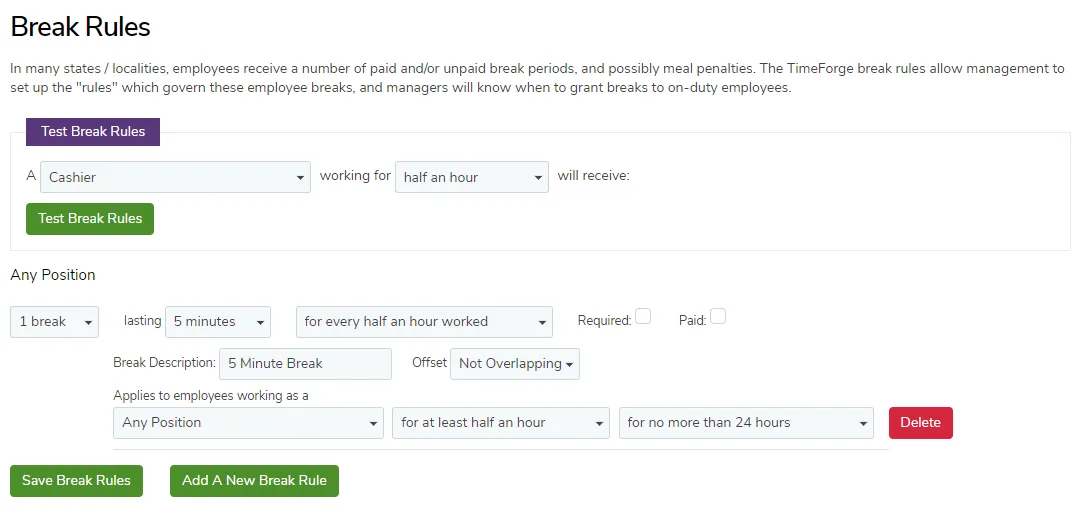
To add an employee break rule, click on the Add A New Break Rule button. Here is an explanation of the information on this screen:
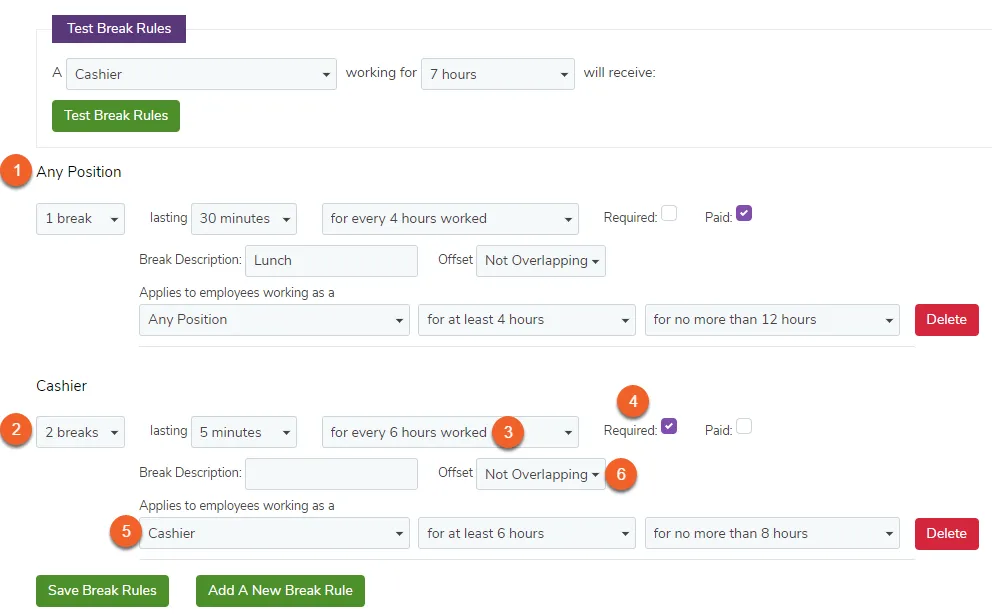
Employee breaks that apply to any position are listed under the Any Position section. Breaks for specific positions are listed under their respective position names. This flexibility allows management, like FOH and BOH, to have different staff member break setups.
Select the number of breaks, and the duration of the break(s). For example, here we are setting a rule for “2 breaks,” and each break lasts “5 minutes.”
Choose the duration that employee breaks repeat. For example, in the picture, we are describing breaks that occur once every 6 hours. If the breaks should be awarded every 2 hours, but the shift is 4 hours long, the staff member may be awarded 2 sets of breaks.
Decide whether the employee breaks are paid, unpaid, required, or optional, and add a description of the break (optional). For example, here we have a required but unpaid break with no description.
Decide if the break applies to all positions, or only one type of position, and also decide which specific shifts will receive the break. For example, here we are awarding breaks to staff members who work Cashier shifts that are at least 6 hours long, but no longer than 8 hours.
Not overlapping simply means that the breaks will be given so that they do not conflict with each other.
TimeForge will tie all of the Break Rules together, and then apply/award the breaks to staff members working any shift that applies. Based on the picture for this step, TimeForge will provide (2) 5-minute breaks to cashiers who work at least 6 hours, but less than 8 hours. Both of these breaks are required, but are unpaid.
When you’re done working with the employee breaks, make sure to click on the Save Break Rules button to save your changes.
After you create rules for employee breaks, you have the ability to test them to ensure that the break rules are configured exactly the way your business needs them.
To test the break rules, choose an applicable position, then choose a logical work shift, and finally click on Test Break Rules.
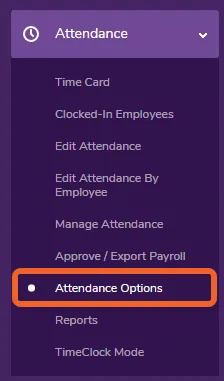
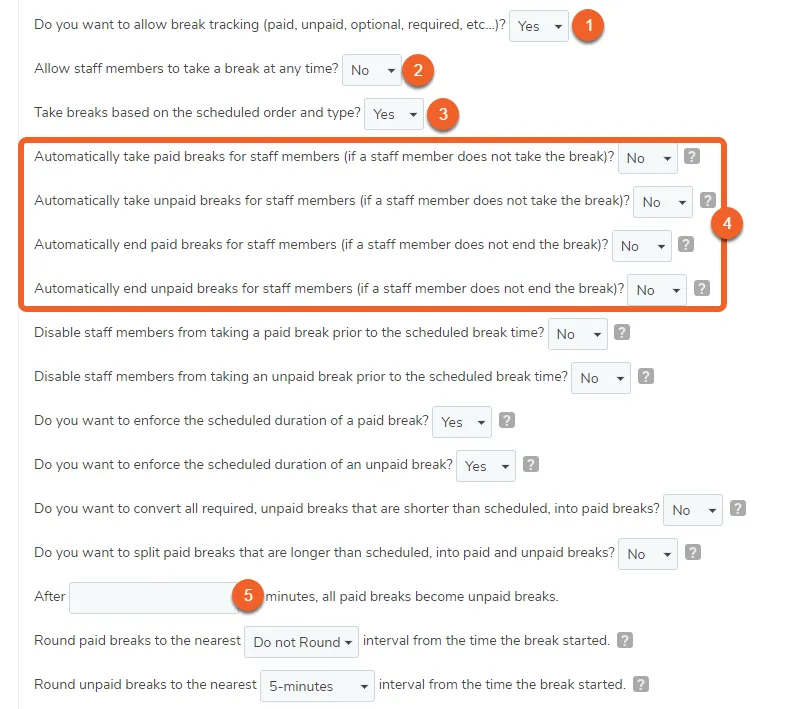
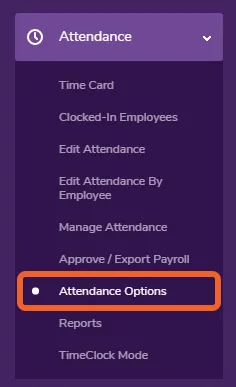
Open the Attendance tab and select Attendance Options.
The employee break options are at the bottom of this page.
This option must be set to “Yes” in order to display the rest of these options. Setting it to the default of “No” will essentially turn off any enforcement of the break rules you’ve set up.
This option will enforce the break time on your employee schedule. If this is set to “Yes,” employees are able to clock out anytime to take a break. If it is set to “No,” many more of these options will appear (everything listed as part of #4 below) so that you can specify how TimeForge will enforce the break rules.
With this option set to “Yes,” you can have TimeForge automatically distribute the breaks based on the schedule. If set to “No,” you’ll receive another option and can set what order breaks are taken. You can choose from “Employee Choice, Paid/Unpaid and Required/Optional, or Unpaid/Paid and Optional/Required.
With these options, you can have TimeForge automatically take out breaks depending on what works best for your business.
This option automatically turns a break into “Unpaid” after a set amount of time. That way, you can prevent employees from getting paid for taking breaks longer than what is allowed on the schedule.
Don’t forget to click Save Company Settings when you’re finished!
Schedule an event
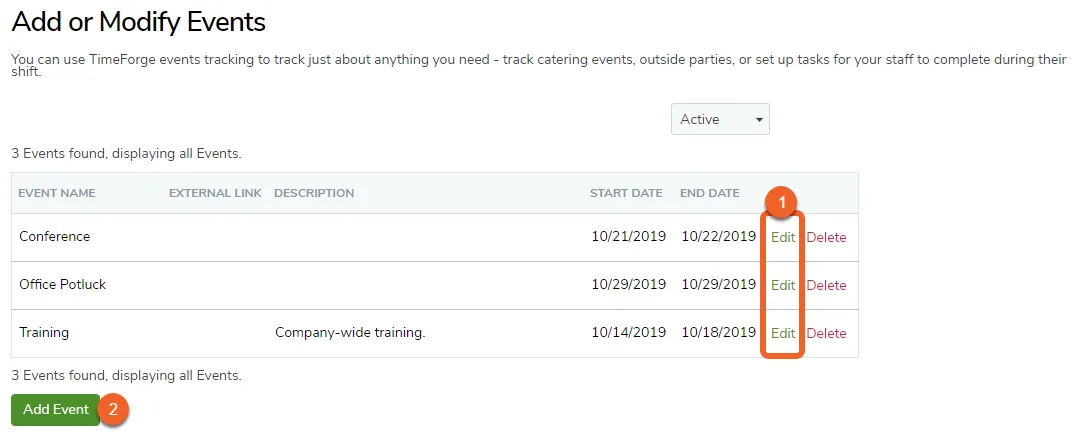
TimeForge Scheduling can do so much more than just quickly create an employee schedule. One awesome feature of Scheduling is the ability to schedule an event, which can be utilized in a variety of manners. For example, events may be scheduled if a large party orders catering services form a restaurant. Perhaps, there is a company social that you would like to put on the schedule. In some cases, companies that go to their customers instead of having their customers come to them may use the Events feature to track where their employees are going. Events work much like regular schedules and shifts, and a comprehensive list of scheduled events can easily be viewed.
The process to schedule an event is painless, so let’s get started.
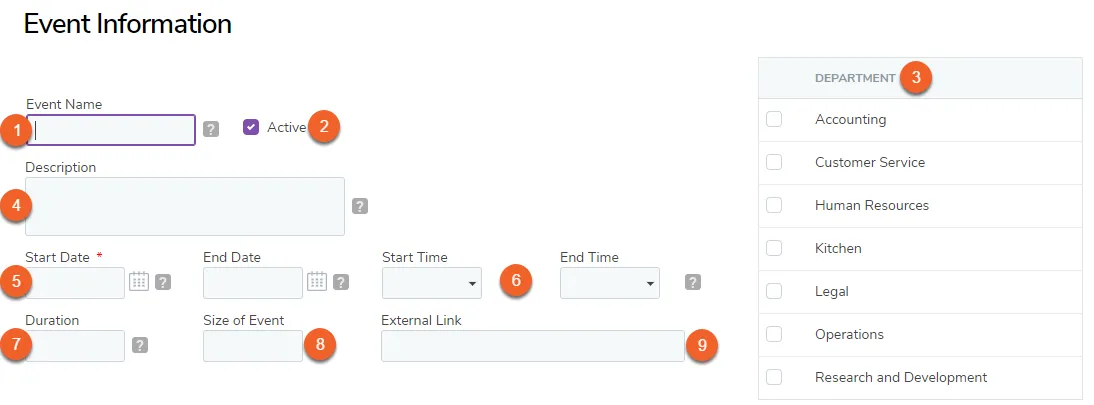
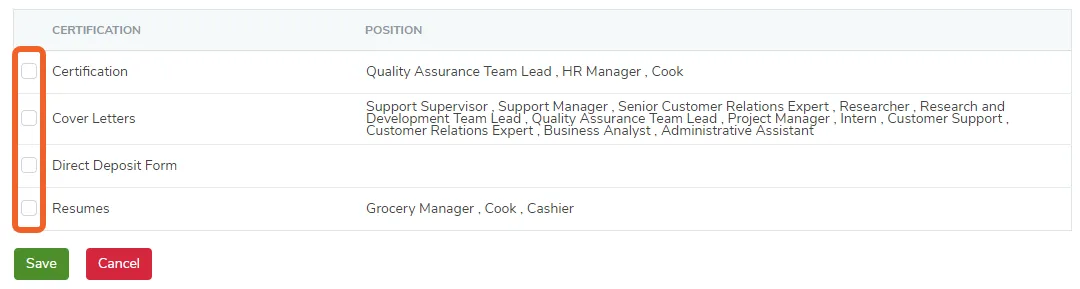
A list of certifications that have been set up in your account will appear on the Event Information page. Check the boxes next to the certifications required for any positions that might work at the event.
You can only set sales by clicking Edit after creating your event.
If you’re using TimeForge Sales and you already have your sales categories set, you can add them to your event and track how you’re doing. This feature will help you make sure your labor cost for each event is at a minimum.
Click Save when you’re finished adding event sales.
After you’ve created events, a new column called Event will appear while you’re building a schedule. To let your employees know which event they’re working, choose the name of the event from the dropdown list that now appears for the shift.
Filter shifts by position or department
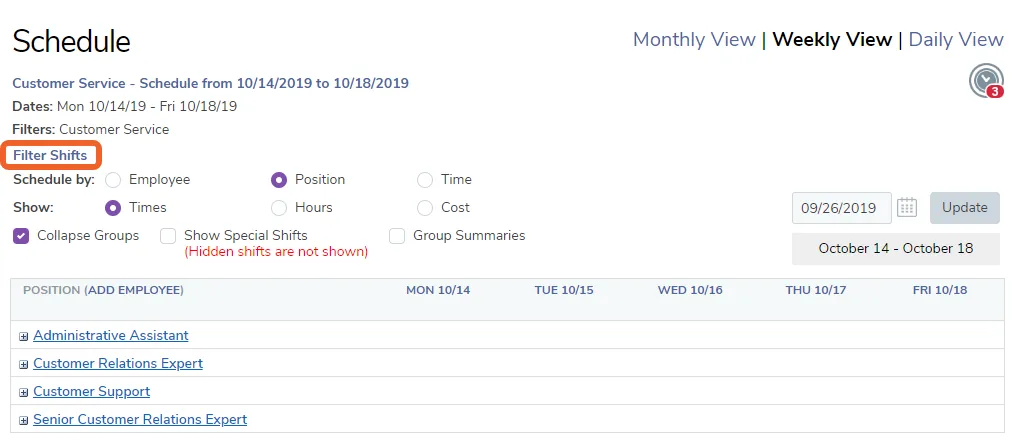
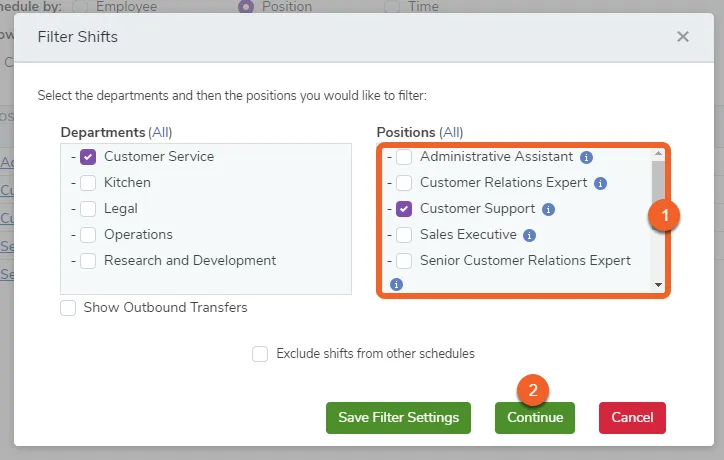
With TimeForge, creating and editing an employee schedule is made simple! We also know that sometimes while creating a schedule, you may find it helpful to filter shifts so that you can ensure coverage for specific positions during the day. For example, a catering company may want to only view the waiters and bartenders for a particular day.
You can filter shifts in TimeForge with just a few clicks.
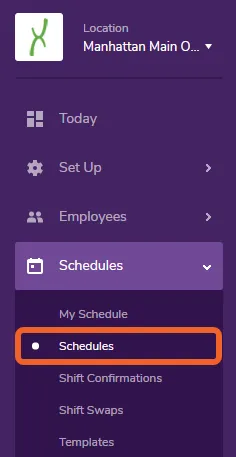
Navigate to the Schedules page under the Schedules tab
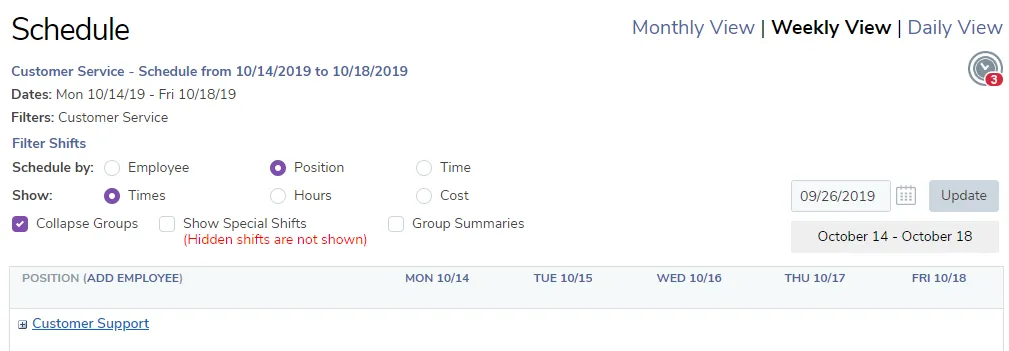
You are now viewing the schedule with only the selected positions.
Print a monthly work schedule
With TimeForge, you have access to the most flexible and powerful labor management system available. TimeForge gives you the ability to quickly and easily create, view, and print work schedules for staff members.
There are many different options for you to print the work schedule for your staff, as well as several types of schedule reports that can be printed.
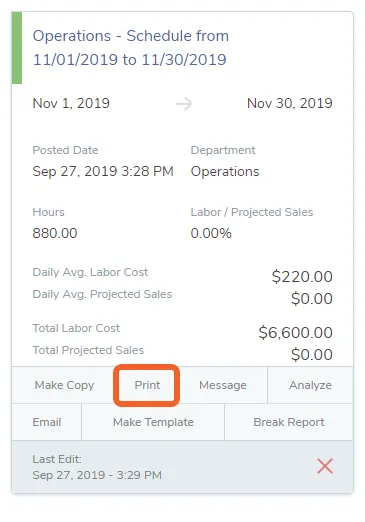
Printing the monthly layout of your employee schedule is easy, and here is how it’s done.
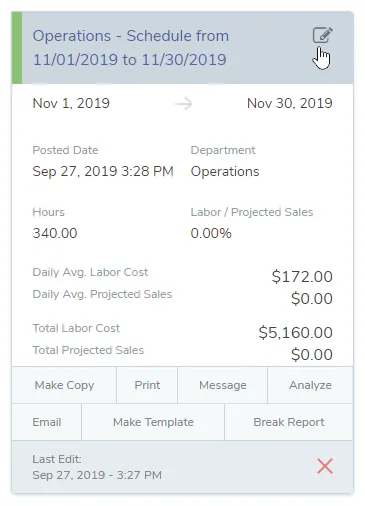
Navigate to the Schedules page under the Schedules tab
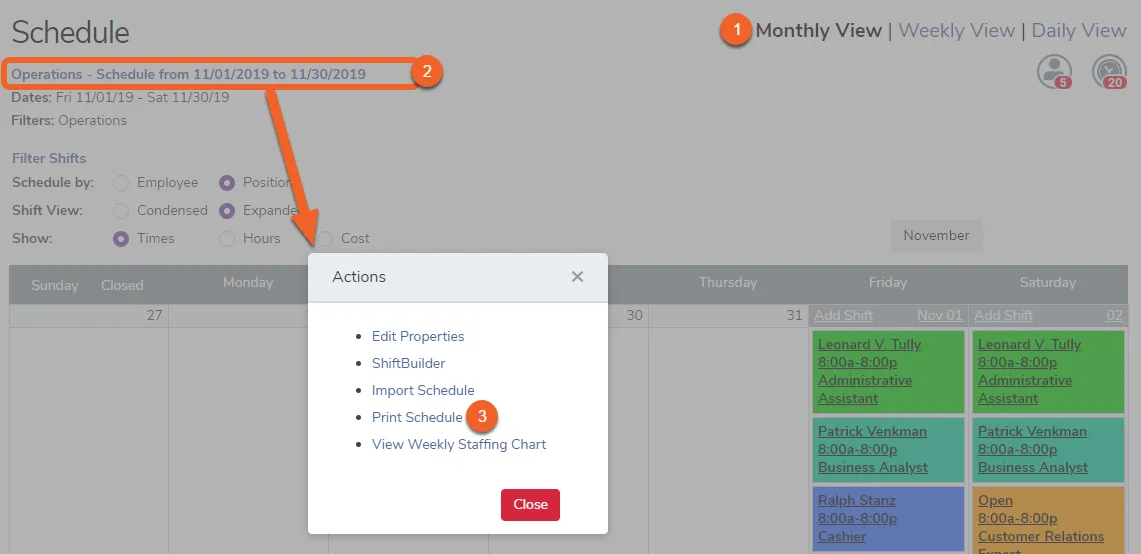
You can also print a schedule from the Actions pop-up while editing/viewing the schedule. This allows you to see a visual representation in calendar view before you print.
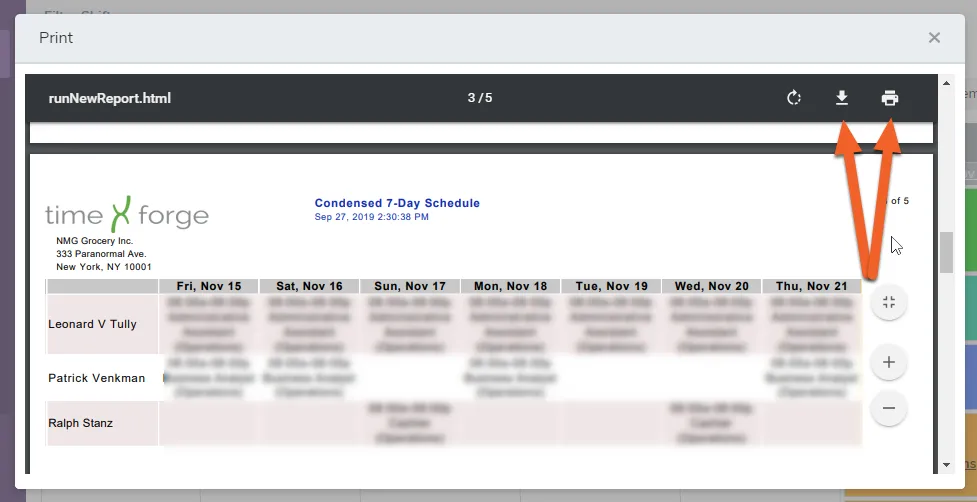
Once you click Print (using either of the above methods), your schedule will appear as a printable PDF on screen, broken up into condensed 7-day segments. If your schedule spans a full month, for example, the PDF will include a condensed 7-day schedule for each week in the month.
Use your browser’s normal download and print methods to save and/or print a copy of the report.
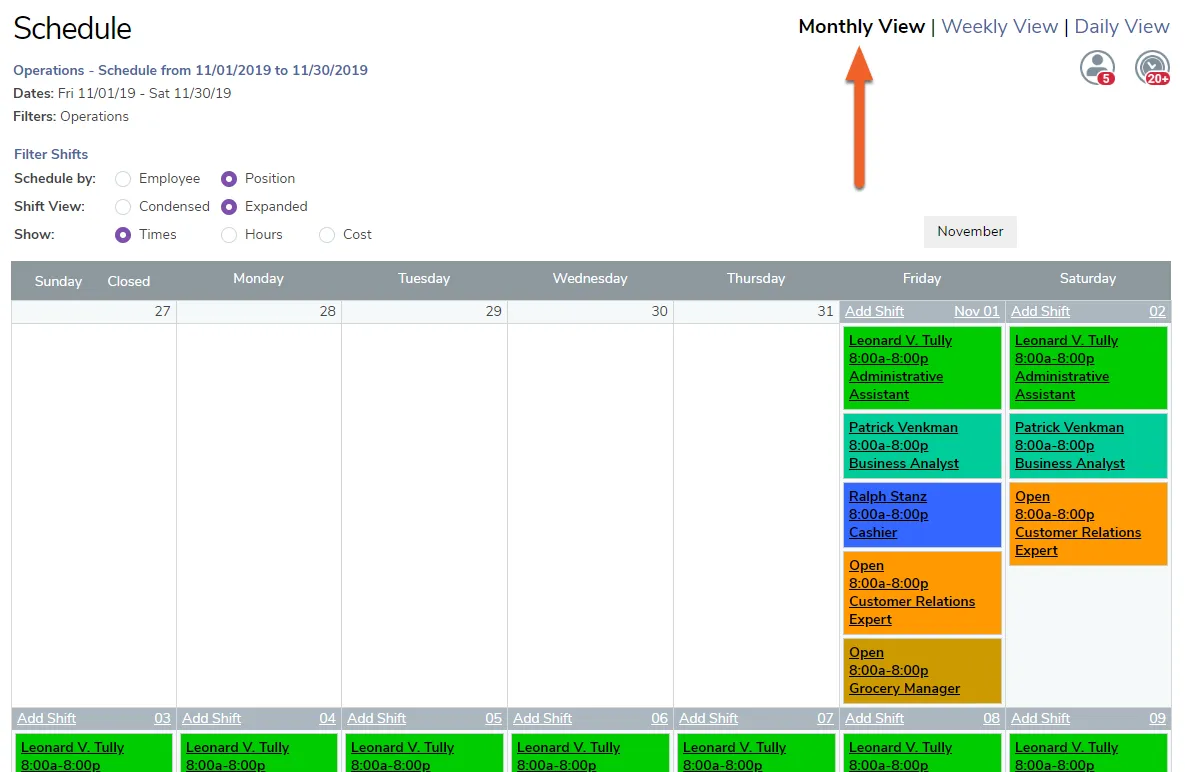
Ways to view a schedule (Daily, Weekly, or Monthly)
With the TimeForge scheduling software, you have the power to create low cost employee schedules that are also effective. Additionally, TimeForge makes it easy to quickly view or print your monthly schedule. You can also quickly switch between weekly and daily views to help you create the perfect employee schedule.
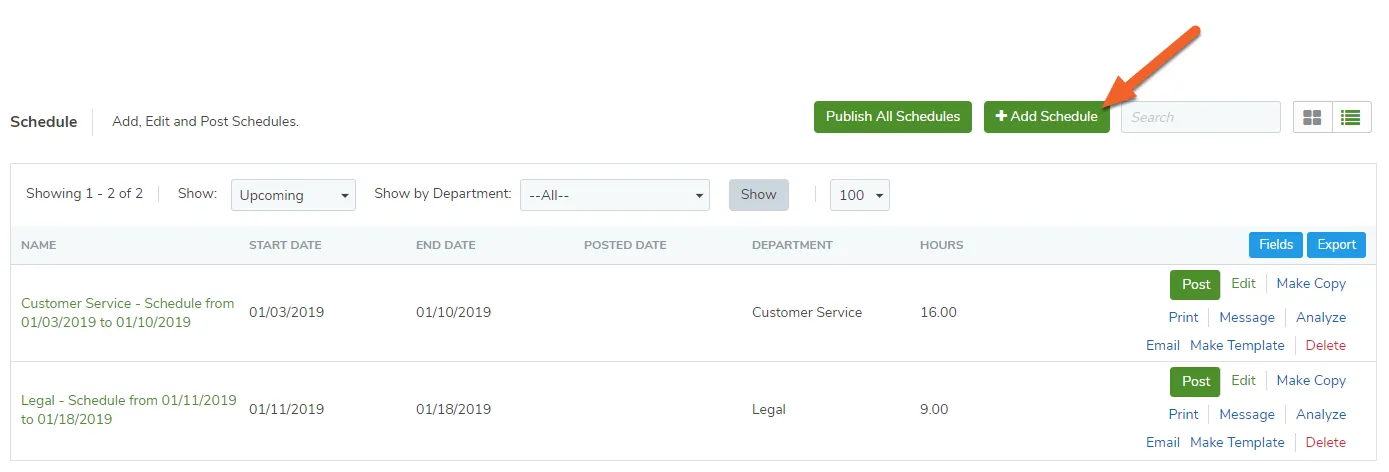
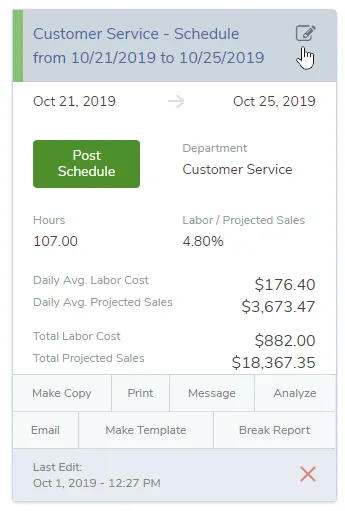
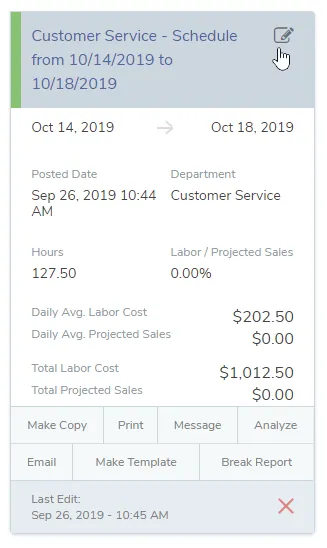
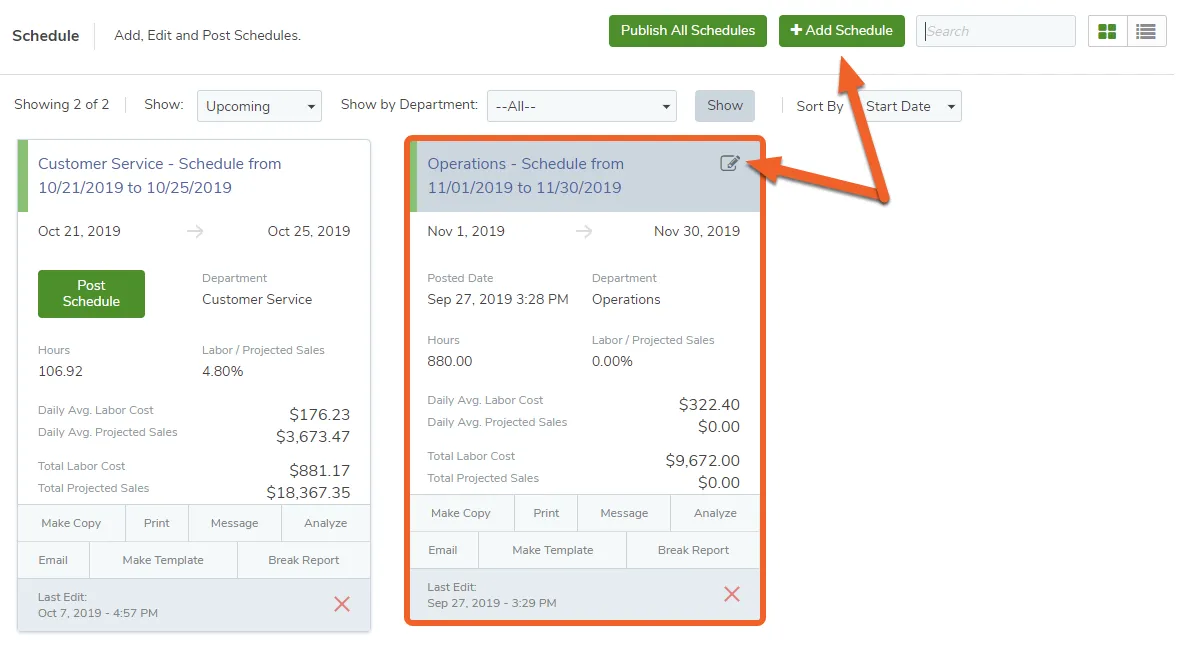
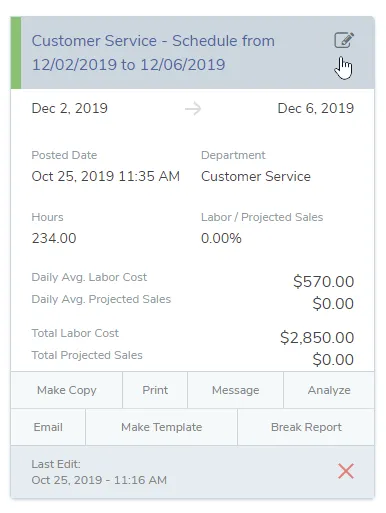
Click on the link/card of the schedule you’d like to work on. Alternatively, you can create a new schedule using the + Add Schedule button at the top of the page.
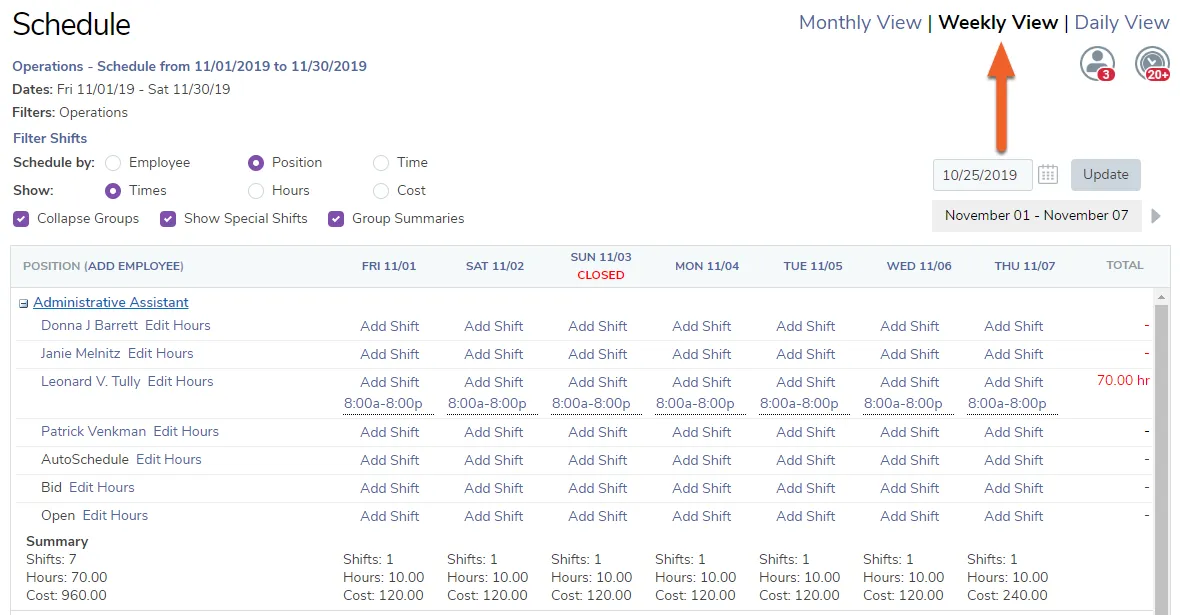
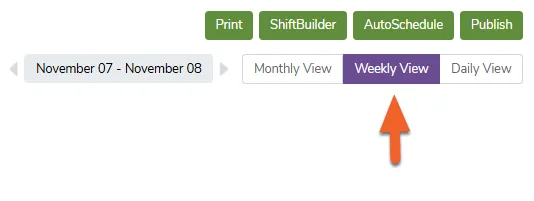
The Weekly View will show you your scheduled positions and employees across the week. By clicking Group Summaries, you can also see the labor hours and costs associated with each position.
When this view is highlighted, you will see schedule information for the selected day, much like you did when you created the schedule.
Create a schedule in under 20 minutes with the AutoScheduler
The AutoScheduler is an industry leading tool that TimeForge offers to its users at no additional cost. AutoScheduler lets you input the basic outline of a schedule, then you click AutoSchedule, and presto! The perfect schedule is born. An AutoScheduled schedule is optimized to make both employees and managers happy by considering employee requests, skill levels, busy times, costs of different employees, and other criteria. The AutoScheduler creates the most profit-friendly and most employee friendly schedule possible.
Here’s how you can use the AutoScheduler to build your schedule.
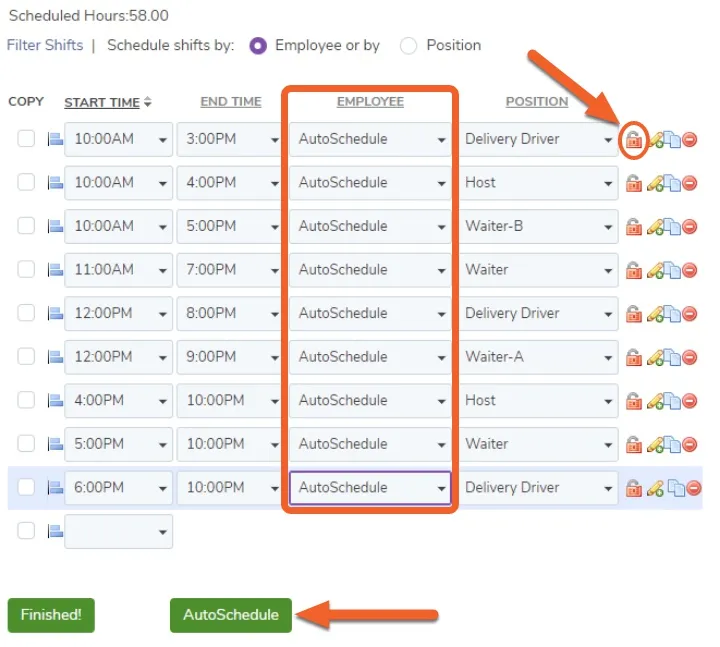
Under the “Employee” column, select AutoSchedule. If there are any shifts you don’t want the AutoScheduler to adjust, click the lock icon on that row so that it is green and locked.
When you’re finished, click “AutoSchedule” at the bottom of the page.
Using the AutoScheduler on the entire week at once
This page will continue to load as long as the Autoscheduler is working. However, you don’t have to stay on this page – the AutoScheduler will continue to work in the background as long as you remain logged-in to your account. Feel free to work on your attendance, sales, or grab a coffee. Whichever is most urgent.
The amount of time it takes for the AutoScheduler to be finished depends on the size of the schedule, but it will never be longer than 20 minutes (it’s written in the algorithm to find the best fitting schedule in under 20 minutes). Once it’s done, all that’s left to do is review the schedule and post it.
Schedule an employee with multiple pay rates
With TimeForge, you have access to the most powerful labor management tool around. One of the most helpful tools in TimeForge is the capability to efficiently and effectively create an employee schedule. Since employees often work different positions, and those positions sometimes have different pay rates, TimeForge gives you the ability to schedule an employee with multiple pay rates.
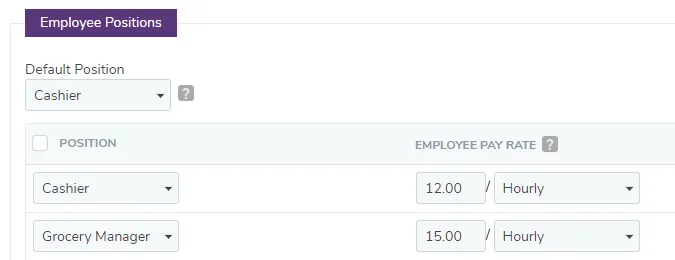
Multiple pay rates are approached just like a regular work schedule. The only difference is an extra step during set up. The employee will need to already have multiple positions and pay rates set up. Then, it is just a matter of scheduling that employee to work multiple shifts with different jobs.
Here’s an easy approach to setting up and creating a schedule for employees with multiple pay rates.
In the example below, the employee is working from 8AM-12PM as an Cashier, which is at a rate of $12 an hour. Then, from 1:00-5:00PM as a Grocery Manager at a rate of $15 an hour.
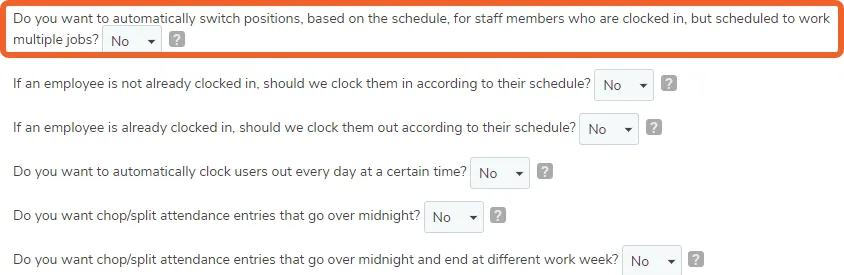
TimeForge Attendance is a powerful system designed to help manage staff clocking in and out. One setting under the Attendance Options controls whether employees should automatically be swapped into different positions based on how they’re scheduled.
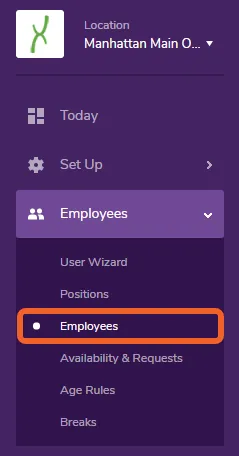
To view and change this setting, open the Attendance tab and select Attendance Options.
If set to Yes, the option below allows you to automatically swap employees’ positions based on the schedule without requiring them to clock out and back in again.
If you make any changes to these settings, don’t forget to click Save at the bottom of the page when you’re finished.
Move all shifts from one employee to another
You will want to move shifts from one employee to another if someone is unable to work scheduled shifts, if you prefer a different staff member to work a scheduled shift, if an employee is terminated, or for any other reason that you want to transfer shifts from one employee to another. TimeForge makes this process easy, simply follow the directions below.
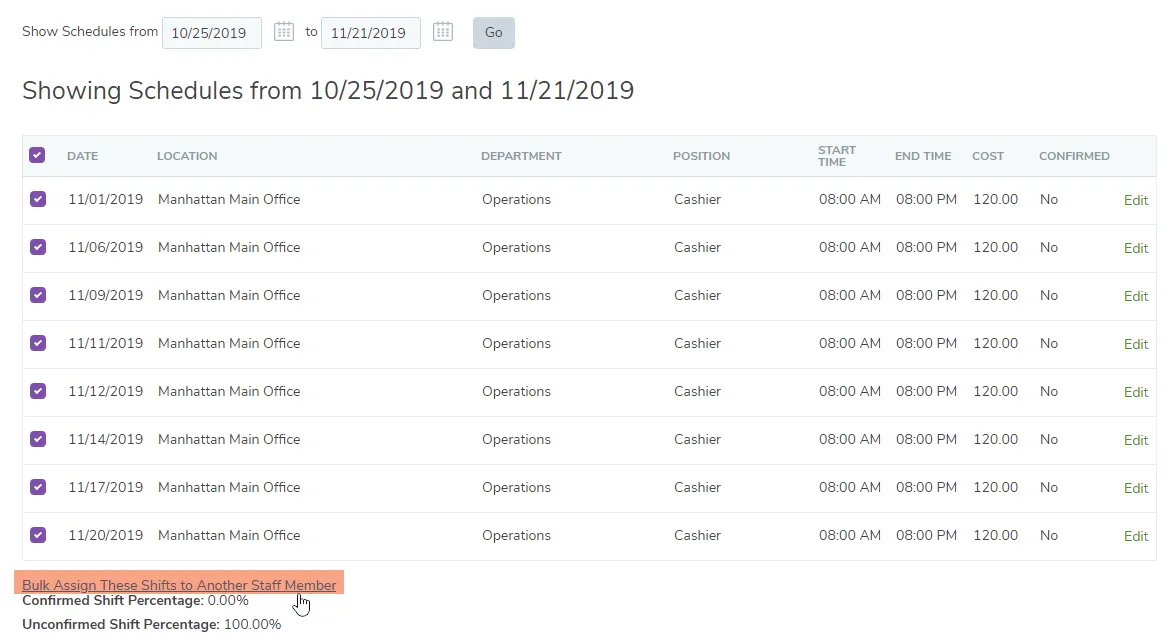
Click on the check boxes next to the shifts you want to remove from this employee. Then, click on the think that says Bulk Assign These Shifts to Another Staff Member. (This link will only appear once you have selected one or more shifts.)
Click on the drop-down menu and select the employee to whom you want to assign these shifts.
Once you’re finished, click the Save button. The selected shifts will be reassigned to the employee you chose.
Approve or deny an employee Shift Swap
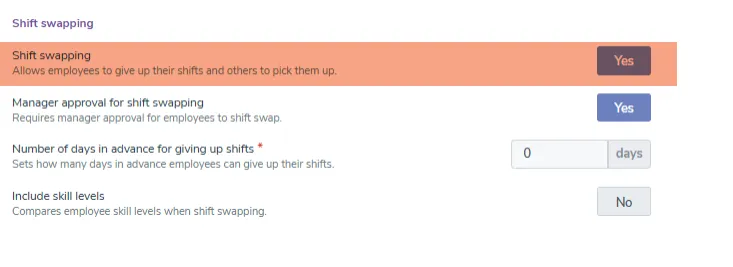
With the appropriate settings enabled, TimeForge allows your employees to swap or trade shifts.
Shift swaps are simple: If Joe Smith doesn’t want to work the shift that he is currently scheduled for, he can “give up” his shift, and another employee can “pick up” that shift. Then, a manager can approve or deny the swap. Of course, Joe is notified that he is still responsible for the shift until the swap has been approved by a manager.
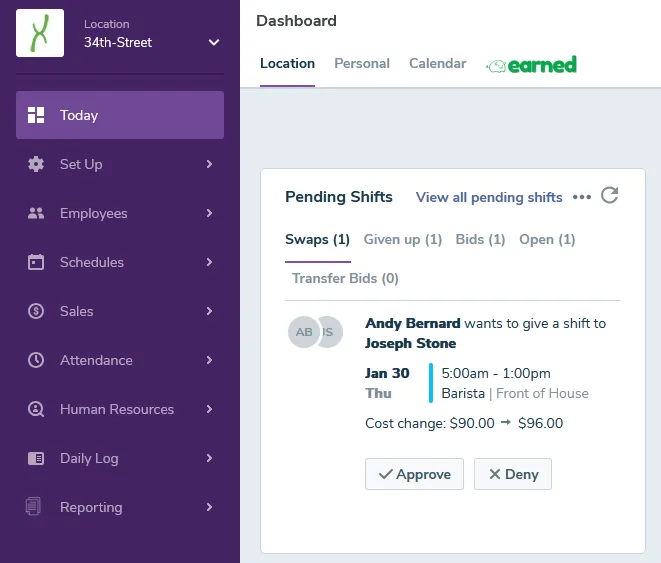
You can view pending shift swaps either through the Schedules tab or through your Today page. After viewing shift swaps, you can accept or deny them, and you can also leave a message for the employee regarding the approval or denial of the swap. TimeForge also has alerts which will email managers (or staff members) when shift swaps are available or need to be reviewed.
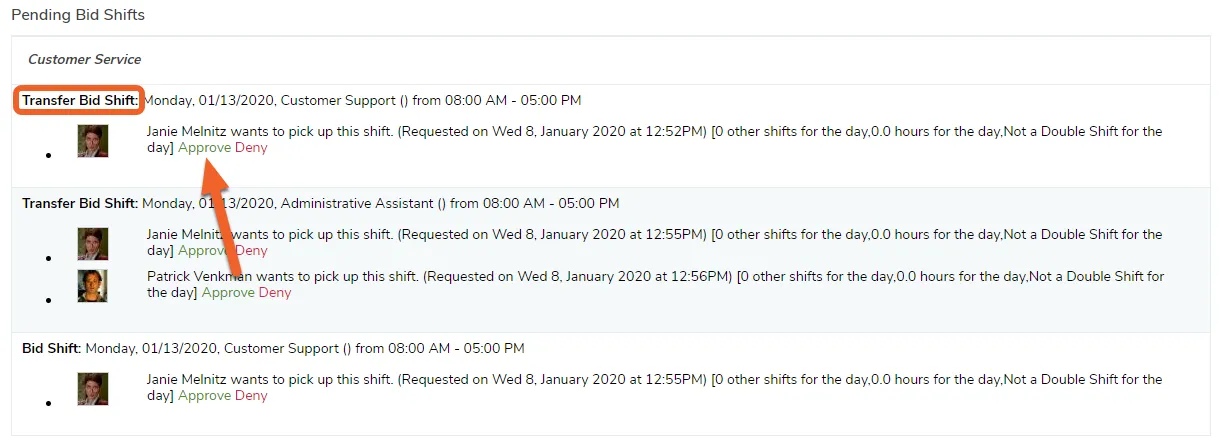
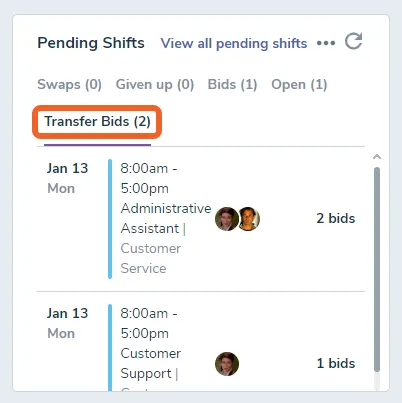
On the Today page, you can view the number of pending and open Shift Swaps. Pending swaps are those that have been picked up but are awaiting manager approval. Given up shifts are those that have been “given up” but not yet “picked up” by another staff member. Shifts listed under the Bids category are bid shifts management created and are awaiting employees to pick up. You can find unassigned shifts under the Open category. Management creates opens shifts to mark a time slot they need cover, but have not decided on which employee to assign to the shift. Finally, Transfer Bids displays bid shifts created by management employees assigned to multiple locations can pick.
When you click one of the categories in the Pending Shifts widget, you’ll see a detailed view of each shift available for pick up or awaiting a manager’s decision.
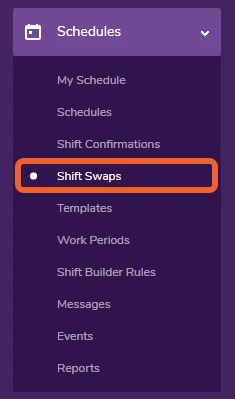
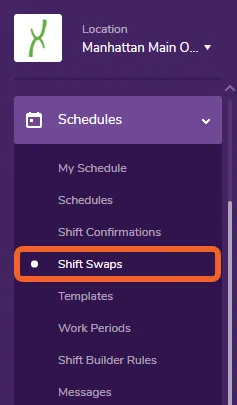
Another way to view pending Shift Swaps (as well as those you have approved or denied) is to open the Schedules tab and click Shift Swaps:
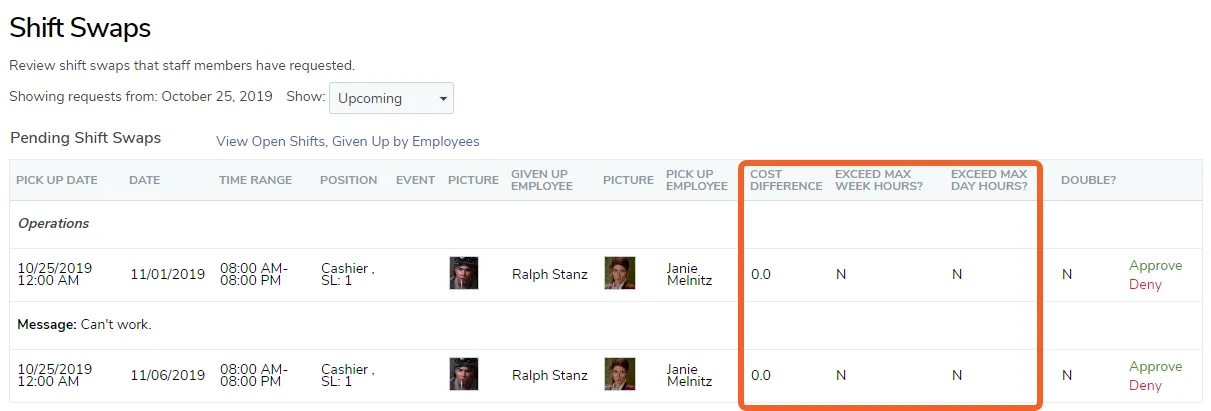
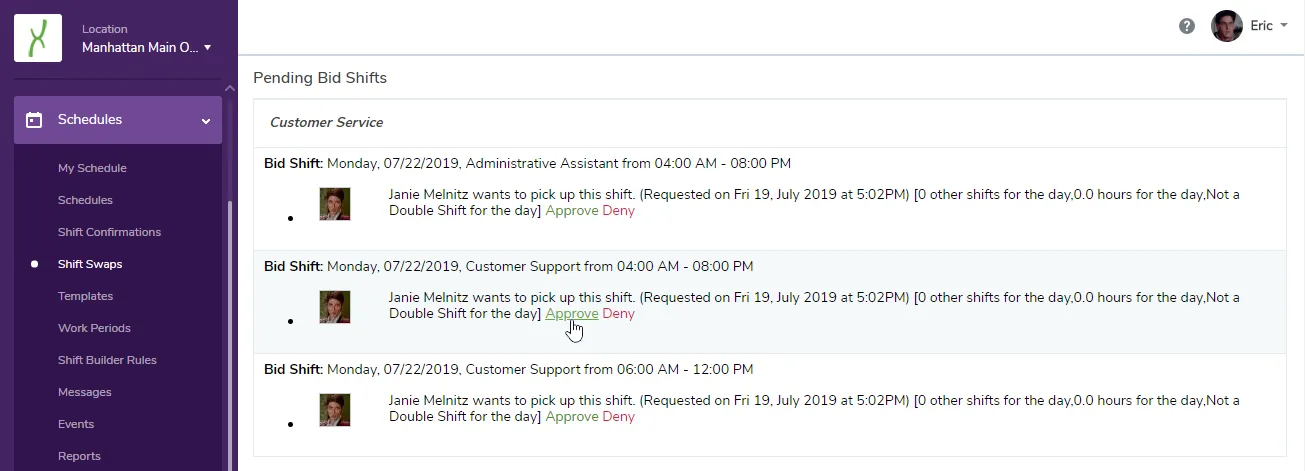
Managers can determine potential cost difference in approving the swap, as well as whether the swap will violate the number of maximum hours assigned to the employee who is picking up the shift.
Click Approve to approve the shift swap or Deny to deny it.
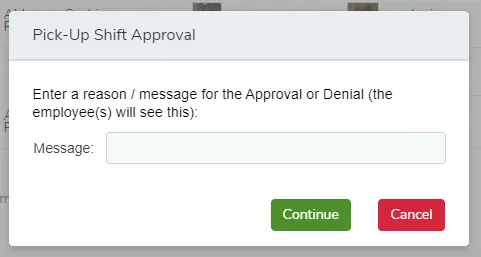
The final step in approving a shift swap is confirming that you wish to approve the swap. When the final approval window pops up, you can even enter a message explaining why you approved or denied the shift swap. Click Continue to finalize the swap.
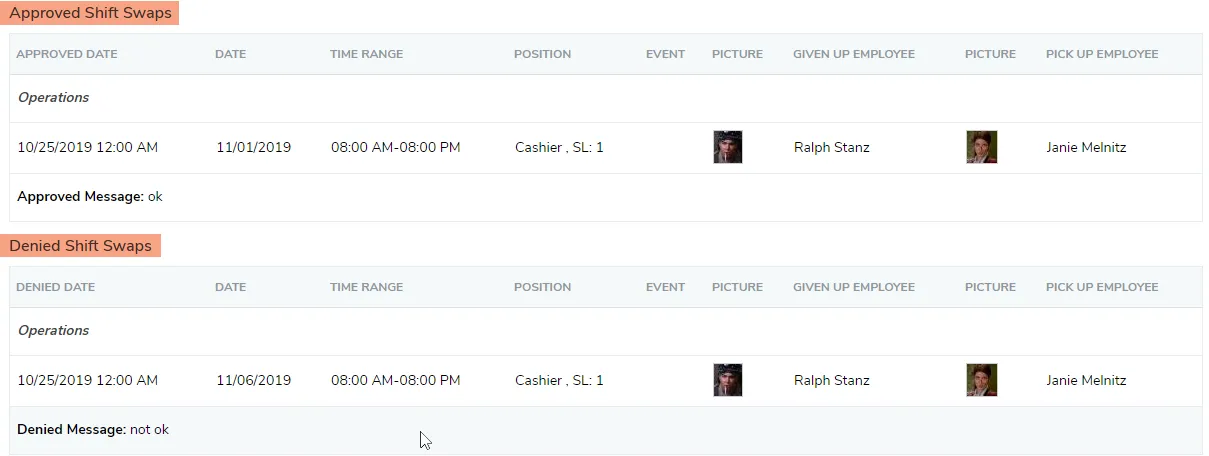
The approved swaps should then show up under Approved Shift Swaps. Denied swaps will show up under Denied Shift Swaps:
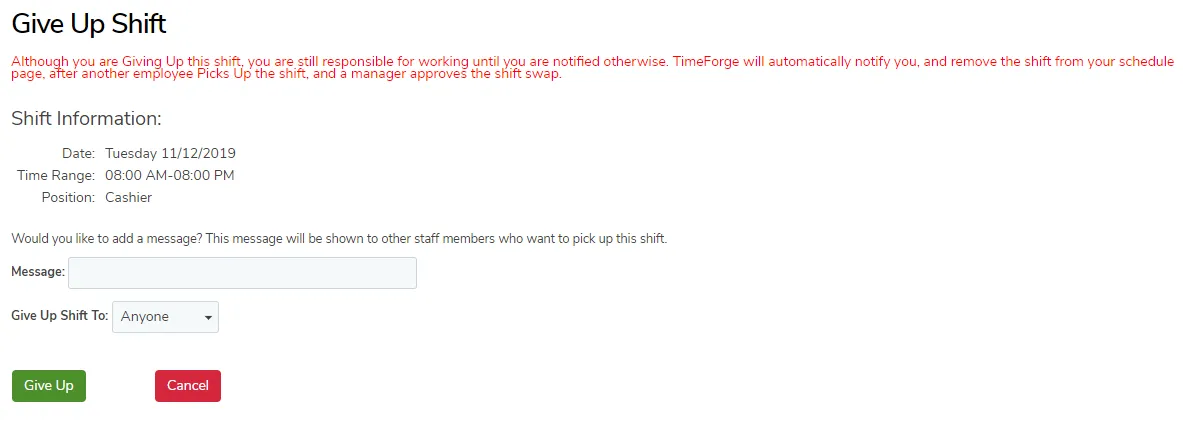
What does an employee see when they attempt to give up a shift?
They are informed that while they may give up the shift, they are responsible for it until someone picks up the shift and their manager approves the swap.
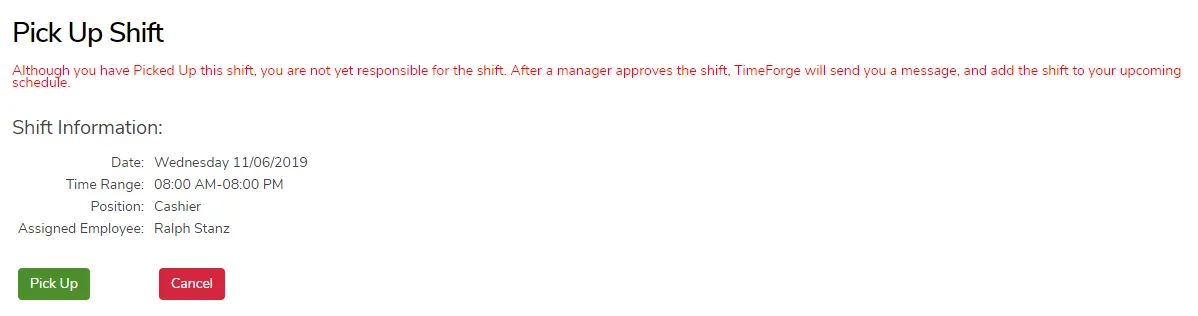
What does an employee see when they attempt to pick up a shift?
They are informed that while they may pick up the shift, they are NOT responsible for it until their manager approves the swap.
Divide the workday into Work Periods
TimeForge gives you total control over every aspect of the employee scheduling process. Work Periods allow you to split the day into different sections of time, such as Morning, Afternoon, and Evening, or Open, Mid, and Close. This is especially useful when you know your times of peak business. For instance, a restaurant may set up “Lunch” and “Dinner” work periosd so that they can make sure those hours are always fully covered.
Here are instructions for adding any work periods that might be relevant to your business operations.
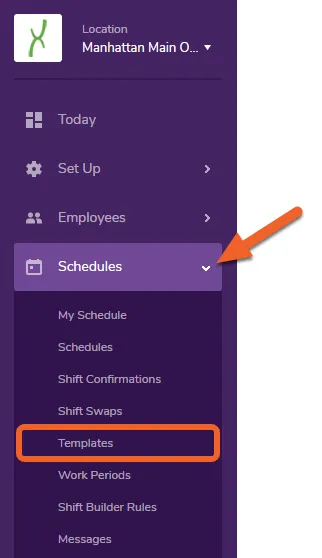
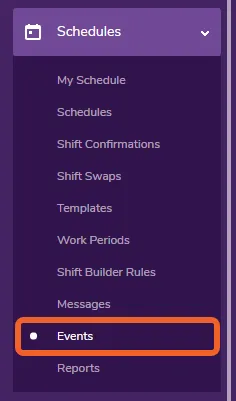
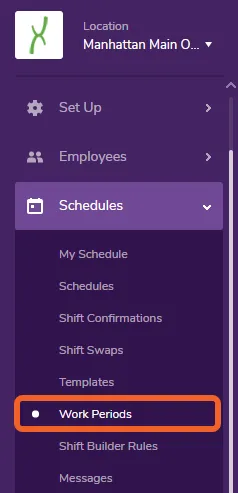
Go to the Work Periods page under the Schedules tab
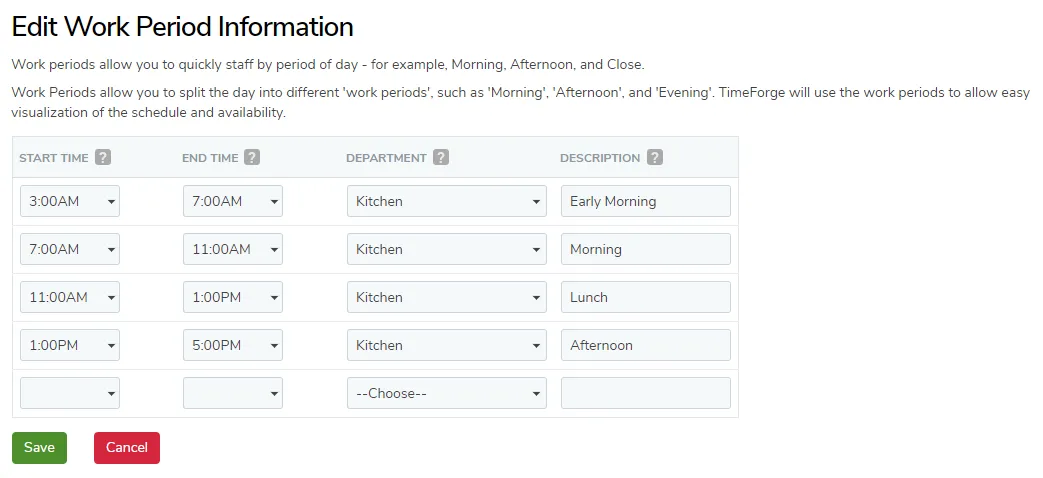
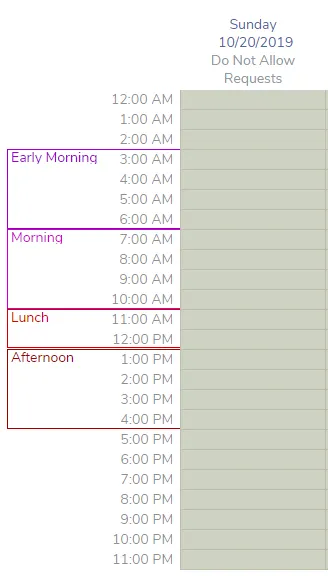
This page will allow you to split the day into different Work Periods. TimeForge will use the work periods to allow easy visualization of the schedule and availability.
Edit the work period information, then click Save at the bottom of the screen when you’re done.
Now when you create a schedule for this department, you’ll see the work periods you defined:
And when you visit your Availability and Requests page, you’ll see the workday divided into the periods you defined:
View your daily labor cost
Analyzing your daily labor costs, or how much employee wages cost each day, is important for understanding your business operations, noticing any room for improvement, and preventing over- or under-staffing in the future.
In TimeForge, there are two easy ways to view the daily labor cost, and both involve the Schedules page. Here are instructions for both methods of accessing your daily labor costs.
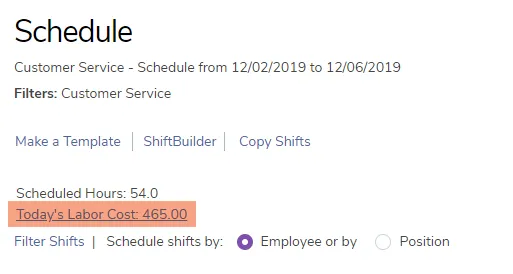
Under the schedule information, you should see a link to Today’s Labor Cost. In this example, we can see that we have 54 hours scheduled and a cost of $465.
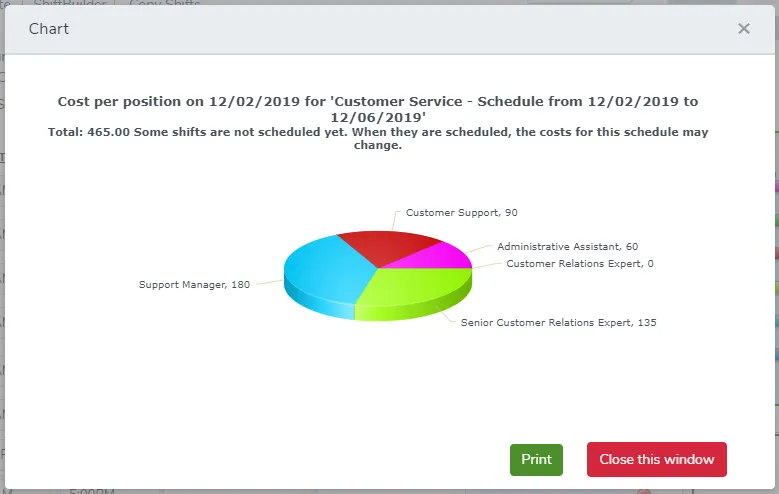
To view a breakdown of cost by position, click the link.
A pie graph will appear, showing daily labor cost by position.
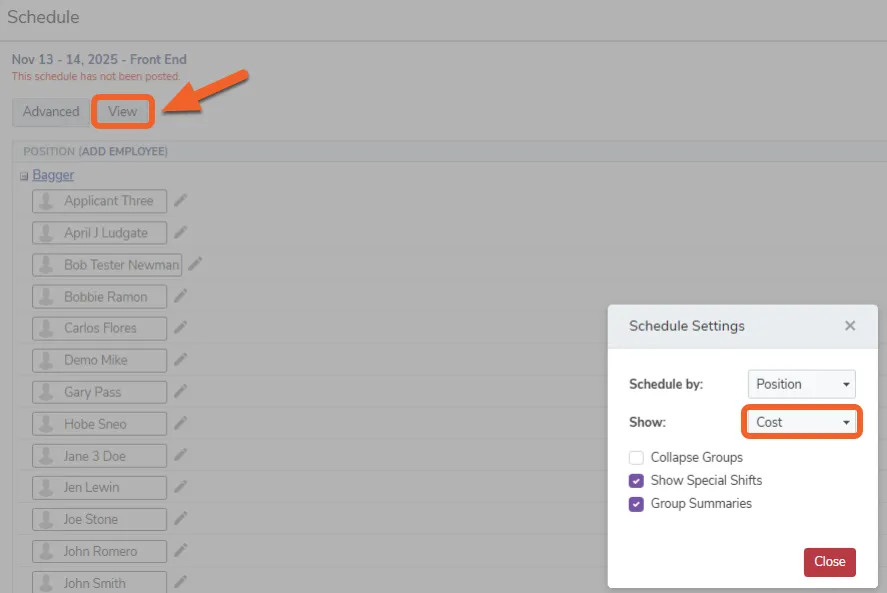
You’ll notice two things when you select Cost. First, the shift times/hours will be replaced with employee cost:
Second, at the bottom of the page, you will see the total costs per day of all shifts, including a Weekly Total at the end of the row:
Configure weekly iterative forecasting and notifications
Weekly Iterative Forecasting allows managers to schedule 2 weeks in advance (or more), but be notified of the impact that more recent forecasting could have on the schedule, and empower the store managers to make adjustments if they choose to. This option allows managers to have information about forecast sales so that their schedules can be more in line with the most recent forecast, or they can choose to leave their schedule as-is, without adjusting.
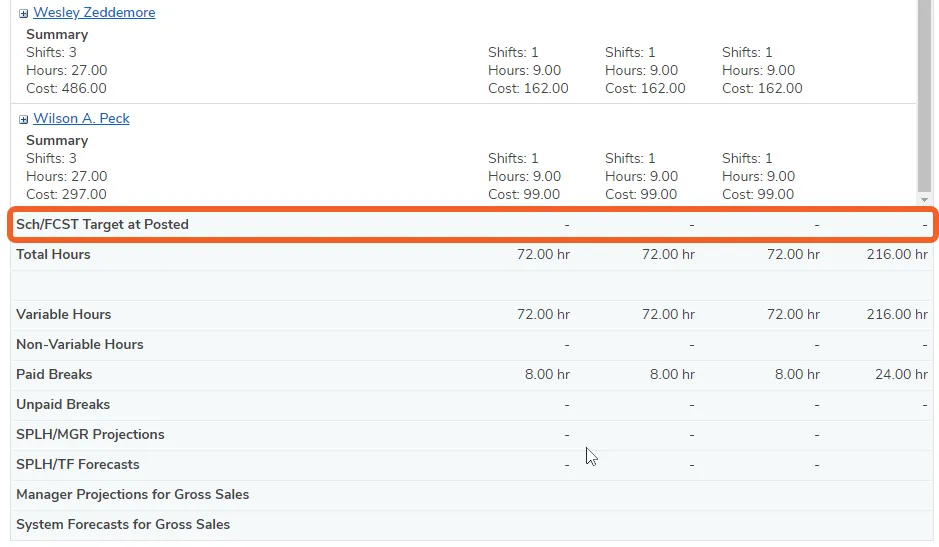
It’s already enabled! On the schedule pages, a new row should now be visible for Schedule/Forecast Target at Posted. TimeForge essentially takes a snapshot of the schedule when it’s published and preserves that data on that row in the schedule.
There are only two options to consider when using weekly iterative forecasting, and both are very easy to set:
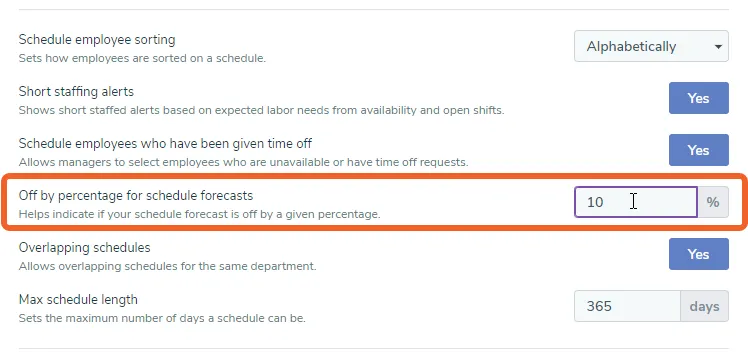
The “off by percentage for forecasts” option needs to be configured for each location. This setting tells TimeForge when to notify managers that the forecast has changed the recommended schedule.
Managers need to opt into the notification about schedule forecast changes.
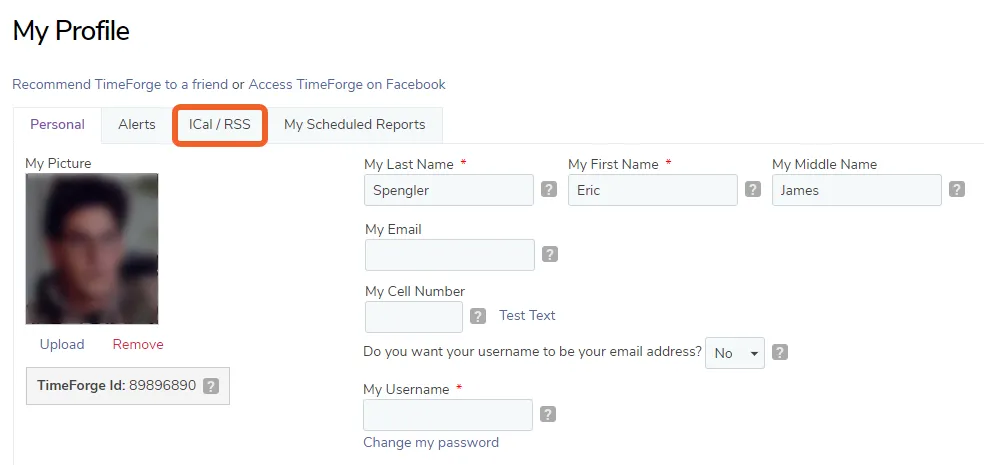
To do this, open up your profile and select the Alerts tab. The option you want to enable is at the bottom of the list:
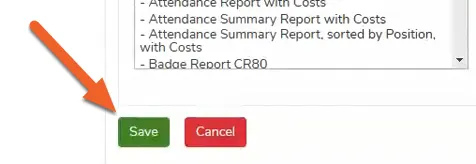
Don’t forget to save your settings!
Create short term labor goals
TimeForge allows managers to configure their sales per labor hour (SPLH), costs per labor hour (CPLH) calculations, and labor targets in order to meet their store’s labor goals while remaining within their labor budget.
This guide will show you how to set up your location correctly so that you can make use of this feature and will then walk you through creating a schedule that meets your labor goals and budget.
The first thing you’ll want to do is make sure your location is configured with the CPLH calculations and labor target percentages that will be used to calculate labor target hours.
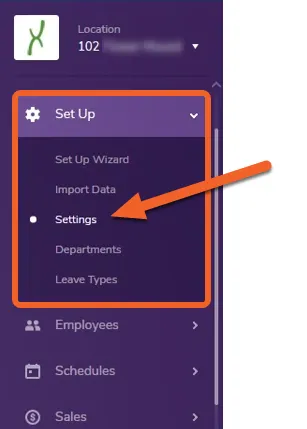
Go to the location Settings page under the Set Up tab
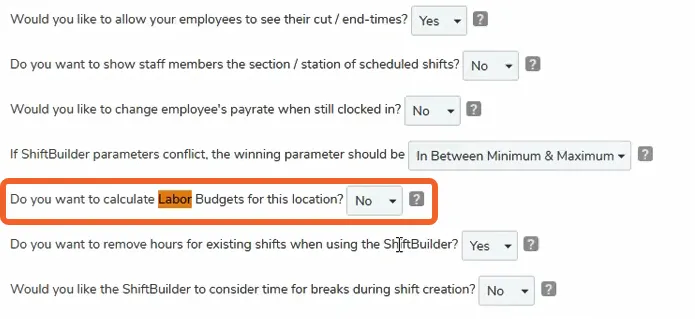
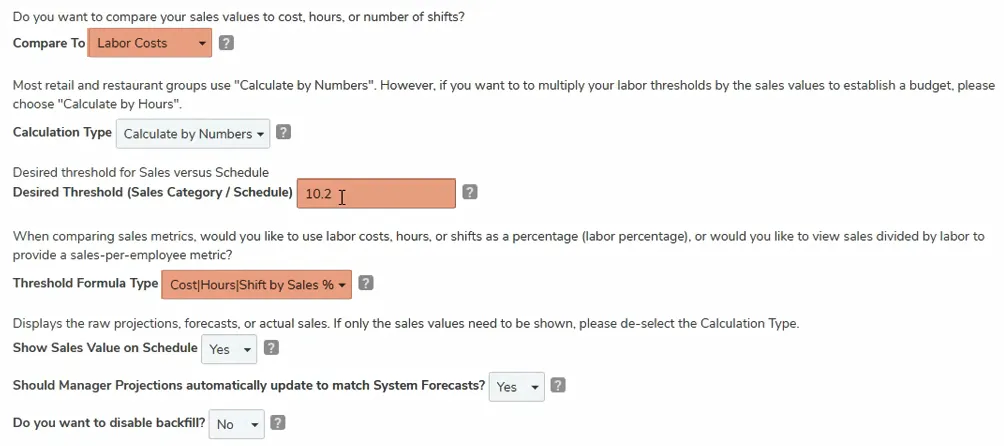
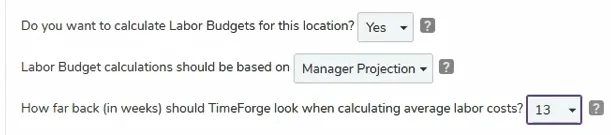
On the Settings page, find the setting that reads, “Do you want to calculate Labor Budgets for this location?”
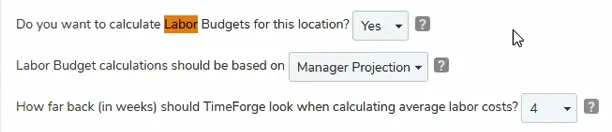
Select “Yes” for this setting to enable it (if it is not already enabled). This will cause two related settings to appear underneath:
Labor Budget calculations should be based on the Manager Projection, and TimeForge should look back 4 weeks when calculating average labor costs.
(If your location does not have sales data from the past four weeks that can be used to make accurate calculations, you can set this number higher to look back even further in time.)
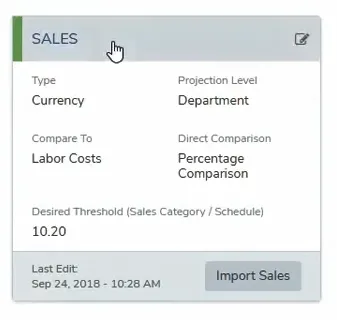
You should be comparing your sales values to Labor Costs, and when comparing sales metrics, you should be looking at Shift by Sales %. Your desired labor target should be set to whatever your goal is for that location. In the example below, it is set to 10.2.
If you don’t have recent attendance, you can use the back button or the date selector to locate your most recent attendance data.
In this example, we don’t have any attendance in the past few weeks, so we need to go back and update our location settings for labor to look further back than four weeks. You can set TimeForge to look back as many as 13 weeks (shown below).
(In most cases, for active stores, there should be recent attendance data, and this step should not be necessary.)
Next, we need to make sure we have sales data.
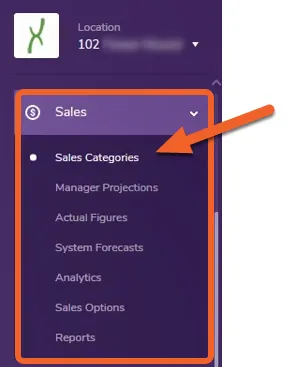
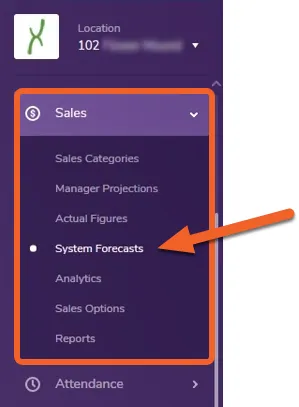
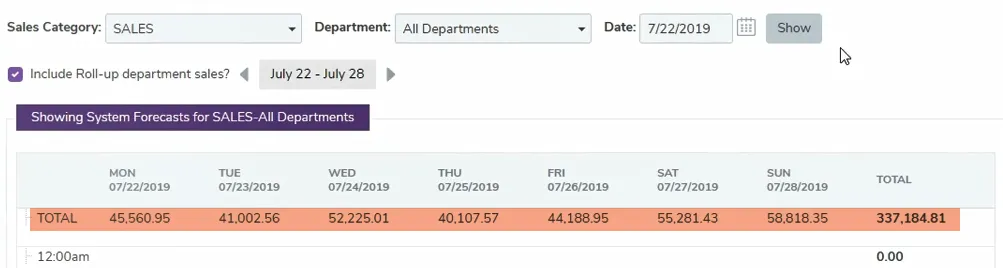
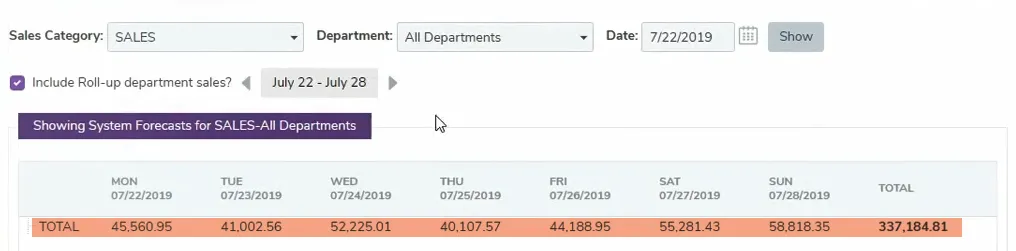
Go to the System Forecasts page under the Sales tab
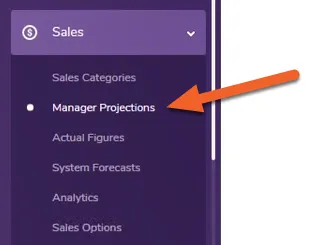
With the Sales tab still open, select Manager Projections from the left side menu.
Again, as with the forecasts, we want to make sure we have Manager Projections through this week and next, in order to accurately create our next schedule to meet our labor and budget targets.
We can also use the Calculate Weekly button to add projections for additional weeks.
Click the + Add Schedule button in the top right corner of the page, then fill out the form as usual.
After handling any employee requests for time off, select your weekly template and then hit the Assign Employees button at the bottom of the page.
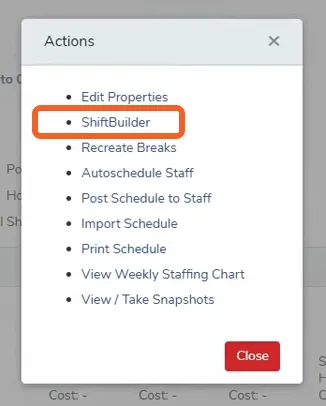
TimeForge will proceed to autoschedule your employees using your chosen template. Selecting the name of the schedule will show you a pop-up list of additional actions.
Choosing ShiftBuilder will allow you to generate the schedule based on your shift rules.
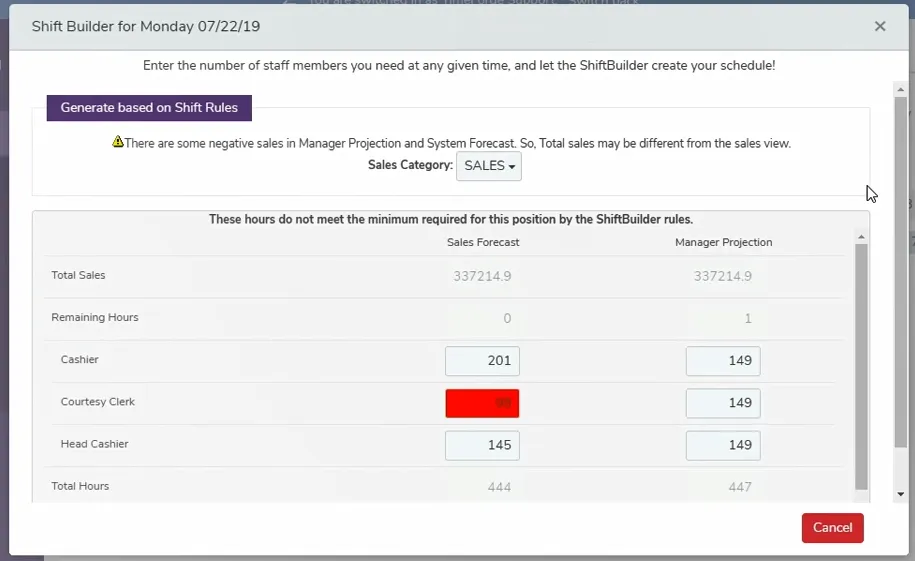
So for example, if the Sales Forecast for the schedule is 337214.9 (as shown above), TimeForge will allocate 444 total labor hours based on the SPLH. It then distributes those hours across positions based on how attendance is typically allocated.
If a value is in red, it means the allocated hours don’t meet the minimum required for that position, as defined by the shift builder rules. Thus, in the example above, if we schedule the 98 hours, we can expect to be short staffed in courtesy clerks.
The values in these boxes can be adjusted, but for this example, we’re going to go ahead and scroll down and Distribute by Forecasts.
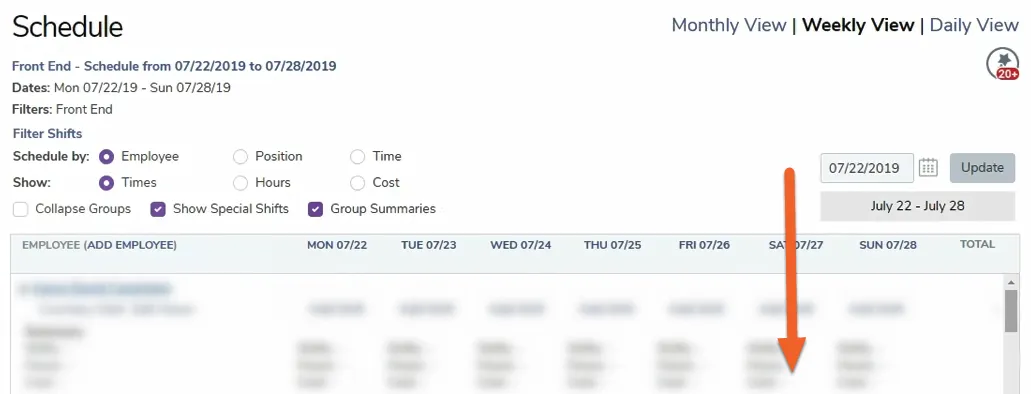
TimeForge will generate labor coverage among staff members based on the forecasted hours. Let’s scroll down to the bottom to view the summary.
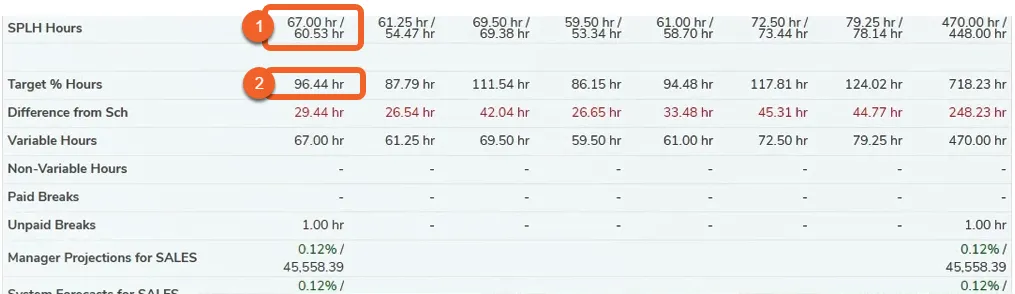
Here we can see some interesting information about our labor allocation. Let’s look at the first column, which is for Monday 07/22 (the last column in the grid represents the entire week):
Next to SPLH Hours, the top number is what’s on the schedule based on what the shift builder just generated. The bottom number is the number of hours that TimeForge thinks we need based on SPLH and the distribution of sales.
Next to Target % Hours, based on our labor target for this store (we used 10.2%), our SPLH is estimating that we should be using 96.44 hours this day. The difference between that number, and what we have scheduled, is shown below it in red (29.44 in this example). This means we have 29.44 hours we could allocate before we exceed our labor budget for that day.
View schedules and timecards using RSS
TimeForge will allow you to view schedules, messages, time cards, and more using any phone capable of reading an RSS feed. Of course, you can always use a web browser, such as Mobile Safari or Opera Mini, to view the TimeForge website at https://app.timeforge.com.
However, TimeForge schedules, messages, shift swaps, and much, much more can be viewed directly on your cell phone, iPhone, Blackberry, or other non-web browser reader by using RSS feeds.
TimeForge uses RSS feeds to deliver the information directly to your cell phone and requires that your phone be able to read both encrypted RSS feeds (over an SSL connection), as well as secured RSS feeds (which require a username and password).
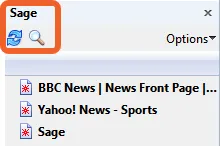
Each RSS program is slightly different in how it requires that you add a feed. In this example, we are using Sage, a popular RSS feed reader for the Firefox web browser.
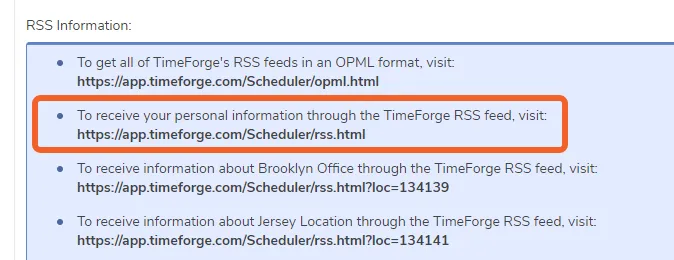
Click on the Find icon. Other RSS readers may require that you enter the URL of the RSS feed. If that is the case, enter the RSS RSS URL directly into the software. This URL is most commonly:
Some RSS readers (such as Viigo for the Blackberry) do support encryption, but do not support username and passwords. In some cases, these RSS readers can be coerced to support username and passwords by using a URL with the format of:
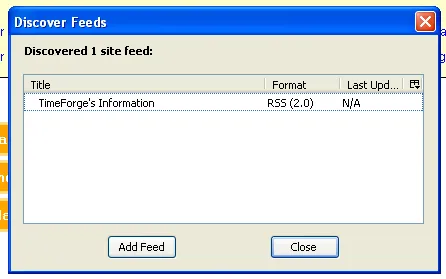
Sage, like many mobile web browsers (such as Safari and Opera) will automatically find any relevant TimeForge RSS feeds. Select the feed (“Timeforge’s Information”), and then click Add Feed.
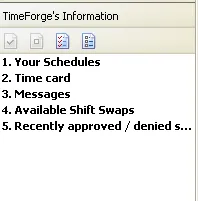
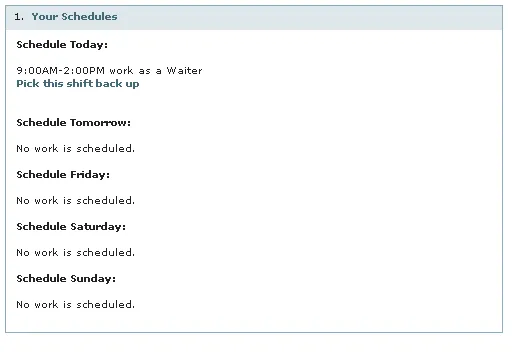
These feeds have a lot of information in them, and contain details such as:
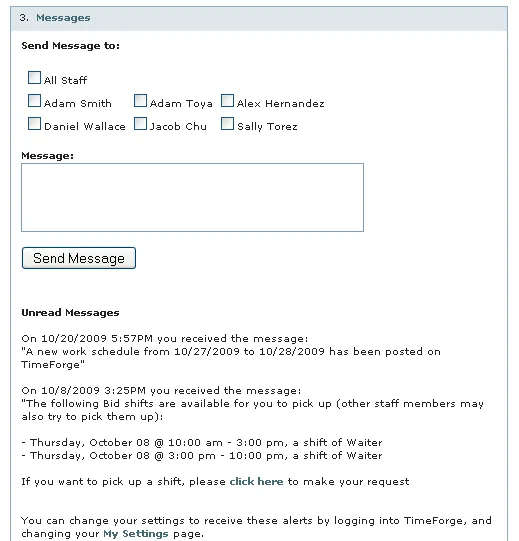
Using the TimeForge RSS feed, you can easily view and send TimeForge messages.
Maximize scheduling efficiency using Bid Shifts
In an organization with variable labor needs, defining fixed employee schedules can be operationally inefficient. Not only do employee availabilities often change, but schedules in which employee preferences are not considered can have a damaging impact on employee morale and turnover. Many organizations resolve this by utilizing tools likeTimeForge’s AutoScheduler to automatically and fairly distribute shifts to employees. However, it’s important to note that TimeForge offers a powerful alternative to AutoScheduled shifts: bid shifts.
Bid shifts allow employees to pick up their own shifts. While this may initially bring to mind images of mass chaos, our customers find that allowing bid shifts within the structure provided by TimeForge often contributes to a positive culture of accountability and payoff while reducing managerial time spent scheduling. Employees love the control and flexibility that Bid Shift scheduling affords them, and managers appreciate spending less time guessing when people do or don’t care to work.
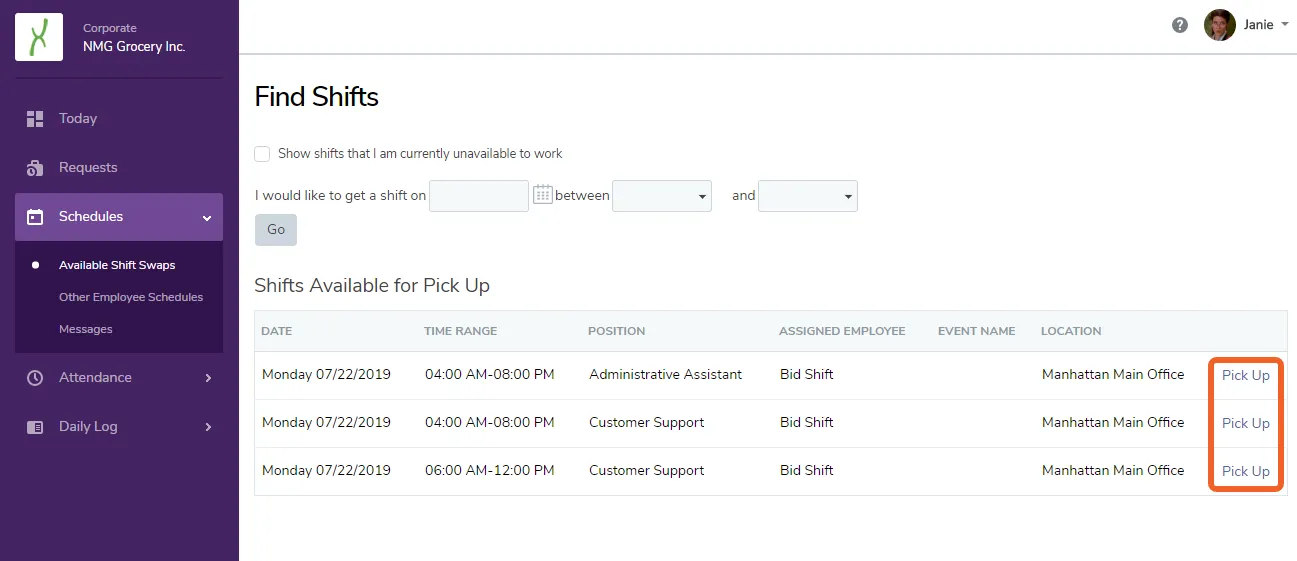
TimeForge’s Bid Shift feature was designed to complement your other scheduling strategies and works seamlessly with your other settings. Details on how it works are below, but the basics are simple: when a schedule is posted, employees select the shifts they want to work.
Instead of assigning a shift as “AutoSchedule” or assigning it to a specific employee, the shift instead is assigned as “Bid”. This can be done automatically by the ShiftBuilder during schedule creation, or the scheduling manager can choose to mix some Bid Shifts with AutoSchedule shifts and employee-assigned shifts.
When the manager posts the schedule, a notification is sent to eligible employees (according to their notification preferences) letting them know that a shift is available for Bid. In order to be eligible to pick up a particular Bid Shift, an employee must meet the following requirements:
Eligible to work the position and department associated with the bid shift
Not scheduled during that time
Not Unavailable during that time
Optionally, you can choose to use Skill Level Enforcement to ensure that difficult or fast-paced shifts are only available to high-skill employees. Read more about skill level enforcement here.
The employee can bid on the shift from their mobile app or any device with internet access, simply by tapping Pick Up under Schedules > Available Shifts.
In most organizations, a manager review step is required. With TimeForge, this manager review step can be configured to be skipped if your organization desires. However, we strongly recommend a manager review step to ensure compliance and avoid unnecessary overtime.
If the manager review step is enabled (as it is by default under Location Settings), then the manager will be notified when a shift is bid on (according to their notification preferences). TimeForge will show the manager the “what if” scenario of approving a particular bid on a shift, including approximate cost, overtime status, etc. If multiple employees have bid on the same shift, the manager can use this information to select the winning employee.
When a manager selects the shift winner, that employee is assigned the shift, notified (according to their notification preferences), and the other bidders are also notified that they did not win the shift (according to their notification preferences).
Additionally, it’s important that managers fill any shifts that were not bid on to ensure adequate coverage. TimeForge offers notifications and reports to help the manager quickly identify any shifts that have gone unfilled, and the manager can then fill the shift or AutoSchedule it.
Further fencing of bid shifting is available, to ensure a frictionless and satisfying bidding experience for both managers and employees without negatively impacting operations. For example, TimeForge can ensure that all bids are input several days before the shift. Many organizations set this parameter at 3 days, to ensure the scheduling manager has time to review the bids, but some organizations set this parameter at 7 or 14 days to assist with advanced scheduling regulations in their areas of operation.
If you choose to enable bid shifts, it’s important that you discuss with your operators the HR repercussions and warnings that TimeForge will display.
For example, some risks of allowing Bid Shifts and TimeForge’s solutions to those risks are listed below.
Risk
Solution
Employees don’t get selected for their chosen shifts.
Ensure managers are well coached on how to avoid favoritism and ensure transparency in their employee bid selection. Alternatively, you can allow first bid to win without manager review.
Employees don’t bid on a shift and it remains open, leaving the store short-staffed.
Ensure managers are paying attention to open shift notifications and reports. Additionally, managers might need to allow fewer bid shifts and utilize more AutoScheduled shifts and employee-assigned shifts.
Managers don’t select bid winners in a timely fashion, leaving shifts open and the store short-staffed.
Ensure managers are paying attention to open shift notifications and reports. Additionally, requiring bids a certain number of days in advance of the shift will reduce the strain on managers to provide quick turnaround on bid approvals. Alternatively, you can allow first bid to win without manager review.
Schedule and approve transfer bid shifts
Transfer Bid Shifts allow managers to open up bid shifts to employees from other locations, as well as prevent employees from being able to bid on shifts that exceed a configurable limit of overtime. The idea is that if two stores are nearby to one another, employees should be able to pick up shifts from either location without necessarily being assigned to that location. TimeForge makes this easy.
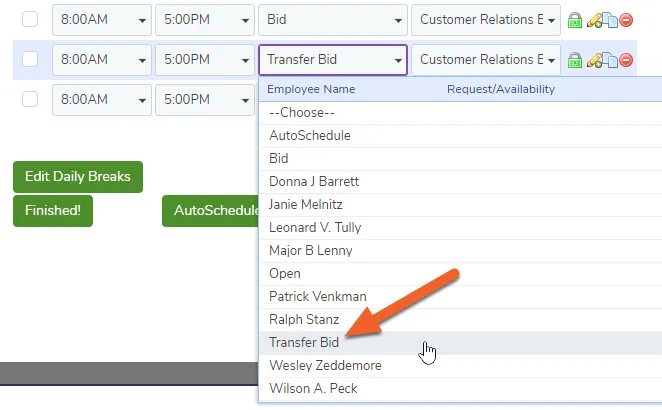
Once Transfer Bid Shifts have been enabled, managers will notice “Transfer Bid Shift” as a shift assignment option (in addition to “Open,” “AutoSchedule,” “Bid,” and selecting a specific employee name). Managers will also notice “Transfer Bid” as a new section in the “Pending Shift Swaps” area.
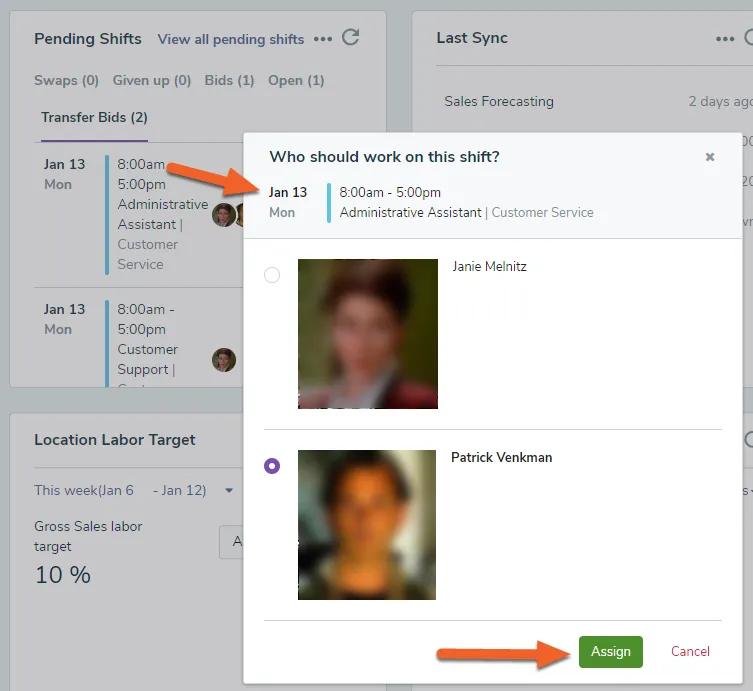
If you’re using the Pending Shifts widget, you can view and approve pending bids, including Transfer bids, from the Location dashboard.
To approve and assign a shift, click the shift, select the employee you’d like to work the shift, and then hit the Assign button.
Set up Transfers and temporary store assignments
TimeForge helps you dynamically meet your staffing needs by allowing you to temporarily transfer employees and shifts to different departments or locations. The day after the transferred shift ends, the employee assigned to the shift will automatically be removed from the temporary store assignment.
This guide will show you how to properly set up your TimeForge account to allow transfers.
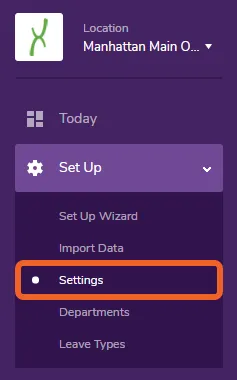
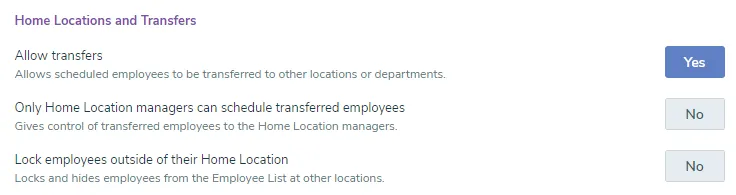
Before you can use Transfers, you’ll need to make sure your settings are configured correctly. The settings that enable and control Transfers are found at the Location level under Set Up > Settings.
At minimum, the option to Allow transfers must be set to Yes.
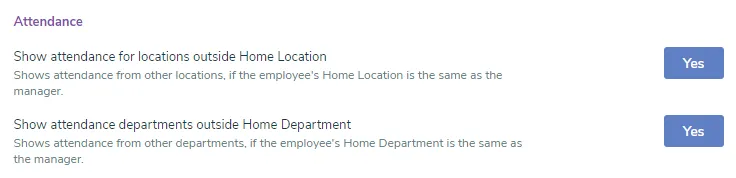
Additionally, to view outbound transfers, at least one of the following must also be set to Yes at the Corporate level under Set Up > Company Settings:
Show attendance for locations outside Home Location
Show attendance departments outside Home Department
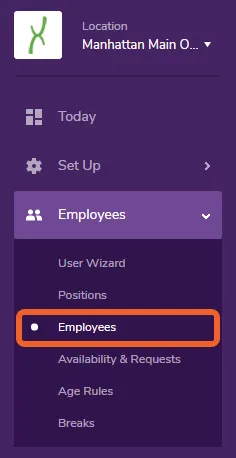
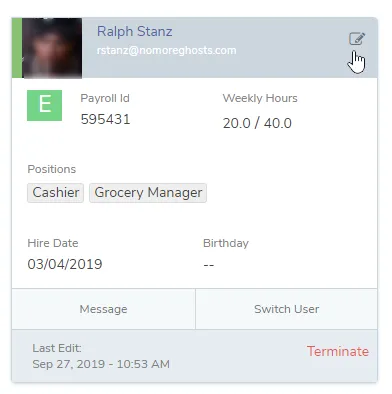
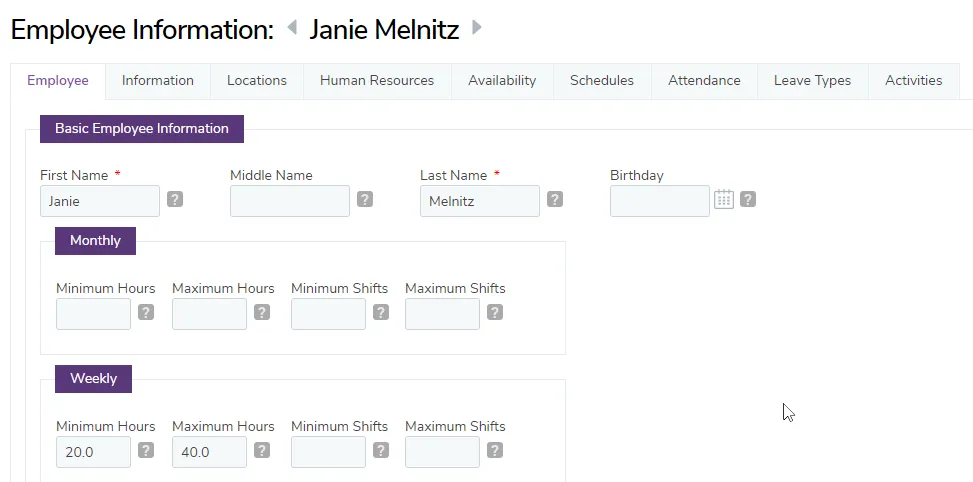
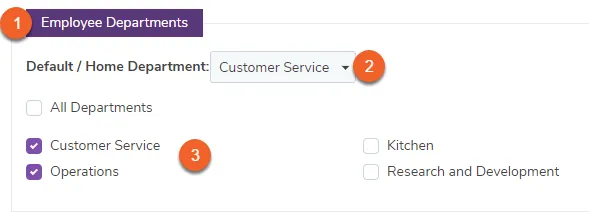
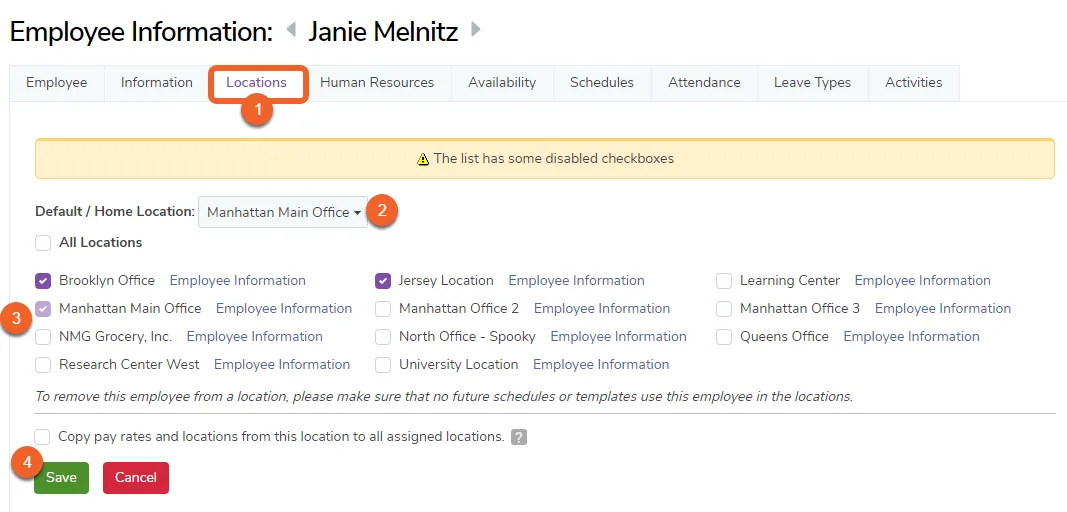
After you configure your TimeForge account to enable Transfers, you’ll need to make sure the employees you want to transfer are set up with the correct Home Locations and Home Departments. This will allow you to see transferred employees and where they came from when you’re looking at a schedule.
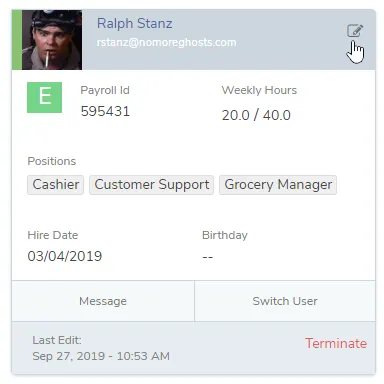
To do this, edit the employee to bring up their information:
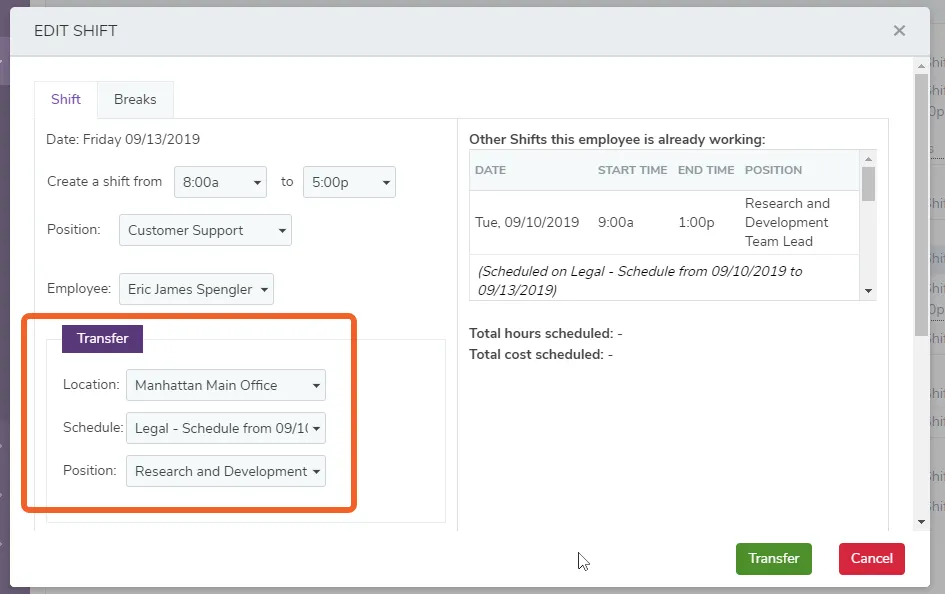
When you’re creating an employee schedule, you can now create shifts and then choose to transfer those shifts to schedules in different departments or locations, allowing you to temporarily reallocate labor as needed. The employee assigned to the shift will be transferred to the chosen department and location for the duration of the shift.
The day after the transferred shift ends, the employee will be automatically removed from the temporary store assignment – no further action is required on your part.
How to transfer an employee shift:
In your schedule, make sure you’re under the Weekly View.
Click Add Shift for the employee you want to transfer on the date you want the transfer to occur.
Fill out the transfer information, including the location and schedule to transfer the shift to (required).
When you’re finished, don’t forget to save!
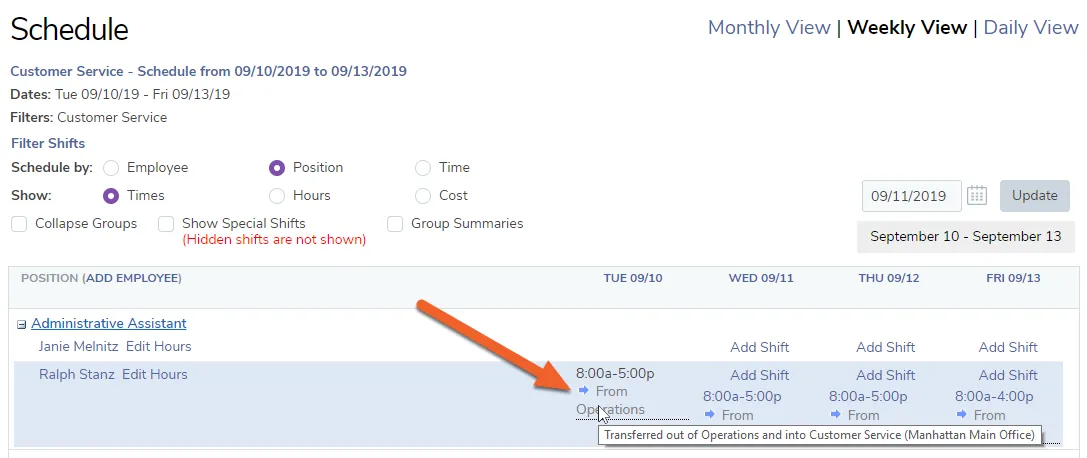
Transfers show blue arrows next to them, and hovering over the text will show you information about the transferred shift:
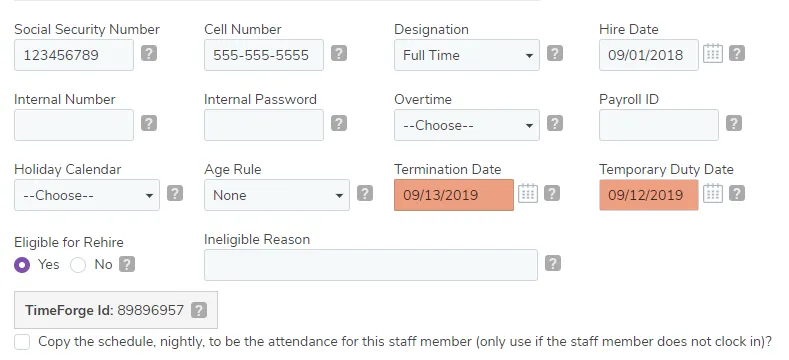
When an employee is transferred to another location’s schedule, their profile information will show a Temporary Duty Date. This date can be found in the first tab, under Basic Employee Information.
Once the temporary store assignment ends, the employee will effectively be “terminated” from that store, resulting in a Termination Date. This simply removes them from the store they were temporarily assigned to.
These values (Temporary Duty Date and Termination Date) are updated each time an employee is temporarily reassigned – and each time the temporary assignment ends, respectively.
Create schedules using graphs
Managers now have two methods for creating and assigning shifts in a schedule’s Daily View. The first option (Classic) allows users to create shifts using drop down menus to select the shift’s start time, end time, employee, and position. The Daily View of a schedule uses this method by default.
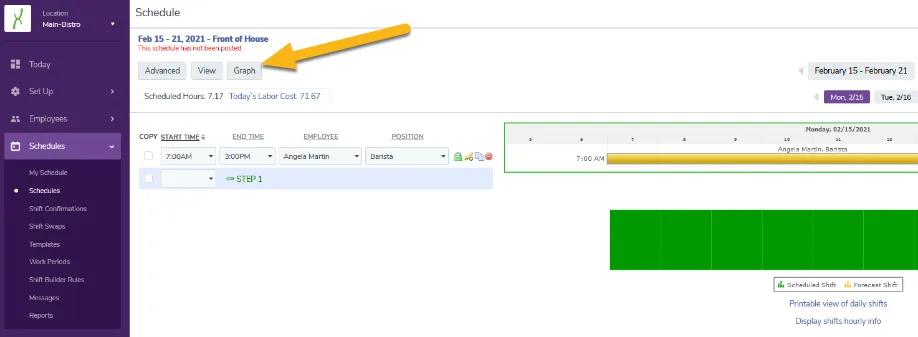
The second option (Graph) allows users to create schedules using drag-and-drop graphs. To use this method, you must first click on the Graph button in the schedule’s Daily View.
This guide will show you how to use the Graph feature, as well as how to change between the two different methods.
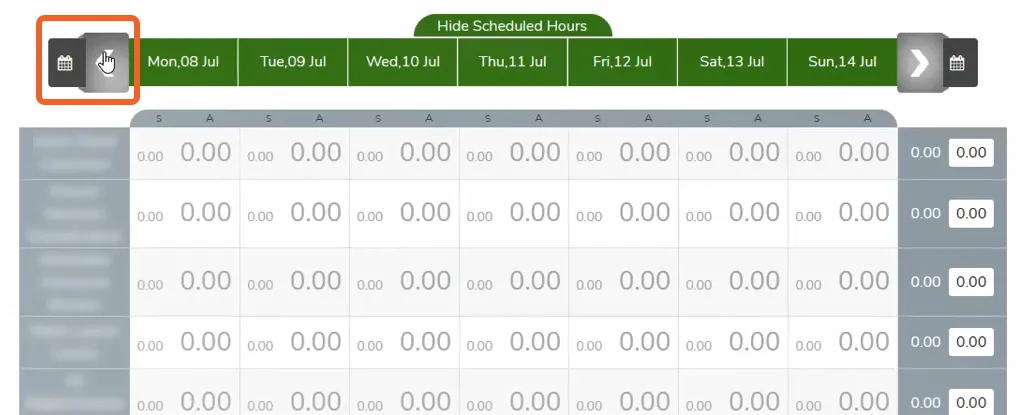
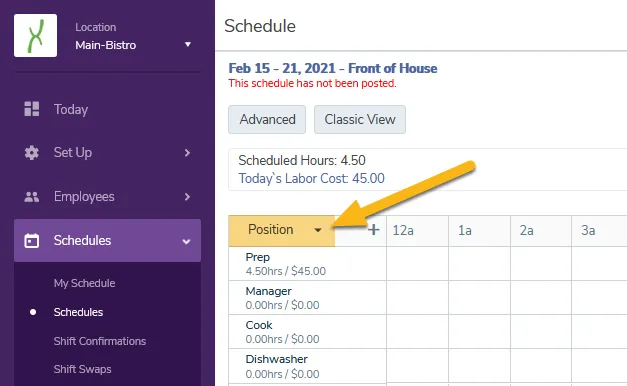
Once you select the Graph option, you can then decide on arranging the shifts on the graph by employee or position. You can toggle between either arrangement by clicking on the arrow at the top left corner of the graph (highlighted below).
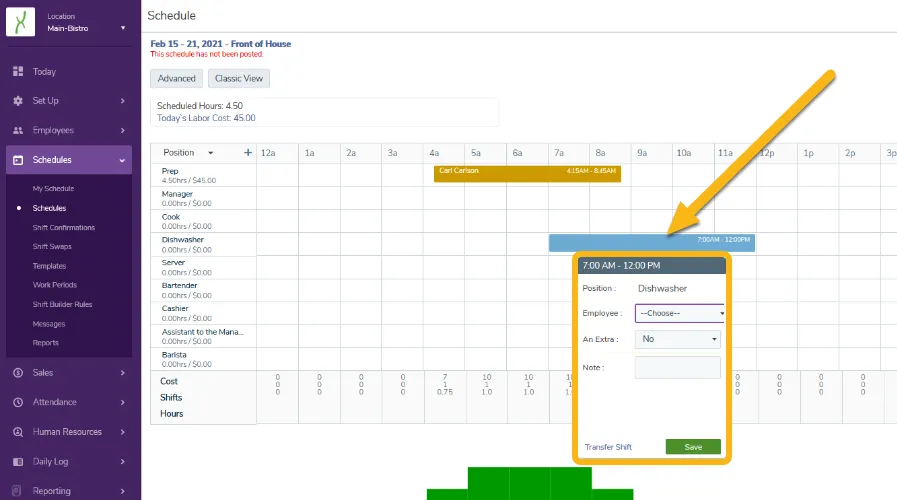
Drag and drop a shift and select an employee or position to assign the shift on your schedule. You can even leave a note or mark a shift as an extra just like the Classic option before saving your changes.
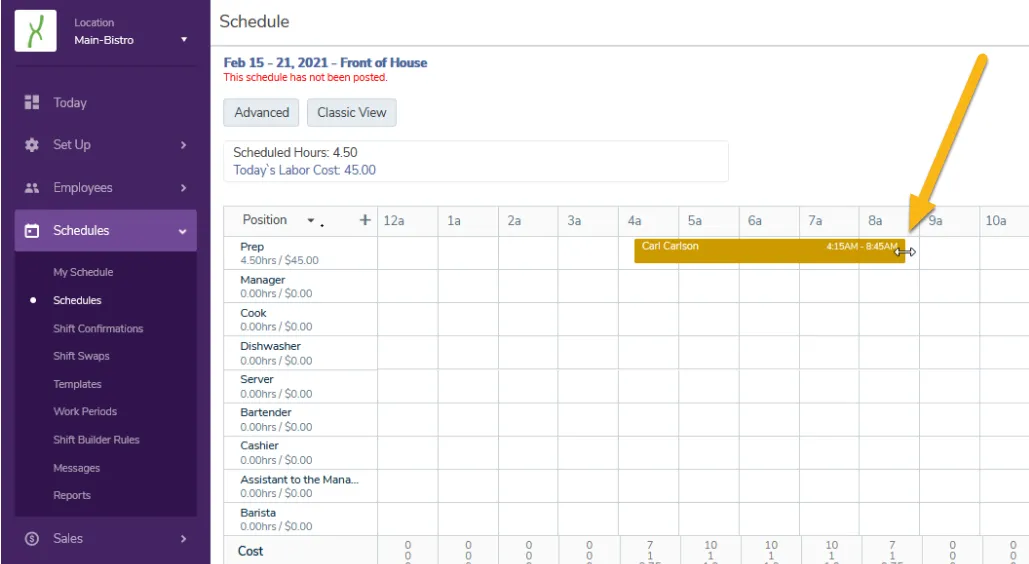
If you need to edit the start and end time of a shift, drag and drop the shift to the appropriate place on the graph. You can also use change the start or end time of a shift by hovering your cursor over the left or right ends of a shift. When you hover over a shift, a double arrow appears. The double arrow allows you to move the start or end time to a later or earlier time on the graph.
You can return to the more familiar drop-down method at any time! Just click on the Classic button in the upper left.
Enable Close/Open Exceptions and Penalties
States like California, Oregon and Washington require employers to give employees a break between shifts. If your state follows “right to rest” laws, also known as clopening laws, TimeForge has settings in place to help you stay compliant. This guide explains how you can enable close/open exceptions and penalties in your attendance options, as well as how to view attendance entries with close/open exceptions.
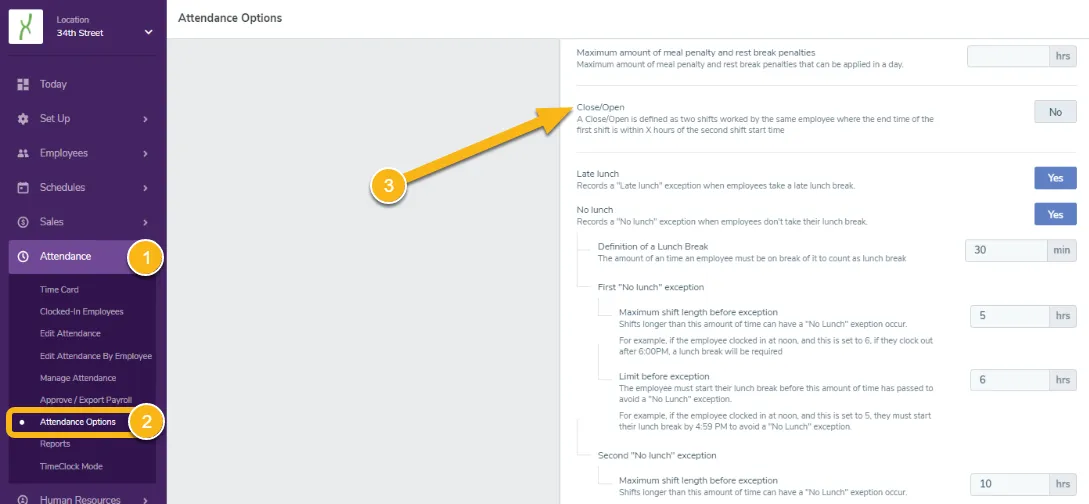
Navigate to your Attendance Options under the Attendance tab
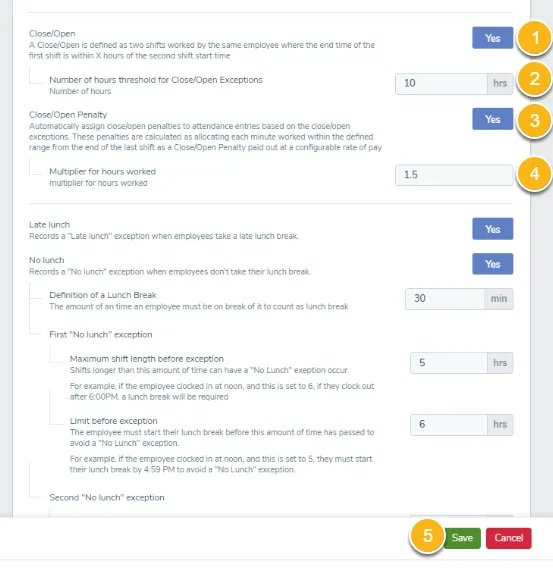
Toggle the Close/Open flag, so that the button reads Yes. This will enable TimeForge to track open/close exceptions.
Set the threshold for how many hours must pass between the end of an employee’s shift and the start of a new shift. Typically, this number is defined by the laws for your city or state. Anything less than this number will be flagged as an exception by the system.
If your city or state requires you to pay employees for any time worked within the open/close hours threshold, set the Close/Open Penalty flag to Yes. This will enable TimeForge to apply compensation toward employee timecards.
Enter in a cost multiplier for any time worked within the close/open threshold.
Save your settings.
View attendance entries with close/open exceptions
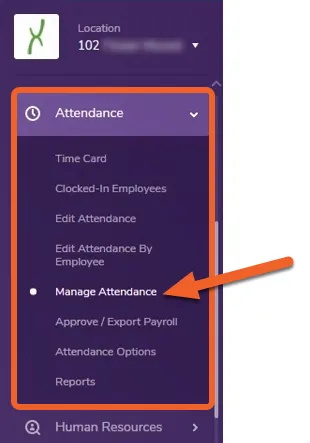
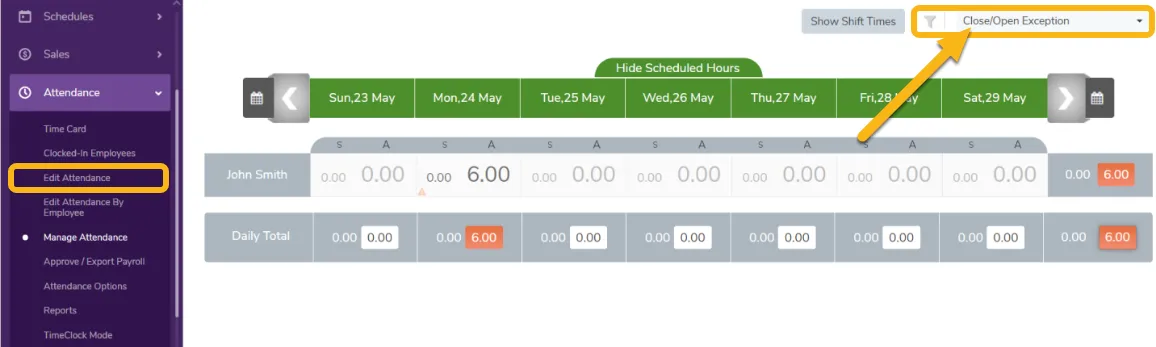
You can view attendance entries with close/open exceptions from your Manage Attendance page.
Once you navigate to the Manage Attendance page, you can filter out your attendance entries by clicking on drop down menu located on the top right corner of the screen. Finally, you can select the Close/Open Exception option to pull up any attendance entries which began within the close/open hours threshold.
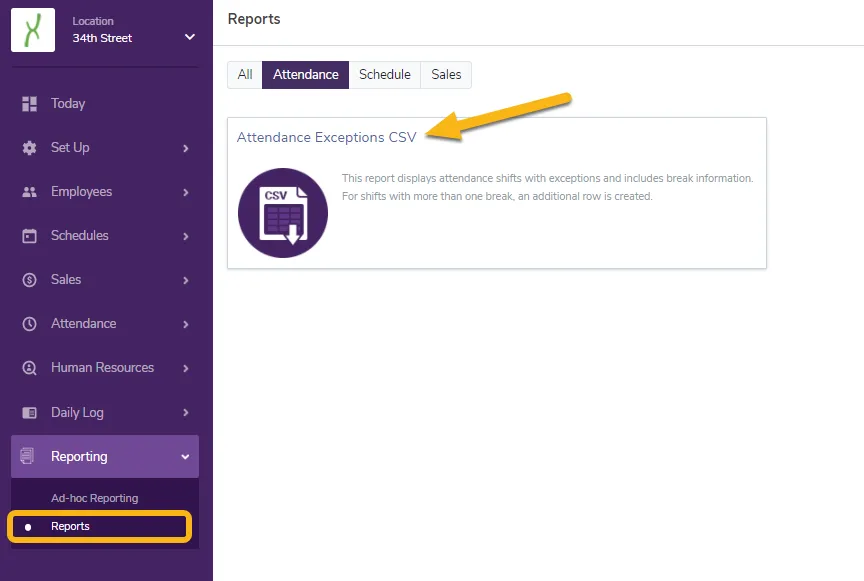
You can also find attendance entries with close/open exceptions from a specific time range by running the Attendance Exceptions CSV report.
To run this report, you’ll need to click on Reports under the Reporting tab and search for “Attendance Exceptions” in the page’s search bar.
Get pre-built schedules based on your scheduling history (RoboSchedule)
TimeForge is proud to introduce our latest feature, RoboSchedule. Yet another quick intuitive tool to help create employee schedules. Each RoboSchedule contains the shifts you’ve already been manually creating each week and eliminates the hassle.
Many managers rely on the TimeForge AutoScheduler and schedule forecasts, or if they’ve got a small crew, they might build schedules manually, one shift at a time. RoboSchedule cuts out the weekly clicks by monitoring your scheduling habits and auto-populating schedules based on your previous scheduling history. This functionality even includes auto-generating on the same day you normally build you schedules.
RoboSchedule Main Features:
Studies your weekly schedule uploads for optimization
Automatically imports previous schedule history
Will copy any previous consecutive manual edits
Use a template? It will automatically apply it to your schedule
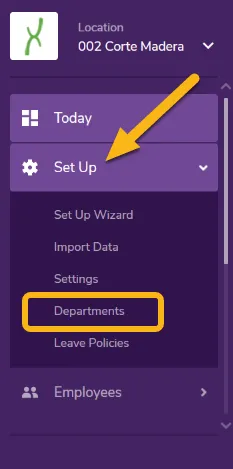
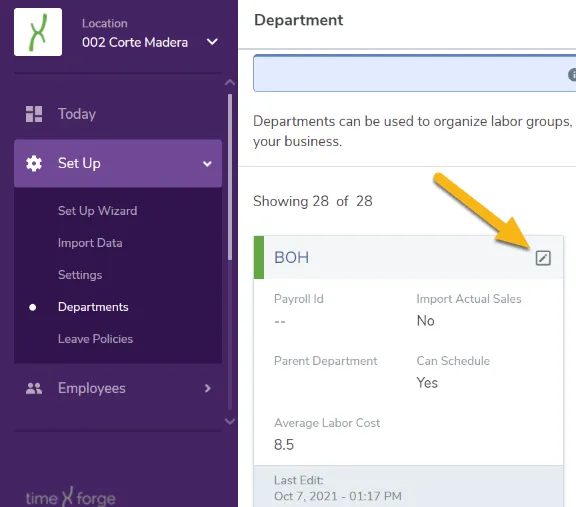
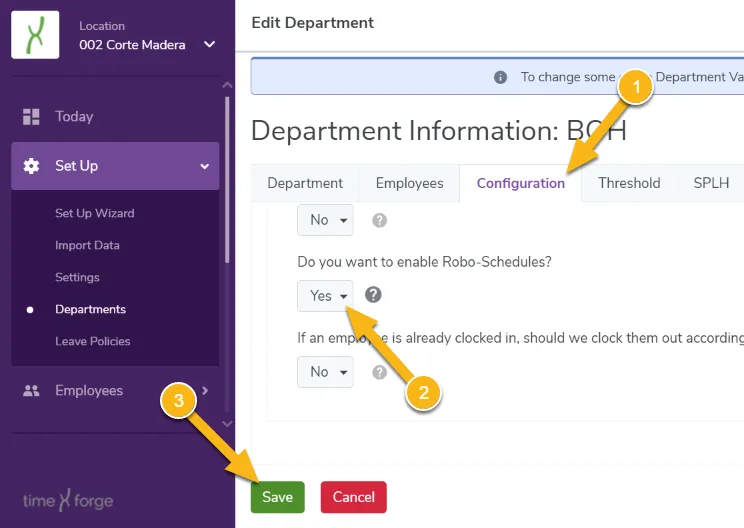
In order to start using RoboSchedule you must first enable it. To do this you’ll need to individually edit each department at the location level.
If you only want to use RoboSchedule for a specific department you do not need to configure any of your other departments as the feature is automatically toggled off.
Enabling RoboSchedule Under Department Configuration Settings
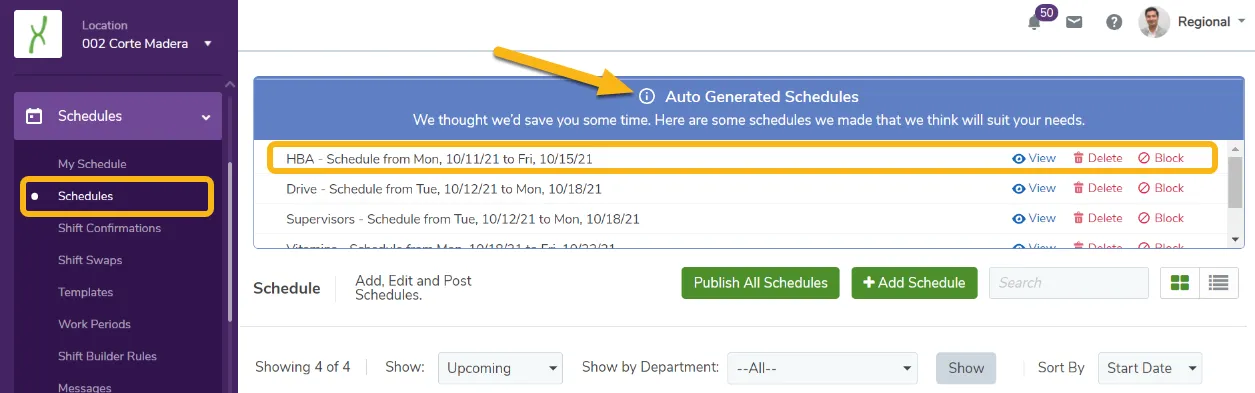
RoboSchedule gives you the option the View the schedule prior to posting. If needed, you can also delete the schedule that was generated and schedule using any other preferred method.
The block feature enables you to toggle RoboSchedule off if you no longer want that particular department’s schedules to be auto-generated.
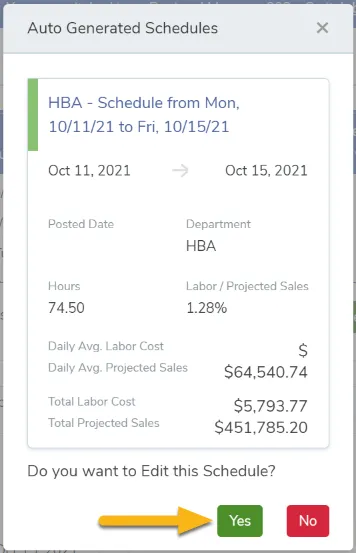
When clicking on View to the far right of the auto-generated schedule you will be prompted with a quick labor summary of that particular schedule. Click Edit if you would like to make any changes to the schedule prior to posting.
Be sure to click the No button if you do not want to edit the schedule.
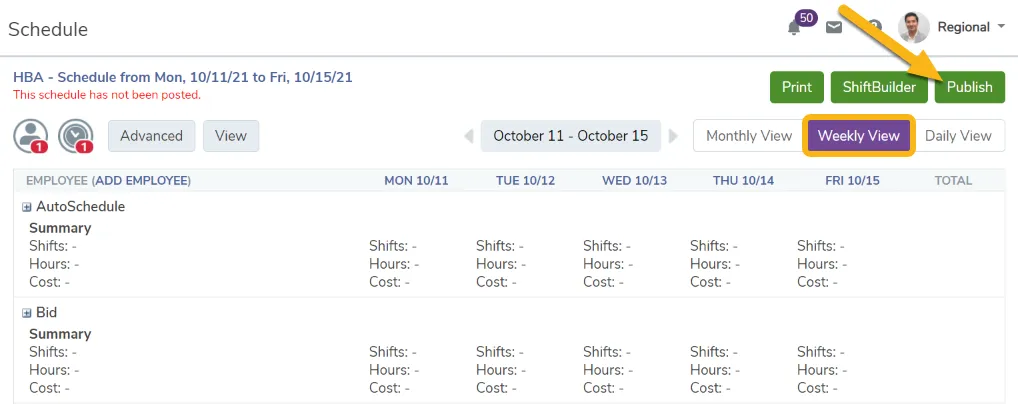
Once you have reviewed the shifts the Roboschedule has created, you can proceed to the weekly view and click Publish on the schedule and your employees and management team will be alerted to the schedule.
Posting a RoboSchedule functions the exact same as your normal weekly schedule but with fewer clicks. Also, the more you use the RoboSchedule feature, the better it will get.
Be sure to click the OK button when you’re prompted about posting the schedule.