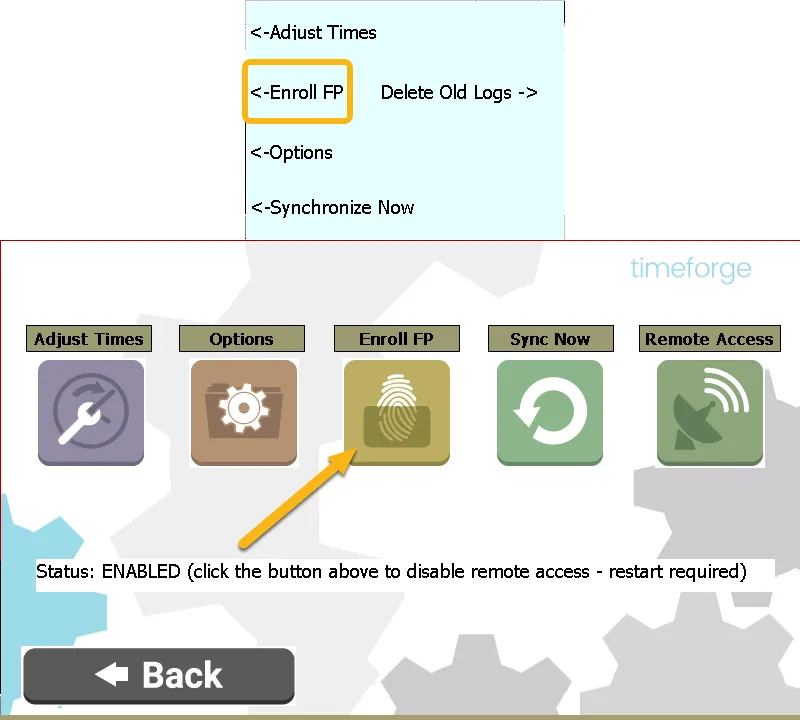
In order to use the Fingerprint Scanner on the Biometric TimeClock, you will need enroll your own fingerprint, as well your employees’ prints, in the TimeClock’s database. Afterward, your employees will be able to clock in/out with their fingerprints.
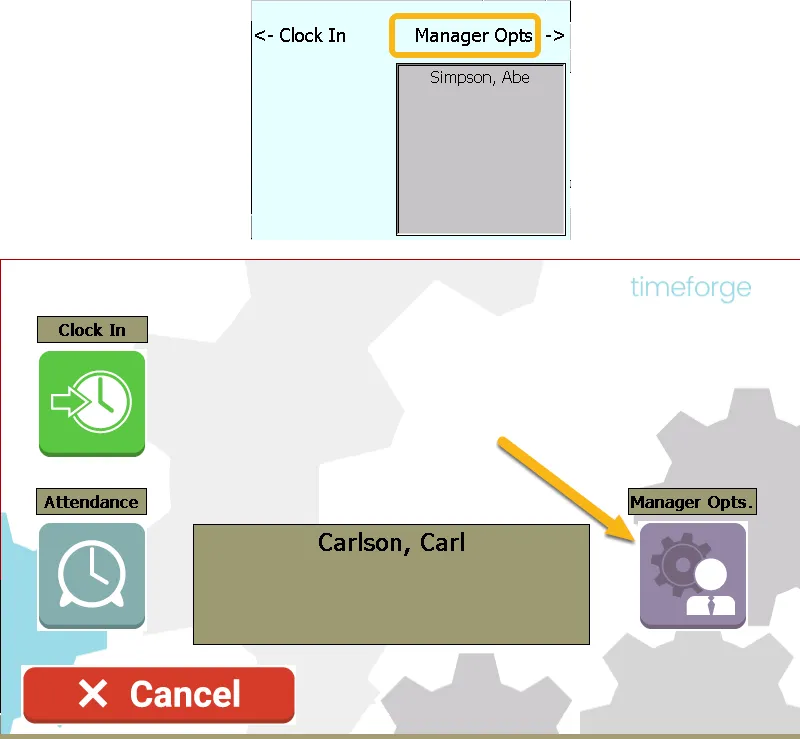
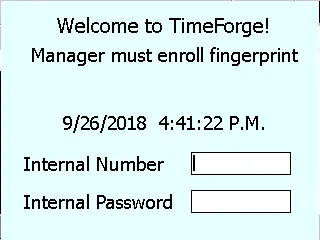
Managers: you will need to put your fingerprint on the scanner to enroll a employee. If you are enrolling your own fingerprint for the first time, log in using your internal number and password first.
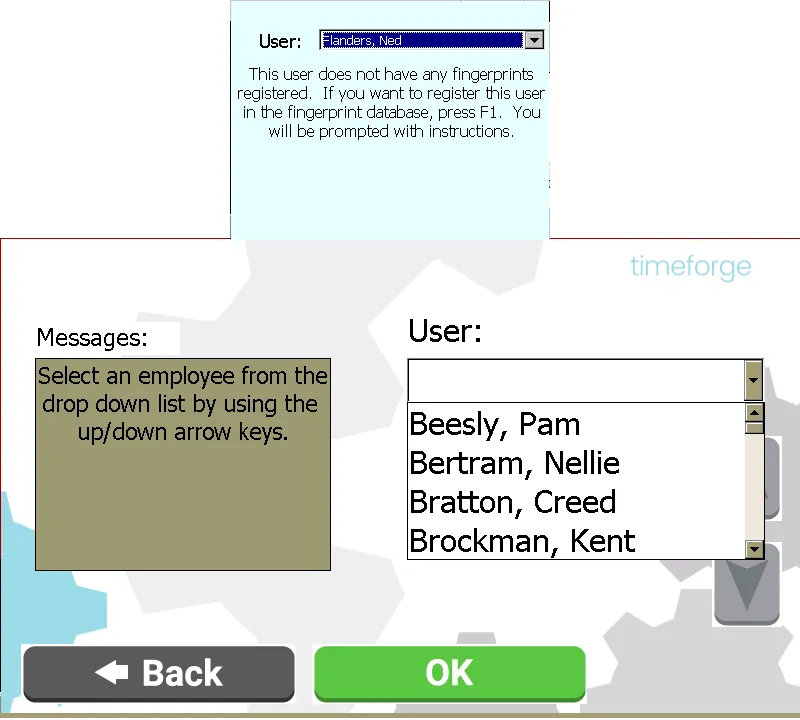
Once you’ve found the employee, hit OK. Then push F1 if you’re on an S900. You will prompted to place a fingerprint on the scanner. Be sure to have the employee put their finger on the scanner. You can enroll any finger you want.
You will be prompt to place the same finger three times. If you get errors grabbing the fingerprint, simply clean the scanner screen and try again.
After successfully enrolling a fingerprint, you can can hit ESC until you arrive back to the Welcome to TimeForge screen. Have the employee enter their internal number and place their finger on the scanner to ensure that they can successfully log in.
Hardware & Integrations › Clocking In/Out
Log in using the M2SYS USB Fingerprint Scanner
Accessing TimeForge.com to view your work schedules and time card is very simple with the TimeForge Fingerprint Scanner, provided by M2SYS Accelerated Biometrics.
Follow these instructions to log in to TimeForge with the Fingerprint Scanner.
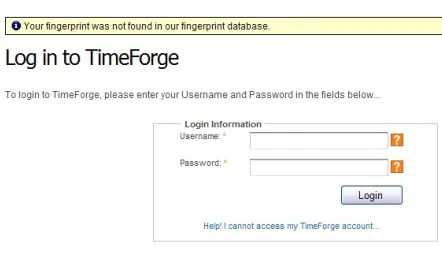
Go to TimeForge and then place your finger on the fingerprint scanner
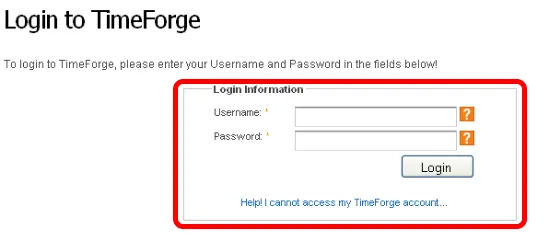
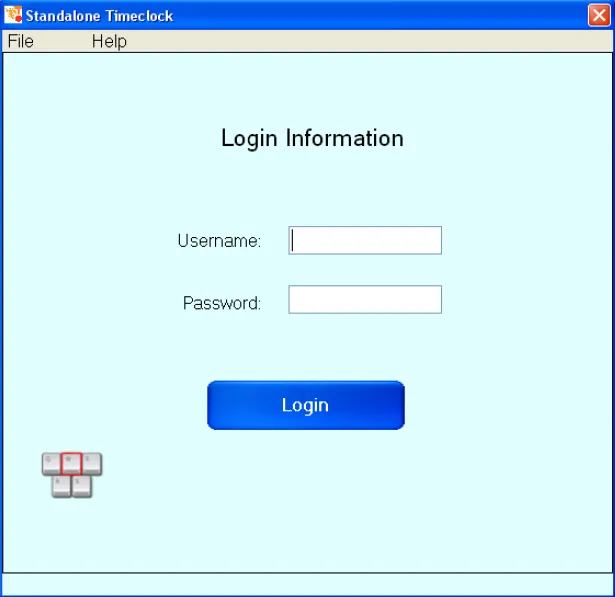
If you’re using the TimeForge fingerprint scanner, simply place your finger on the scanning pad to log in. Otherwise, enter your username and password and click “Login” to continue.
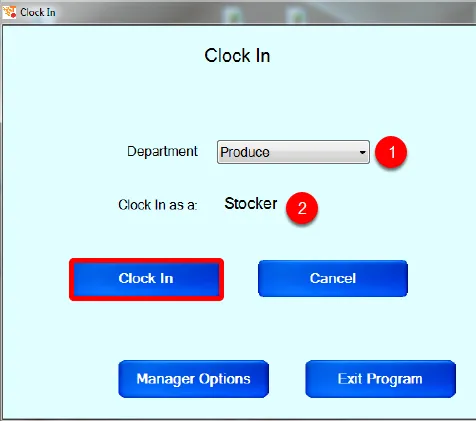
After you log in, select the following information:
The department to which you would like to clock in.
The Position for which you would like to clock in.
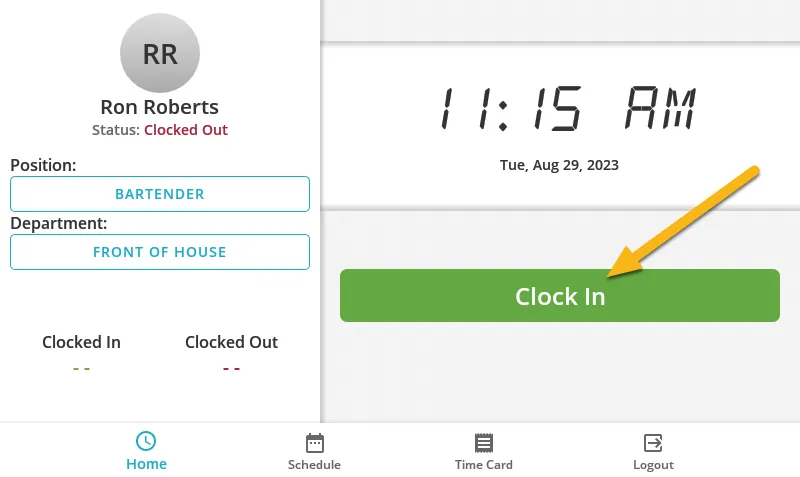
Then, simply click the “Clock In” button. That’s all there is to it!
Hardware & Integrations › Troubleshooting
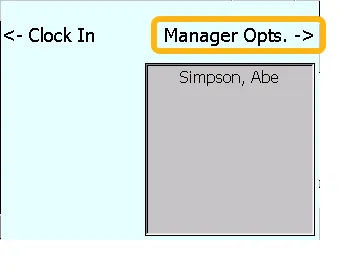
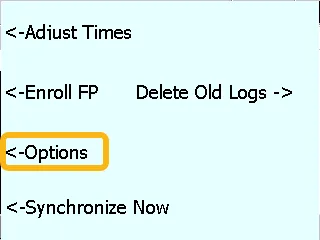
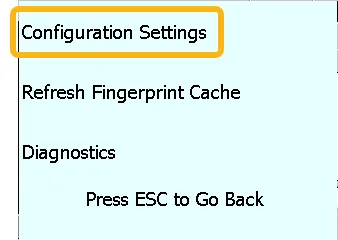
Locate the IP address of the Biometric TimeClock
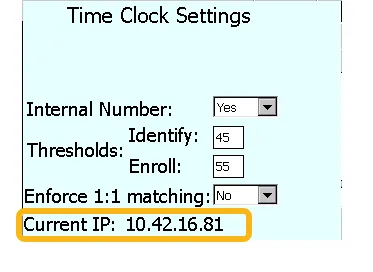
Knowing the IP address of the TimeClock is an important step when trying to diagnose or troubleshoot common issues. This guide will show you how to locate the IP address of the TimeClock.
This will bring you to the TimeClock Settings screen. Look for Current IP toward the bottom: this is the IP address for the TimeClock.
To get back to the Welcome Screen, just push ESC until you see that screen.
Locate your computer's IP address
Locating your computer’s IP address may be useful for troubleshooting common problems with the TimeClock or for setting up the TimeClock on a network. To locate your computer’s IP address, follow the steps below.
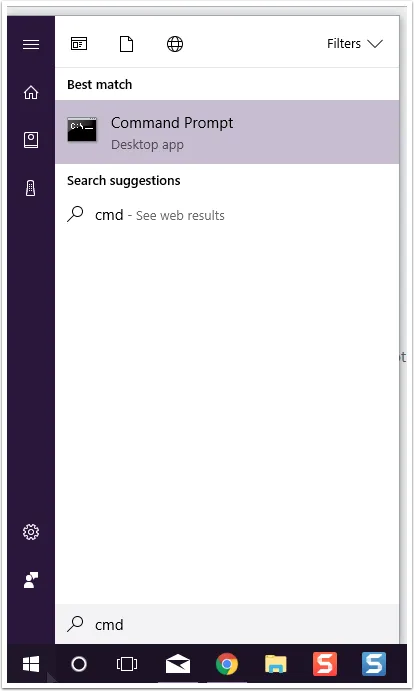
Hit the Windows button on your keyboard or click the Start Menu button
In later versions of Windows, e.g. Windows 10, you can simply start typing to perform a search – no need to look for a search box first! Windows will automatically show you possible matches as you type and will highlight the best one. If “Command Prompt” is highlighted, all you have to do is hit enter to start the program.
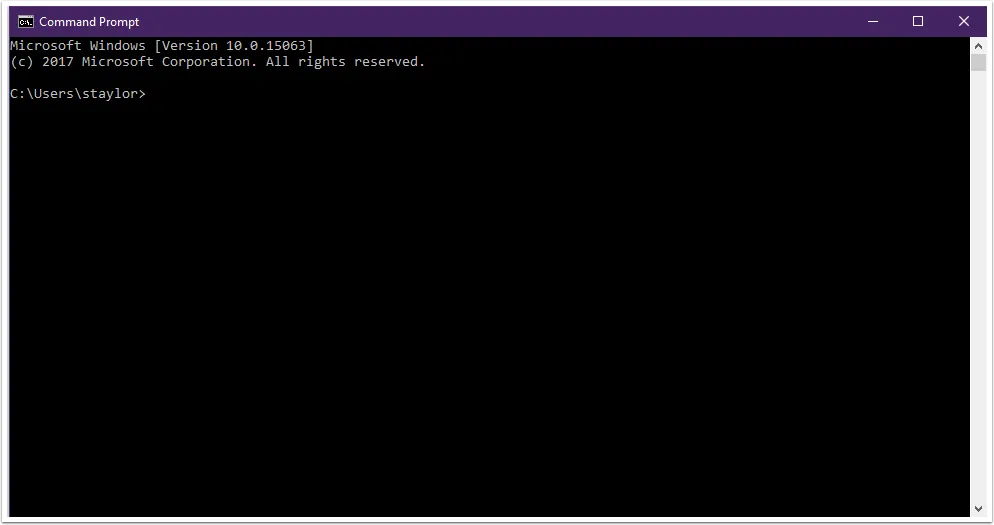
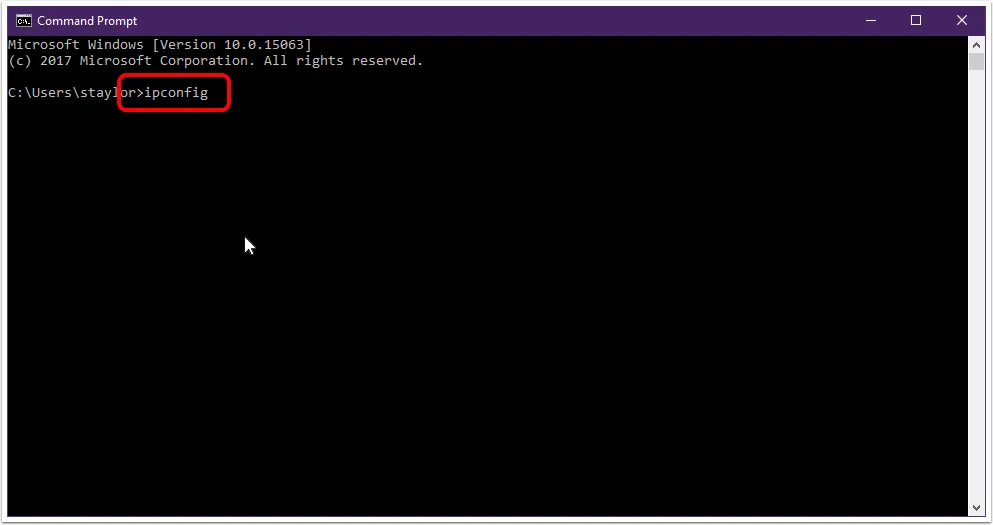
A command prompt will appear. It will look something like this:
What do I do if typing doesn't bring up a search bar?
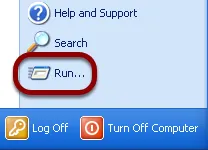
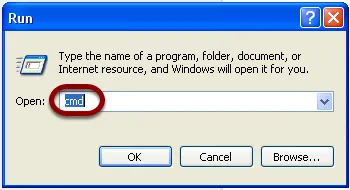
If you’re on an older version of windows, open the Start Menu
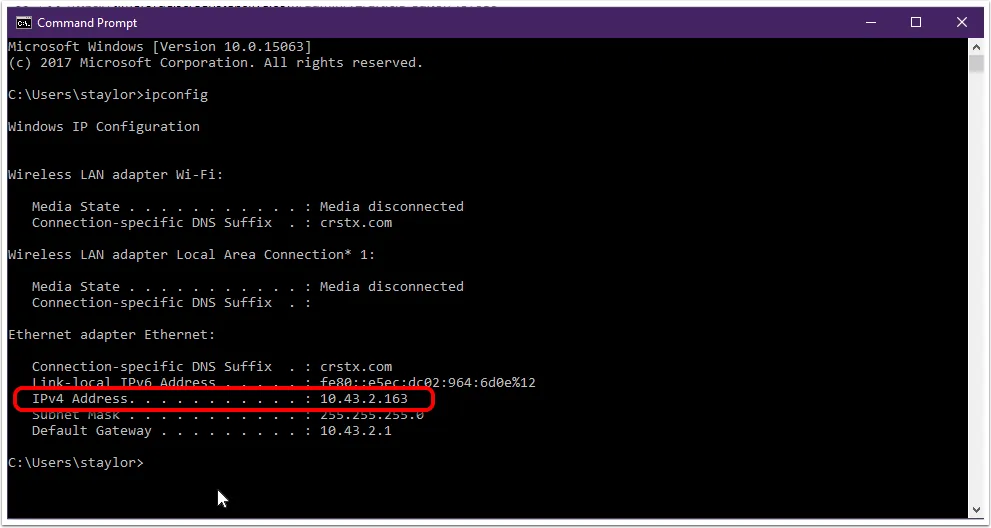
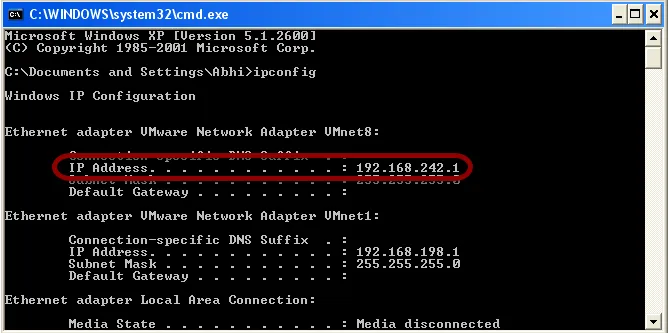
After ipconfig runs, look for the IP Address in the list (it will most likely be listed as IPv4 or IP Address). This the Internal IP Address for your computer. That’s all there is to it!
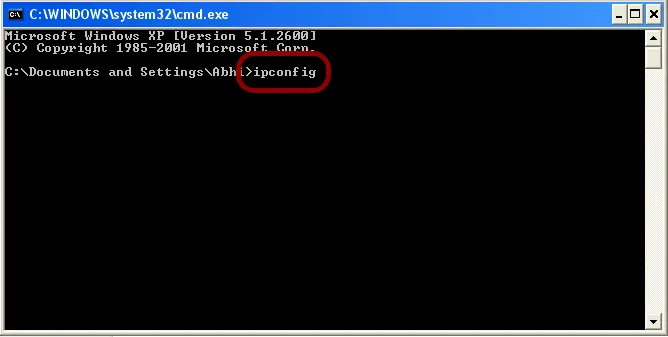
Show me an example from an older version of Windows
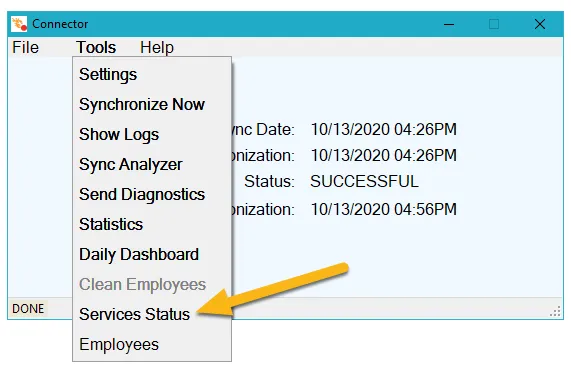
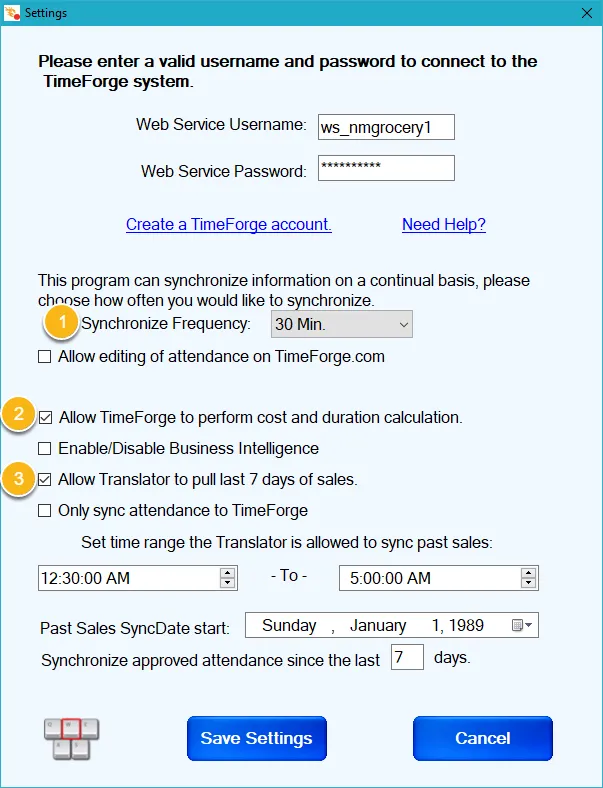
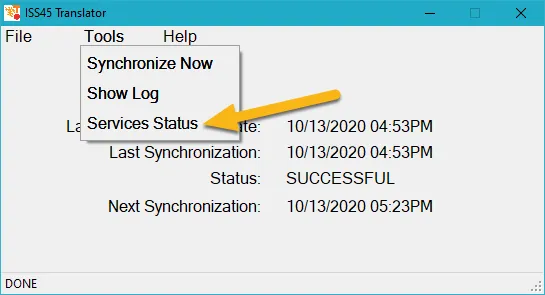
Check the translator and connector of the Biometric TimeClock
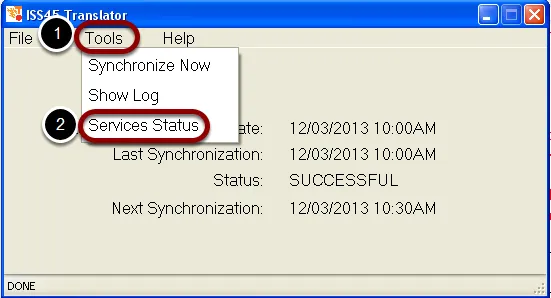
A common issue with TimeClocks, Fingerprint Scanners, Standalone Clocks occurs when they stop importing information in TimeForge. The issue arises when either the TimeForge Translator or Connector have been turned off or disabled. Follow these easy steps to get your TimeClock working again.
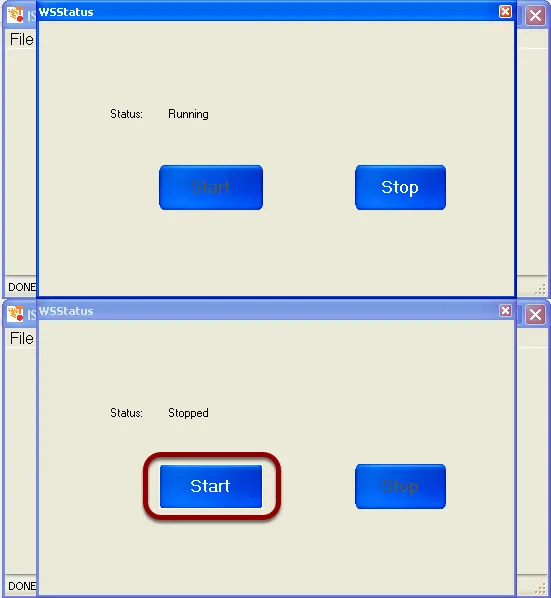
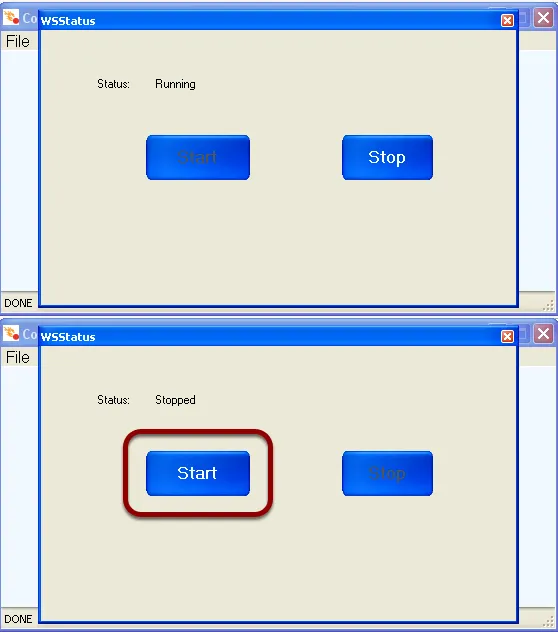
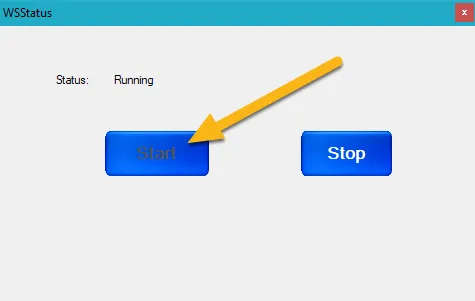
If the Translator is running you will see Status: Running. You can now close the window.
If the Translator is stopped, you will see Status: Stopped. In this case, you will need to click the Start to start the translator service. Once the status changes to Running, you may close the window and proceed to the next step.
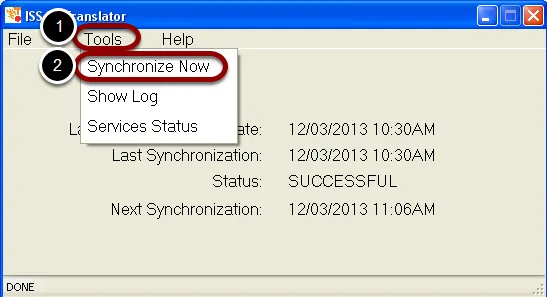
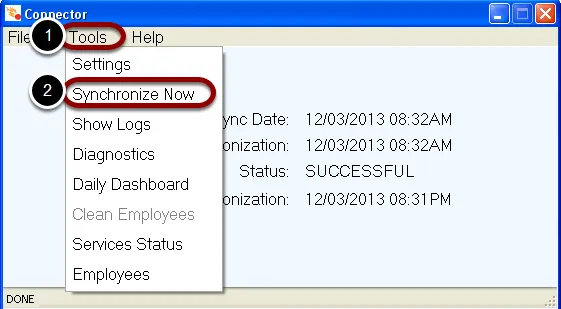
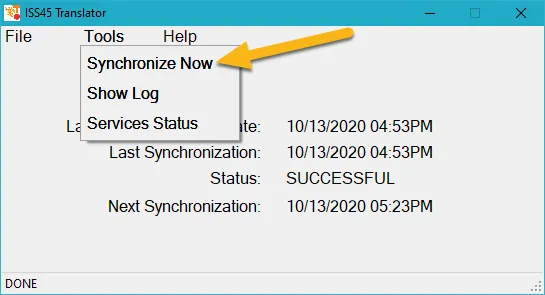
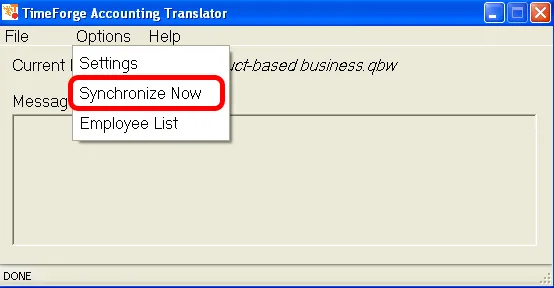
Once you have the Translator running, you will need to sync it to update the data in TimeForge. Click Tools again, then select SynchronizeNow from the dropdown menu. When the sync completes, you may close the window.
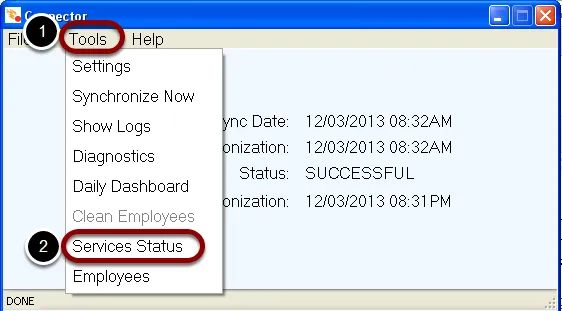
If the Connector is running you will see Status: Running. You can now close the window.
If the Connector is stopped, you will see Status: Stopped. In this case, you will need to click the Start to start the connector service. Once the status changes to Running, you may close the window and proceed to the next step.
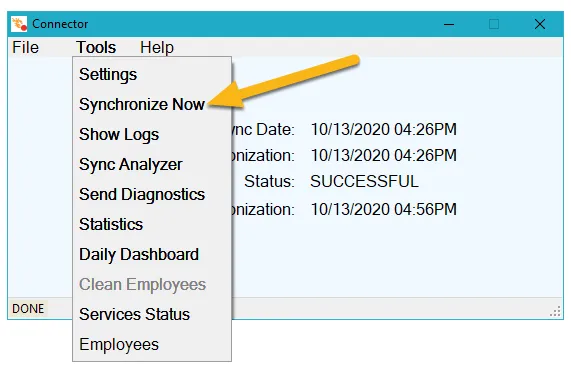
Once you have the Connector running, you will need to sync it to update the data in TimeForge. Click Tools again, then select SynchronizeNow from the dropdown menu. When the sync completes, you may close the window.
Both the Translator and the Connector should now be properly syncing data with TimeForge, and your TimeClock should be operational.
I have one employee whose fingerprint never works. Why? How should they clock in?
This a common occurrence for stores with higher number of employees.
You can enroll the employee’s fingerprint again and try a different finger.
Assign the employee a Internal Number and Password. This will allow the employee to clock in/out without having to use their fingerprint.
Hardware & Integrations › The Time Machine
Enroll Employee Fingerprints on the Time Machine
In this guide, we’ll show you how to enroll employee fingerprints on the TimeForge Time Machine, our newest timeclock.
We recommend that you enroll at least 2 different fingerprints for each employee. (The system can take up to 3 per employee.) This is so that if the employee develops a callus or has a problem with one finger, they still have a backup option.
Please do not enroll with thumbprints, as thumbprints do not work very well.
How the Time Machine uses fingerprints
Sometimes, employees express concerns about having their fingers scanned. They need not worry!
Our timeclock never saves or stores their fingerprints in any way. For more information, see this explanation flyer. You can print it out and share it with your employees to help give them peace of mind.
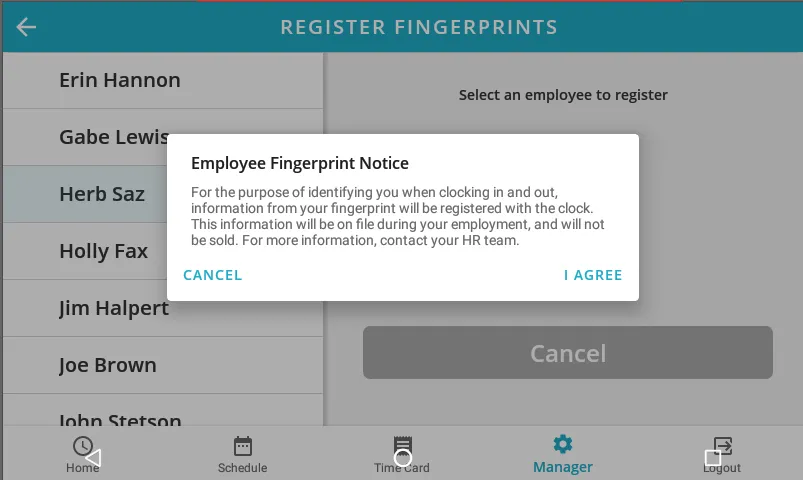
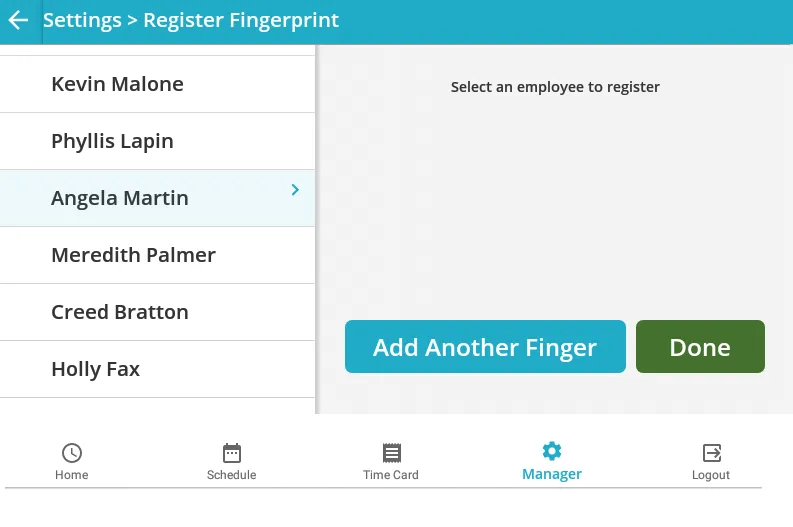
Tap on the name of the employee you want to register. The timeclock will then prompt the employee read the notice shown below explaining the purpose scanning their fingerprint.
If the employee selects “I Agree” to the notice, they can proceed with registering their fingerprint. When an employee selects the “Cancel” option, the prompt closes and the employee does not proceed with scanning their fingerprint.
Have the employee place their finger on the scanning pad
Have the employee place one finger on the scanning pad for 3 different scans. You should see the fingerprint scanner flash each time the timeclock scans their fingerprint.
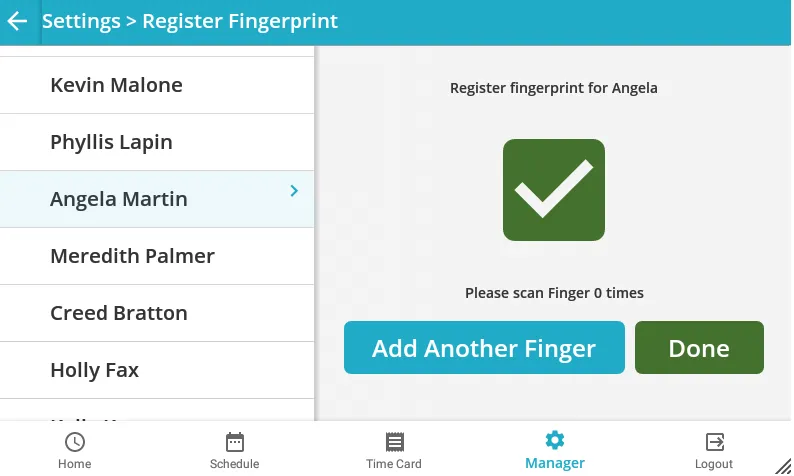
Once the timeclock is finished with all 3 scans, the screen should display the message shown below.
Tap the Add Another Finger button to keep enrolling fingerprints.
You should enroll at least 2 per employee, but the system will accept up to 3. This will ensure that if anything happens to the employee’s preferred finger (such as a burn, callus, grime, cut, etc.), they will have a backup option.
Once you’re done enrolling fingerprint for the first employee, you then need to repeat the steps above for each employee you wish to register on the Time Machine.
If you have finished registering fingerprints, you can tap the Done button to return to the Settings page. That’s all there is to it!
As always, if you need help or have any questions, please contact TimeForge Support. Our awesome support staff will be glad to answer any questions or help in any way they can.
In this guide, you’ll learn how to log into and use the Time Machine timeclock. The timeclock allows you to clock in and out for your shift and review your schedule and attendance.
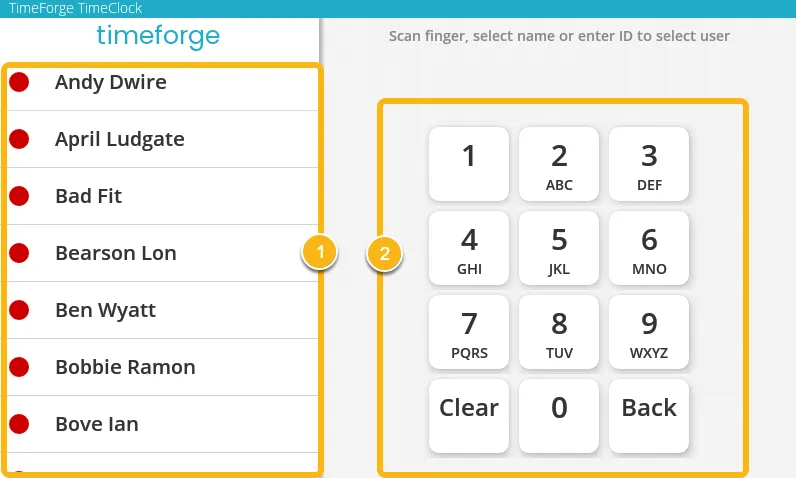
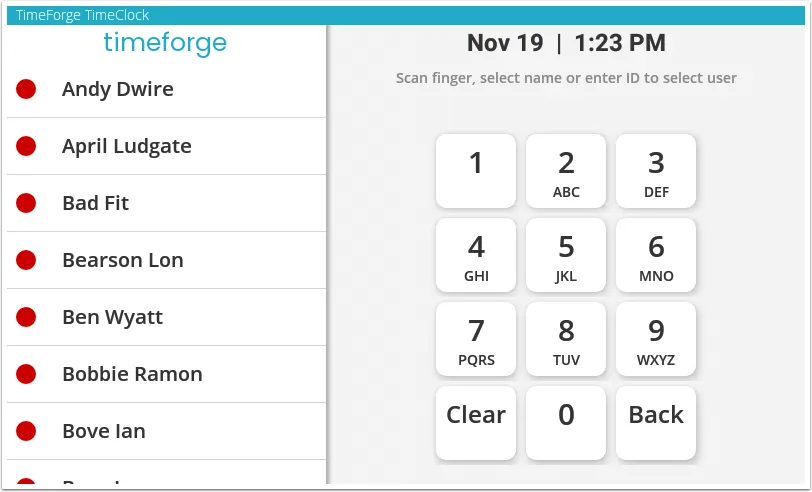
The Time Machine home screen lists everyone in your location at a glance.
1. The list on the left shows each employee in alphabetical order, sorted by first name. By tapping on your name in the list, TimeForge will select your profile, and you can then enter your Internal Password or place your finger on the scanner to log into your account.
2. On the right is a panel where you can input your Internal Number instead of searching through the employee list page.
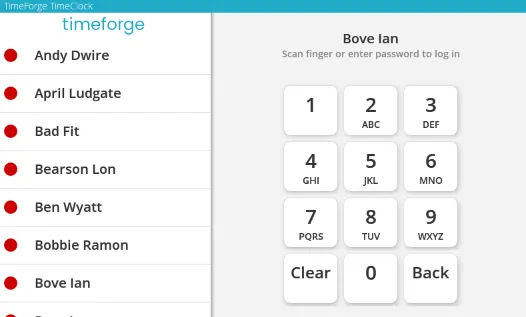
When you select your name from the left-hand menu or enter your Internal Number, TimeForge should display your name at the top of the right panel, as in the example below:
From here, you can either enter your Internal Password or scan your fingerprint to log into the timeclock.
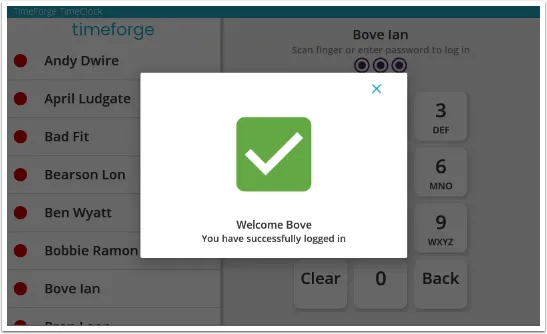
When you successfully log in, you will get a welcome message from TimeForge:
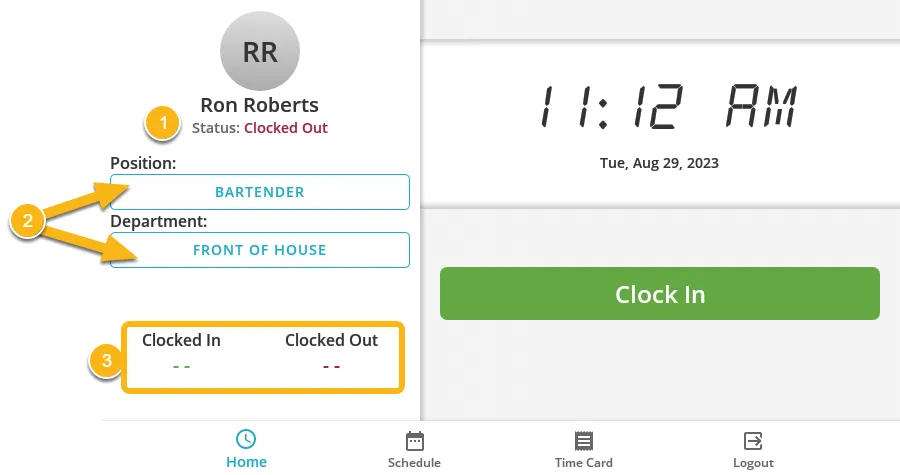
Important information is displayed for you on your dashboard:
Status: This will display “Clocked Out”/“Clocked In”/“On break” based on what your current status is.
Department/Position: These fields show your currently selected department and position. If you are a cross-trained employee, by clicking on the fields you can clock into different departments and positions.
Clocked In/Out: This shows you the time that you clocked in or out for your shift.
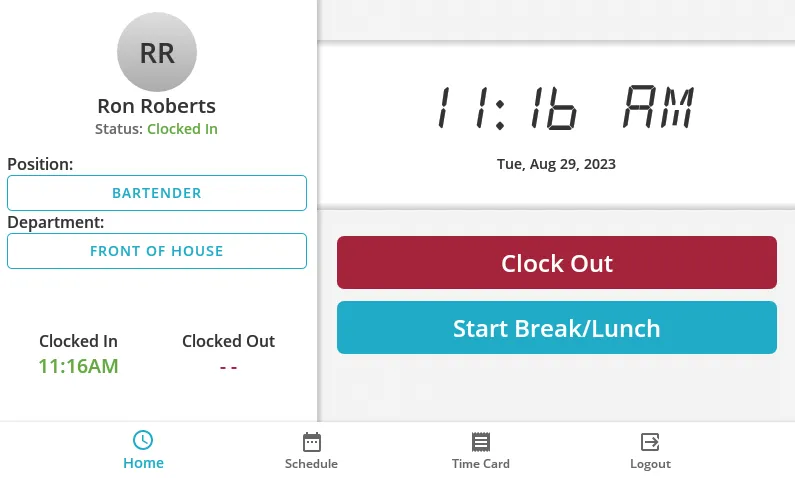
When you’re ready to take a break or clock out, you’ll need to first log back into the timeclock.
Once logged in, you can take a break by tapping the Start Break button, which will bring up a selector to choose which break you’re eligible for, or will automatically put you on break based on your company’s break policies.
To clock out at the end of the day, simply tap the Clock Out button.
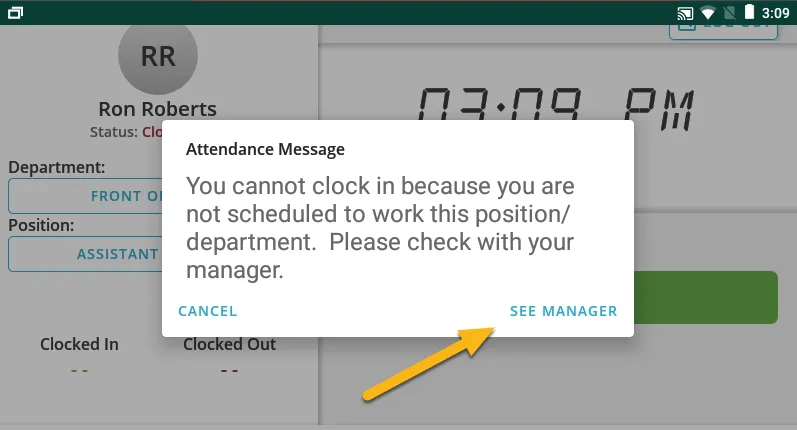
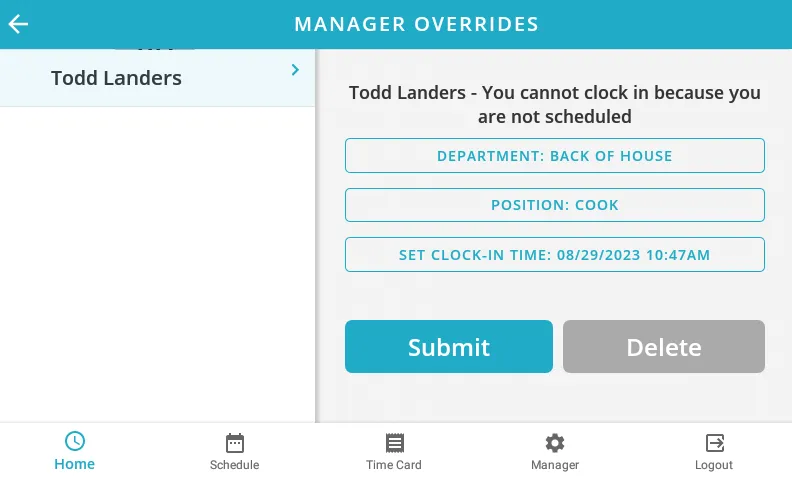
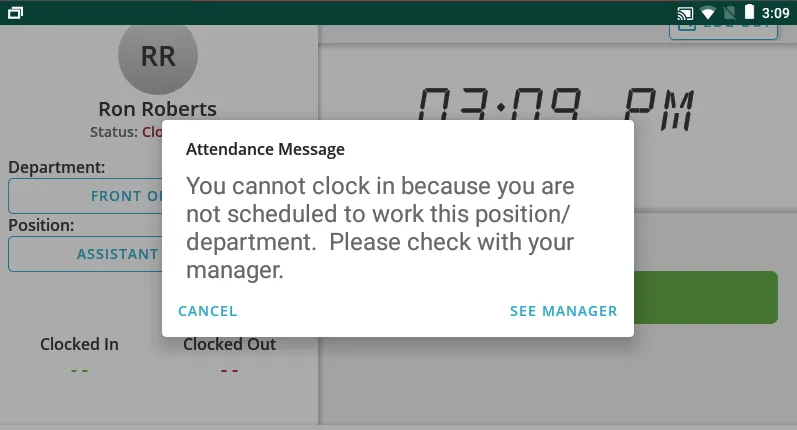
Depending on your company’s policy, you may receive a message when trying to clock in early before the start of your scheduled shift or if you try to clock out later than the end of your scheduled shift.
When this happens, simply tap on See Manager in the lower right corner, then notify your manager.
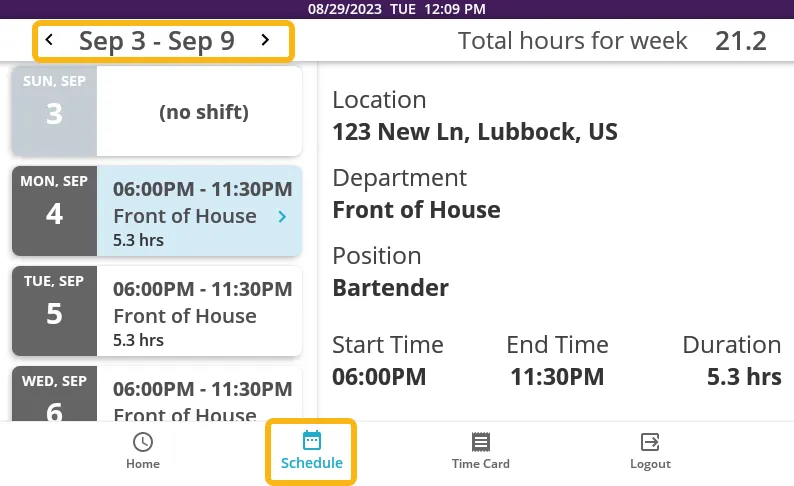
Using the navigation arrows at the top of the screen, you can view past and currently scheduled shifts. Once you navigate to the dates you can to review, the timeclock will display your scheduled shifts dates, time, and duration. If you tap on a specific shift, you can then view additional information such as the location, department and position you were scheduled to work under.
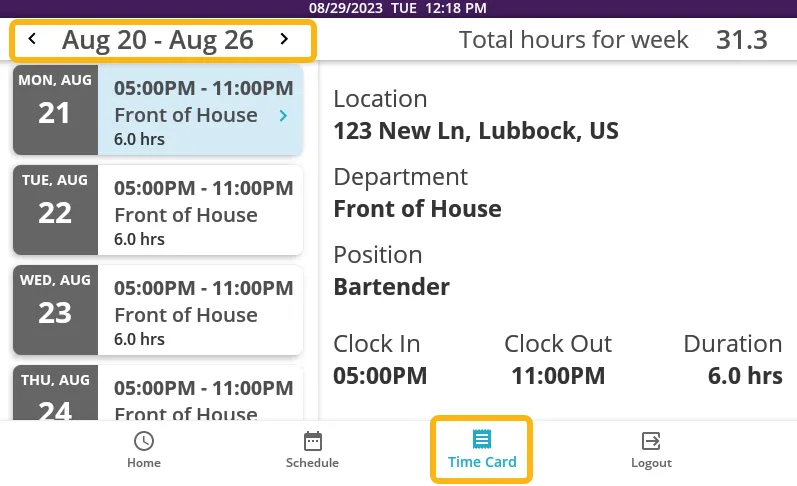
By default, when you tap the Time Card button, you can view the hours you’ve recorded for the current week. Using the navigation arrows at the top left corner, you can navigate to view attendance entries from previous weeks. The timeclock will display an attendance entry’s date, time, and duration. If you tap on a specific shift, you can then view additional information such as the location, department and position the attendance entry was recorded under.
How to Use the Time Machine (Manager Guide)
As a Supervisor or Manager in TimeForge, you’ll have access to a few features on the Time Machine that employees don’t have access to.
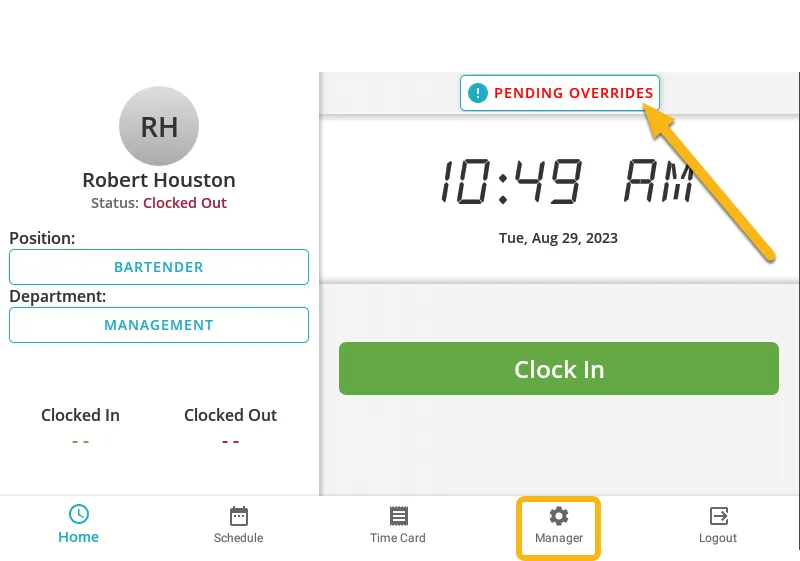
The two main pieces of functionality on the home page are the Pending Overridesbutton (top) and the Manager button (bottom):
The Pending Overrides button lets you quickly view all employees who’ve requested an early clock in or late clock out that exceeds the threshold your company has configured.
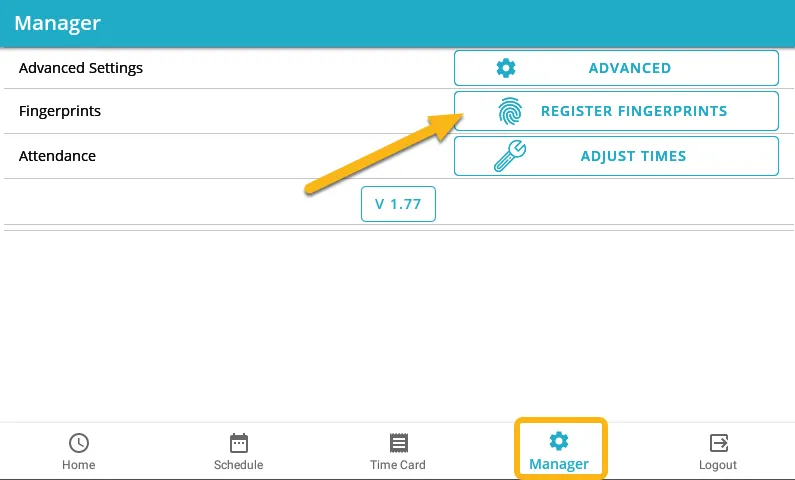
The manager tab lets you enroll employees fingerprints, install clock updates, and clock out employees.
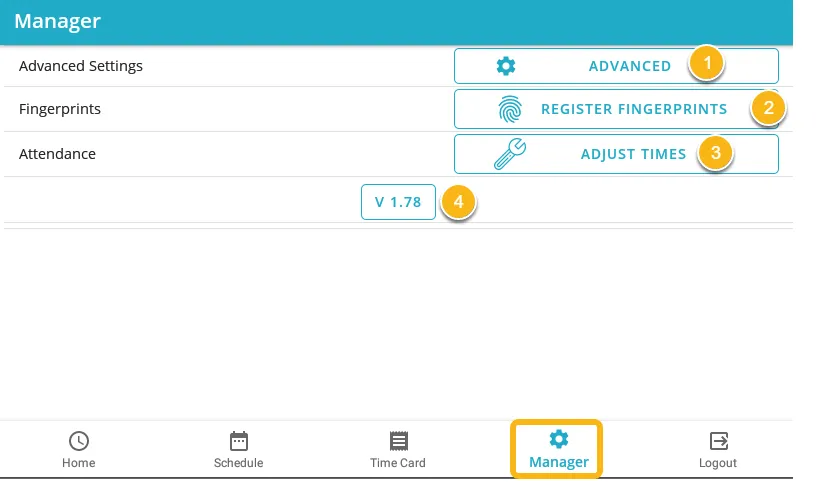
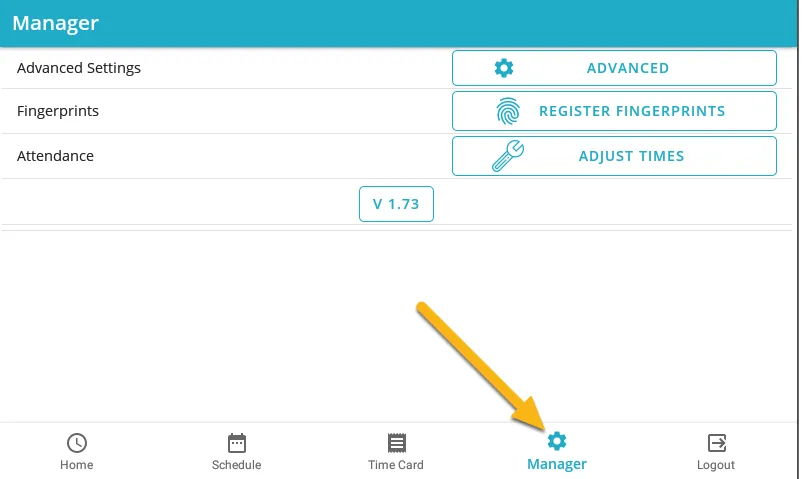
Tapping the Manager button at the bottom of the screen will take you to the Manager page.
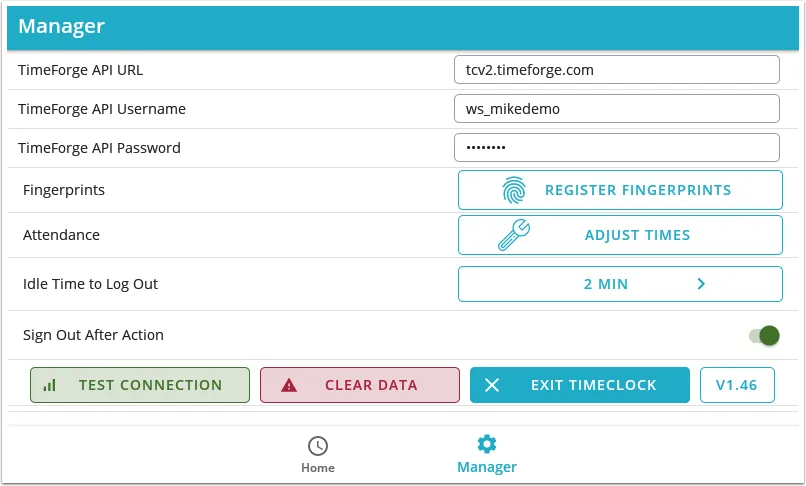
The Manager page gives you a lot of configuration options to control your timeclock.
There are several buttons on this screen, so let’s walk through a brief overview of what each one does.
Advanced
Selecting this option allows you to access the timeclock’s connection settings and navigate to more advanced configuration options. For more information on the Advanced Settings screen, please read the next section.
Register Fingerprints
Tapping this button will allow you to enroll fingerprints for yourself and other employees.
Adjust Times
This is where you clock out employees who forgot to clock out for the day and have already left. Note: Only users listed as “Managers” have access to this button.
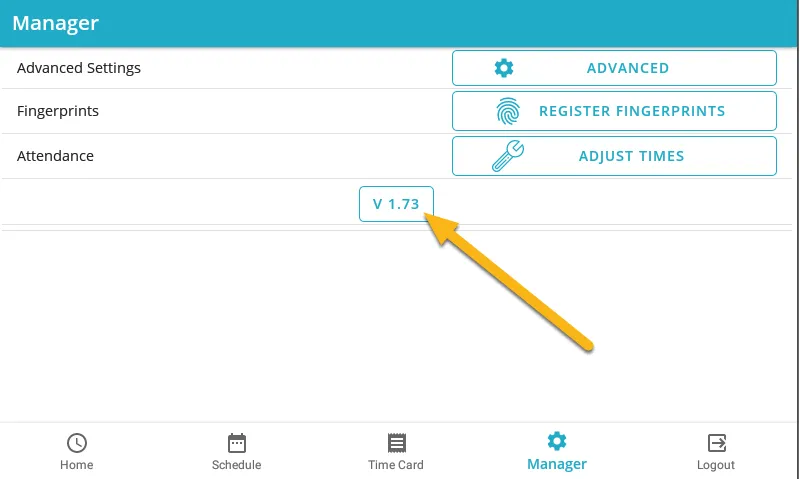
Version Button
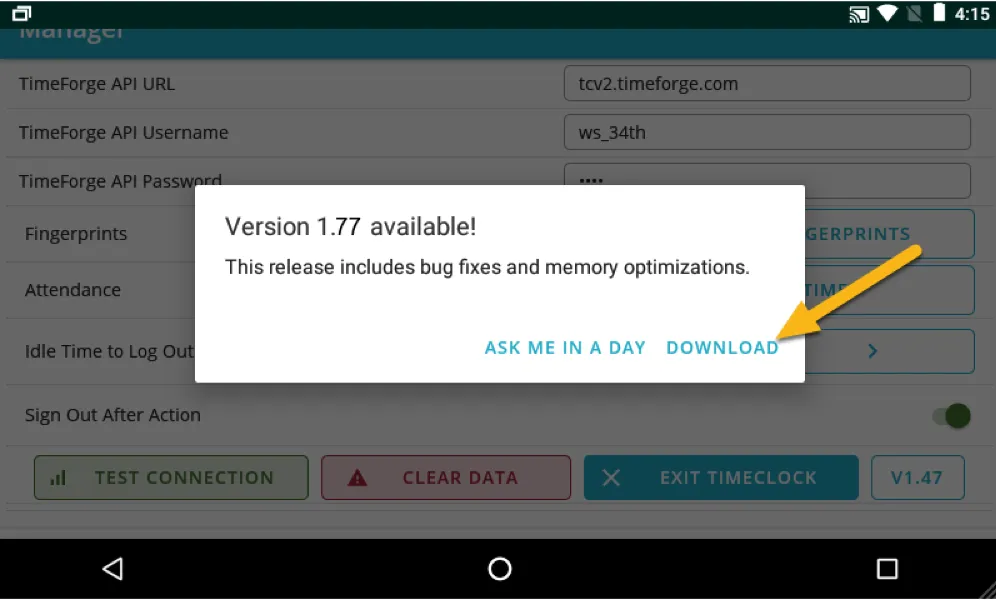
While the above screenshot displays “V1.26” you will likely have a different number present. By tapping this button, the timeclock will look to see if a new version is available. If one is, it will offer to download and install the update.
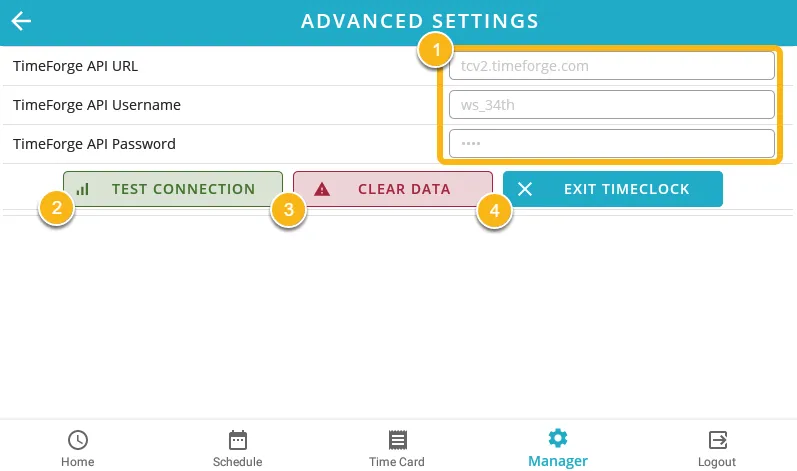
These API URL controls what website the timeclock talks to when sending data. To know which location to send employee punches to on TimeForge, the timeclock uses the username and password fields. . TimeForge pre-populates the fields when setting up your timeclock. If the timeclock changes locations, please contact TimeForge’s Support team to help you update the API credentials.
Test Connection
Tapping this button will make the time clock perform a test to see if it’s got a connection to the internet and to the TimeForge web app.
Clear Data
This button allows you to completely wipe the device, removing any employee and attendance data. Only do this at the direction of a TimeForge Technician.
Exit Timeclock
Tapping this button will minimize the application so that you can access the device’s settings. This is useful when re-configuring internet connections, allowing a TimeForge Technician access to the machine, etc.
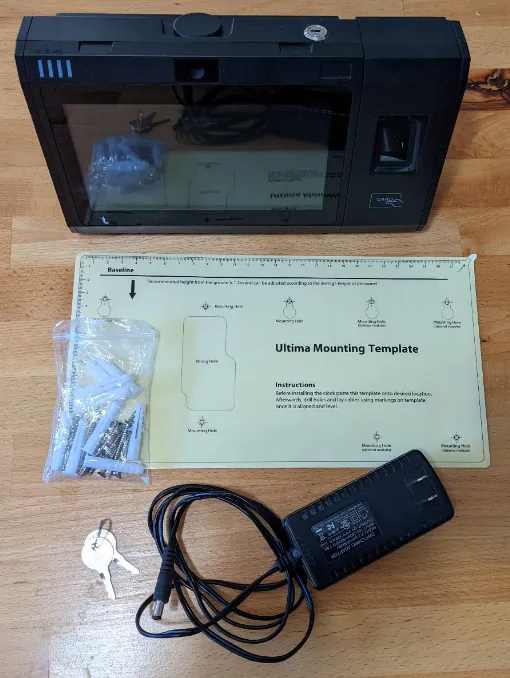
The Mounting Template provided with your Time Clock is a peel and stick that you can use directly on your wall to make placing the screws an easier process.
Once you have the screws appropriately anchored into the wall, you should be able to slide the Time Machine directly onto the screws. It should feel firm and stable once mounted appropriately.
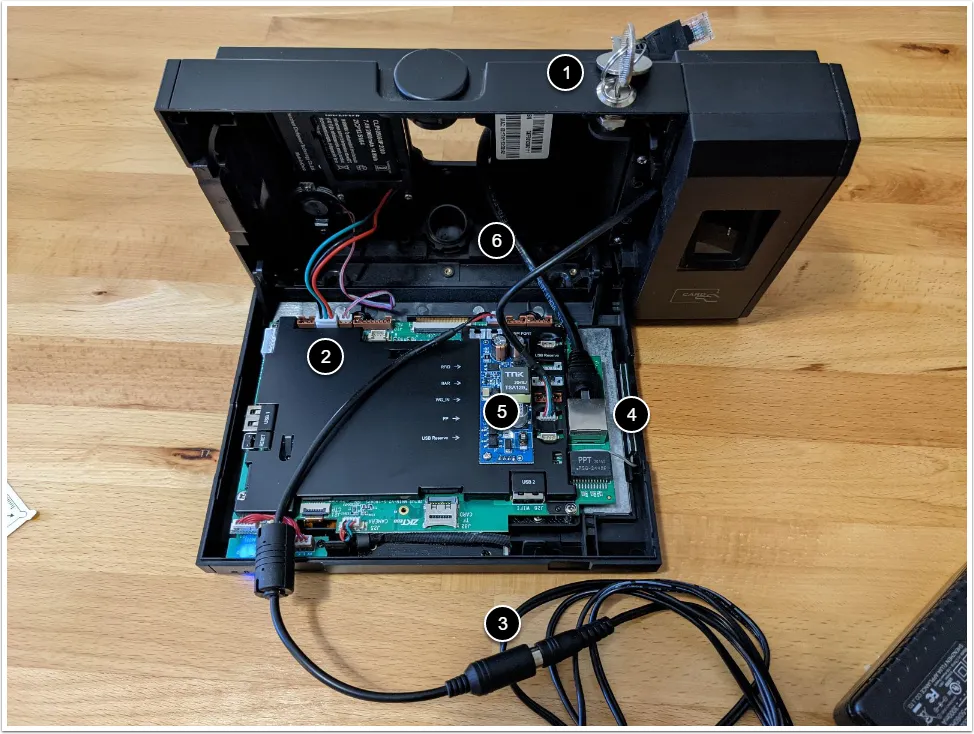
Inside your Time Machine there are multiple connections you’ll want to ensure are connected properly:
To open your Time Machine, insert the key into the key hole on the top of the machine and turn it 90 degrees counter-clockwise so that the key is perpendicular to the wall. Next, gently pull the top of the front cover forward until it comes loose from the back of the unit. You can then carefully lift upwards on the front cover and it should allow you to drop the front cover down for easy access into the clock.
This is the back-up power unit. You’ll want to ensure that it is plugged in to the second slot from the left as pictured above. Once plugged in, your Time Machine will stay running in the event of a power outage.
Inside the device you’ll find a power cable connector, plug the external power cable provided in the box to your device’s power cable connector. The inner cable should already be connected firmly into the left-most slot of the upper right-hand slots. This wire can be fed directly through the back of the unit, or through the lower optional access port, labeled 6.
This is the port for your Time Machine’s Ethernet connection. We strongly recommend connecting your clock via an Ethernet connection and configuring a static IP address where possible. Just like the power cable, this can be directly fed out of the back of the unit or through the optional access port labeled 6.
This cable connects the Fingerprint Scanner into the Time Machine. It should already be firmly plugged into the second slot from the bottom, labeled “FP” as above.
This optional access port can be unscrewed to allow cables to run directly into the Time Machine from the bottom of the unit if there isn’t enough space behind the unit to run the wires.
Once the wires are properly connected and routed through the device, you can close the front cover and lock the panel by turning the key 90 degrees clockwise.
Now that the Time Machine’s hardware is appropriately wired and set up, let’s look at configuring the software.
We’ll start off by removing the protective film covering the front screen and the fingerprint scanner.
Your clock should be sitting directly on the TimeForge Time Clock screen. From here, you’ll want to enter your Internal Number and Internal Password using the keypad on the screen.
Once logged in, you’ll want to click on the Manager tab on the bottom, then click “Test Connection.”
If you receive a “Successfully Connected” message, the Time Machine is able to connect to the TimeForge Website, and you should be set to immediately begin enrolling fingerprints and using the clock.
A guide to enrolling fingerprints can be found here.
If possible, we recommend configuring your Time Machine with a static IP address to help ensure there are minimal potential disruptions to internet connectivity.
Step 1: Have a manager log onto the clock, navigate to “Manager” and click “Exit Timeclock”
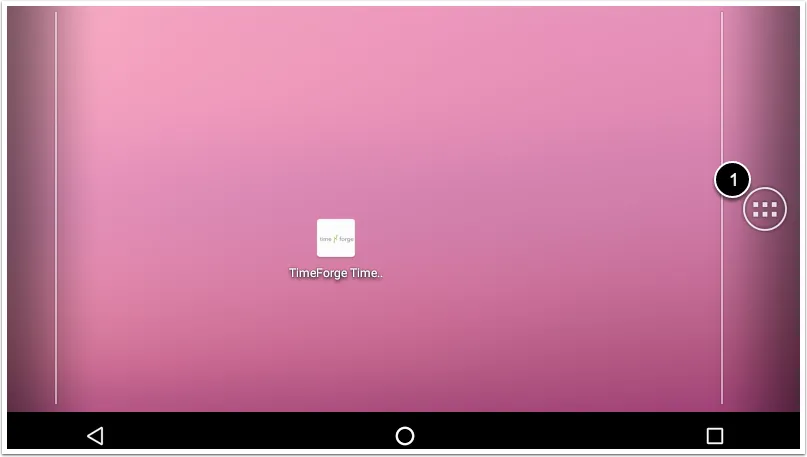
From here, click on the six square dots on the right, labeled with “1”.
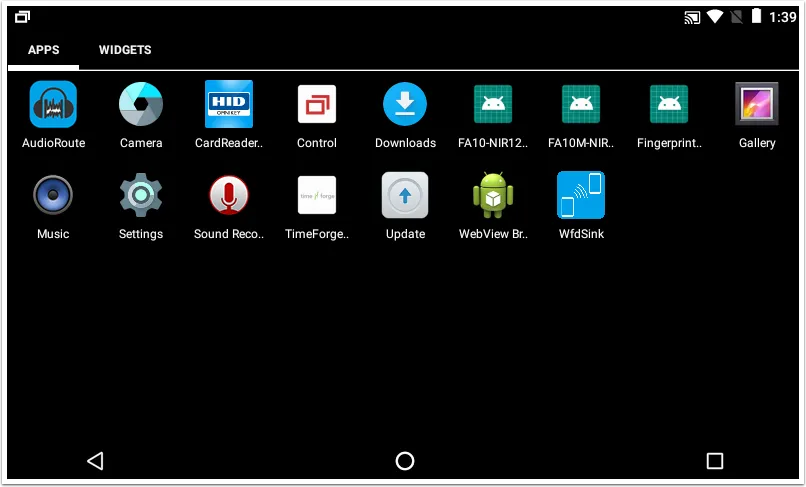
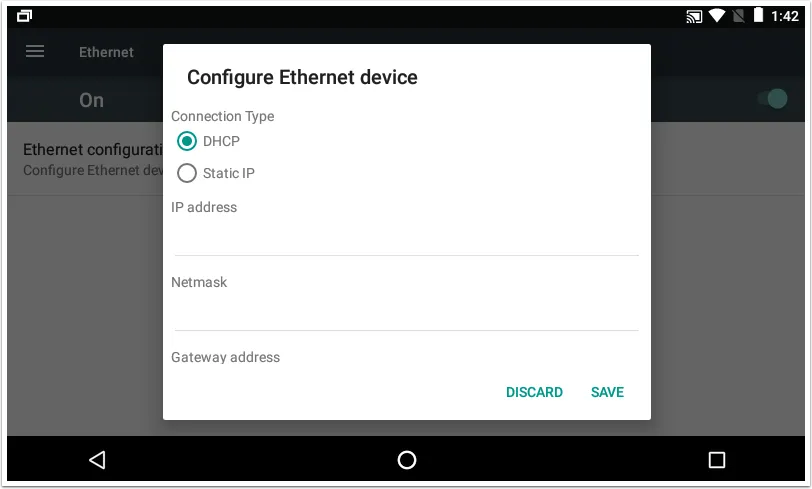
Then click on “Settings”, then “Ethernet”. If Ethernet is showing “Off”, click on the toggle on the right side of the screen, then click “Ethernet configuration.”
By default, the Time Machine is configured for DHCP, so you’ll want to click “Static IP”.
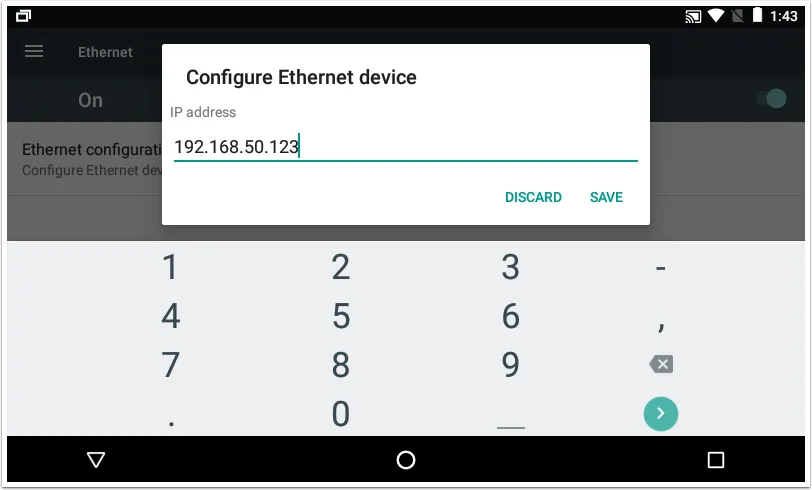
Once Static IP is selected, click on the IP Address field, and a keyboard should appear so that you can edit the field.
Once you’ve updated the IP Address field, hit the green button on the bottom right-hand corner to enter the Subnet Mask, then hit the green button again.
Once you’ve filled out the Gateway, Primary DNS, and Secondary DNS fields, you can click “Save”.
Lastly, you can click the circle icon on the bottom of the device to go back to the main screen and click on “TimeForge Timeclock” to pull up the application, then repeat Step 4 to test the connection.
Update your Time Machine timeclock
TimeForge releases updates to the Time Machine’s software periodically. The updates improve the timeclock’s functionality and add new features to your device. This guide walks you through how to update your timeclock in just a few easy steps.
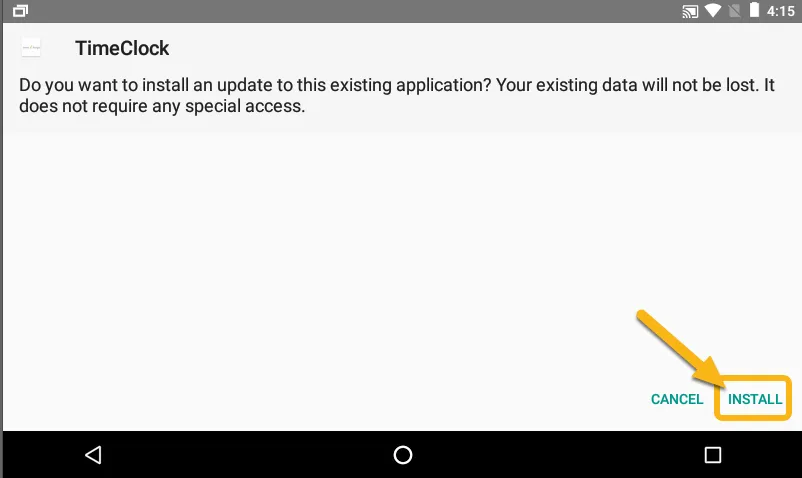
The timeclock will ask you to confirm if you want to install the update. Tap INSTALL to continue.
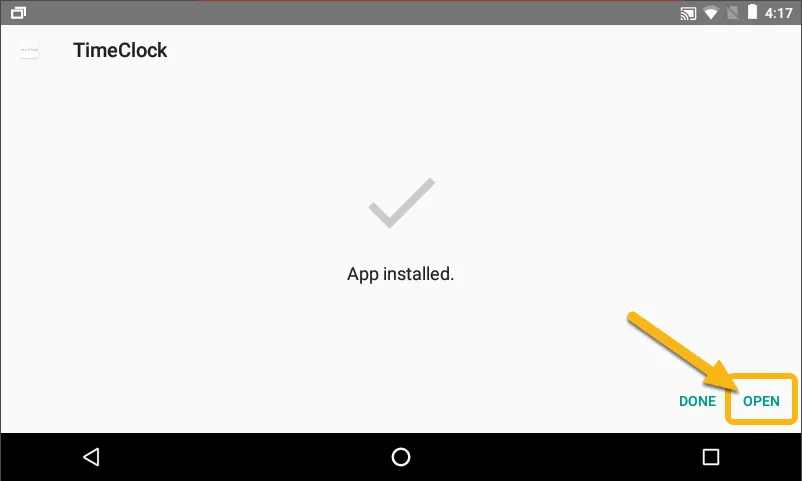
Once the install is complete, tap OPEN to restart the app.
Once the app finishes restarting, your staff can record their attendance and use the timeclock as normal.
Hardware & Integrations › General Setup
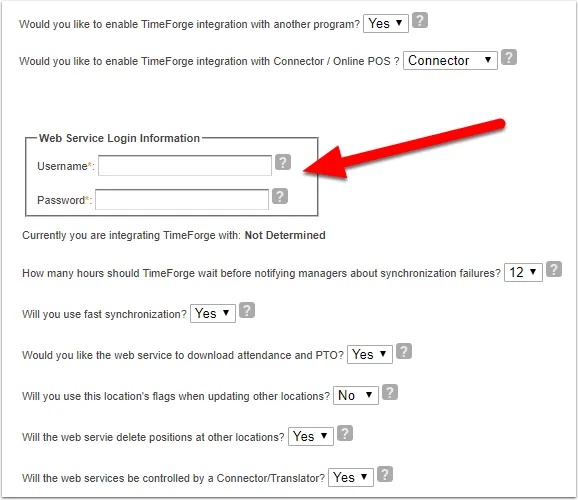
Set up a web service username and password
TimeForge uses web services to communicate with other 3rd party applications. Web services are like a modern CSV (Excel) file, and they allow TimeForge to communicate with other applications, such as Point of Sale systems, accounting products (such as Quickbooks), and hardware TimeClocks.
To ensure that no one else can modify your data by using the TimeForge web services, you will need to create a Web Service username and password. We’ve made sure that this is easy to do, so you can quickly use the power of TimeForge with your 3rd party application.
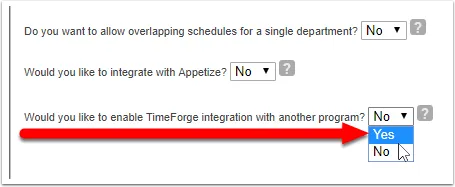
Several more options will appear on the screen when you select Yes (shown below). By default, TimeForge permissions are controlled by the Connector/Translator or other 3rd party software.
Choose an appropriate username and password for the web service. This is specific to your location / store and won’t be needed again. We recommend that you choose the longest username and password possible.
Note that TimeForge will automatically send an email to managers if it cannot synchronize. This heartbeat functionality will ensure that TimeForge and 3rd party applications are running properly at your business. In many cases, the default sync and configuration settings (shown above) may be used.
Not sure about some of the settings and whether they will work with your integration? No problem! Our support team is here to help.
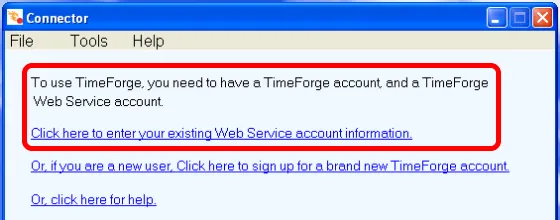
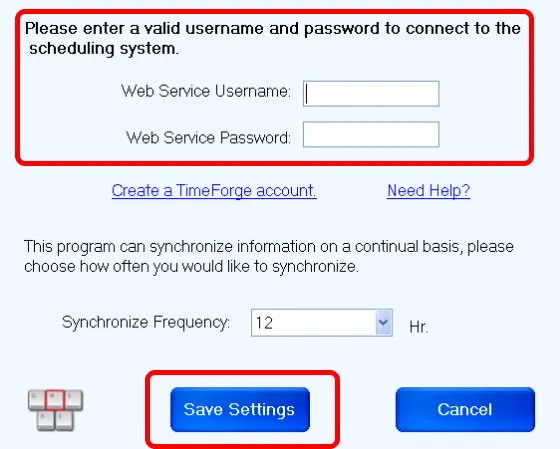
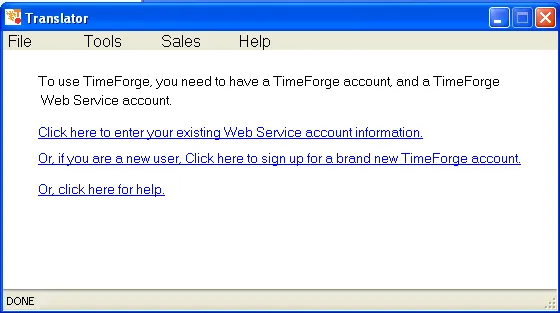
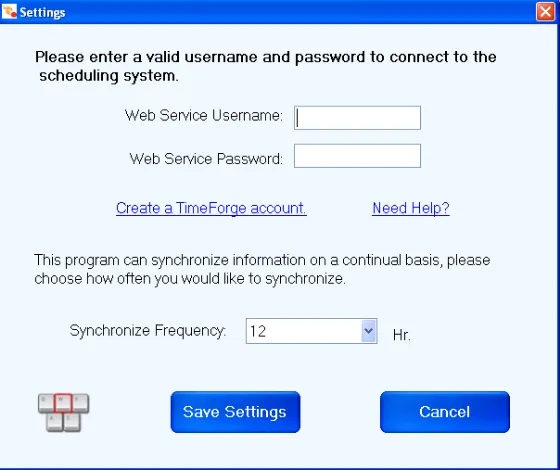
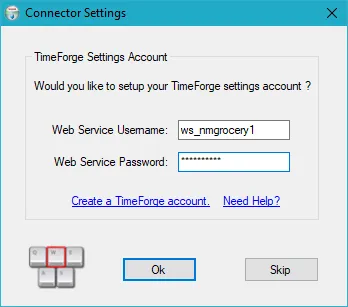
To use the your new web service username and password, open up the Connector or Translator you’re trying to configure (e.g. the TimeForge Aloha POS Bridge) and enter in your existing web service account information.
Click “Save Settings” and…
That’s it … you are done!
Hardware & Integrations › Aloha
Integrate TimeForge with Aloha POS
TimeForge can integrate and communicate with several Point of Sale systems, including Aloha by Radiant Systems. Aloha is a great Point of Sale system, with dealers all over the world.
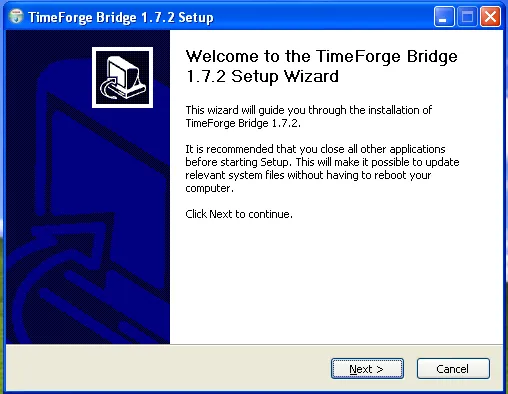
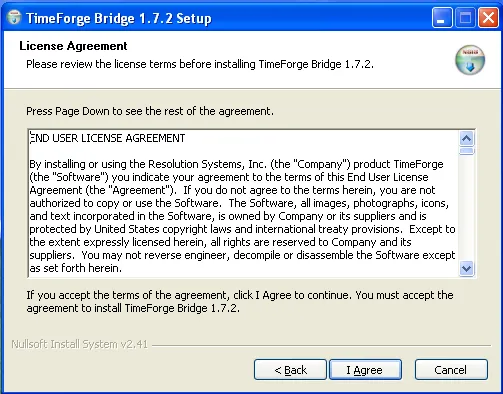
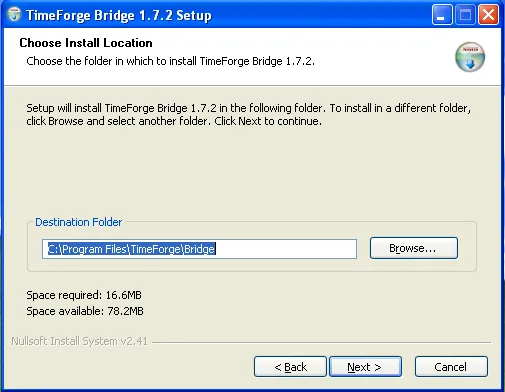
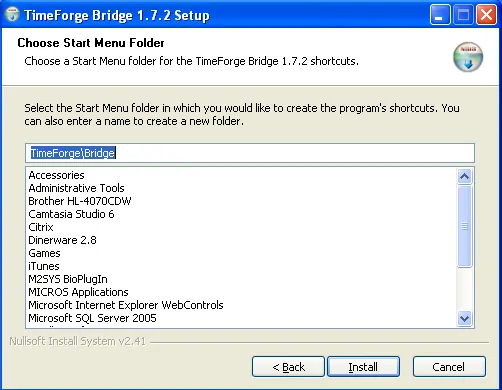
TimeForge integration with Aloha involves installing the TimeForge Aloha Bridge software on a computer system with access to the Aloha installation directory. Need a copy of the software? No problem. Our support team is here to help.
The software will read and write to your Aloha system as necessary, and can keep employees, positions, job codes, sales, and time punches synchronized between TimeForge and Aloha.
Additionally, you can use the TimeForge Fingerprint scanner with Aloha POS to allow biometric clock-ins and clock-outs.
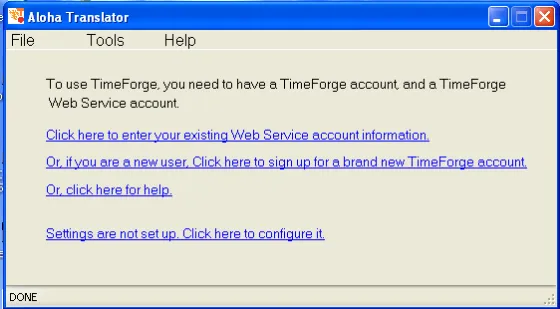
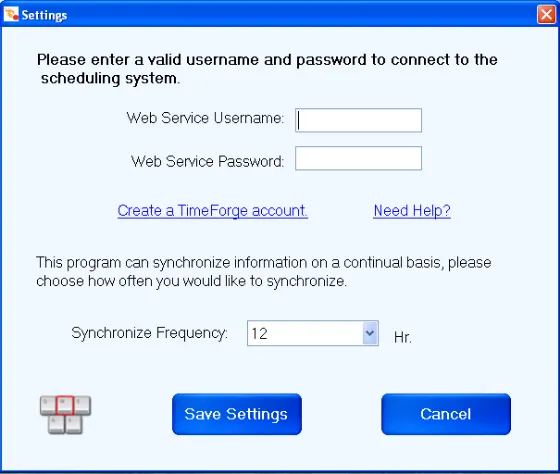
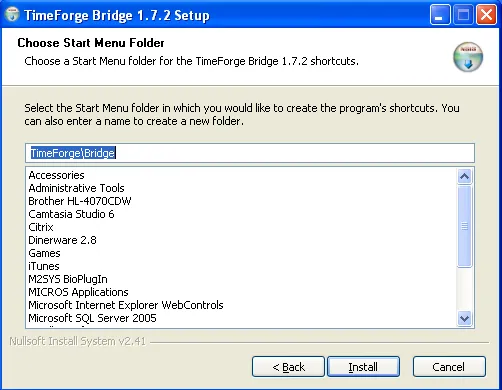
The Aloha Bridge will prompt you to enter your Web Service account information, confirm TimeForge account information, and configure your settings. Once you have a Web Service account, click the last link to configure your settings.
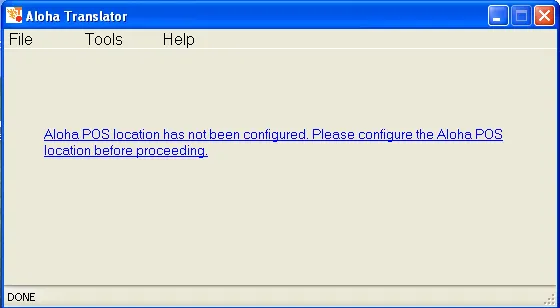
The TimeForge Aloha bridge will prompt you to configure the Aloha POS location. You will need to determine where Aloha stores the daily grind files on your computer and then enter in this information into the TimeForge Aloha bridge.
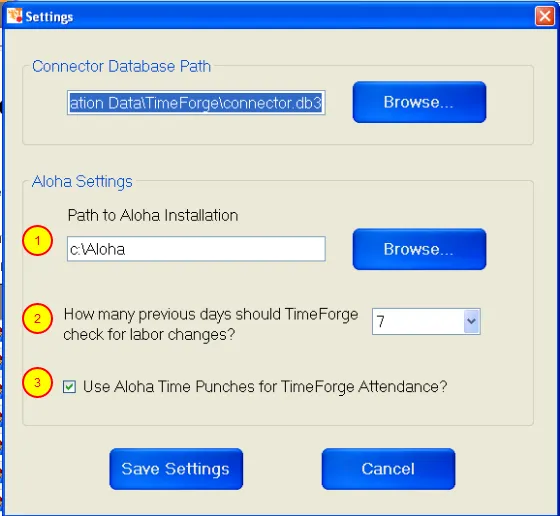
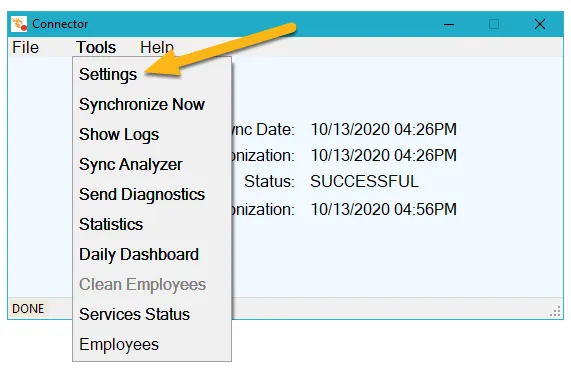
When you click the link, you will be able to configure the TimeForge Aloha Bridge and enter in the Aloha POS location. Some of the important values on this screen include:
The path to the Aloha grind files, which is normally C:\Aloha or C:\AlohaQS (for quick service or QSR restaurants).
Choose how many previous days TimeForge should consider for labor adjustments. This ensures that TimeForge scans old time punch / time card entries to identify manager edits to time punches.
By default, TimeForge uses the time punch values from Aloha. However, if you would like to circumvent the Aloha time punches (time cards), and would prefer to use the TimeForge Attendance system and optional biometrics, then please un-check this option.
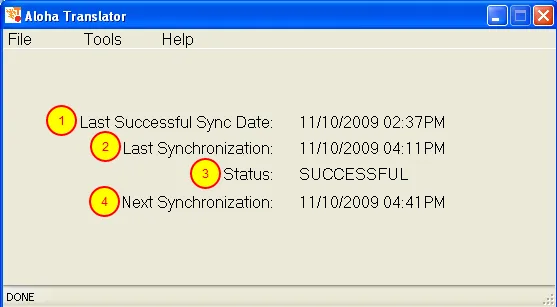
Once you have properly configured the system, you should review sync settings on the TimeForge Aloha Bridge dashboard.
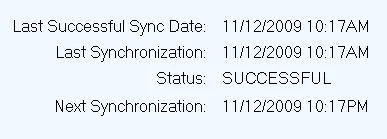
The Last Successful Sync Date shows the last date and time that the software was able to read from your Aloha grind files. This normally happens once per day, and should occur automatically.
The Last Synchronization shows the last date and time that a synchronization was attempted.
The Status shows the status of the last synchronization (it will either be SUCCESSFUL or FAILED).
The Next Synchronization shows the date and time of the next scheduled synchronization.
That’s it! You’re all done. TimeForge will synchronize your data based on the needs of your restaurant and will keep the data in TimeForge and in Aloha POS communicating properly. You can now run the program.
Hardware & Integrations › Dinerware
Install TimeForge with Dinerware Point of Sale
TimeForge is capable of integrating with several Point of Sale systems, including Dinerware. Dinerware is a wonderful Point of Sale system, with dealers all over the world.
This integration will ensure you get the most out of Dinerware and scheduling; the process involves installing the TimeForge Dinerware Bridge software on the main computer system. Need a copy of the software? No problem. Just contact our support team.
The software will read and write to your Dinerware system as necessary and can enforce your TimeForge schedules - preventing employees from riding the clock. Additionally, you can use the TimeForge biometric TimeClock or Fingerprint scanner with Dinerware to allow biometric clock-ins and clock-outs.
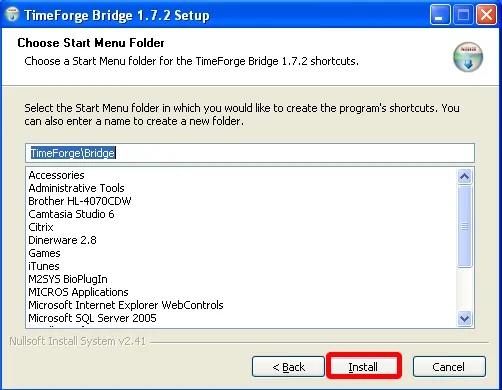
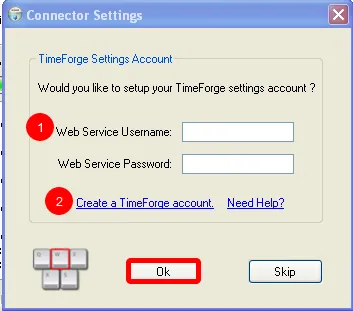
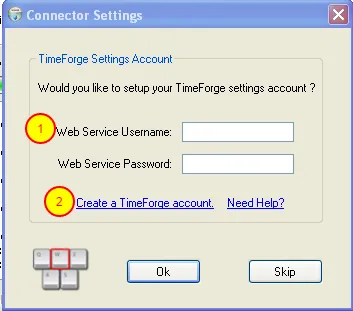
1. If you already have a TimeForge account, enter your Web Service Username and Password to connect with TimeForge.
A web service username and password is not the same as your TimeForge username (usually your email address), but is a secured username and password that allows the Dinerware TimeForge Bridge to communicate with TimeForge.
You can create a Web Service account by logging into your account and going to the Settings for your location / store. You can then set your web service username and password.
2. Click the link if you do not yet have a TimeForge account. We will create a Web Service Username and Password for you automatically.
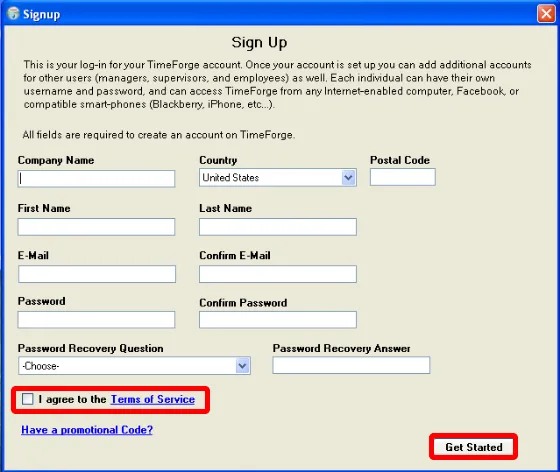
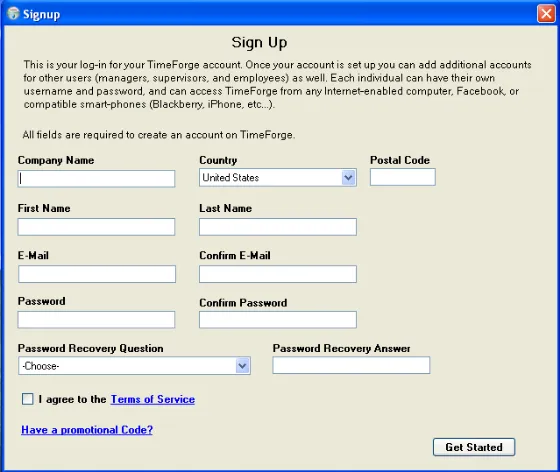
If you need to create a TimeForge account, please fill out all of the fields, including your company name, first and last name, email address, password, and a password recovery answer.
Select the check box if you agree to the Terms of Service, then click “Get Started”. We will then automatically create your Web Service Username and Password for you.
At this point, you can run the TimeForge Bridge software.
Configure TimeForge with Dinerware Point of Sale
This guide will teach you how to properly configure TimeForge to integrate with Dinerware POS if you encounter problems. It assumes you’ve already performed the steps in our installation guide.
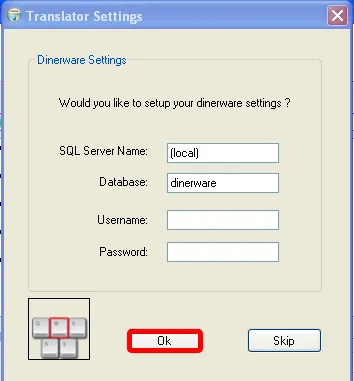
If the TimeForge Dinerware Bridge was not properly configured to use a Web Services account, you will first need to configure the Web Services. Follow the options given on screen (shown here, below).
Next, configure the Dinerware POS side of the TimeForge Dinerware Bridge.
Some of the important values on this screen include:
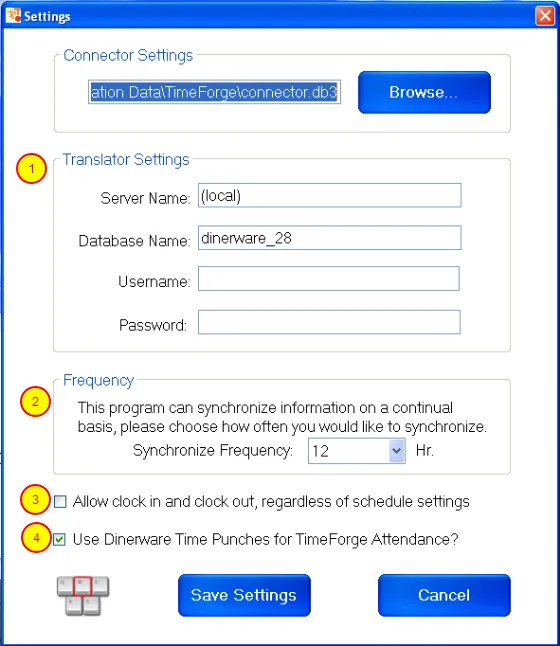
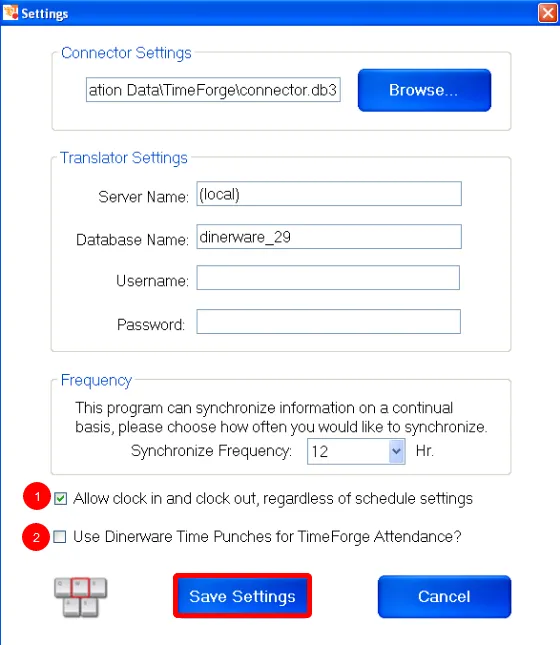
Dinerware Server settings, including the Server Name, Database Name, Username and Password. In most cases, the defaults will work for your Dinerware installation.
Choose how often the software should poll or synchronize with the Dinerware POS system.
If you would like to override the TimeForge settings for early clock-in’s and late clock-out’s, or to enable staff members who are not scheduled to clock in (without manager approval), please check this box.
By default, TimeForge uses the time punch values from Dinerware. However, if you would like to circumvent the Dinerware time punches, and would prefer to use the TimeForge Attendance system and biometrics, then please un-check this option.
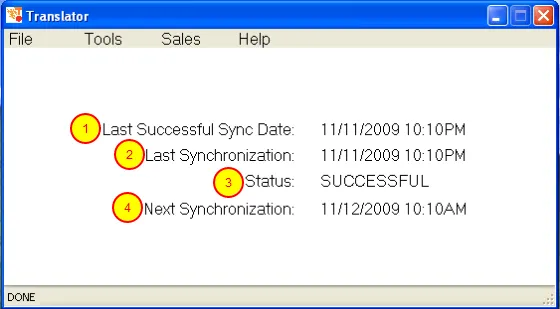
The Last Successful Sync Date shows the last date and time that the software was able to read from your Dinerware database.
The Last Synchronization shows the last date and time that a synchronization was attempted.
The Status shows the status of the last synchronization (it will either be SUCCESSFUL or FAILED).
The Next Synchronization shows the date and time of the next scheduled synchronization.
You are all done! TimeForge will synchronize your data based on the needs of your restaurant and will keep the data in TimeForge and in Dinerware POS communicating properly.
Define menu items for Sales Forecasting with Dinerware POS
TimeForge integration with Dinerware makes labor management easier for your business by streamlining the functionality of Dinerware and scheduling. Installing TimeForge to work with Dinerware is easy and involves installing the TimeForge Dinerware Bridge software on your main computer system.
When building schedules, it is often useful to forecast sales at your store or to ensure that sales and labor have an acceptable ratio. TimeForge automatically pulls sales data from your Dinerware POS system, synchronizes this data to TimeForge, and allows you to build fast and simple schedules.
You can forecast sales by gross sales, individual menu items, or groups of menu items (such as entrées or desserts).
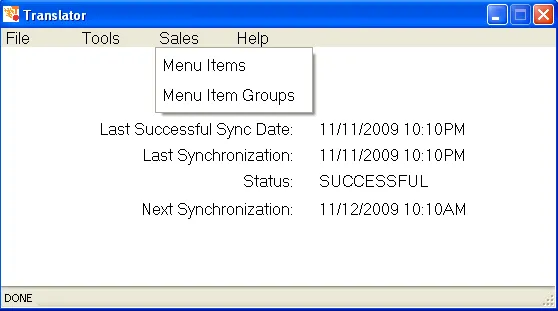
In the TimeForge Translator, access the “Sales” menu to set up menu items and menu item groups for Sales Forecasting within TimeForge. This will allow you to benchmark and schedule labor in comparison to your desired labor needs.
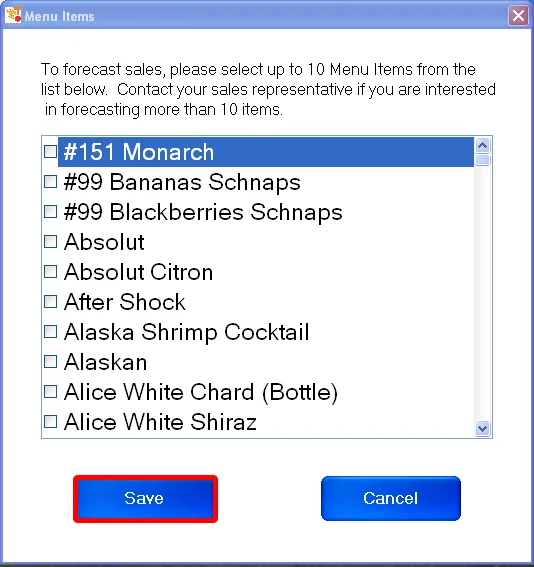
TimeForge allows up to 10 menu Items from your Dinerware menu to be chosen for Sales Forecasting. Details for the sales of these 10 menu items are copied from Dinerware to your TimeForge labor management system and will allow you to accurately compare sales against schedules and actual attendance.
Click “Save” once you’ve finished selecting menu items for sales forecasting.
Use Menu Item Groups to combine sales from multiple menu items
Menu Item Groups allow you to easily and quickly combine sales from multiple menu items in your Dinerware menu into a single Sales Forecast.
For example, you may want to build schedules based on entrées, drinks, or some other combination of menu items. These can be set up as Menu Item Groups and then compared to your employee schedule or attendance later.
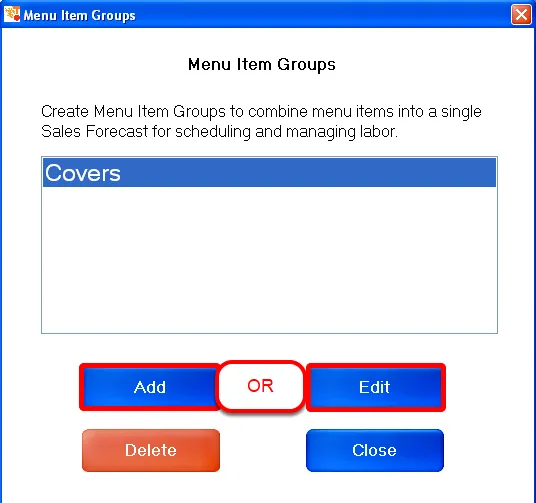
Click “Add” to create a new Menu Item Group, or click “Edit” to edit the properties of an existing Menu Item Group.
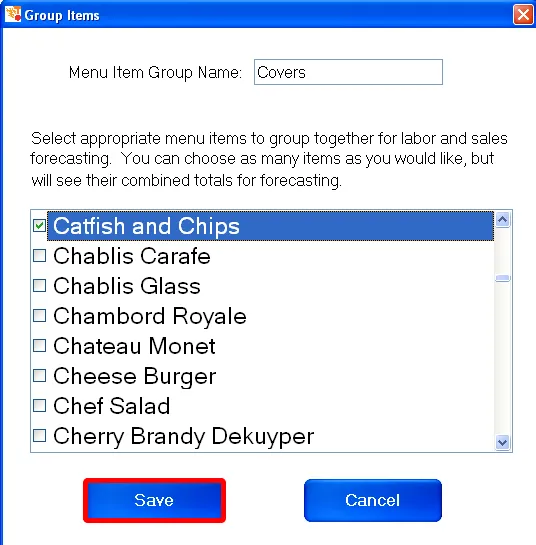
Enter a descriptive name and choose the necessary menu items from your Dinerware database. Choose “Save” when you are finished. TimeForge will automatically synchronize your sales data the next time it connects to the TimeForge server!
Add employees to TimeForge with Dinerware POS
After installation, the TimeForge Dinerware Bridge copies the data from your Dinerware POS to your TimeForge account. This can ensure that you get the most out of not only Dinerware and scheduling but all your labor management needs. In most cases, the data is automatically copied over, but there are a few rules to follow that can ensure TimeForge and Dinerware work seamlessly together.
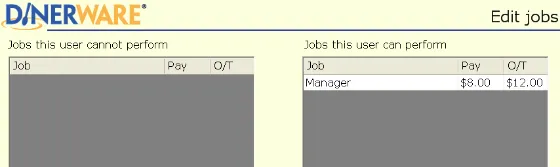
One key point is adding employees. To do this, you’ll simply need to enter your employee into the Dinerware system and then sync to TimeForge. That way, you don’t have to waste time entering duplicate information.
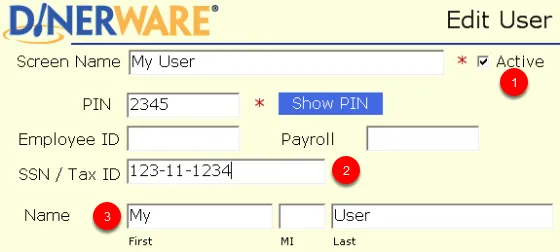
Add your users to the Dinerware POS software. Some of the key fields include:
Active/Inactive. The employee must be active in Dinerware to appear in TimeForge. If an employee is made inactive, TimeForge will assume they are terminated and will remove them from your employee list (they can later be re-activated).
SSN/Tax ID. The SSN / Tax ID is not required, but if provided, it must be unique to employees within your company. For example, two employees cannot share the same social security number.
Name. Each Dinerware employee must have a unique first and last name. For example, only one employee can be named “John Smith.”
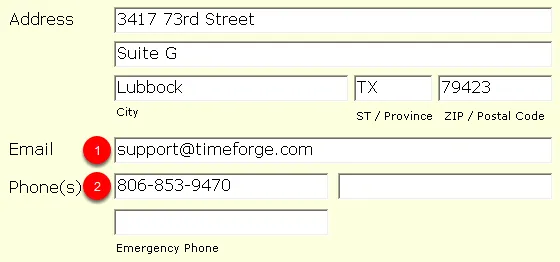
Email address. The staff member must have an email address. TimeForge will automatically send the employee an email address to allow them to set up a username and password to log in to TimeForge. Email addresses must be unique to each staff member, i.e. employees cannot share email addresses.
Phone number. To receive cell phone and text message alerts about upcoming schedules, enter the staff member’s cell phone number in the “phone” field.
TimeForge regularly syncs with Dinerware to ensure that the data is current and accurate.
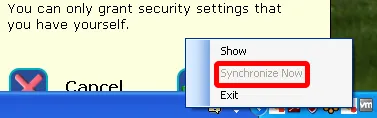
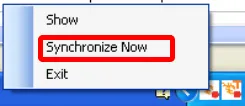
After adding your staff members, you can manually synchronize the system by right-clicking on the connector icon and clicking “Synchronize Now.” Alterntively, you can wait for TimeForge to automatically sync later.
Once synced, TimeForge will add staff members to the appropriate departments and locations if you are using TimeForge at multiple locations or with department-level scheduling.
TimeForge and Dinerware with Scheduling Enforcement
TimeForge has the ability to integrate with a variety of Point of Sale systems, including Dinerware. Integrating these two systems will ensure that you get the most out of both Dinerware and scheduling employees.
The first step in using TimeForge with Dinerware is installing the TimeForge Dinerware Bridge software on your computer system. The software will read and write to your Dinerware system as necessary, and can enforce your TimeForge schedules, thereby preventing employees from riding the clock.
When combined with the 1-to-1 matching that the TimeForge biometric TimeClocks offer, you never have to worry about inaccurate employee attendance again!
Ensure both the Connector and Translator are running
Check the Windows task bar, which is the bar that normally runs along the bottom of the computer and contains the “Start” menu (on the left) and clock (on the right).
You should see icons similar to those shown below. For Dinerware and scheduling to work, both of these icons should be displayed. Contact us if your system isn’t functioning and these icons don’t appear.
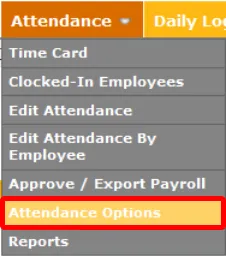
While logged into TimeForge, navigate to the “Attendance Options” page under the Attendance tab
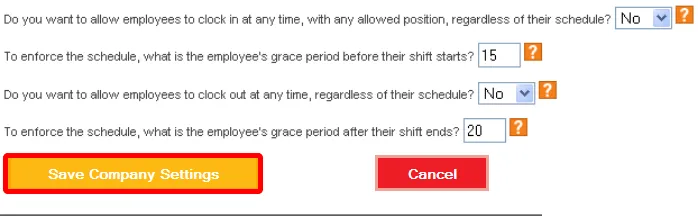
Scroll down the page to the options directly following the open and close times.
Set the grace periods for early clock in and late clock out. These settings can be any value that makes sense for your business, though many businesses choose a 5-10 minute early clock in and a 10-20 minute late clock out.
Click “Save” at the bottom of the page once you’ve finished making changes.
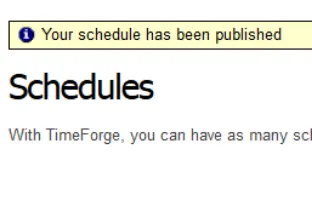
Create and post a schedule in TimeForge so that staff members are notified of upcoming shifts. This will also allow the TimeForge Dinerware Bridge to synchronize and enforce the schedule. TimeForge will confirm when you’ve successfully published a schedule, like so:
TimeForge automatically synchronizes data between your Dinerware POS system and the live TimeForge server. This ensures that employees, positions, schedules, time cards, and sales are automatically transferred between the two systems.
During heavy activity at your restaurant, this synchronization is done frequently. Alternatively, the synchronization will occur less often when your business isn’t as busy.
An employee who is not on the schedule will be presented with a screen for a manager override. Additionally, employees who show up too early or attempt to clock out too late will also be prompted for a manager override.
This will reduce the amount of clock riding that staff members can do, reducing labor costs by 2% - 3% instantly!
TimeForge Attendance with Dinerware POS
TimeForge is capable of integrating and communicating with many of the leading Point of Sale systems to reduce the time you spend entering data. Dinerware is a focused and easy-to-use Point of Sale system with dealers all over the world.
Integrating TimeForge with Dinerware will ensure that you get the most out of Dinerware and scheduling, and is also great for tracking employee attendance. The first step toward using these features is to install the TimeForge Dinerware Bridge software on your main computer system.
The TimeForge Dinerware Bridge software will read and write to your Dinerware system as necessary, and can enforce your TimeForge schedules, thereby preventing employees from riding the clock.
In some cases, you may want to use TimeForge Attendance exclusively as a way to track time and attendance at your business. To do this, you can turn off the synchronization of time punch entries from the POS system and use the full power of the TimeForge Attendance system instead, including our fingerprint scanner (to stop buddy punching), and our comprehensive meal and staff break system.
Ensure both the TimeForge Connector and Translator are running
You should see icons similar to those shown below. These icons will appear on the Windows task bar, which is the bar that normally runs along the bottom of the computer and contains the “Start” menu (on the left) and clock (on the right).
The TimeForge Dinerware Bridge is running when both of these icons are displayed. Contact us if these icons don’t appear and your system isn’t working properly.
Click the connector icon to load the connector settings.
In the TimeForge Translator, make sure that the check box next to “Allow clock in and clock out, regardless of schedule settings” is selected. This will allow your users to clock in and out of Dinerware as necessary, which is important for choosing cash drawers and meal coursing, as well as check printing.
In the TimeForge Translator, make sure that the check box next to “Use Dinerware Time Punches for TimeForge Attendance” is NOT selected. This option turns off the synchronization of the Dinerware time punches, and instead allows you to use TimeForge Attendance for tracking time.
To use the software immediately, you will need to force a synchronization so that both softwares know there was a change. Right-click on the connector and choose “Synchronize Now” to immediately sync Dinerware with TimeForge.
Require employees to clock in and clock out at work
TimeForge Attendance is very flexible and can allow your employees to clock in from their cell phones, Facebook, or any Internet-enabled computer. However, most businesses will prefer to have staff clock in from restricted computers, such as those provided at their work location. This option can be found by hovering over “Attendance” and selecting “Attendance Options” in TimeForge.
You can also lock down attendance tracking by limiting clock-ins and clock-outs to specific IP’s. To do so, simply click on the button displayed below, which will add the computer you’re currently using to the list of allowed IPs.
Employees can now log in to TimeForge using their username (usually their email address) and password. Alternatively, if the location is using a compatible fingerprint scanner, staff members can use their fingerprints to log in to TimeForge.
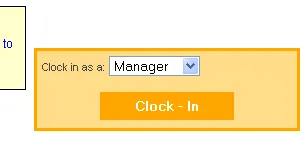
After logging in, they will see a clock in / clock out box on the right-hand side of their screen.
Clocking in and out is now point-and-click easy!
Hardware & Integrations › ISS45
Install TimeForge on ISS45
This guide will walk you through the process of setting up TimeForge on an NCR ISS45 system.
Set up the Web Service Login Information in TimeForge
Before you begin installing and configuring the connector that will sync data from TimeForge and ISS45, you’ll need to set up the web services username and password that will be used to secure the connection between the two.
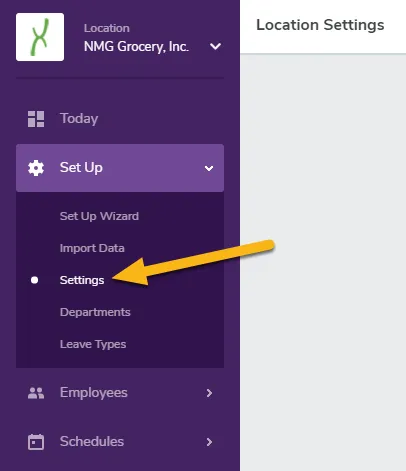
From the Location level, open the Set Up tab and select Settings from the menu.
Scroll down to the section titled Integrations.
Under Web Service login information, enter a Username and a Password.
The Username should be in the form of: ws_locationname
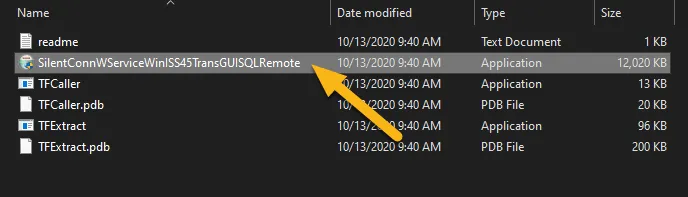
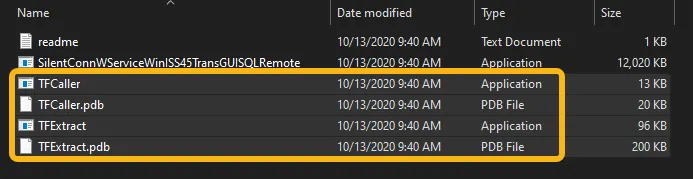
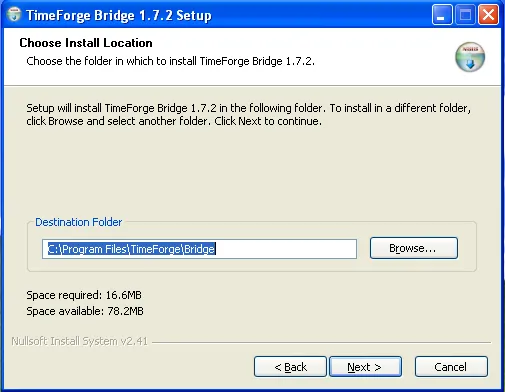
Copy the TFCaller and TFExtract files into the TimeForge\Bridge folder. The location of this folder will differ slightly depending on whether you’re on a 64-bit or 32-bit system:
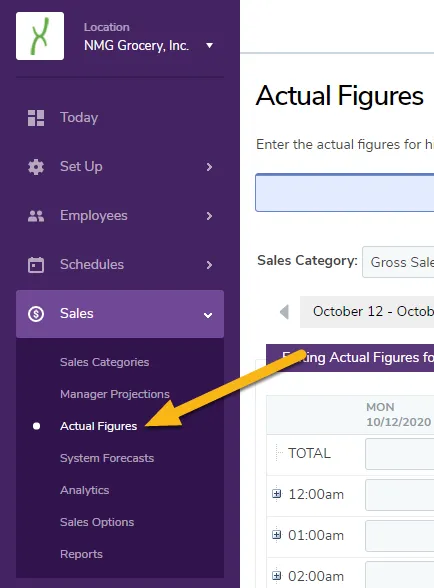
Wait until the sync completes, then validate that the sales synced in TimeForge. To do this, open the Sales tab, then click Actual Figures.
You should see sales data listed on the page.
Hardware & Integrations › Restaurant Manager
Install TimeForge with Restaurant Manager Point of Sale
TimeForge can integrate with several Point of Sale systems, including Restaurant Manager. Restaurant Manager by ASI, is an easy to use and powerful Point of Sale system, with dealers all over the world.
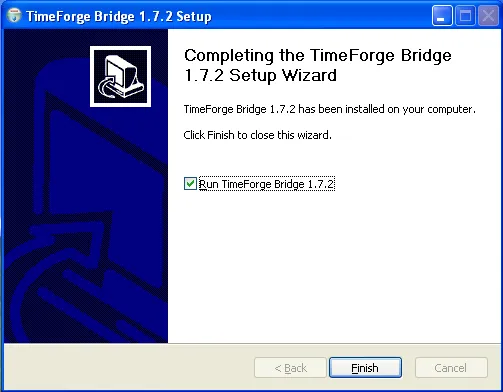
TimeForge integration with ASI Restaurant Manager involves installing the TimeForge RM Bridge software on the main RM computer system.
The software will read and write to your Restaurant Manager system as necessary, and can enforce your TimeForge schedules - preventing employees from riding the clock.
Install the TimeForge-Restaurant Manager Bridge software
1. If you already have a TimeForge account, enter your Web Service Username and Password to connect with TimeForge.
A web service username and password is not the same as your TimeForge username (usually your email address), but is a secured username and password that allows the TimeForge-Restaurant Manager Bridge to communicate with TimeForge.
You can create a Web Service account by logging into your account, and go to the Settings for your location / store. You can then set your web service username and password.
2. If you do not yet have a TimeForge account, get started by creating a TimeForge account. We will create a Web Service Username and Password for you automatically.
If you need to create a TimeForge account, please fill out all of the fields, including your company name, first and last name, email address, password, and a password recovery answer.
We will automatically create your Web Service Username and Password for you.
At this point, go ahead and run the TimeForge Bridge software.
Configure TimeForge with Restaurant Manager Point of Sale
TimeForge integrates with a number of powerful POS systems, including Restaurant Manager. ASI Restaurant Manager, is a powerful and easy to use Point of Sale system, with dealers all over the globe.
Integration between TimeForge and Restaurant Manager requires installing the TimeForge RM Bridge software on the main Restaurant Manager computer.
The integration software will read and write to your Restaurant Manager system where necessary, and can enforce your TimeForge schedules - preventing employees from clocking in before they are scheduled to work.
If the TimeForge-Restaurant Manager Bridge was not properly configured to use a Web Service account, you will first need to configure the Web Services.
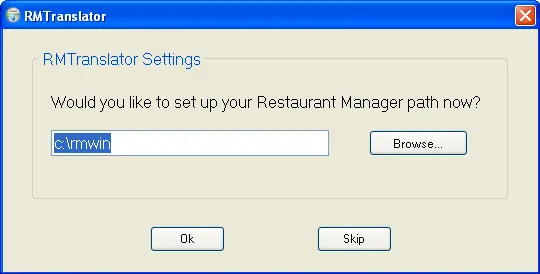
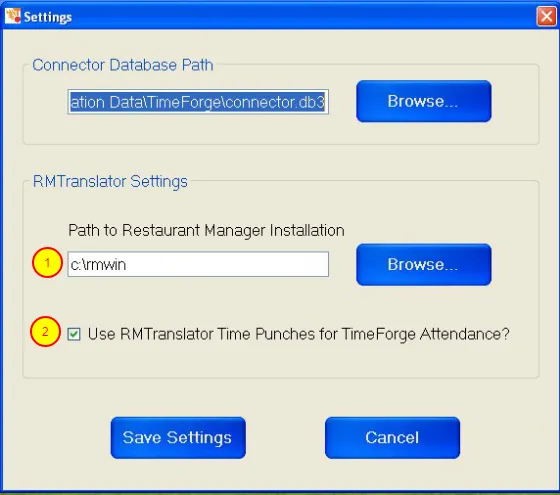
Configure the Restaurant Manager POS side of the TimeForge-Restaurant Manager Bridge. Some of the important values on this screen include:
1. Restaurant Manager system location. This is the directory with all of the DBF files, and Restaurant Manager programs, in it. In most cases, the defaults will work for your Restaurant Manager installation.
2. By default, TimeForge uses the time punch (login) values from Restaurant Manager. However, if you would like to circumvent the Restaurant Manager time punches, and would prefer to use the TimeForge Attendance system, then please un-check this option.
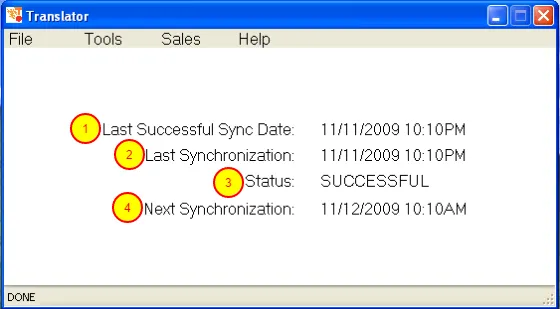
Review the TimeForge-Restaurant Manager Bridge dashboard.
1. The Last Successful Sync Date shows the last date and time that the software was able to read from your RM database.
2. The Last Synchronization shows the last date and time that a synchronization was attempted.
3. The Status shows the status of the last synchronization (it will either be SUCCESSFUL or FAILED).
4. The Next Synchronization shows the date and time of the next scheduled synchronization.
You are all done. TimeForge will synchronize your data based on the needs of your restaurant, and will keep the data in TimeForge and in Restaurant Manager POS communicating properly.
TimeForge and Restaurant Manager
TimeForge integrates with a number of powerful POS systems, including ASI Restaurant Manager. Restaurant Manager, is a powerful and easy to use Point of Sale system, with dealers all over the globe.
To synchronize data between TimeForge and Restaurant Manager, you must first install and configure the TimeForge RM Bridge software on the main Restaurant Manager computer.
The integration software will automatically read and write to your Restaurant Manager POS system when required, and can enforce your TimeForge schedules - stopping employees from clocking in before they are scheduled to work.
Make Sure that the Connector and Translator are Both Running
Check the Windows task bar, which is the bar that normally runs along the bottom of the computer and contains the Start menu (on the left) and clock (on the right).
You should see icons similar to those shown above. Both of these icons should be displayed, and if they are, then TimeForge is running properly.
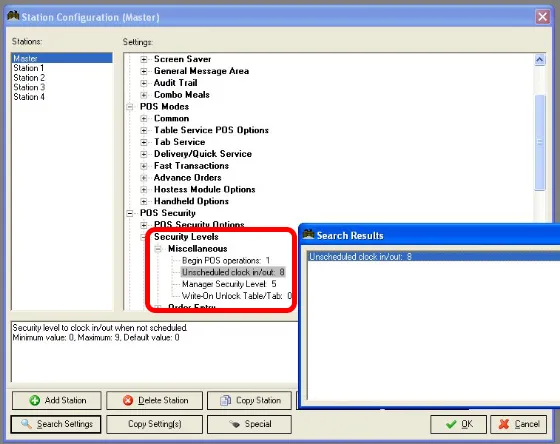
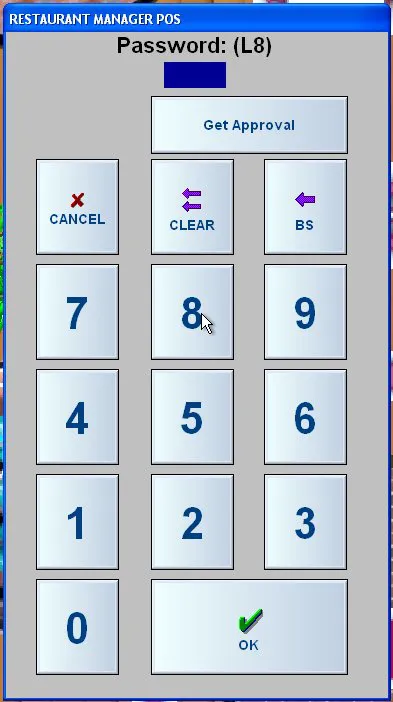
Configure the Security level of the manager providing overrides for employees who are too early.
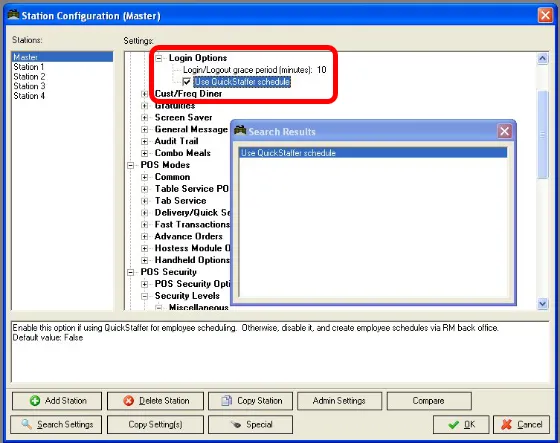
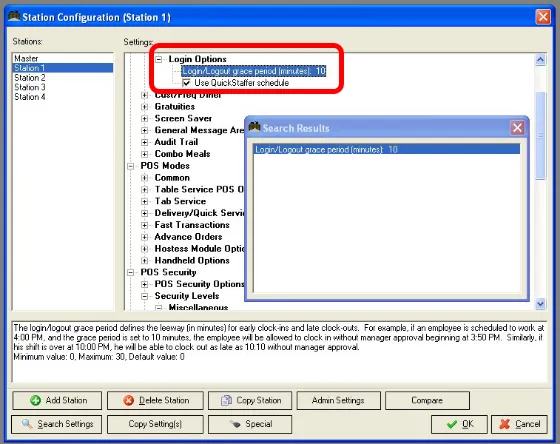
1. Run the Station Config. To do so, launch the RM Back Office, then choose “Setup Station Config.”, and choose Station 1.
2. Click on “Search Settings”, and look for “unsched”. Find the “Unscheduled Clock in/out” setting, and change this to the security level you would like to require for someone to allow a staff member to clock in, who isn’t on the schedule. For example, 8 might be a good value.
Repeat steps 1 and 2 for any other stations you would like to enforce the schedule with.
TimeForge automatically keeps data between your Restaurant Manager POS system and the live TimeForge server synchronized. This ensures that employees, positions, time cards, schedules, and sales are automatically transferred between the two systems without you needing to do anything.
During heavy activity at your restaurant or hotel, this synchronization is done automatically very often, and during slower periods of activities, it is done less often.
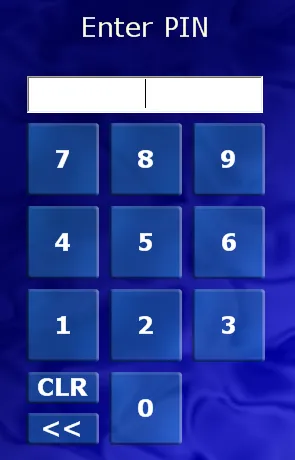
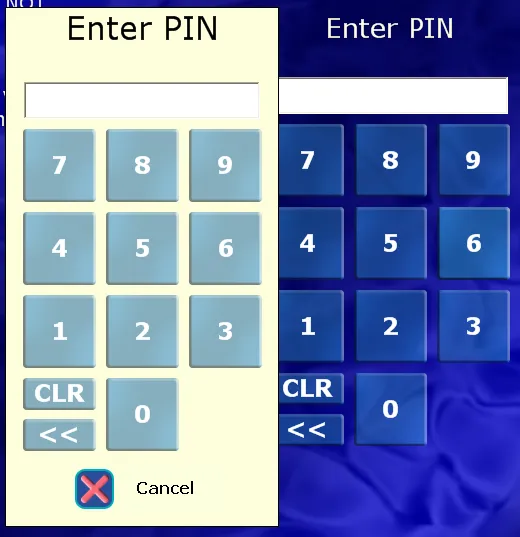
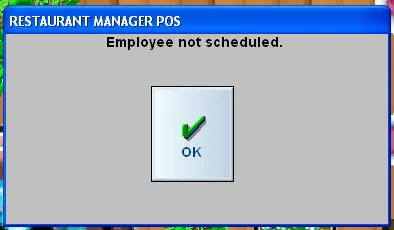
Before an employee can access the Restaurant Manager POS, they must enter their PIN, swipe a mag card (if configured), or use their fingerprint (if configured).
If they are too early, or are not on the schedule, Restaurant Manager will display the above warning.
Staff Arriving Too Early Will Need Manager Approval to Clock In
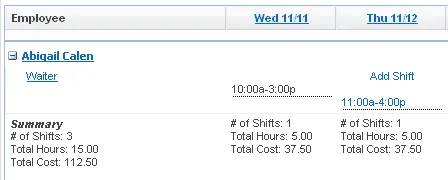
An employee who is not on the schedule will be presented with a screen for a manager override. Additionally, any staff member who shows up prior to the grace period for their shift will also be prompted for a manager override.
Enforcing the schedule will immediately reduce the amount of clock riding that staff members can do, reducing labor costs by 2% - 3% instantly!
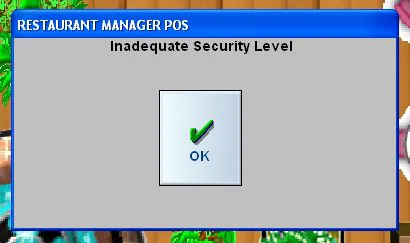
If the overriding manager that is attempting to clock in the staff member doesn’t have a sufficient security clearance, they will be presented with the above dialog box, and will not be able to clock the employee into Restaurant Manager.
Hardware & Integrations › QuickBooks
Install TimeForge with QuickBooks
TimeForge can integrate with many different software programs, including accounting systems such as QuickBooks. QuickBooks is one of the most popular accounting systems in the world, and is used by small, medium, and large businesses around the globe.
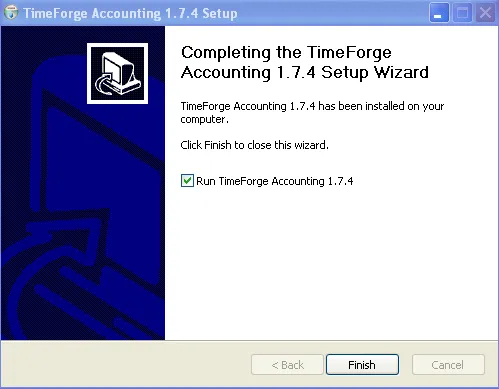
TimeForge integration with QuickBooks involves installing the TimeForge Accounting Bridge software on one of the computer systems running QuickBooks. If you are using QuickBooks Enterprise, you can install the software on the QuickBooks Enterprise server.
The TimeForge Accounting software will read approved time sheets from TimeForge, and then import time cards and weekly time sheets into QuickBooks. With the time sheets inside of QuickBooks, you can pay your employees using QuickBooks Payroll - either by cutting your staff a check, or using Intuit Online Payroll.
1. If you already have a TimeForge account, enter your Web Service Username and Password to connect with TimeForge.
A web service username and password is not the same as your TimeForge username (usually your email address), but is a secured username and password that allows the TimeForge Dinerware Bridge to communicate with TimeForge.
You can create a Web Service account by logging into your account, and go to the Settings for your location / store. You can then set your web service username and password.
2. If you do not yet have a TimeForge account, get started by creating a TimeForge account. We will create a Web Service Username and Password for you automatically.
If you need to create a TimeForge account, please fill out all of the fields, including your company name, first and last name, email address, password, and a password recovery answer.
We will automatically create your Web Service Username and Password for you.
TimeForge can integrate with many different software programs, including accounting systems such as QuickBooks. QuickBooks is one of the most popular accounting systems in the world, and is used by small, medium, and large businesses around the globe.
TimeForge integration with QuickBooks involves installing the TimeForge Accounting Bridge software on one of the computer systems running QuickBooks. If you are using QuickBooks Enterprise, you can install the software on the QuickBooks Enterprise server.
The TimeForge Accounting software will read approved time sheets from TimeForge, and then import time cards and weekly time sheets into QuickBooks. With the time sheets inside of QuickBooks, you can pay your employees using QuickBooks Payroll - either by cutting your staff a check, or using Intuit Online Payroll.
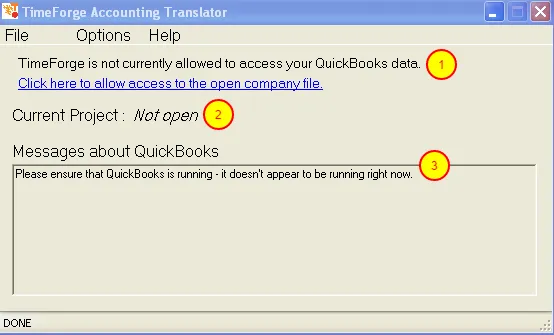
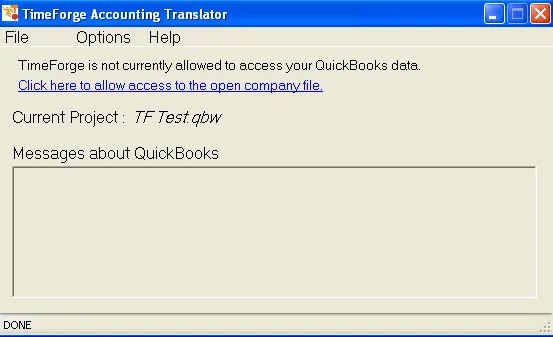
1. Click on this link to set up the type of QuickBooks payroll that is imported. TimeForge will import all payroll hours (time sheets) as a single type of pay, for example, as “Regular Pay” or “Hourly Rate”. If you would like to split the time into multiple payroll types, this will need to be done inside of QuickBooks.
2. If a QuickBooks file is currently open, the company file will be displayed. In this example, no QuickBooks company file is open.
3. A status message about QuickBooks will be displayed. In this example, QuickBooks does not appear to be running.
You are all done! You can start using TimeForge and QuickBooks to process your payroll.
Install TimeForge with Quickbooks 2013
Run payroll with TimeForge and QuickBooks
TimeForge is able to integrate with many different software systems, including accounting and payroll programs such as QuickBooks. QuickBooks is the most popular accounting system for small businesses in the world, and is used by small, medium, and large businesses around the globe.
The TimeForge QuickBooks integration involves installing the TimeForge Accounting Bridge software on one of the computers running QuickBooks. If you are using QuickBooks Enterprise, you can install the software on the QuickBooks Enterprise server.
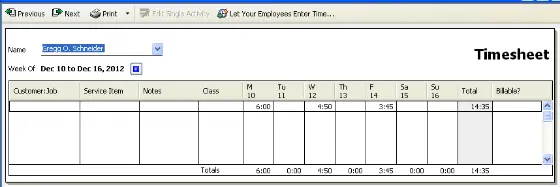
The TimeForge Accounting software will read approved time sheets from TimeForge, and then import time cards and weekly time sheets into QuickBooks. With the time sheets inside of QuickBooks, you can pay your employees using QuickBooks Payroll - either by cutting your staff a check, or using Intuit Online Payroll.
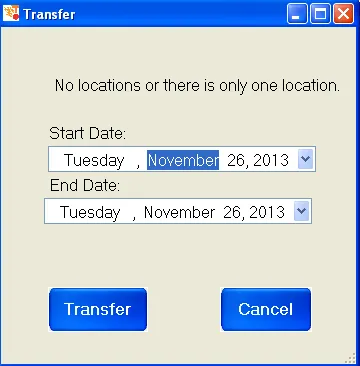
Synchronize Your Time Sheets from TimeForge into QuickBooks
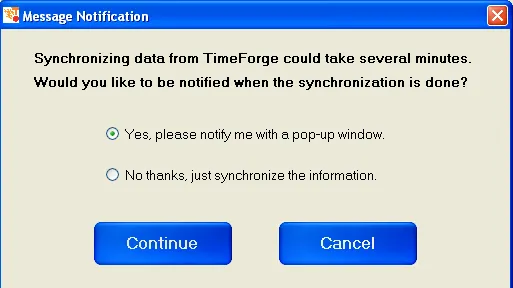
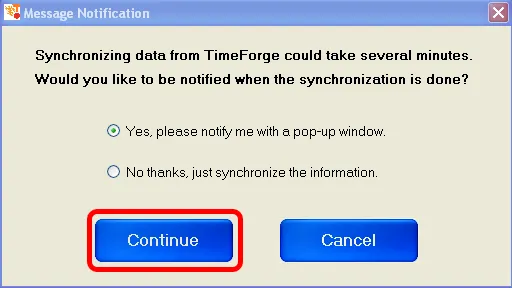
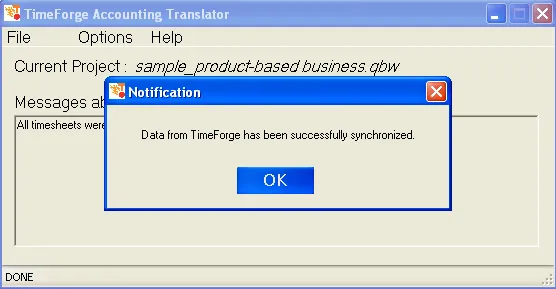
If you choose to receive a pop-up reminder, TimeForge will notify you after the synchronization is successful and the timesheets have been placed into QuickBooks.
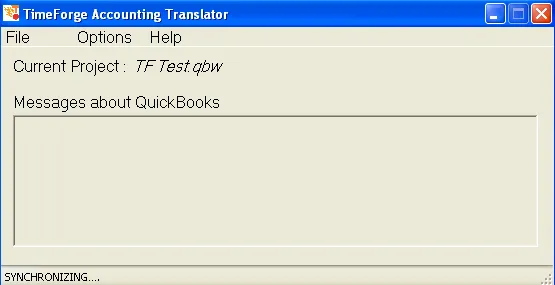
Any notes, errors, or warnings about the synchronization / import will be shown in the Messages screen.
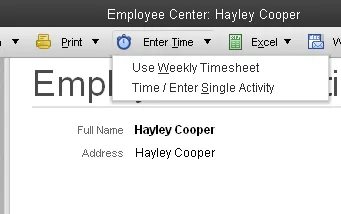
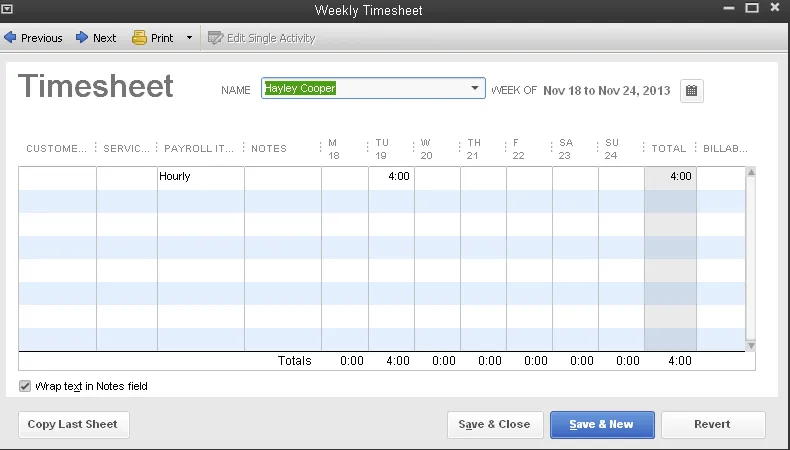
After the time sheets are imported, you can run payroll with QuickBooks. Using QuickBooks, you can run your own checks, or use one of their many options to do electronic payroll.
Allow TimeForge access to QuickBooks data
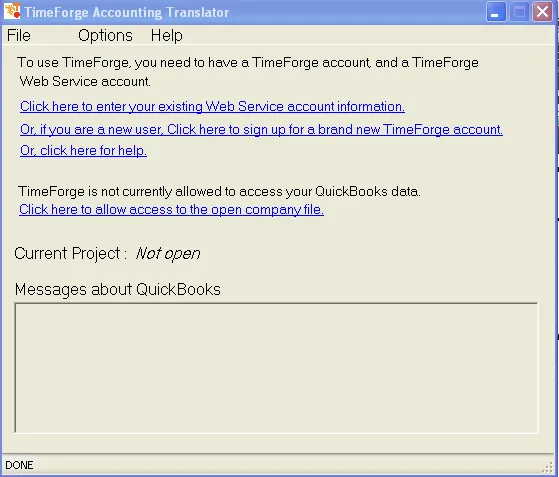
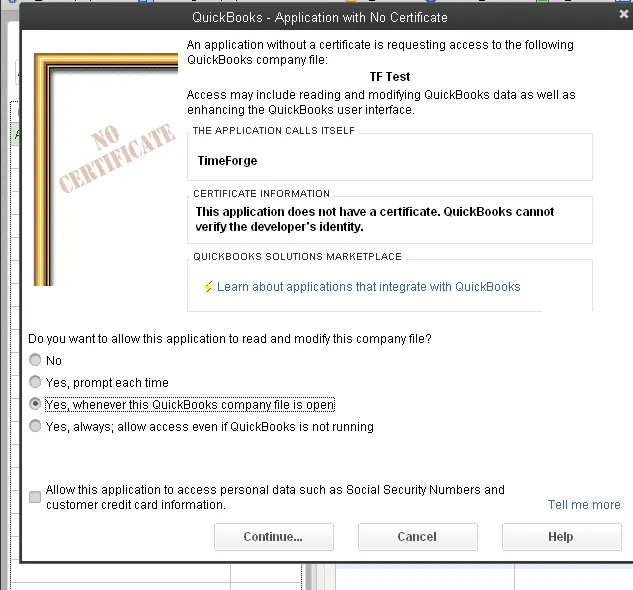
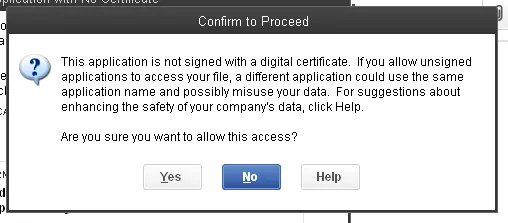
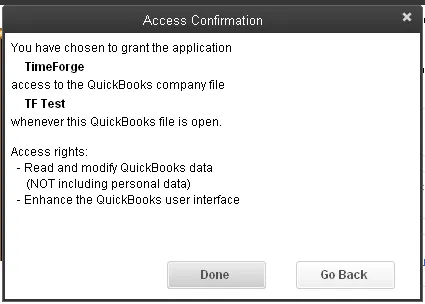
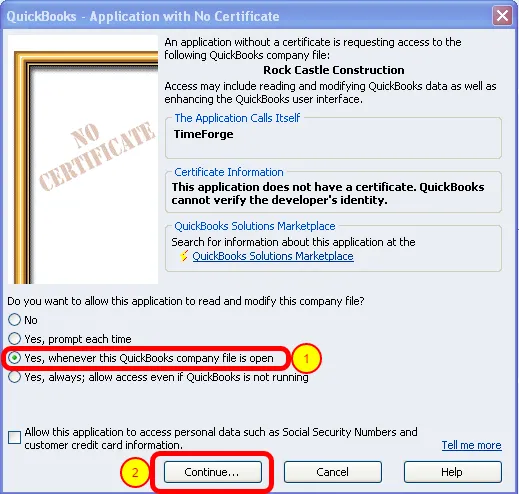
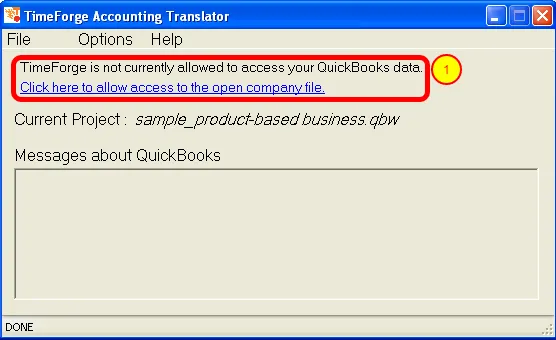
In order to integrate TimeForge and QuickBooks, you’ll need to allow TimeForge access to your QuickBooks data. Here’s how to set that up.
The TimeForge Accounting Translator will tell you about the status of the TimeForge synchronization.
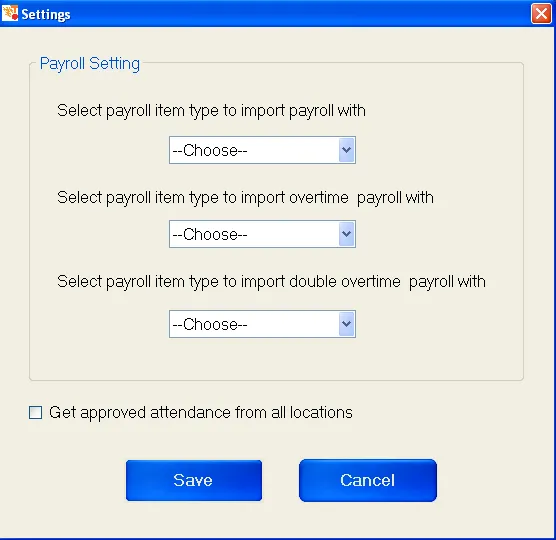
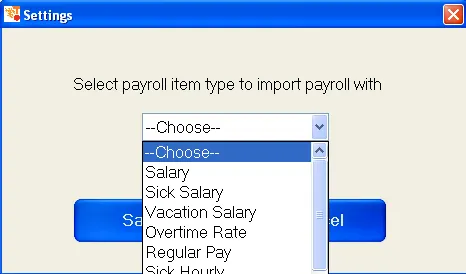
1. After permission has been granted to access your QuickBooks company file, you still need to set up the payroll type to import (which is the next step). Click on the link to set up the payroll item type.
A payroll item in QuickBooks is a way to do payroll calculations and reporting. Every item on a paycheck is tracked with a payroll item, thus the name payroll item.
Some items you could track using QuickBooks payroll items include:
- Hourly wages
- Overtime wages
- Salaries
- Sick time
- Vacation time
- Federal, state, and local taxes
- Employee and company 401(k) contributions
- Garnishments such as child support
- Benefits such as health insurance, health club dues
- Etc…
Payroll items are also required to track non-taxable items such as:
- Mileage reimbursements
- Employee loans
- Etc…
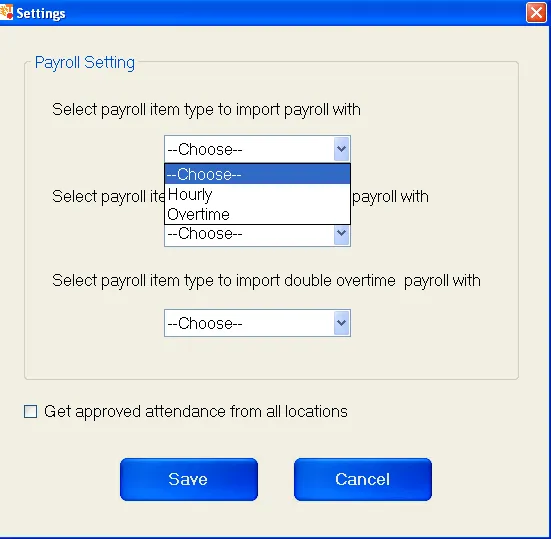
TimeForge allows you to choose a payroll item for importing time sheets. Currently, TimeForge only allows one payroll item to be chosen for all imported time sheets. In the future, TimeForge will allow separate payroll items for hourly, salaried, sick, vacation, and overtime.
Choose an appropriate payroll item to import the time sheets.
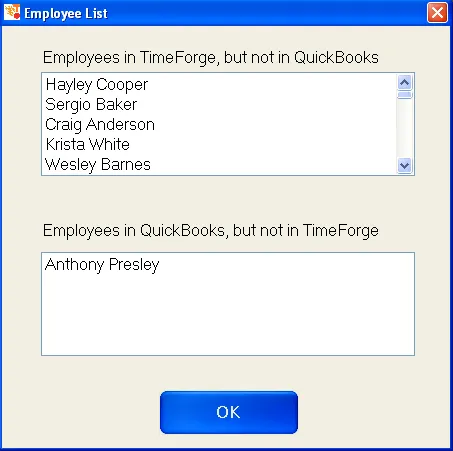
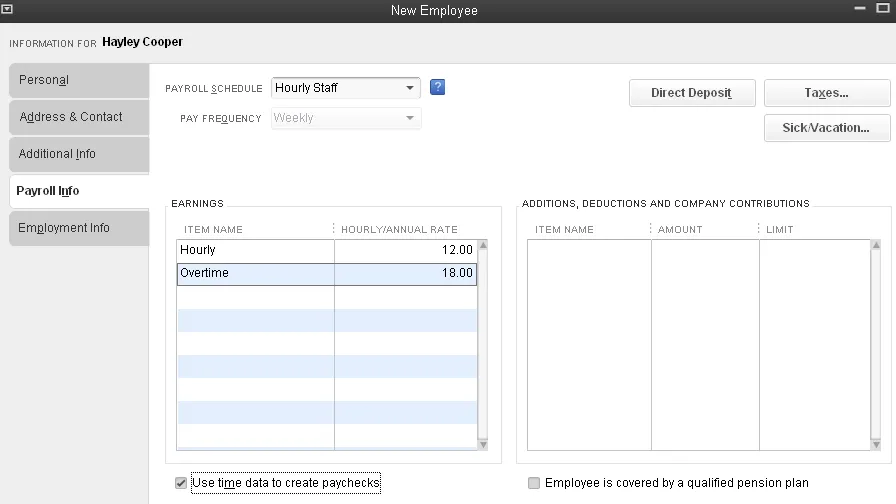
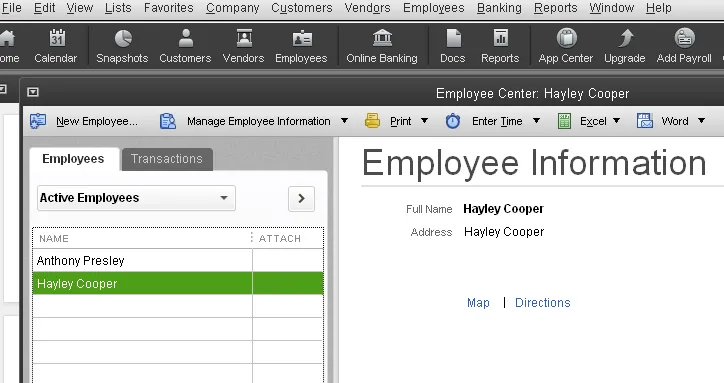
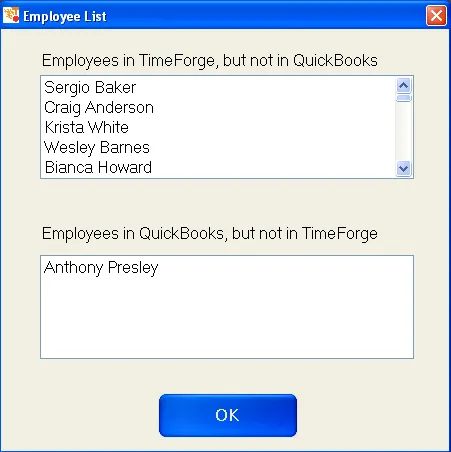
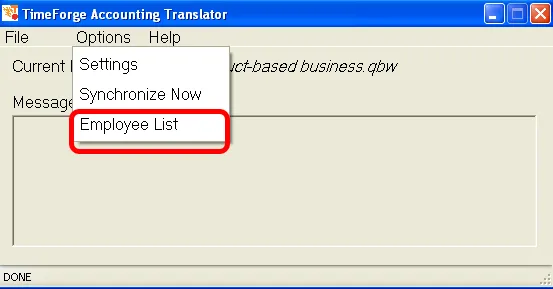
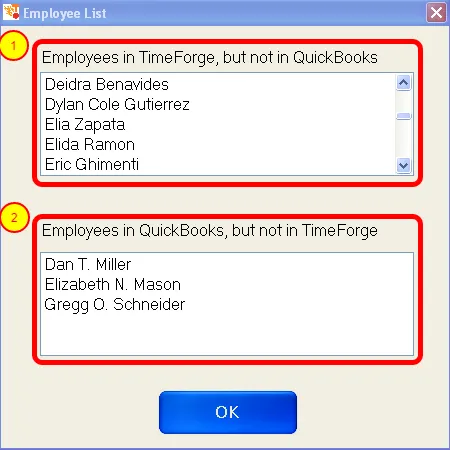
Because TimeForge imports employees into QuickBooks based on their Full Name (the combination of their first name, middle name, and last name), you will want to make sure that these lists of staff members are both correct.
1. This is a list of employees who are present in TimeForge (and may have time sheets), but are not in QuickBooks. The time sheets for these employees will not be imported into QuickBooks. To import the time sheets for these staff members, please add the employees into QuickBooks.
2. This is a list of employees who are present in QuickBooks, but are not in TimeForge. These employees do not have TimeForge accounts, nor do they have time sheets. If you would like to collect time cards for these staff members, please add the employees to TimeForge.