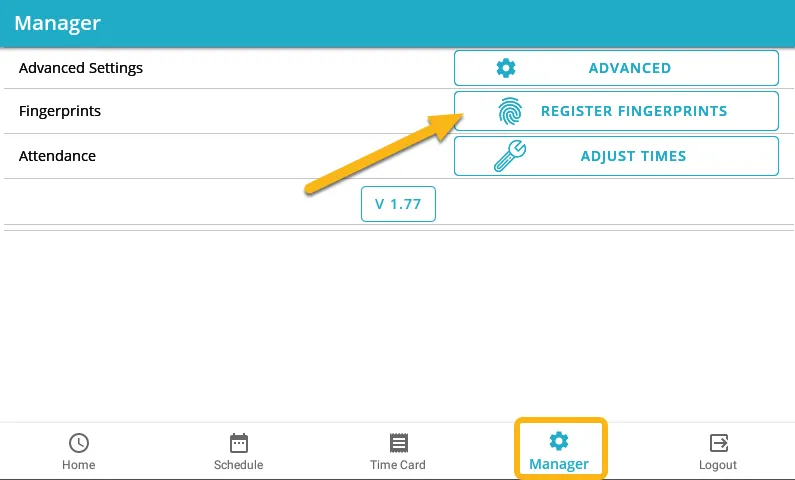
In this guide, we’ll show you how to enroll employee fingerprints on the TimeForge Time Machine, our newest timeclock.
We recommend that you enroll at least 2 different fingerprints for each employee. (The system can take up to 3 per employee.) This is so that if the employee develops a callus or has a problem with one finger, they still have a backup option.
Please do not enroll with thumbprints, as thumbprints do not work very well.
How the Time Machine uses fingerprints
Sometimes, employees express concerns about having their fingers scanned. They need not worry!
Our timeclock never saves or stores their fingerprints in any way. For more information, see this explanation flyer. You can print it out and share it with your employees to help give them peace of mind.
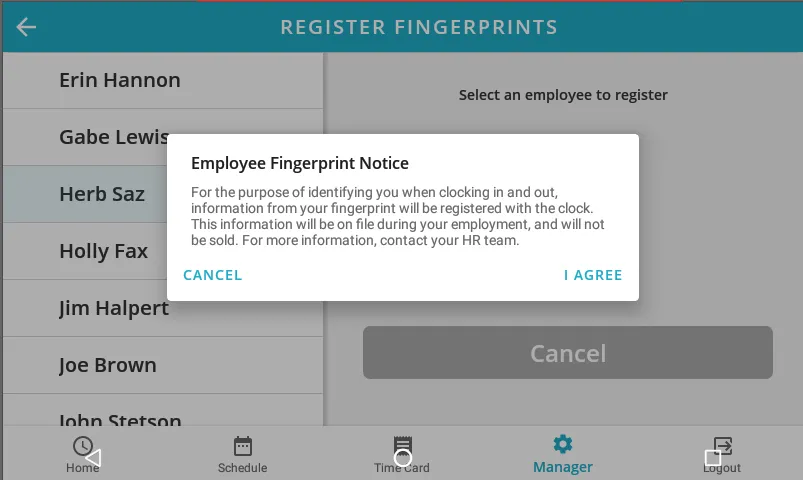
Tap on the name of the employee you want to register. The timeclock will then prompt the employee read the notice shown below explaining the purpose scanning their fingerprint.
If the employee selects “I Agree” to the notice, they can proceed with registering their fingerprint. When an employee selects the “Cancel” option, the prompt closes and the employee does not proceed with scanning their fingerprint.
Have the employee place their finger on the scanning pad
Have the employee place one finger on the scanning pad for 3 different scans. You should see the fingerprint scanner flash each time the timeclock scans their fingerprint.
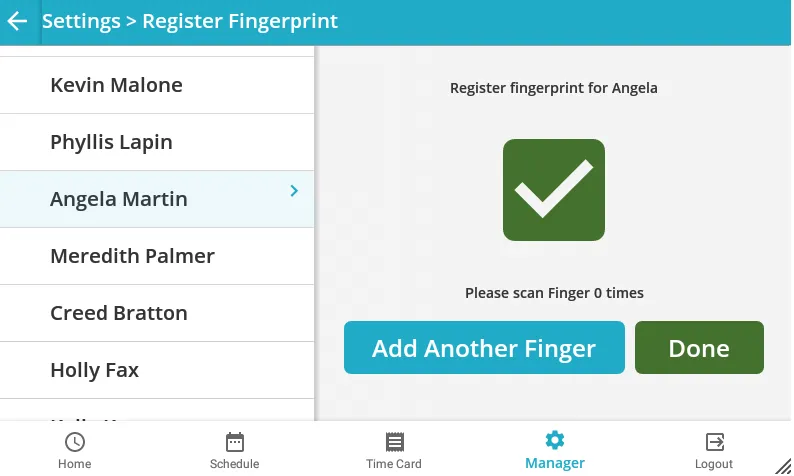
Once the timeclock is finished with all 3 scans, the screen should display the message shown below.
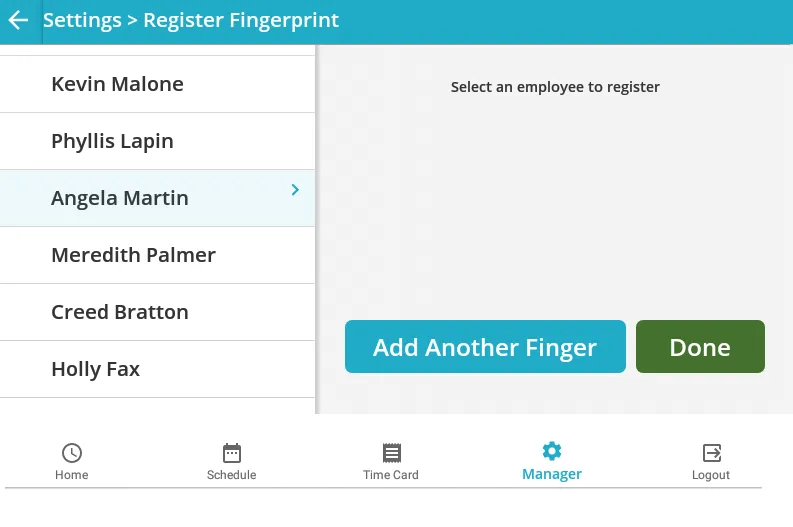
Tap the Add Another Finger button to keep enrolling fingerprints.
You should enroll at least 2 per employee, but the system will accept up to 3. This will ensure that if anything happens to the employee’s preferred finger (such as a burn, callus, grime, cut, etc.), they will have a backup option.
Once you’re done enrolling fingerprint for the first employee, you then need to repeat the steps above for each employee you wish to register on the Time Machine.
If you have finished registering fingerprints, you can tap the Done button to return to the Settings page. That’s all there is to it!
As always, if you need help or have any questions, please contact TimeForge Support. Our awesome support staff will be glad to answer any questions or help in any way they can.
In this guide, you’ll learn how to log into and use the Time Machine timeclock. The timeclock allows you to clock in and out for your shift and review your schedule and attendance.
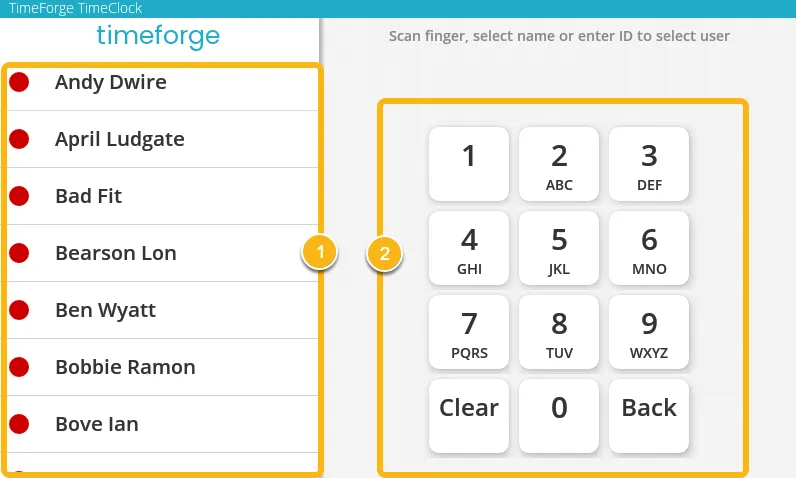
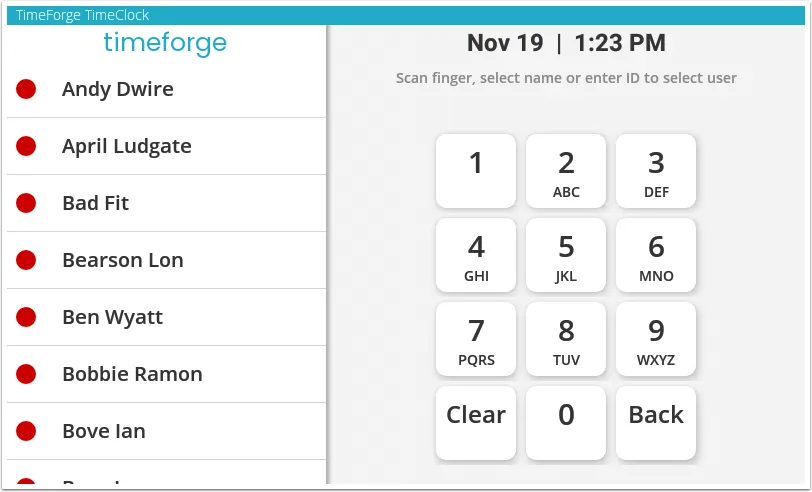
The Time Machine home screen lists everyone in your location at a glance.
1. The list on the left shows each employee in alphabetical order, sorted by first name. By tapping on your name in the list, TimeForge will select your profile, and you can then enter your Internal Password or place your finger on the scanner to log into your account.
2. On the right is a panel where you can input your Internal Number instead of searching through the employee list page.
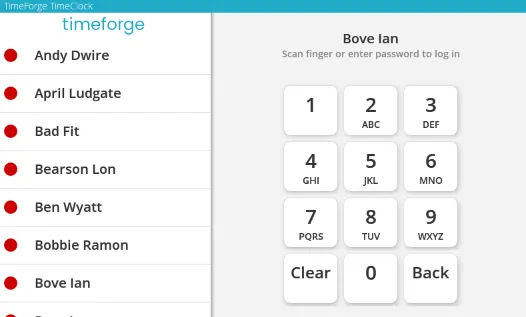
When you select your name from the left-hand menu or enter your Internal Number, TimeForge should display your name at the top of the right panel, as in the example below:
From here, you can either enter your Internal Password or scan your fingerprint to log into the timeclock.
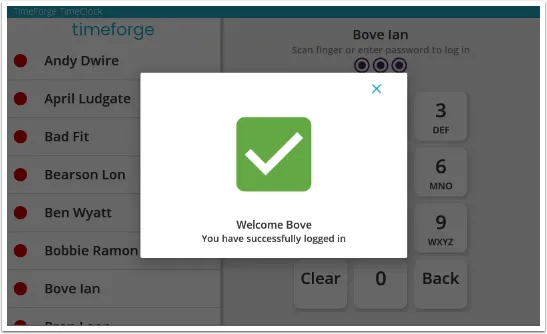
When you successfully log in, you will get a welcome message from TimeForge:
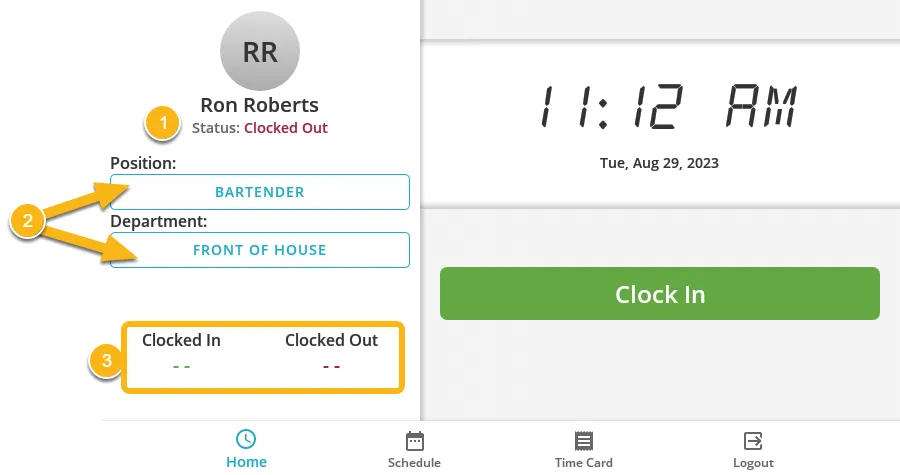
Important information is displayed for you on your dashboard:
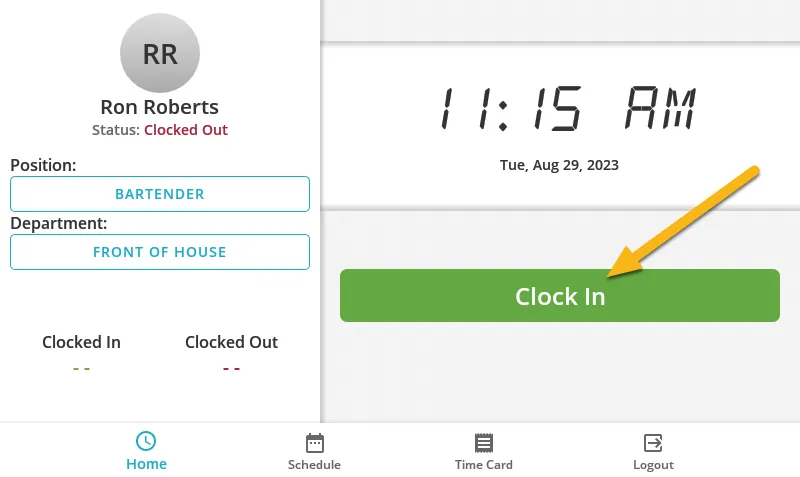
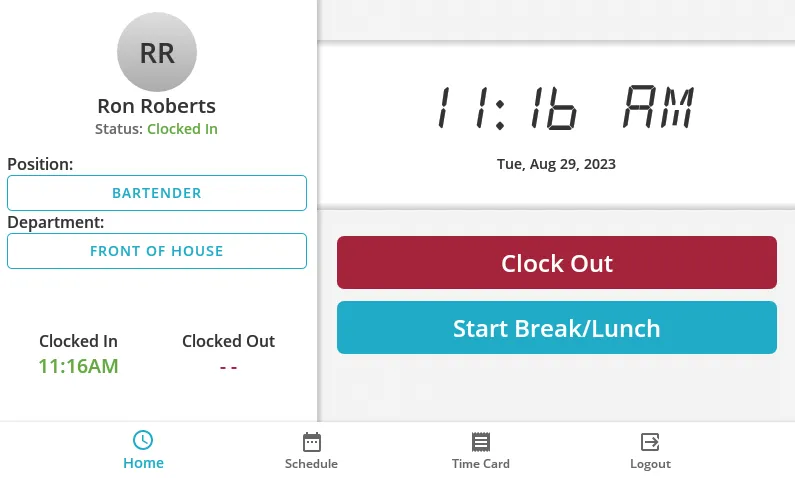
Status: This will display “Clocked Out”/“Clocked In”/“On break” based on what your current status is.
Department/Position: These fields show your currently selected department and position. If you are a cross-trained employee, by clicking on the fields you can clock into different departments and positions.
Clocked In/Out: This shows you the time that you clocked in or out for your shift.
When you’re ready to take a break or clock out, you’ll need to first log back into the timeclock.
Once logged in, you can take a break by tapping the Start Break button, which will bring up a selector to choose which break you’re eligible for, or will automatically put you on break based on your company’s break policies.
To clock out at the end of the day, simply tap the Clock Out button.
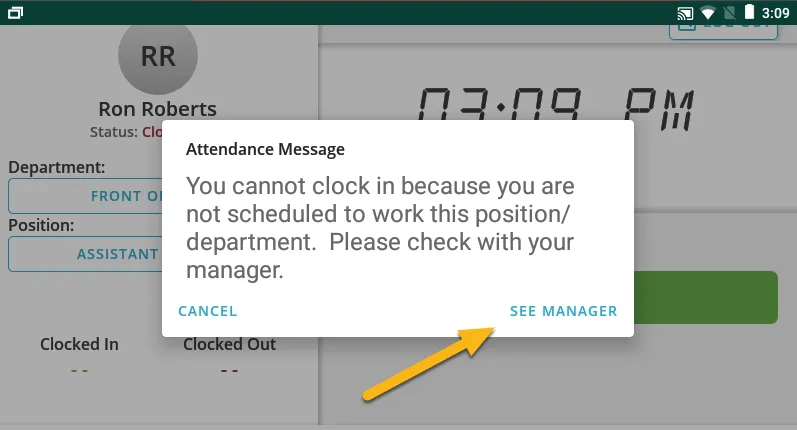
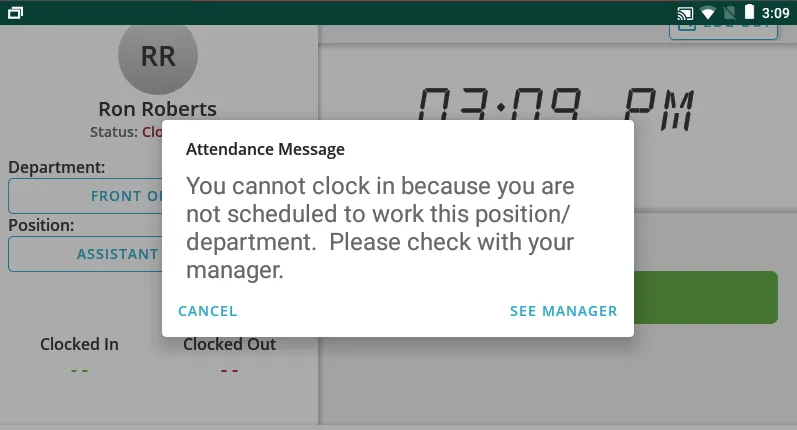
Depending on your company’s policy, you may receive a message when trying to clock in early before the start of your scheduled shift or if you try to clock out later than the end of your scheduled shift.
When this happens, simply tap on See Manager in the lower right corner, then notify your manager.
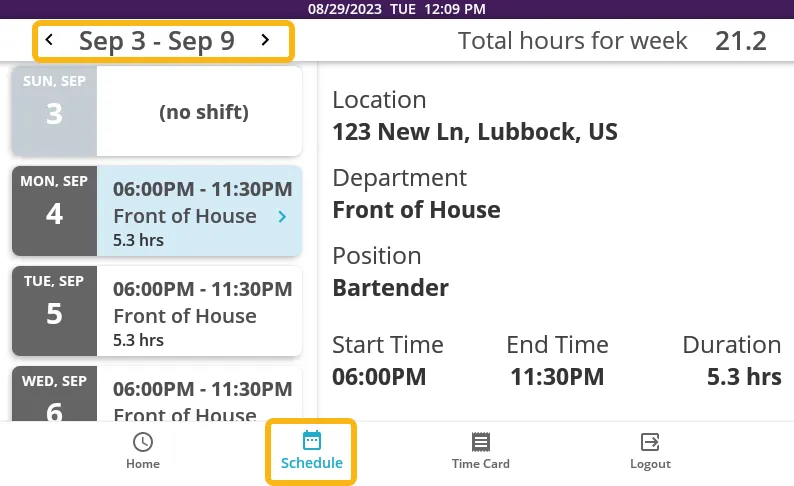
Using the navigation arrows at the top of the screen, you can view past and currently scheduled shifts. Once you navigate to the dates you can to review, the timeclock will display your scheduled shifts dates, time, and duration. If you tap on a specific shift, you can then view additional information such as the location, department and position you were scheduled to work under.
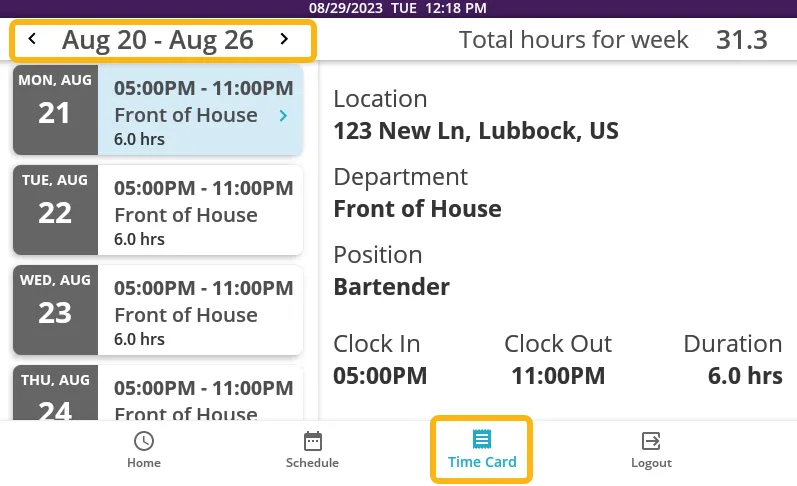
By default, when you tap the Time Card button, you can view the hours you’ve recorded for the current week. Using the navigation arrows at the top left corner, you can navigate to view attendance entries from previous weeks. The timeclock will display an attendance entry’s date, time, and duration. If you tap on a specific shift, you can then view additional information such as the location, department and position the attendance entry was recorded under.
How to Use the Time Machine (Manager Guide)
As a Supervisor or Manager in TimeForge, you’ll have access to a few features on the Time Machine that employees don’t have access to.
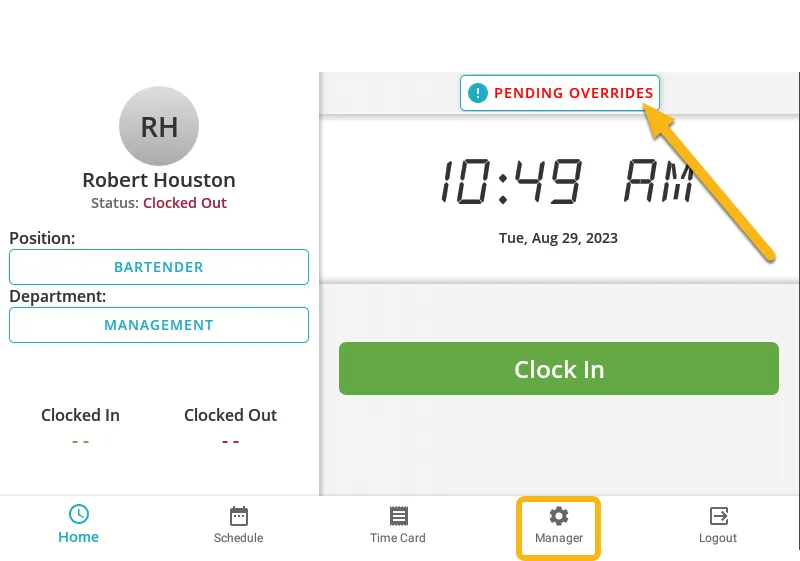
The two main pieces of functionality on the home page are the Pending Overridesbutton (top) and the Manager button (bottom):
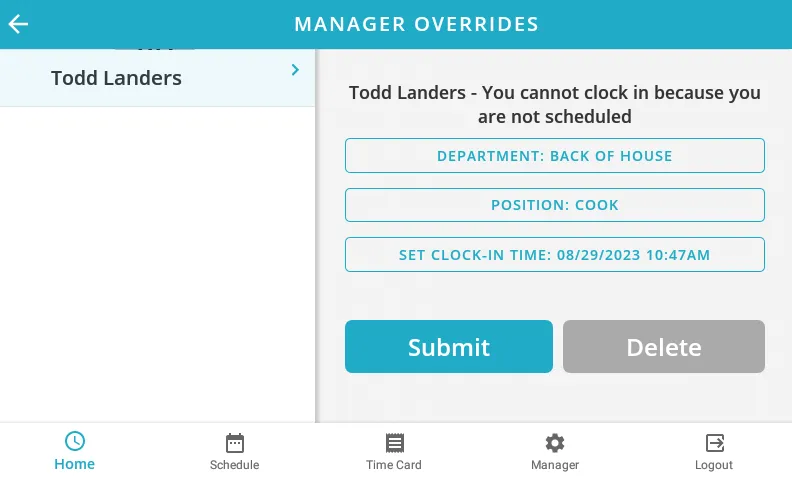
The Pending Overrides button lets you quickly view all employees who’ve requested an early clock in or late clock out that exceeds the threshold your company has configured.
The manager tab lets you enroll employees fingerprints, install clock updates, and clock out employees.
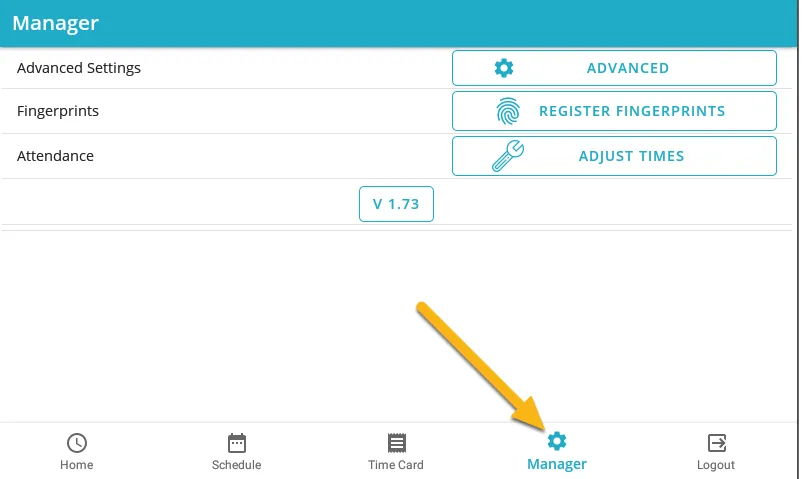
Tapping the Manager button at the bottom of the screen will take you to the Manager page.
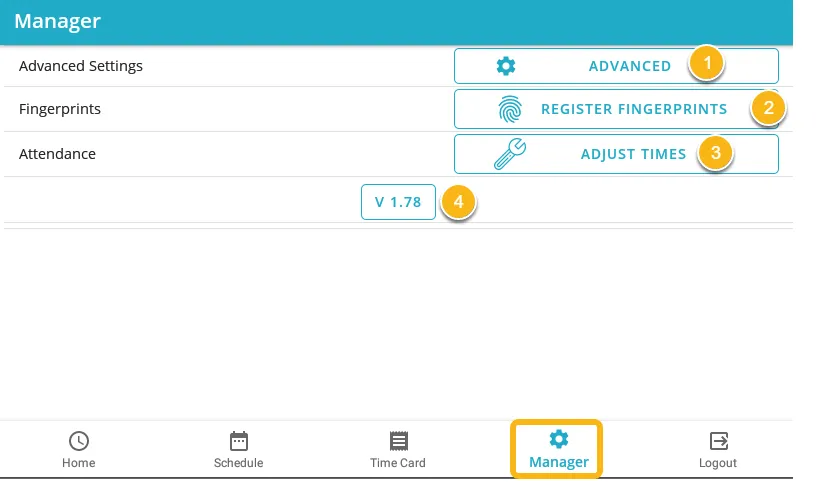
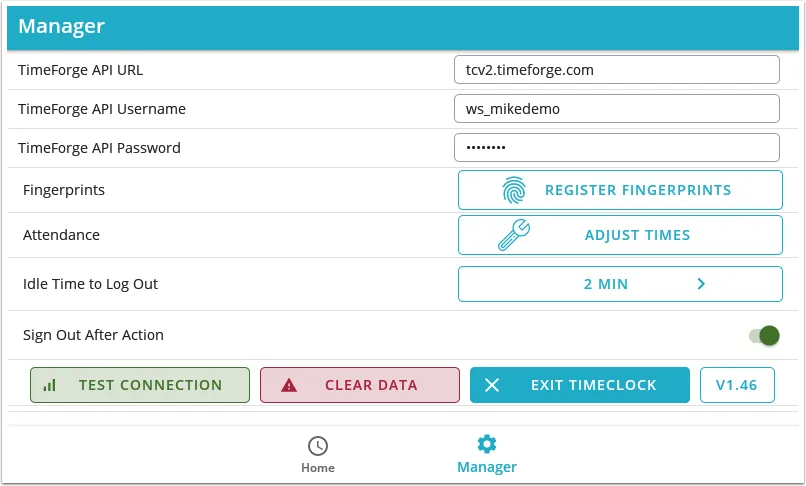
The Manager page gives you a lot of configuration options to control your timeclock.
There are several buttons on this screen, so let’s walk through a brief overview of what each one does.
Advanced
Selecting this option allows you to access the timeclock’s connection settings and navigate to more advanced configuration options. For more information on the Advanced Settings screen, please read the next section.
Register Fingerprints
Tapping this button will allow you to enroll fingerprints for yourself and other employees.
Adjust Times
This is where you clock out employees who forgot to clock out for the day and have already left. Note: Only users listed as “Managers” have access to this button.
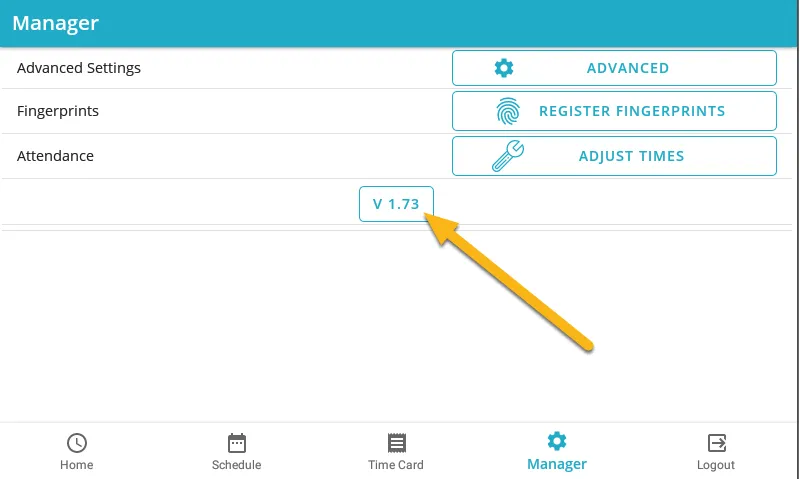
Version Button
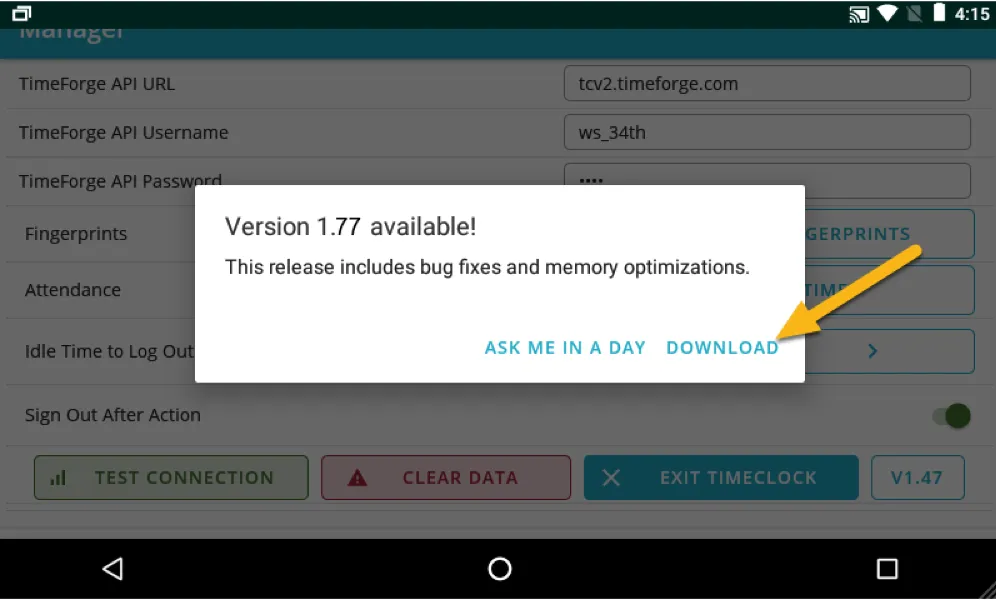
While the above screenshot displays “V1.26” you will likely have a different number present. By tapping this button, the timeclock will look to see if a new version is available. If one is, it will offer to download and install the update.
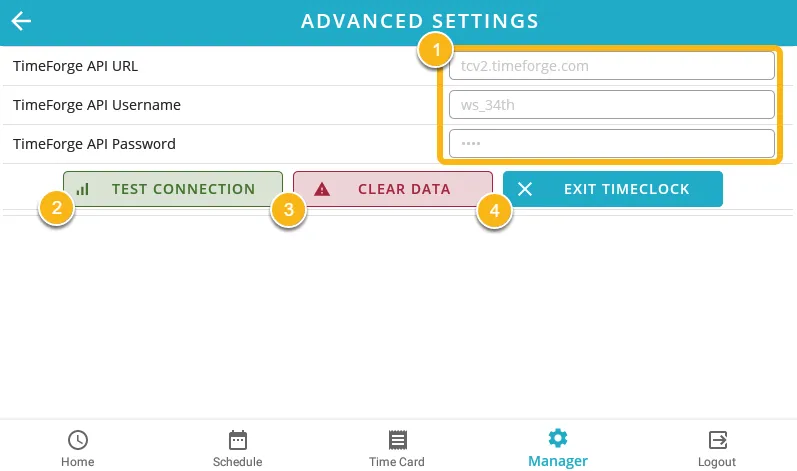
These API URL controls what website the timeclock talks to when sending data. To know which location to send employee punches to on TimeForge, the timeclock uses the username and password fields. . TimeForge pre-populates the fields when setting up your timeclock. If the timeclock changes locations, please contact TimeForge’s Support team to help you update the API credentials.
Test Connection
Tapping this button will make the time clock perform a test to see if it’s got a connection to the internet and to the TimeForge web app.
Clear Data
This button allows you to completely wipe the device, removing any employee and attendance data. Only do this at the direction of a TimeForge Technician.
Exit Timeclock
Tapping this button will minimize the application so that you can access the device’s settings. This is useful when re-configuring internet connections, allowing a TimeForge Technician access to the machine, etc.
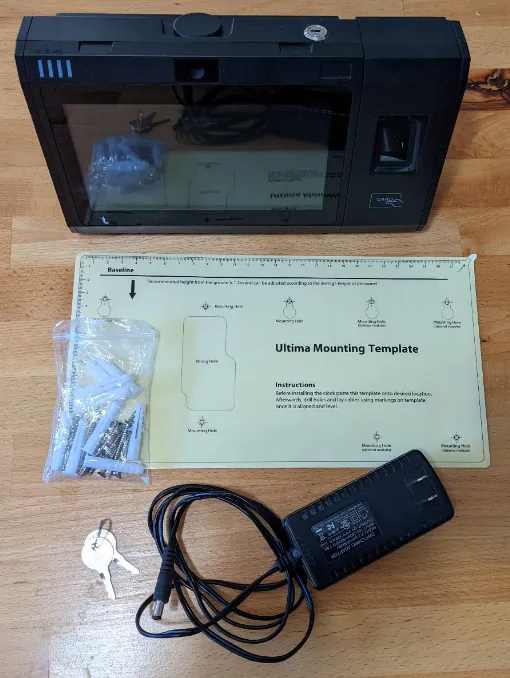
The Mounting Template provided with your Time Clock is a peel and stick that you can use directly on your wall to make placing the screws an easier process.
Once you have the screws appropriately anchored into the wall, you should be able to slide the Time Machine directly onto the screws. It should feel firm and stable once mounted appropriately.
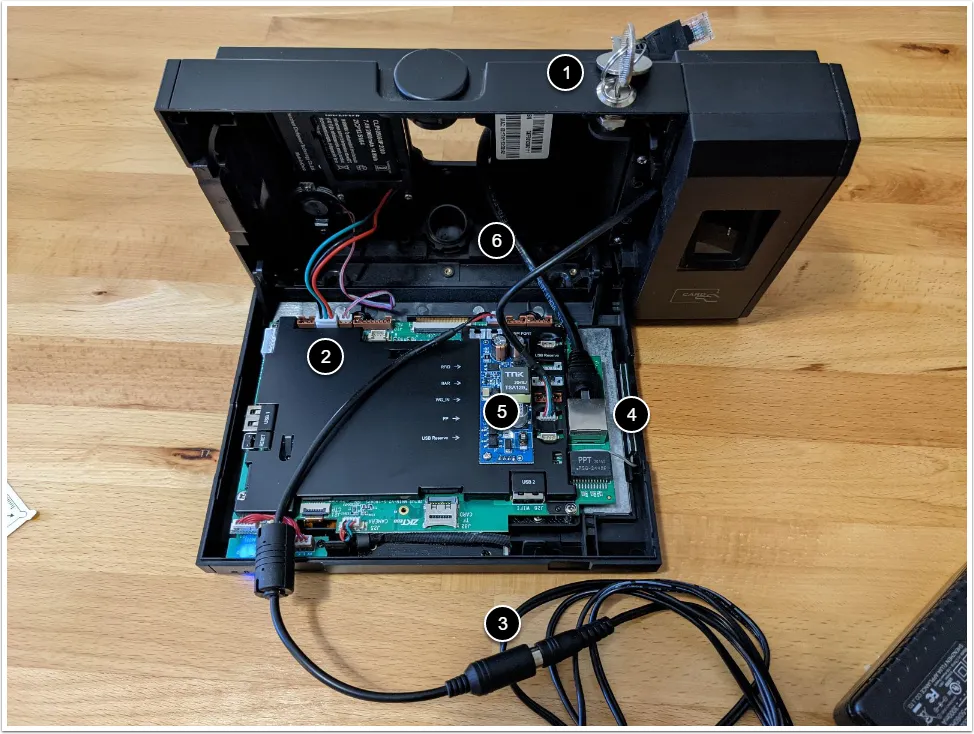
Inside your Time Machine there are multiple connections you’ll want to ensure are connected properly:
To open your Time Machine, insert the key into the key hole on the top of the machine and turn it 90 degrees counter-clockwise so that the key is perpendicular to the wall. Next, gently pull the top of the front cover forward until it comes loose from the back of the unit. You can then carefully lift upwards on the front cover and it should allow you to drop the front cover down for easy access into the clock.
This is the back-up power unit. You’ll want to ensure that it is plugged in to the second slot from the left as pictured above. Once plugged in, your Time Machine will stay running in the event of a power outage.
Inside the device you’ll find a power cable connector, plug the external power cable provided in the box to your device’s power cable connector. The inner cable should already be connected firmly into the left-most slot of the upper right-hand slots. This wire can be fed directly through the back of the unit, or through the lower optional access port, labeled 6.
This is the port for your Time Machine’s Ethernet connection. We strongly recommend connecting your clock via an Ethernet connection and configuring a static IP address where possible. Just like the power cable, this can be directly fed out of the back of the unit or through the optional access port labeled 6.
This cable connects the Fingerprint Scanner into the Time Machine. It should already be firmly plugged into the second slot from the bottom, labeled “FP” as above.
This optional access port can be unscrewed to allow cables to run directly into the Time Machine from the bottom of the unit if there isn’t enough space behind the unit to run the wires.
Once the wires are properly connected and routed through the device, you can close the front cover and lock the panel by turning the key 90 degrees clockwise.
Now that the Time Machine’s hardware is appropriately wired and set up, let’s look at configuring the software.
We’ll start off by removing the protective film covering the front screen and the fingerprint scanner.
Your clock should be sitting directly on the TimeForge Time Clock screen. From here, you’ll want to enter your Internal Number and Internal Password using the keypad on the screen.
Once logged in, you’ll want to click on the Manager tab on the bottom, then click “Test Connection.”
If you receive a “Successfully Connected” message, the Time Machine is able to connect to the TimeForge Website, and you should be set to immediately begin enrolling fingerprints and using the clock.
A guide to enrolling fingerprints can be found here.
If possible, we recommend configuring your Time Machine with a static IP address to help ensure there are minimal potential disruptions to internet connectivity.
Step 1: Have a manager log onto the clock, navigate to “Manager” and click “Exit Timeclock”
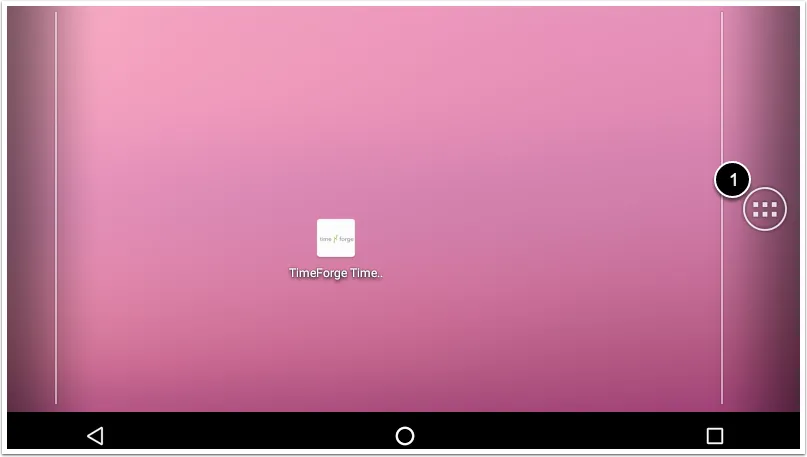
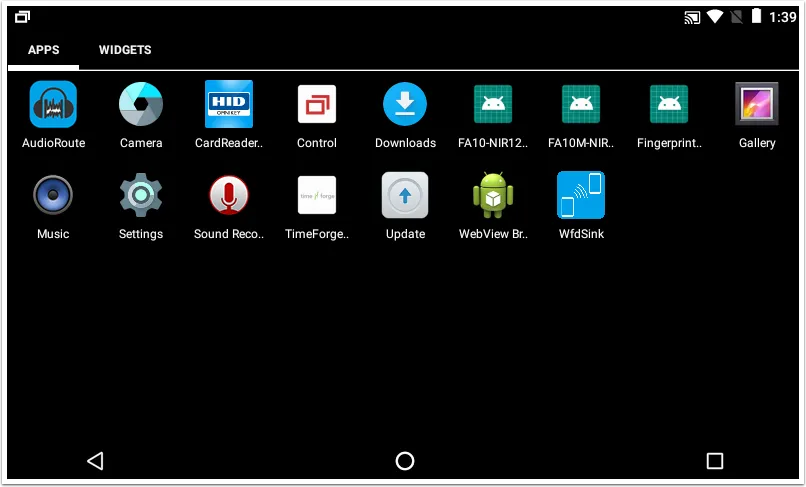
From here, click on the six square dots on the right, labeled with “1”.
Then click on “Settings”, then “Ethernet”. If Ethernet is showing “Off”, click on the toggle on the right side of the screen, then click “Ethernet configuration.”
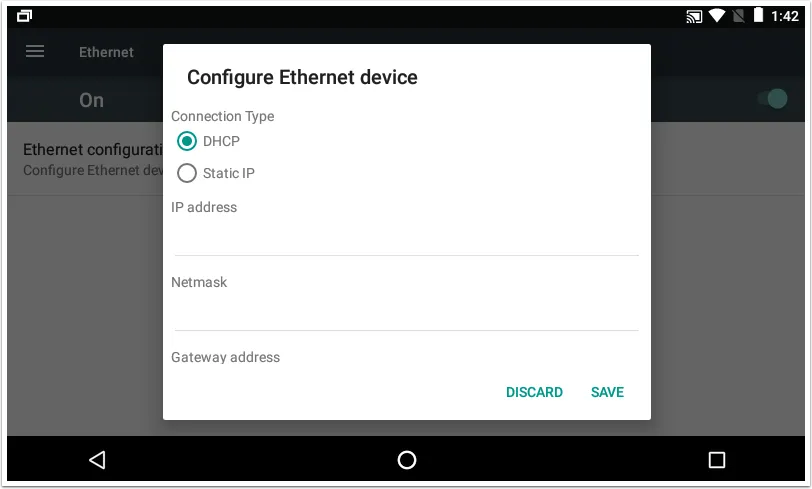
By default, the Time Machine is configured for DHCP, so you’ll want to click “Static IP”.
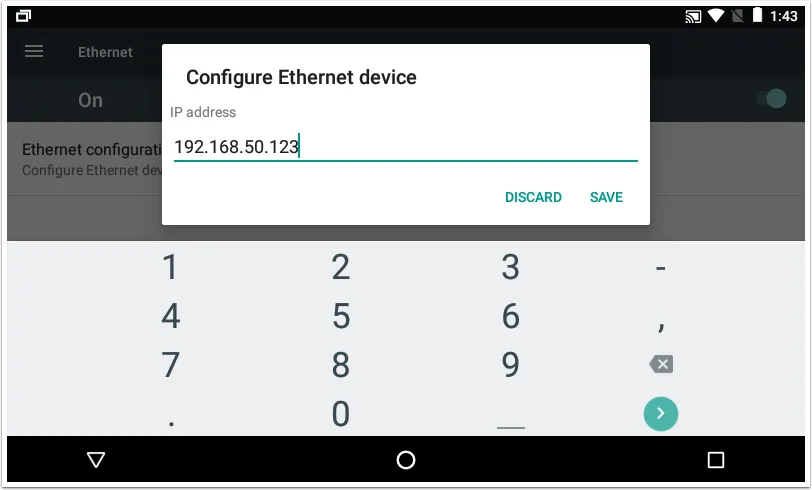
Once Static IP is selected, click on the IP Address field, and a keyboard should appear so that you can edit the field.
Once you’ve updated the IP Address field, hit the green button on the bottom right-hand corner to enter the Subnet Mask, then hit the green button again.
Once you’ve filled out the Gateway, Primary DNS, and Secondary DNS fields, you can click “Save”.
Lastly, you can click the circle icon on the bottom of the device to go back to the main screen and click on “TimeForge Timeclock” to pull up the application, then repeat Step 4 to test the connection.
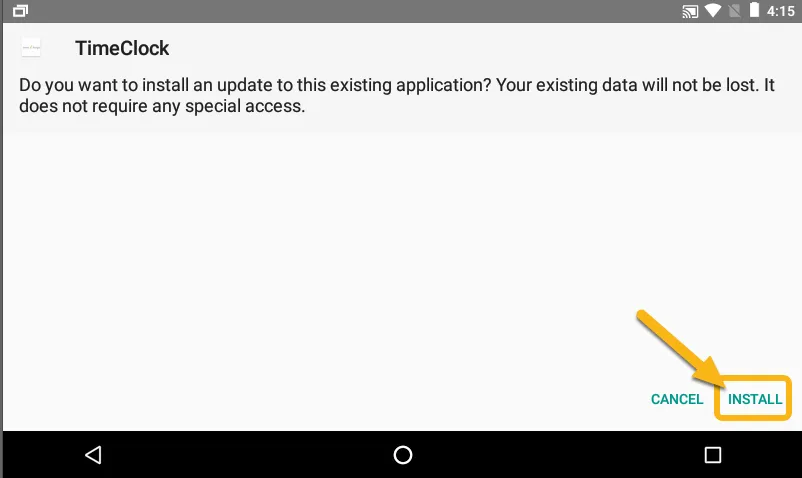
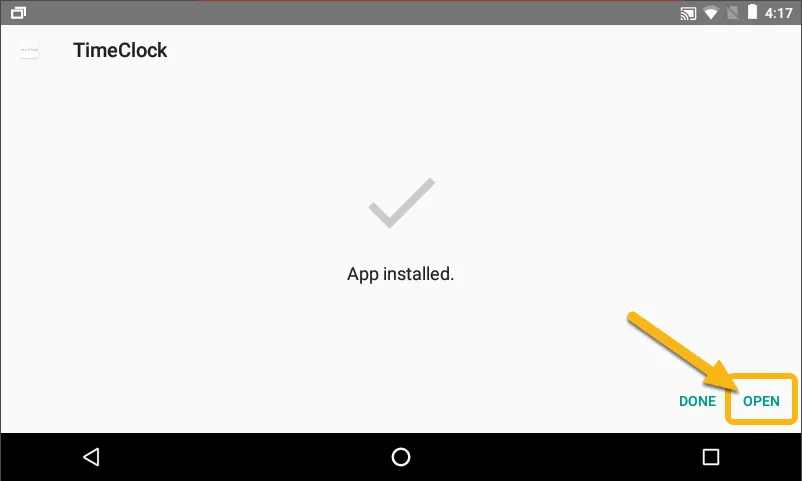
Update your Time Machine timeclock
TimeForge releases updates to the Time Machine’s software periodically. The updates improve the timeclock’s functionality and add new features to your device. This guide walks you through how to update your timeclock in just a few easy steps.