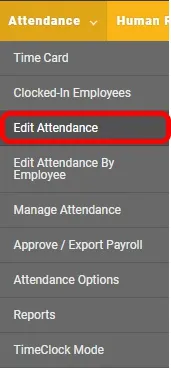
TimeForge is a complete labor management system, with both employee scheduling and attendance tracking capabilities.
Using TimeForge, staff members are able to clock in and out, record tips, take breaks, enter mileage, and do many other operations to streamline labor management. And although most employees are great at remembering to clock in and out, occasionally someone forgets, and you’ll need to modify a time card entry.
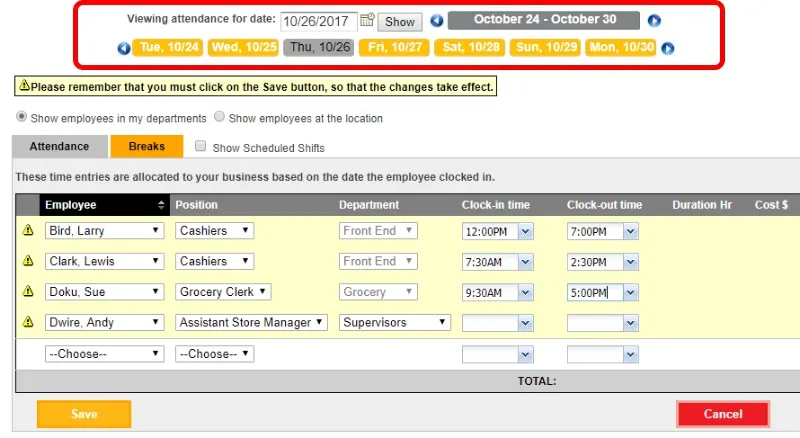
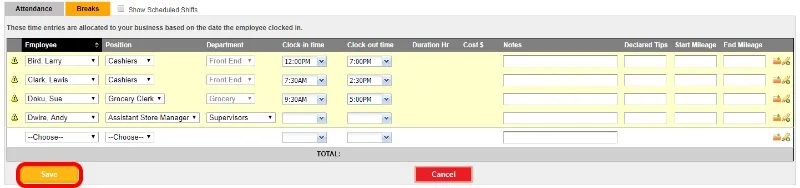
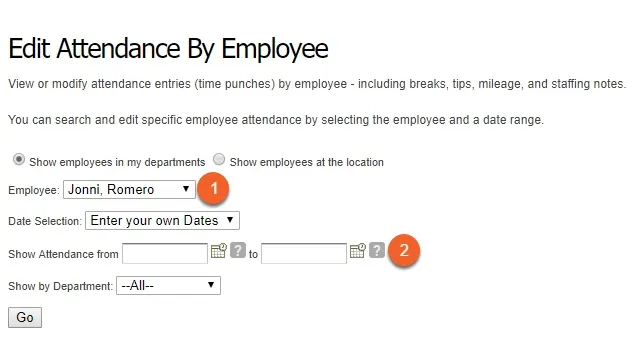
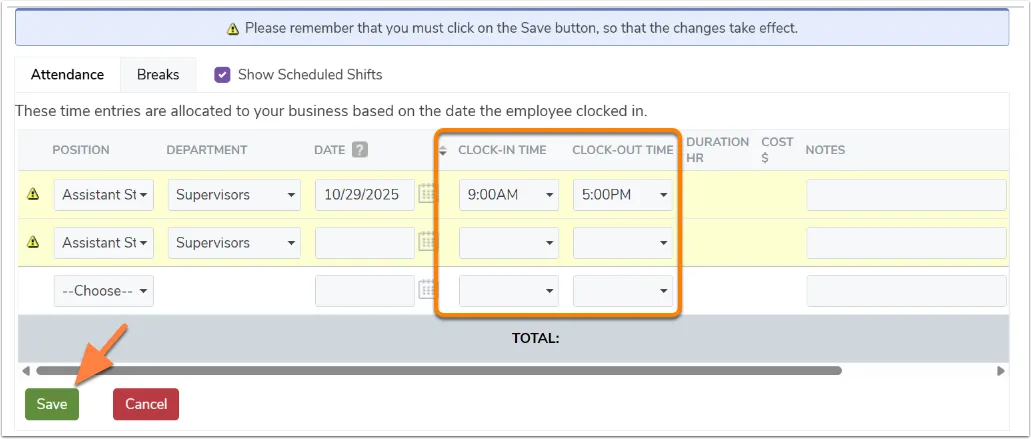
You can adjust the shift where necessary, including changing the employee, position, and clock in or out times. You can also add a note if you would like to.
TimeForge will automatically adjust the labor cost based on the time duration and any over time adjustments.
Note:If you have enabled departments, there may be shifts that you are unable to see (if they are in another department).
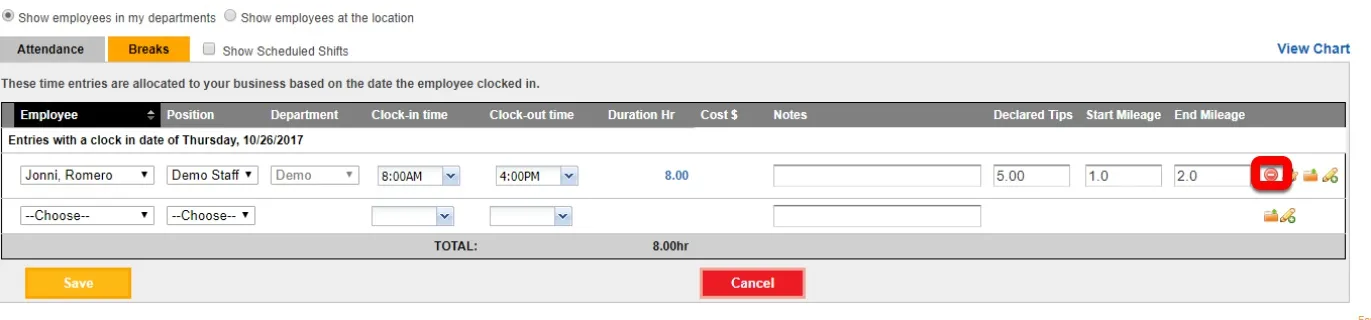
To delete a Timecard entry click the red button on the far right hand side of the attendance entry.
Edit an employee's attendance
TimeForge is a complete labor management system, with both attendance tracking and employee scheduling capabilities.
Using TimeForge, employees are able to clock in and out, record tips, take breaks, enter mileage, and do many other operations to streamline labor management. And although most employees are great at remembering to clock in and out, occasionally someone forgets, and you’ll need to modify or add to their time card.
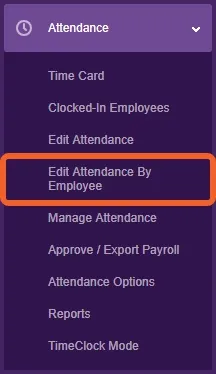
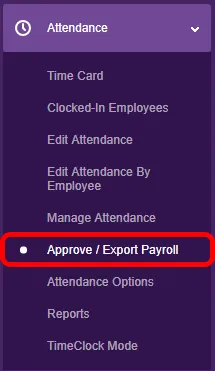
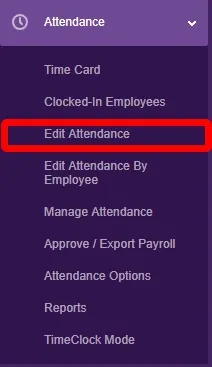
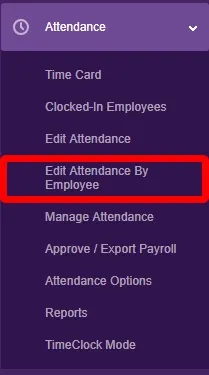
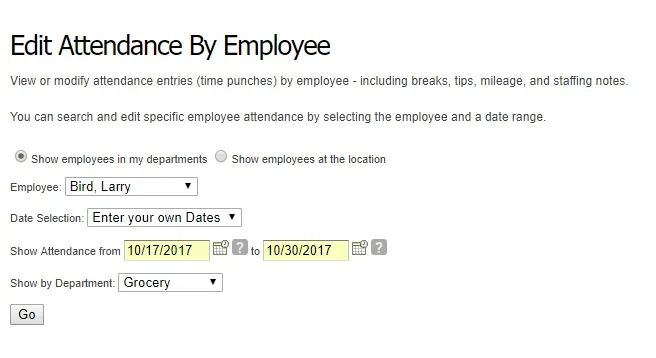
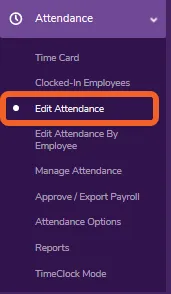
Go to the Edit Attendance by Employee page under the Attendance tab
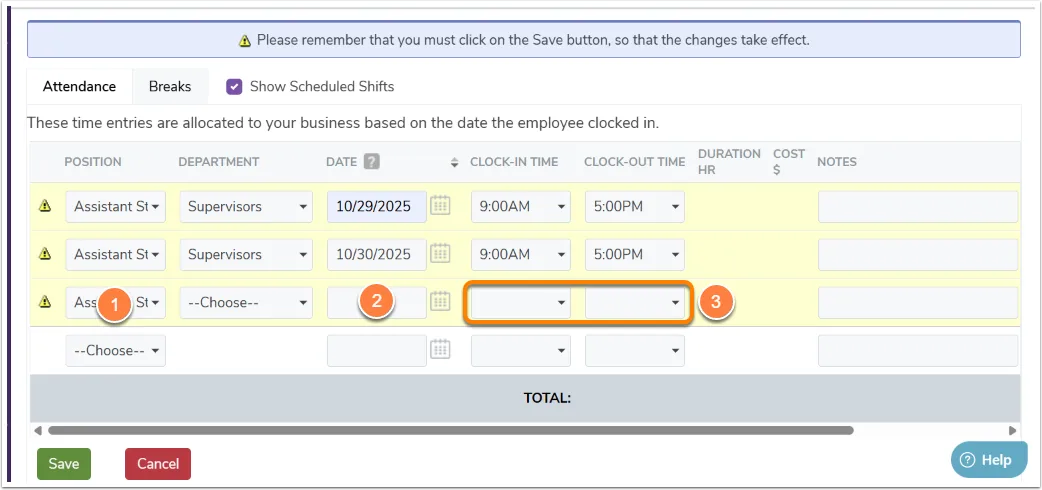
If an entire time punch is missing, you can quickly add one from the same page. All you need to do is:
Select the position the employee works.
Pick the date that you’d like to edit.
Input the correct time that the employee worked.
Once again, remember to click Save to save your changes!
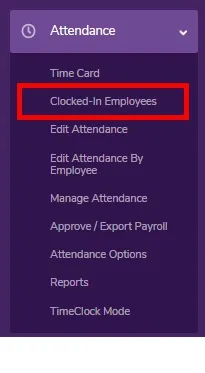
View clocked-in employees
TimeForge is an extensive and powerful employee time card entry and attendance tracking management package, and you can begin to see some of TimeForge’s functionality by clicking on the Attendance tab. Many, but not all, of the employee attendance capabilities occur within the Attendance tab.
With TimeForge, you can add or edit employee attendance by date or employee, approve payroll for pay periods, export time punches to a third-party payroll company, and run numerous reports to review employee attendance. Additionally, TimeForge can monitor labor costs in real time.
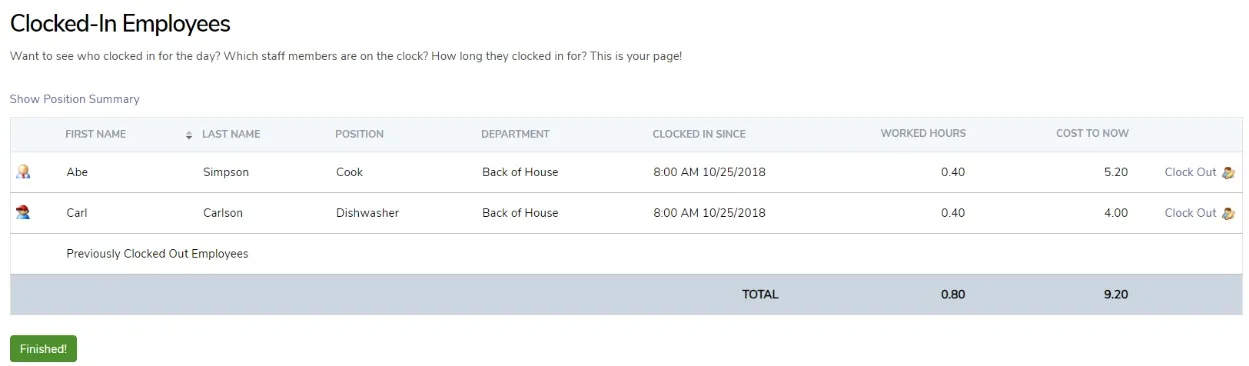
TimeForge will display the clocked-in staff members.
For each employee, you can review their name, position, and when they clocked in. You can also see a computed cost for the staff member, if they were to be clocked out.
In many cases, you will also see a “Clock Out” link, which will allow you to clock out the staff member.
Note: If this link is not displayed, you are most likely running TimeForge integrated with another system, such as a Point of Sale system. Some systems do not support clocking users out from the TimeForge website.
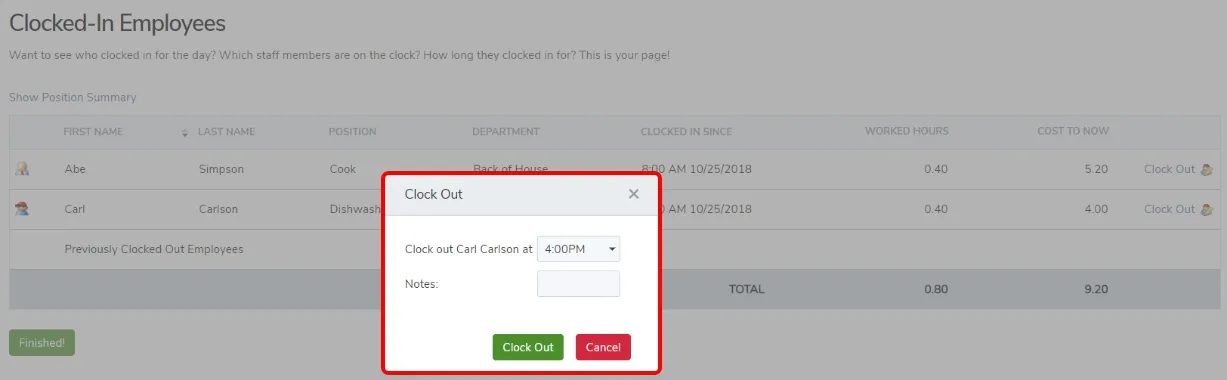
After clicking on “Clock Out,” you can modify the clock out time.
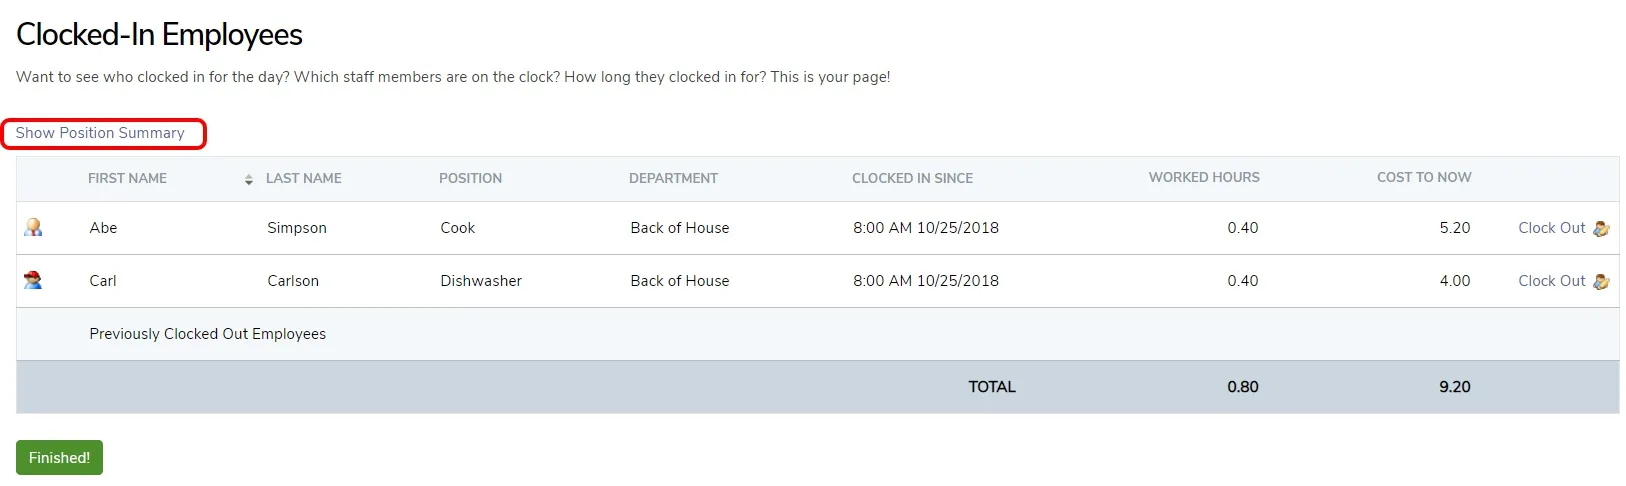
TimeForge can display position summaries, including the number of staff members clocked in for each position.
To display this information, click on the Hide (or Show) Position Summary link.
Prevent employees from riding the clock
TimeForge is an extensive and powerful attendance tracking, employee scheduling, and labor management package, and you can begin to see some of TimeForge’s power by clicking on the Attendance tab. Many, but not all, of the time card punches and employee attendance capabilities occur within the Attendance tab.
With TimeForge, you can add or edit attendance by date or employee, approve payroll for pay periods, export time punches to a third-party payroll company, and run numerous reports to review employee attendance.
TimeForge has a number of additional time card capabilities, including the ability to enforce your schedule and stop employees from riding the clock.
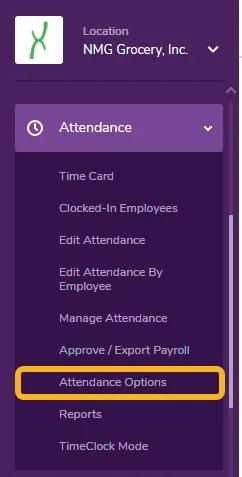
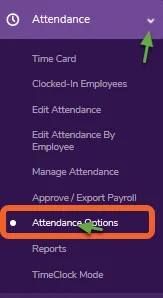
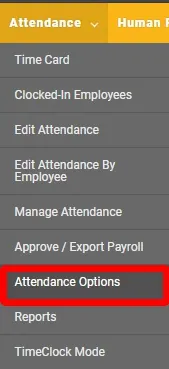
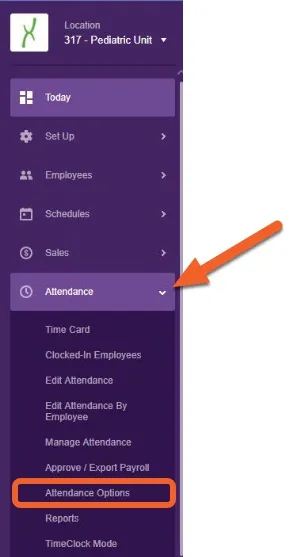
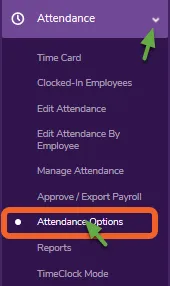
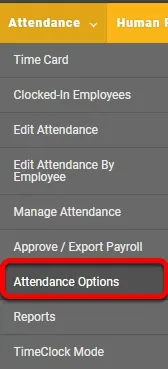
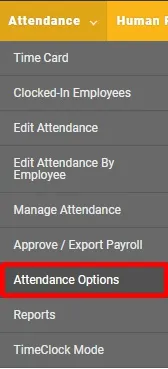
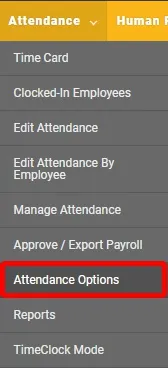
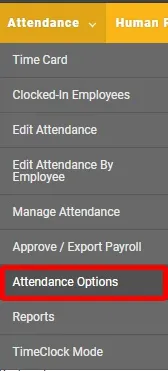
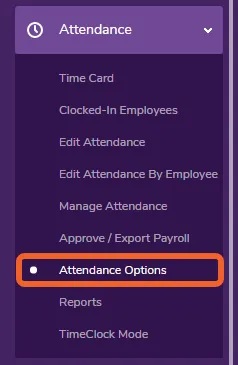
Open the Attendance tab and select Attendance Options
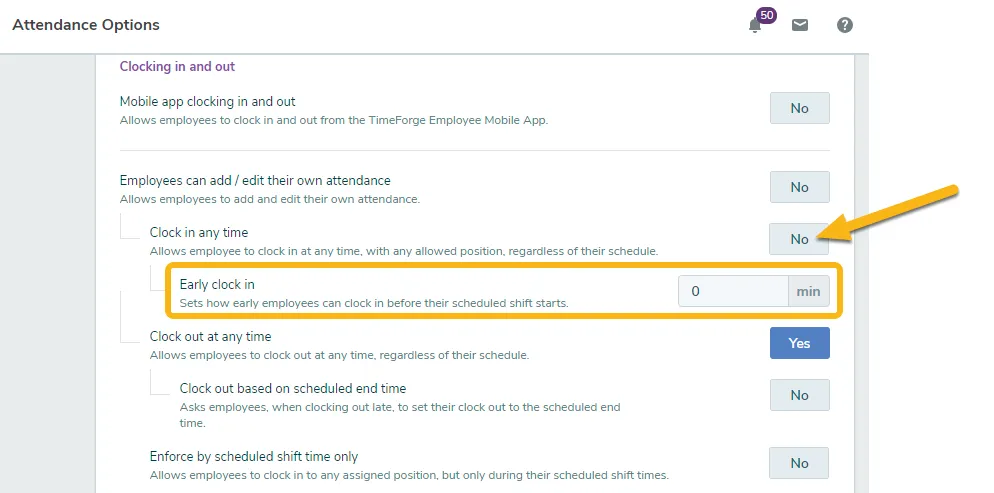
TimeForge includes a number of settings on the Attendance Options page. These options include the ability to restrict how staff members clock-in and clock-out based on the schedule.
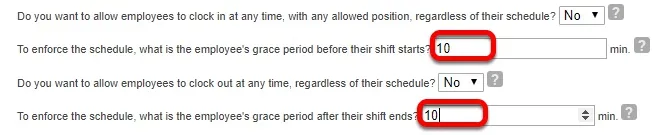
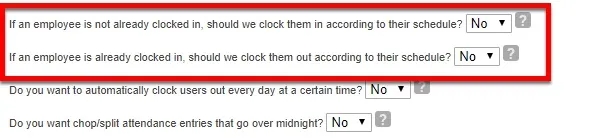
By default, staff members can clock in and out at any time. However, by toggling these options to No, you can make sure that employees clock in or clock out within a certain time limit (“grace period”). An attempt to clock in or out outside of the grace periods will require a manager override.
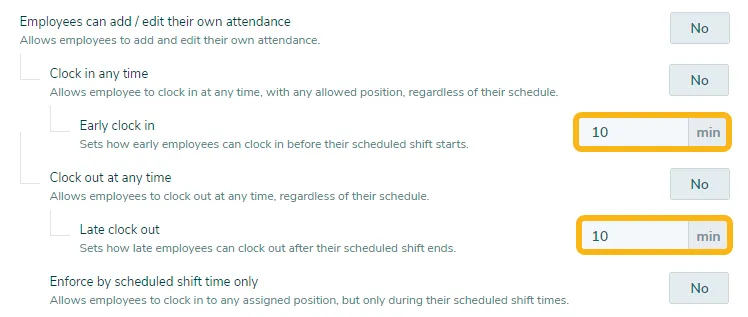
In the example below, we set a grace period of 10 minutes for both clock-ins and clock-outs to prevent employees from riding the clock.
If a staff member is scheduled to begin work at 10:00am, a 10 minute grace period will allow the employee to clock in at 9:50am but not at 9:45am. If a staff member is scheduled to end work at 3:00pm, a 10 minute grace period will allow the employee to clock out at 3:10pm but not at 3:15pm.
Don’t forget to save any changes you make to these settings!
Employee clock-ins and clock-outs are now enforced
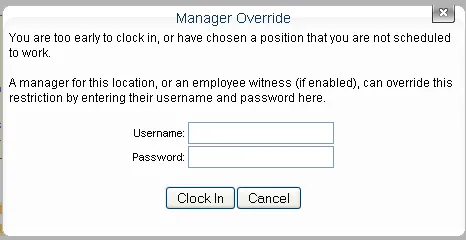
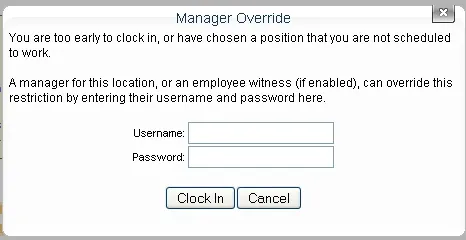
With schedule enforcement enabled, and grace periods set up, employees who are too early to clock in, or too late to clock out, are presented with the manager override screen.
So that the staff member can’t ride the clock, a manager will need to enter their username and password, or use their fingerprint, if you are using the TimeForge Fingerprint scanner.
Record tips and mileage
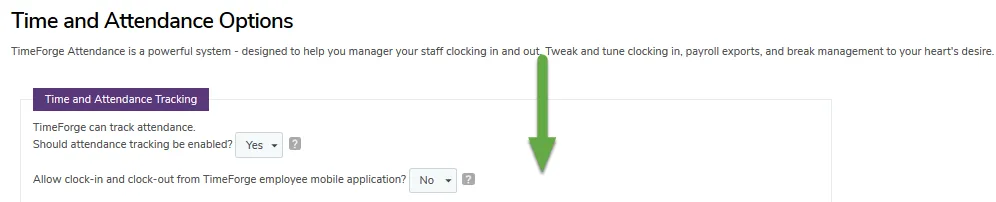
TimeForge is a complete labor management package, and one powerful feature is the ability to track time and attendance for staff members. TimeForge can track hourly or salaried employees, and can also track information about each shift worked.
In many businesses, employees need to record tips and mileage on a per-shift basis. Tip tracking allows management to accurately report the income that individual staff members are earning, and mileage reporting allows staff members to receive mileage reimbursements for their vehicles.
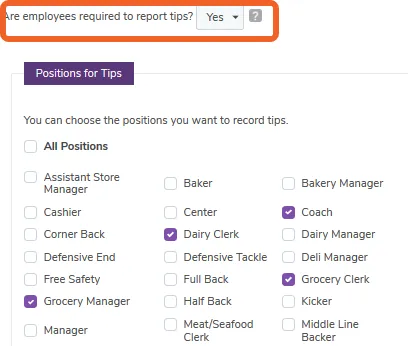
The first option highlighted in orange controls whether or not employees are required to report tips. Set this to “Yes” to require tips to be reported.
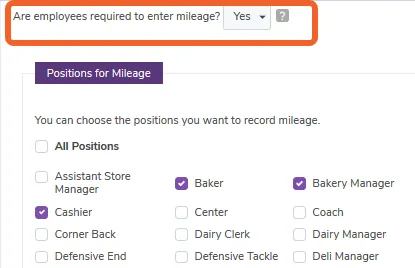
The second option highlighted in orange option in TimeForge controls whether staff members are required to enter mileage. Set this to “Yes” to require staff members to record driving mileage.
After you change these options to “Yes,” the above positions checkbox will appear.
In most businesses, only a few staff members collect tips or need to record driving mileage for reimbursement. In hospitality-related businesses, these are commonly delivery drivers, caterers, or employees who are shopping for the business, in addition to the servers and bartenders who collect tips.
Choose which positions will be required to record mileage.
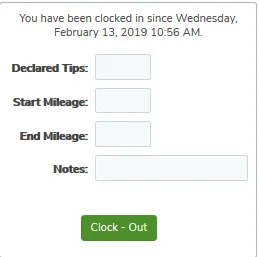
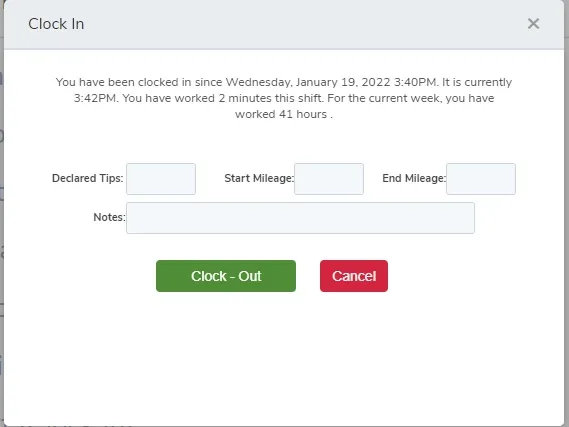
TimeForge will prompt employees when they clock out for their declared tips, start and ending mileage, and any necessary notes for the shift.
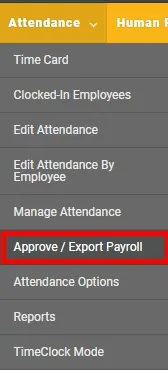
Approve your payroll
TimeForge is an extensive and powerful time and attendance management system. Many, but not all, of the time and attendance capabilities occur within the Attendance tab.
With TimeForge, you can add or edit attendance by date or employee, approve payroll for pay periods, export time punches to a third-party payroll company, and run numerous reports to review employee attendance.
There are several ways to manage payroll inside of TimeForge, and many users simply run one of the many payroll reports at the end of their pay period.
You can also manage the Approval process by approving time cards for a pay period, reviewing any sick, vacation, or PTO time, and then exporting payroll to one of our supported payroll providers. To use this feature, you must first have set up payroll periods for your location.
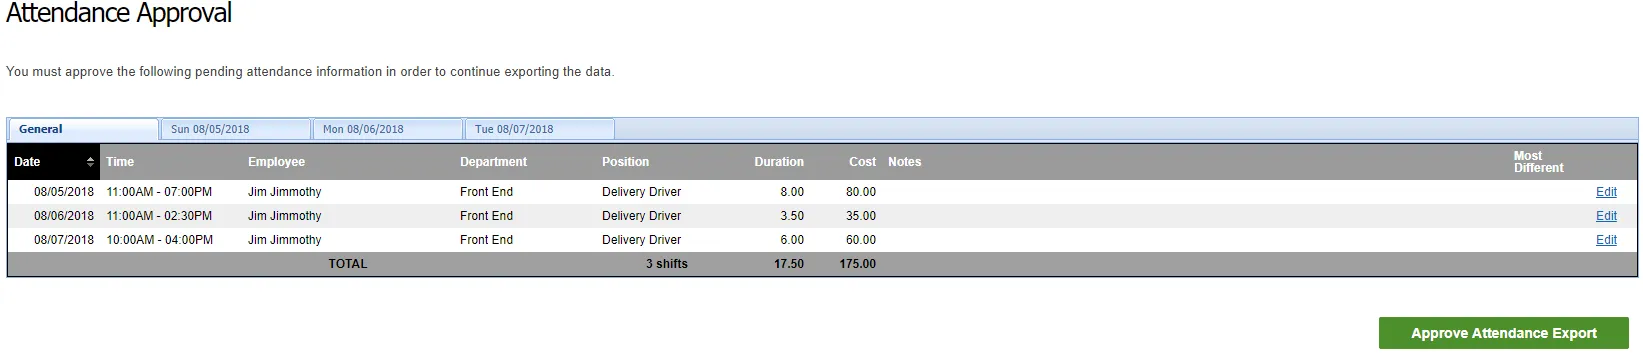
If you have not yet processed the selected pay period, TimeForge will display a list of time card entries for the pay period.
You can review staff member time cards by date, time, employee, position, or cost.
Additionally, TimeForge will display outliers, or “Most Different” time entries, so that you can quickly and easily identify time punches that may be erroneous or problematic.
Focusing on time entries labeled “Very Different” will allow you to find missed punches, late and early clock-ins, employees who forgot to clock out, and other strange data before you have approved the payroll. After the payroll is approved, you will not be able to edit the time punches inside of TimeForge. Instead, you’ll need to make the changes in your payroll program.
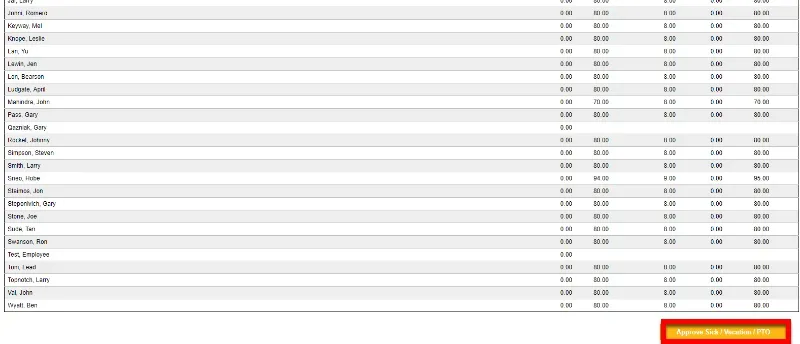
When you are ready to Approve payroll, click on the “Approve Attendance Export” at the bottom of the screen.
Export your payroll
TimeForge is an extensive and powerful employee schedule and attendance tracking management package, and you can begin to see some of TimeForge’s power by clicking on the Attendance tab. Many, but not all, of the time and attendance capabilities occur within the Attendance tab.
With TimeForge, you can add or edit attendance by date or employee, approve payroll for pay periods, export employee payroll to a third-party payroll company, and run numerous reports to review employee attendance.
There are several ways to manage employee payroll inside of TimeForge, and many users simply run one of the many payroll reports at the end of their pay period. This works well for many TimeForge customers.
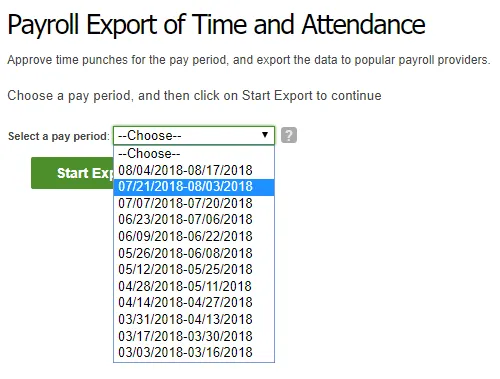
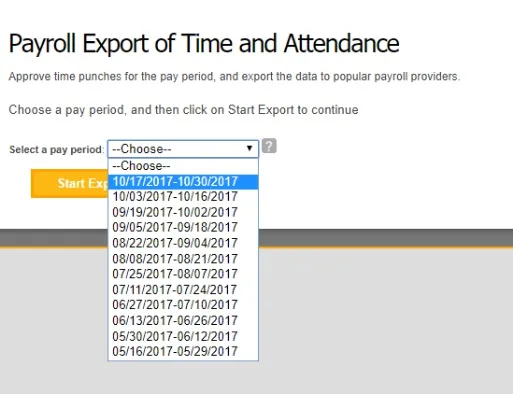
You can also manage the approval process by approving time cards for a pay period, reviewing any sick, vacation, or PTO time, and then exporting payroll to one of our supported payroll providers. To use this feature, you must first have set up payroll periods for your location.
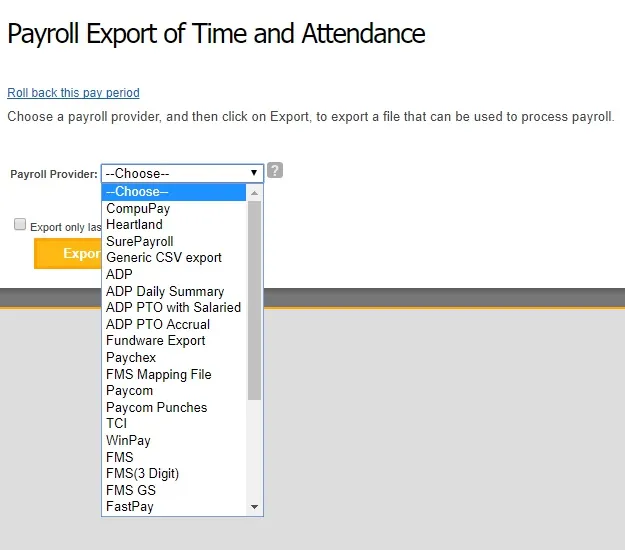
With TimeForge, you can export employee payroll to many payroll providers, including QuickBooks, ADP, Paychex, SurePayroll, Heartland Payment Systems, CompuPay, and others.
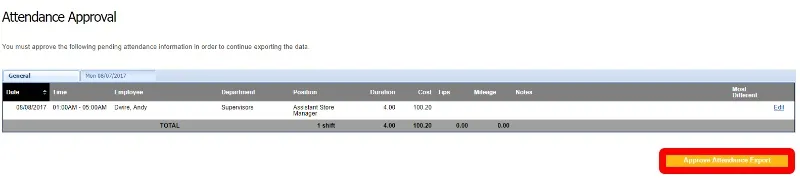
If you have not yet processed the selected pay period, TimeForge will display a list of time card punches for the pay period.
You can review staff member time cards by date, time, employee, position, or cost.
Additionally, TimeForge will display outliers, or “Most Different” time entries, so that you can quickly and easily identify time punches that may be erroneous or problematic.
Focusing on time entries labeled “Very Different” will allow you to find missed punches, late and early clock ins, employees who forgot to clock out, and other strange data before you have approved the payroll. After the payroll is approved, you will not be able to edit the time punches inside of TimeForge. Instead, you’ll need to make the changes in your payroll program.
Note:You will not be able to approve payroll if employees are currently clocked in for the time period.
When you are ready to Approve payroll, click on the Approve Attendance Export at the bottom of the screen.
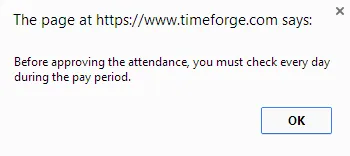
Prior to clicking “Approve Attendance Export” you must click and select each day that you are exporting payroll for or you will be prompted with the above message. The main purpose of this prompt is to decrease the instance of error.
After approving attendance, you will have a chance to review, edit, and approve Leave Type requests.
First, you will see a summary of all Sick/Vacation/PTO and you will be able to adjust the hours as needed.
Next, you will see the Totals by Leave Type followed by the Totals by Employee.
If you are sure all of your Leave Type hours are correct, click the Approve Sick/Vacation/PTO button at the bottom of the page.
Note: This is the only time you will see this page. Rolling back the pay period will not roll back the Sick/Vacation/PTO Approval page. Do not click the Approve Sick/Vacation/PTO button unless you are positive the totals are correct.
TimeForge will process the time card punches for the payroll period you selected and return a payroll file to you, which will allow you to send the file to your payroll provider.
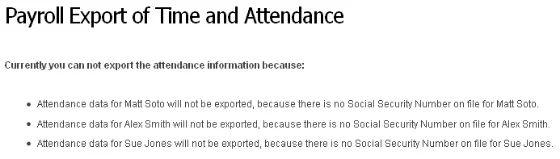
To ensure a successful import into your payroll provider, you will be prompted to correct any problems before an employee payroll period will be exported.
Set up pay periods
TimeForge will allow you to manage your labor, employee schedules, and time and attendance in the way that works best for your business. If you want to manage different departments differently, TimeForge will let you.
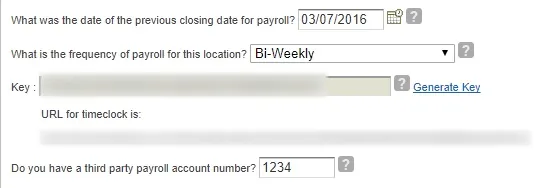
However, to ease the administration of staff schedules, payroll exports, and labor statistics, TimeForge supports the concept of pay periods. Each location, store, or unit can have a specific pay period. Payroll periods can be:
- Weekly, where staff are paid every week
- Bi-Weekly, where staff are paid every other week (common in many hospitality and restaurant businesses)
- Monthly, where staff are paid on a specific date (common in many professional and teaching businesses)
- On the 1st and 15th, where there are always two pay periods in a single month
After setting up pay periods, you will be able to quickly and easily export payroll, approve sick, vacation, and PTO time, and run reports that correspond to your pay periods.
Here are the simple steps to set up payroll periods in your account.
After choosing the correct settings for your Payroll Periods, make sure to save your settings.
Limit clock-ins and clock-outs to a specific IP address
TimeForge has the ability to limit clocking in and clocking out to a specific Internet Protocol (IP) address. One common concern with web based software and attendance tracking is ensuring that staff members are actually at work before they are allowed to clock in. TimeForge can require staff members to be physically be at the location that connects to a specific IP address before allowing staff members to clock in or out.
IP addresses are unique identifiers for computers on the internet and are normally provided by your Internet Service Provider (ISP). In some cases, your ISP will provide a dynamic IP address, which changes every few weeks. Most ISPs will allow you to get a static, or sticky-static IP address for a nominal monthly fee. In many cases, multiple computers in a single office will share a single IP address through the use of a router or firewall device (such as those provided by Cisco, Linksys, D-Link, or Netgear). Similar to a phone number, only one physical location at a time can have an IP address.
Note:TimeForge can require that employees must clock in and clock out using a fingerprint scanner, which will restrict clocking in and out to a single physical computer at your location, regardless of the IP address.
Employees that try to clock in to TimeForge from an IP address other than those you have allowed will receive a warning similar to the one pictured below.
These staff members will not be able to clock in or clock out.
Prevent clock-ins from home or with a cell phone
TimeForge Attendance is a powerful time tracking tool for retail, restaurant, and other service businesses. With this tool, you can view your clocked-in employees, view employee attendance reports, approve/export payroll, and much more!
By default, employees can clock-in from anywhere that has an Internet connection, and this includes work, home, or their mobile Internet on a cell phone. In some circumstances, this is the correct and desired set up. However, for many businesses in the retail and food service industries, it is not desirable to allow staff to clock-in anywhere.
To support these businesses, TimeForge includes the ability to restrict employee clock-in and clock-out functionality to specific IP addresses, or physical locations.
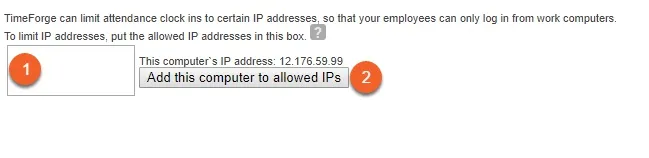
You can specify where staff clocks-in by adding one or more IP addresses that employees must be at to punch in for the day. To add an IP address for employees to clock in:
- You can type your IP address into the text box next to the “Add this computer to allowed IPs” button. If there is more than one allowed IP address, they should be separated by either a space, comma, or on separate lines.
- Instead of typing in the IP address, you can click on the Add this computer to allowed IPs button, and TimeForge will add your current IP address to the list of allowed IP addresses.
Note:Remember to click “Save Company Settings” at the bottom of the page when you’re finished.
Additional options for clocking in and out
TimeForge includes a powerful and flexible time and attendance management system, and is able to track (and round) clock in and clock out times on an accurate minute-by-minute clock, which is synchronized with the National Institute of Standards and Technology. TimeForge can use the clock in and clock out times to calculate the payroll for your pay period without any problems. Accurate time tracking is part of what TimeForge does!
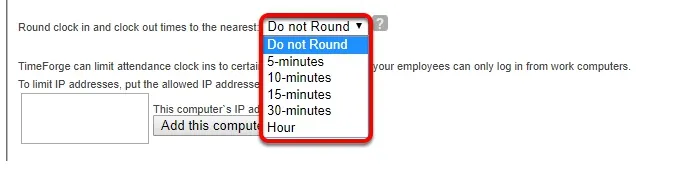
Locate the option to round clock in and clock out times and choose the appropriate rounding rule from the drop down menu. However, TimeForge will not round any clock in or clock out times provided by your Point of Sales (PoS) system. If you want to round time and attendance in your Point of Sale system, please do so within the PoS software.
Note:TimeForge will not round clock in or clock out times for previous pay periods. Changing the rounding rules will only affect upcoming attendance entries.
When a staff member is too early to work, they will receive a pop-up window similar to the above image.
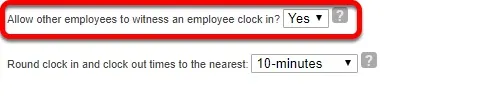
A manager can allow the staff member to clock in, or another employee can provide their own credentials (username and password, or fingerprint) to allow the employee to clock in.
Switch the option highlighted above to “Yes,” and your employees will automatically be clocked in.
Scroll down to the bottom of the page and click “Save Company Settings” when you’re finished.
Automatically switch the position for clocked-in employees with multiple jobs
TimeForge is a powerful and easy to use, labor management platform for service oriented industries (restaurants, retail, c-stores, grocers, hotels, etc.). Service-oriented businesses often have difficulties managing the complexities of their ever changing workforce.
TimeForge helps manage labor by making labor management simple. Employees are commonly scheduled to work doubles, or back-to-back shifts. In some cases, a staff member may transition from one job (or position) to another without ever leaving the business, and may forget to switch their position in the attendance system.
To help ease the administration of employees clocking in and out throughout the day, TimeForge can automatically switch staff to the correct position.
For example, a waiter or waitress (server) may work from 10:00am - 3:00pm as a waiter, and then transition to a bartender from 4:00pm - 8:00pm. Or, a lifeguard may work from 8:00am - 1:00pm, then as a swim coach from 1:00pm - 3:00pm.
Locate the option above that’s highlighted in red.
Switch this option to “Yes.”
TimeForge will now automatically switch jobs / positions for staff members who work back-to-back shifts.
Note:The staff member needs to clock in to the first scheduled shift to allow TimeForge to transition between positions.
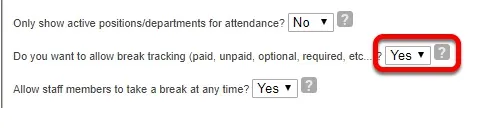
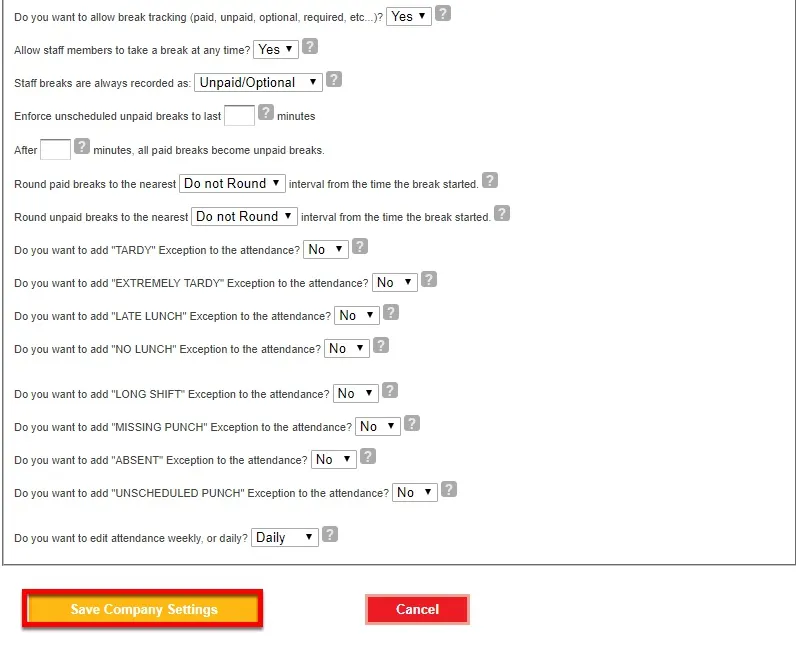
Configure break options
The TimeForge Breaks module is a comprehensive feature inside of TimeForge Attendance that allows management to control employee breaks and meal periods. You can set the Break Options as needed for your business, which provides you significant flexibility in managing and monitoring staff member breaks and meal periods.
You will want to configure Break Options so that they conform to fit your business’ operations, and so TimeForge can provide the best possible and most convenient Attendance monitoring to your business. Some of the Break Options you’ll need to consider are whether employees are required to take breaks. For example, if your state labor laws require a 15 minute break every 4 hours, you’ll want to require breaks.
You also need to consider whether employees can take breaks without being scheduled for a break. For example, if John needs a bathroom break, but isn’t scheduled for a break for another two hours, do you want to provide him the option of taking an extra break? Additionally, you should decide whether you want employees to be automatically clocked in and out for breaks. For example, if Jane is scheduled for a ten minute break at noon, do you want TimeForge to clock her out for ten minutes automatically at noon?
If set to “No”, staff must take their breaks based on the scheduled break times and the posted schedule. So, if no breaks are scheduled, staff cannot take a break.
If set to “Yes”, staff are allowed to take a break at any time, regardless of the scheduled break times or types.
If set to “Yes”, staff must take their breaks based on the order of their scheduled breaks and the posted schedule. For example, if an unpaid/required break is scheduled first, and then a paid/optional break, employees must first take the unpaid/required break, and then they can take the paid/optional break.
If set to “No”, staff are allowed to take a break at any time, regardless of the scheduled break times or types. For example, if an unpaid/required break is scheduled first, and then a paid/optional break, employees may take either break, in any order.
If set to “No”, staff must take their breaks manually (by going to TimeForge and starting their break).
If set to “Yes”, TimeForge will automatically take scheduled breaks for any staff member who forgets to take their scheduled break. For example, if an unpaid/required break is scheduled at 10:00am, but the employee forgets to take the break, TimeForge will automatically take the break for them.
If set to “No”, employees must end their breaks manually (by going to TimeForge and ending their break).
If set to “Yes”, TimeForge will automatically end scheduled breaks for any staff member who forgets to end their scheduled break. For example, if an employee starts a 15 minute unpaid/required break at 10:00am, but forgets to end the break at 10:15am, TimeForge will automatically end the break for the staff member.
If set to “No”, employees are allowed to take their scheduled breaks at any time, regardless of the scheduled start times for the breaks. For example, if a break is scheduled at 11:15am, the employee can click on “Take a Break” at 11:00am, and will be allowed to start the break at 11:00am.
If set to “Yes”, employees must take their breaks no earlier than the scheduled start time of the break. For example, if a break is scheduled at 11:15am, the employee can not click on “Take a Break” until 11:15am.
If set to “No”, employees are allowed to take breaks that are of any duration, regardless of the scheduled break times. For example, if an employee ends a scheduled 30 minute break after 20 minutes, they will be allowed to do so.
If set to “Yes”, employees must take a break that is at least as long as the scheduled break time. For example, if an employee attempts to end a scheduled 20 minute break after 15 minutes, TimeForge will not allow them to do so. They must be on break at least 20 minutes, if this option is set.
If set to “No”, breaks that are unpaid will never convert to any other type of break. For example, if an employee ends a scheduled 15 minute unpaid break, it will continue to be an unpaid break.
If set to “Yes”, any break that is unpaid, but ends prior to the scheduled duration, will be converted from an unpaid break to a paid break. For example, if an employee ends an unpaid 30 minute lunch break after 28 minutes, then the 28 minute unpaid lunch break will convert to a 28 minute paid break.
Edit an employee's break
Managing staff member breaks, meal periods, and scheduled lunches can be a headache for even the most experienced management team. In addition to the ability to view your clocked-in employees, view attendance reports, and approve/export payroll. TimeForge Attendance makes quick work of taking and managing staff member breaks.
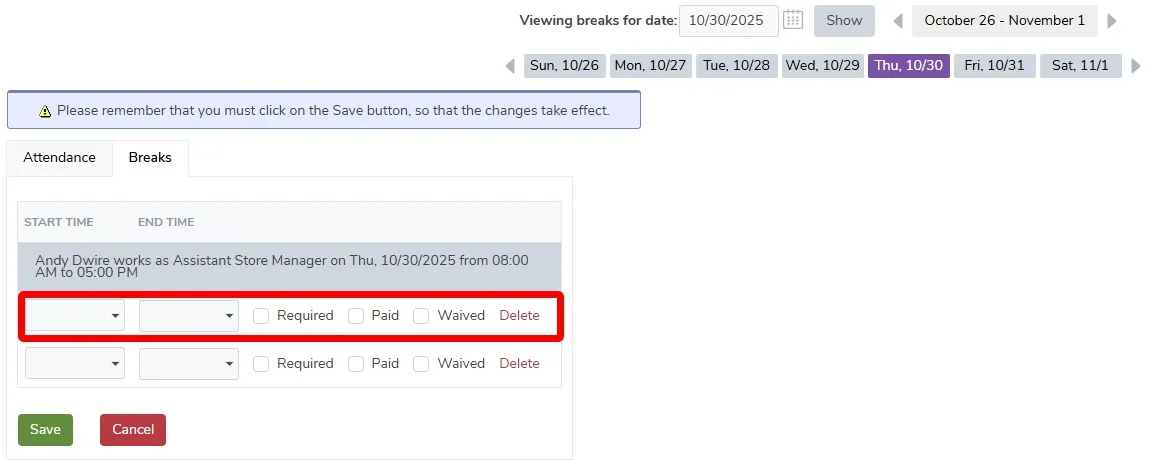
You will want to edit employee breaks by date if an employee forgot to clock out during a break, forgot to clock in after a break, or if there was some other attendance error that needs remedied.
Choose the date that you would like to edit by entering it into the date field in the format MM/DD/YYYY, or click on a date from the calendar that pops up when you select the calendar icon (located next to the “Show” button).
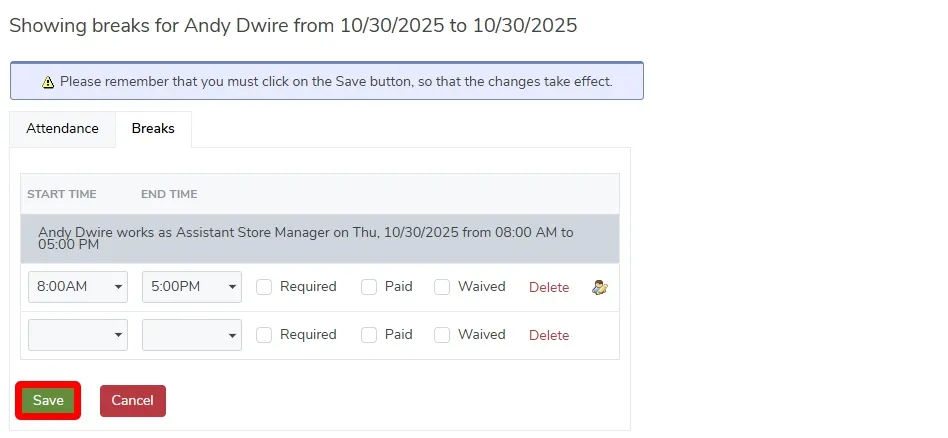
After choosing an employee, you can begin editing the attendance and breaks.
Don’t forget to click “Save” when you’re finished.
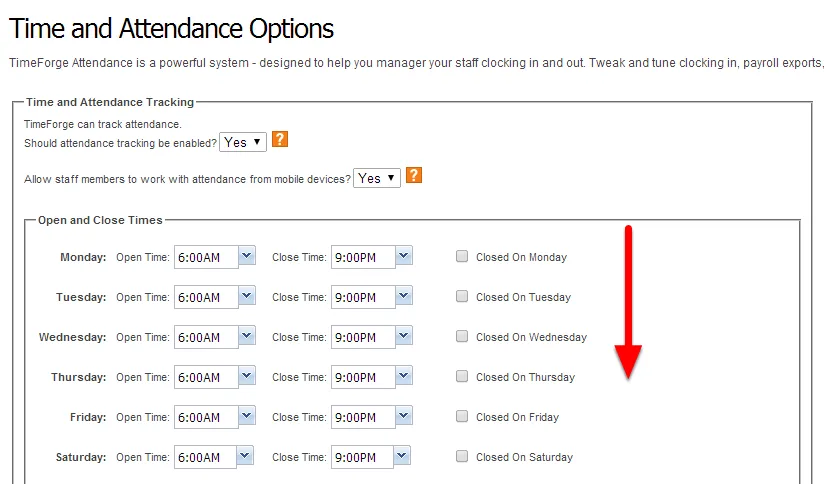
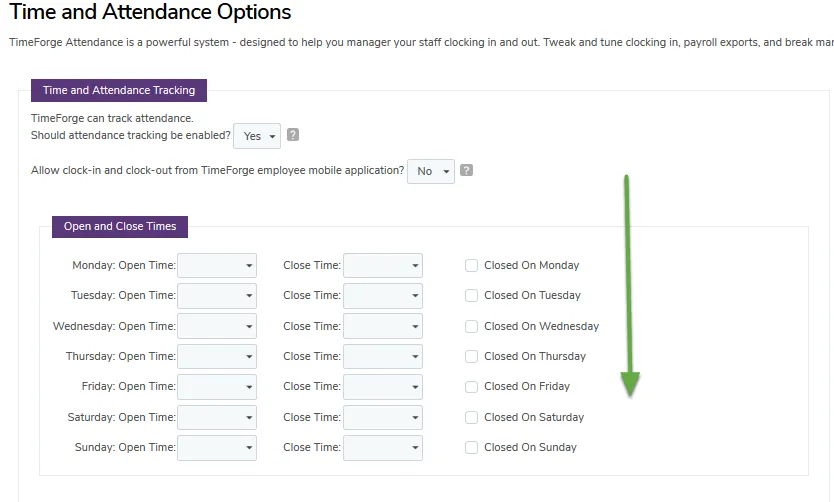
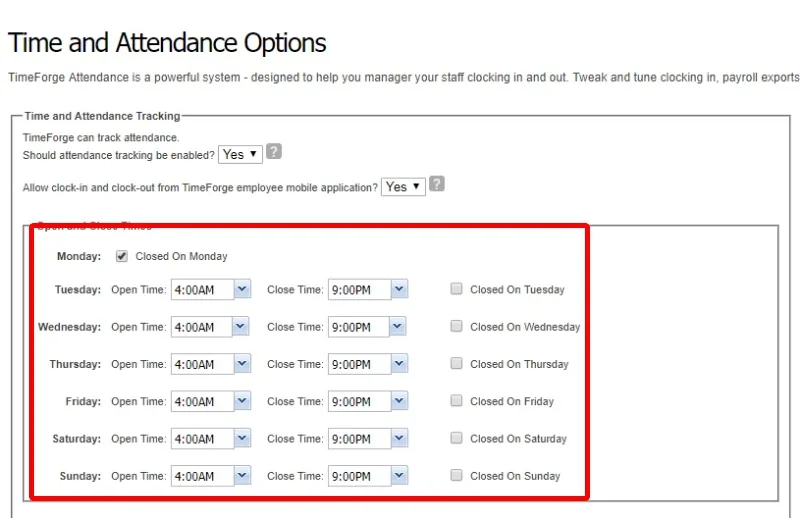
Set your location's open and close times
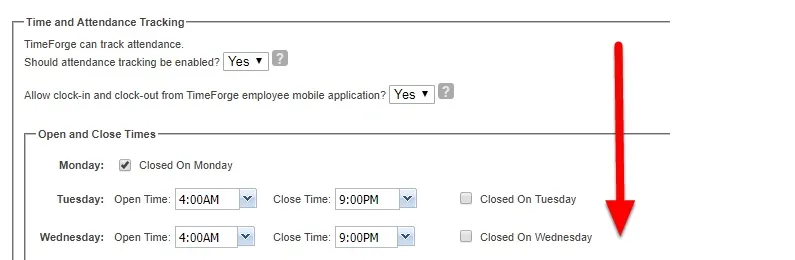
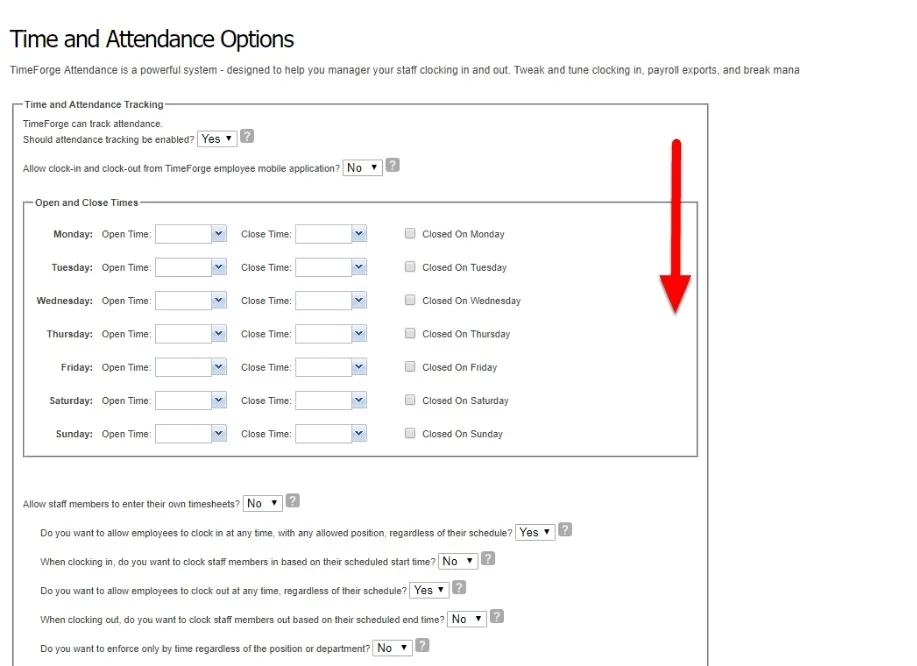
In TimeForge, “Open and Close Times” are an optional safety net for your daily labor costs and ultimately payroll. By entering an open or close time, you are telling TimeForge when your “day” actually starts and ends. For example, if you have an open time of 8:00 AM, and an employee clocks in at 5:00 AM, their attendance will be recorded on the previous day. This is because TimeForge believes the current day won’t begin until 8:00 AM. On the other hand, if your close time is set to be 10:00 PM, and an employee clocks out at midnight, their attendance will be recorded on the next day.
The “Open and Close Times” should not be the same times as your hours of operation if there is a chance your employees would work outside of those hours. In any case, it is good to allow for extra time in case your employees ever are outside of that range.
Here is how you can easily view and change your open and close times.
If you want to use Open and Close Times, Use the time you tell your employees to show up for their shift to the time everyone goes home. If for any reason your attendance appears on the wrong day but falls between your open and close times, call us, and we’ll get the issue resolved.
Note:If you make any changes to the Open or Close Times, be sure to scroll down to the bottom of the page and click “Save”.
Turn attendance tracking on or off for salaried employees
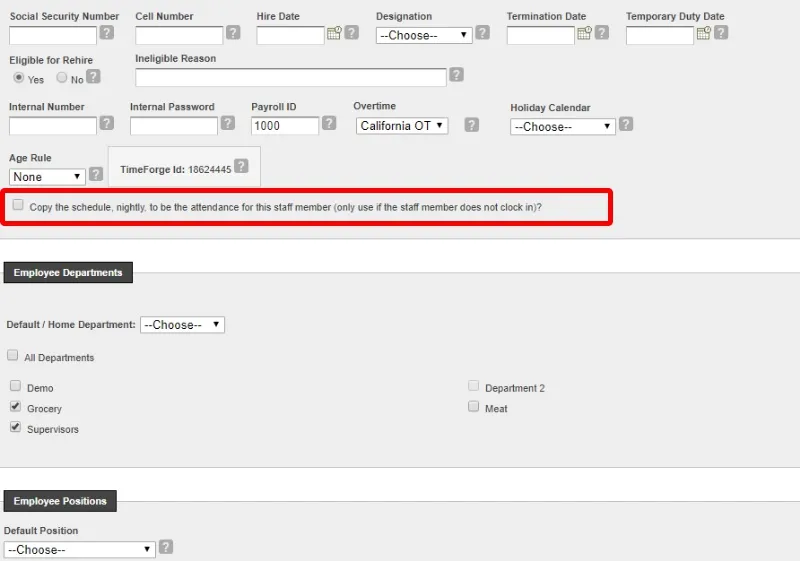
TimeForge gives you the ability to copy hours from the schedule in order to show attendance for salaried employees. While making an employee schedule, you may choose to schedule your managers and other salaried employees so that you can keep accurate record of hours worked. However, this may not be ideal for every business, and is an easy option to toggle on and off.
Highlighted in red above is the option that copies a salaried employee’s scheduled hours to attendance.
Scroll down and click “Save” if you make any changes to this page.
Configure and track meal penalties
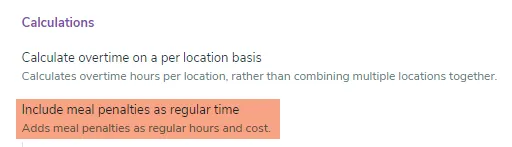
With TimeForge, employers can easily track meal penalties and automatically apply compensation toward an employee’s regular hours. This is useful for those employers who do not care to differentiate regular hours and a lunch break.
Alternatively, you can track meal penalties separately from regular hours. Both options are easy to configure. Here’s how to set up meal penalties, then how to interpret your attendance report based on your chosen settings.
The report will add the number of hours you entered into the employees meal penalty to their regular hours.
For example, Craig Anderson worked an 8 hour shift, but we added 1 hour as compensation for a meal penalty. So, that extra hour gets added to his regular hours, which is why we see 9 hours worked on the report.
If TimeForge does NOT include meal penalties as regular hours…
The report will not add the number of hours you entered into the employees’ meal penalty to their regular hours.
For example, Craig Anderson worked an 8 hour shift, but we added 1 hour as compensation for a meal penalty. However, in this example, we didn’t want that meal to count towards his regular hours, so the meal penalty doesn’t get added, which is why we see 8 hours.
Apply a meal penalty to an employee
At TimeForge, we understand how important Federal and State Wage and Hour laws are to follow for companies that supply and use a contingent workforce. This affects every aspect of your labor management, from creating employee schedules to accurately tracking employee attendance. Not following or understanding these laws can lead to costly violations that can be easily avoided.
Here’s how you can create a meal penalty for an employee’s attendance.
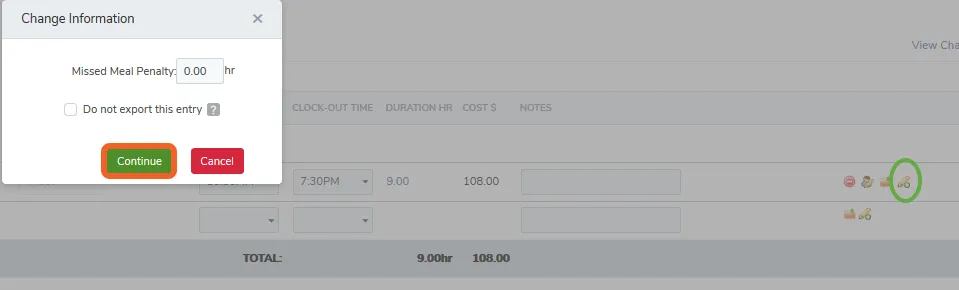
Click on the pencil icon to the right of the appropriate employee attendance entry.
The above box will display. Enter the number of hours to count toward a meal penalty. Then click “Continue” to save the meal penalty.
Manage Attendance Overview
Manage Attendance is a new feature that allows you to handle all aspects of your employee’s attendance in one centralized location. In Manage Attendance, you can easily view your employees’ attendance, compare attendance with scheduled shifts, quickly add or edit shifts, and more.
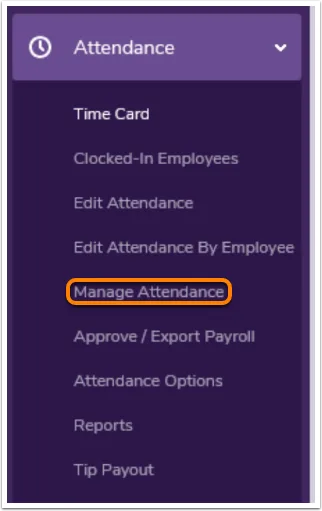
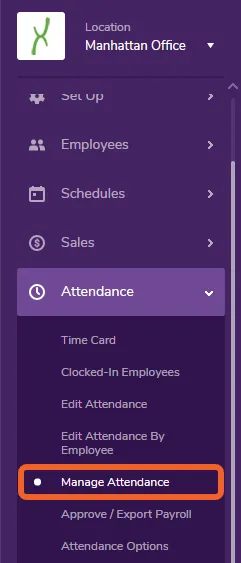
Navigate to the Manage Attendance page under the Attendance tab
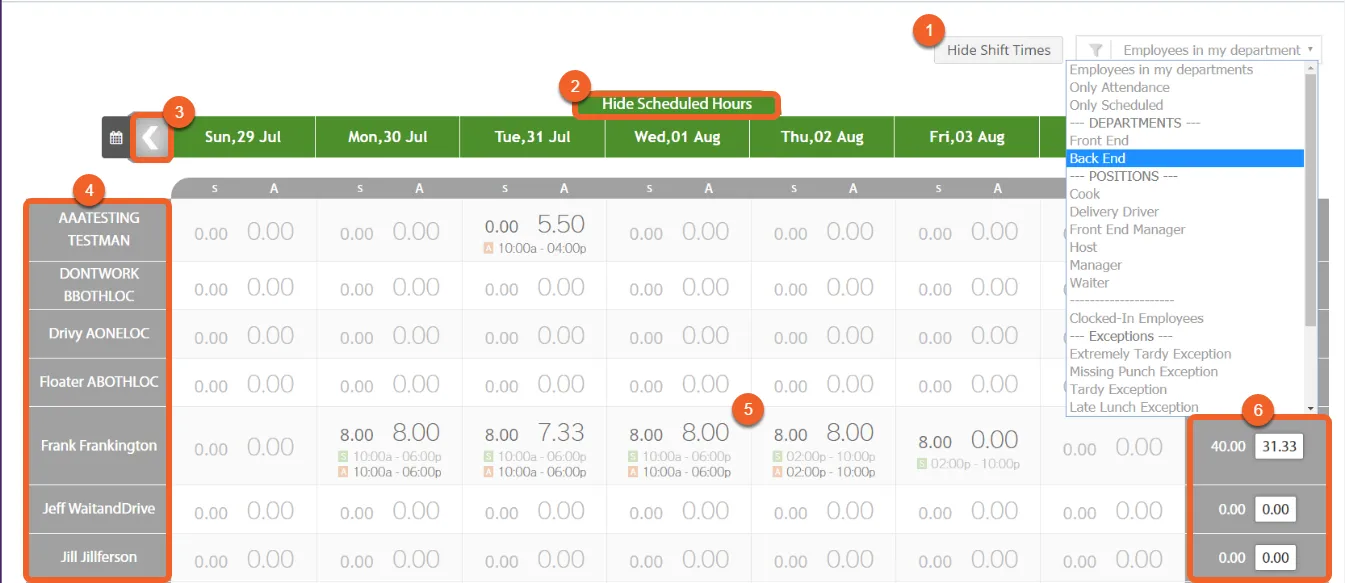
The Manage Attendance layout is designed to provide you with everything you need to know in one central place. We’ll walk you through it:
Sorting and “Show Shift Times”: Sort the list of employees by department, position, exceptions, and more. Click the button for “Show Shift Times” to add shift clock in and out times to the table.
Hide/Show Scheduled Hours: By clicking the “Hide Scheduled Hours” button located above the Week Date Bar, TimeForge will hide the scheduled hours from the table, leaving only the attendance hours. This can be reversed by clicking on “Show Scheduled Hours.”
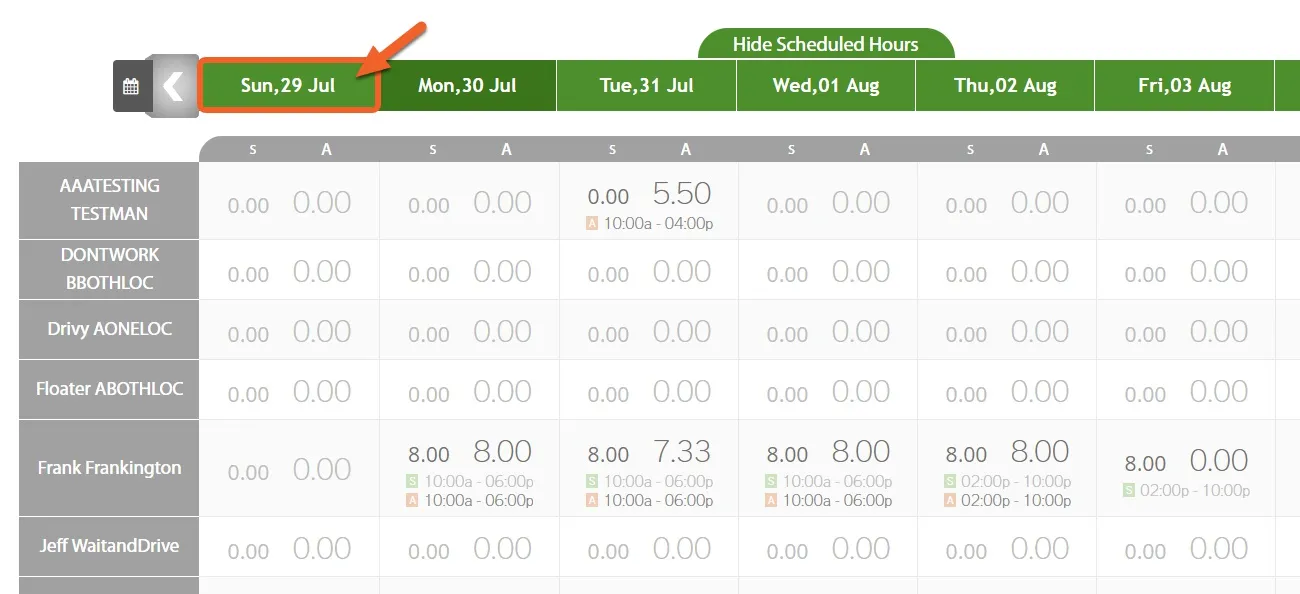
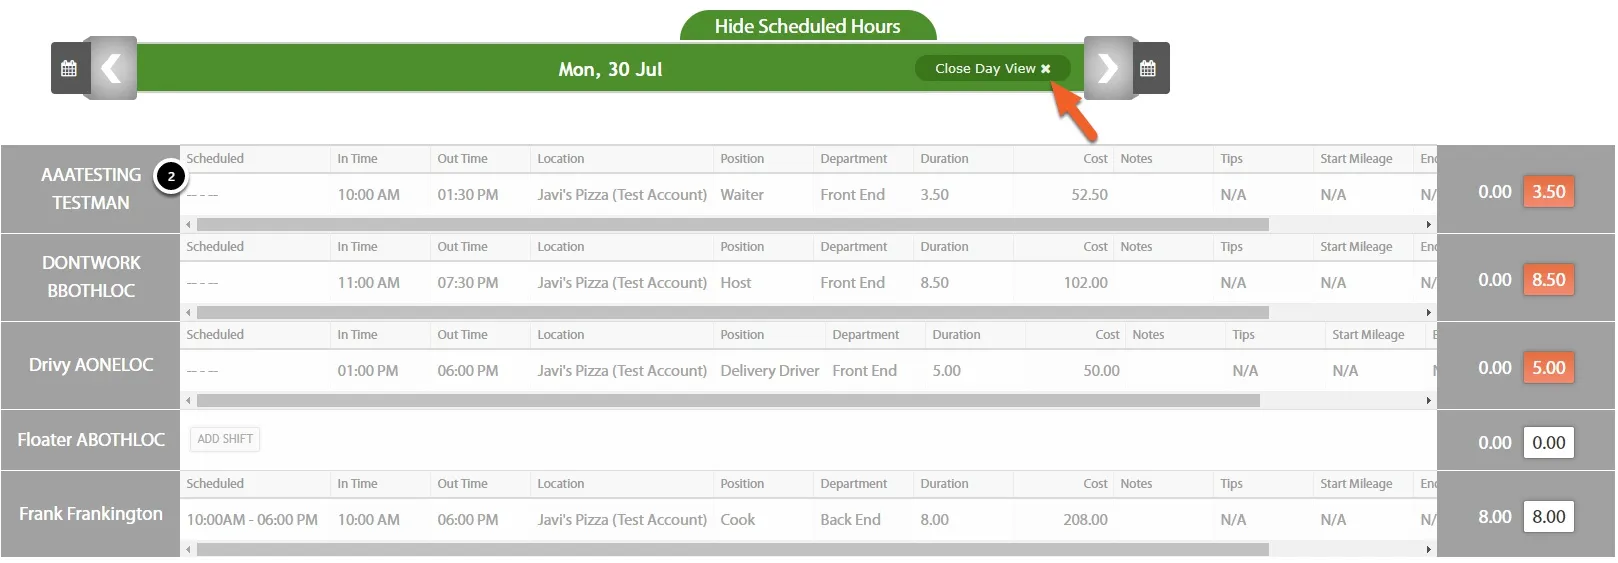
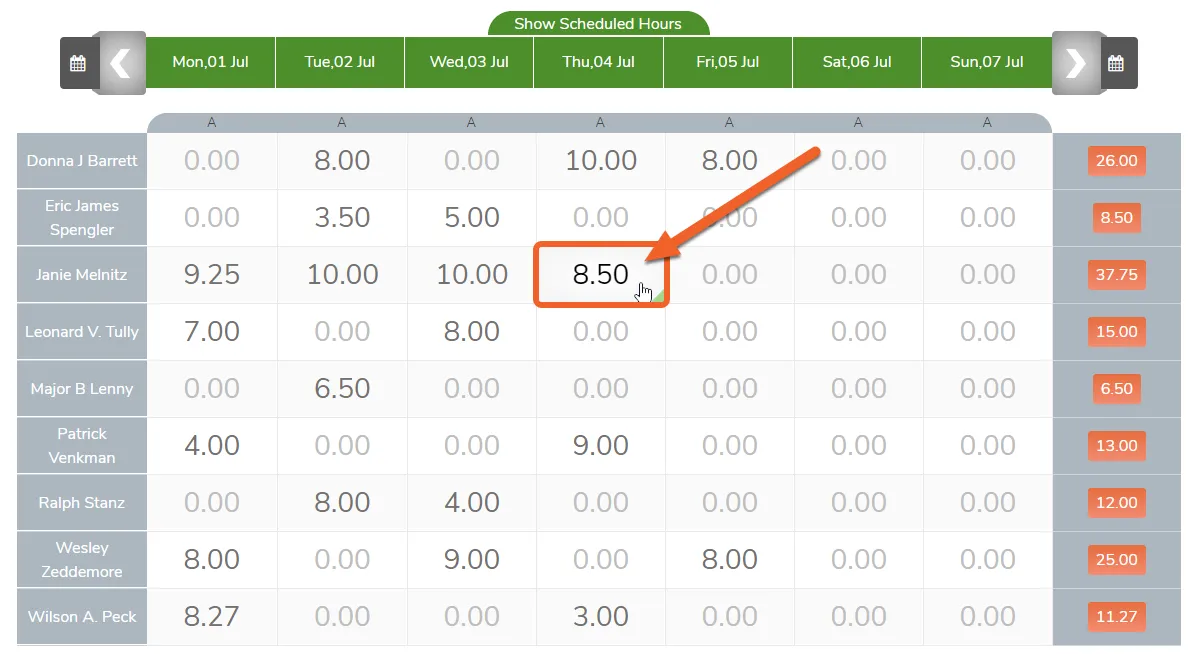
Week Date Bar: View attendance for a whole week. Change weeks by selecting the arrows, or go directly to a specific week by selecting the Calender icon. Clicking on a specific day will take you to the “Day View,” where you can see information focused to a single day. You can use the arrows on the top right and left of the chart to move to next or the previous week.
Employee List: Employees are listed on the left side of the screen. Each row consists of that employee’s attendance information. Clicking on a specific employee will open up a more detailed view of their information.
Attendance Table: Each cell shows scheduled hours and actual hours for each employee and day. The smaller number in size on the left is the employee scheduled hours, and the larger sized number on the right is their attendance hours. Clicking on a specific cell opens a pop-up that allows you to edit and add attendance for that day for that employee.
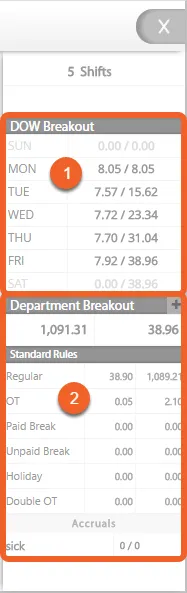
Totals: On the right side of the table, the attendance entries for each employee is summarized. The number on the left is the total scheduled hours for the week and the number in the box represents the total attendance hours. When attendance hours are greater than scheduled hours, the box becomes red to highlight the fact.
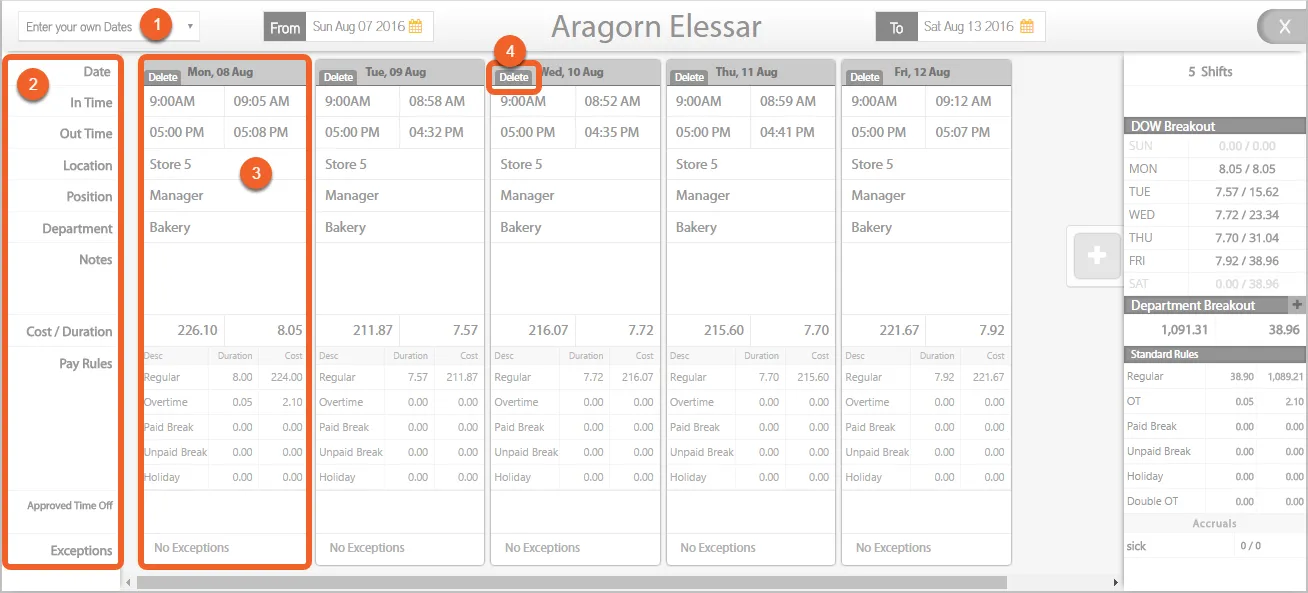
After selecting an employee from the Manage Attendance main page, the employee detail view of shifts and summarized information pop-ups:
Date Range: When set to “Enter your own Dates,” then you can enter a custom date range by changing the dates for “From” and “To.” If set to “Use Predefined Dates,” then dates are preset by pay period.
Row Titles: The left column shows the titles of each row.
Shift Information: Each card of information includes clock in/out times, position, pay rules, modifications, and more. Clicking on a shift will allow you to edit the attendance information.
When viewing a particular employee in Manage Attendance, to delete a shift, simply click on the Delete button which can be found to the left of the date stamp. Note that you can only delete shifts worked. To remove a scheduled shift, you must edit their actual schedule.
First select the day you’d like to transfer from the Manage Attendance screen to bring up the display.
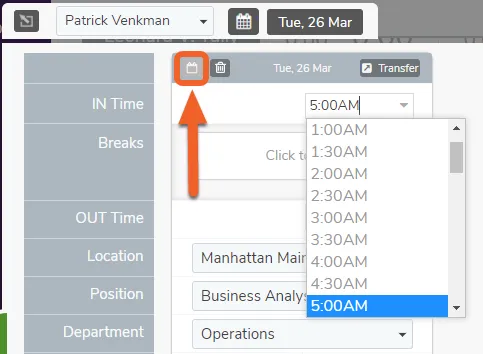
To move an employee’s punch to another day, click on the small calendar icon on the upper left of a shift that they worked.
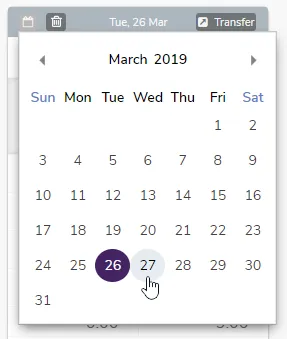
Next, a calendar will appear to allow you to select the date you’d like to transfer to. Once you confirm the move, the employee’s punch will be moved to the selected date. Please note that this will not move an employee’s schedule, only their punches.
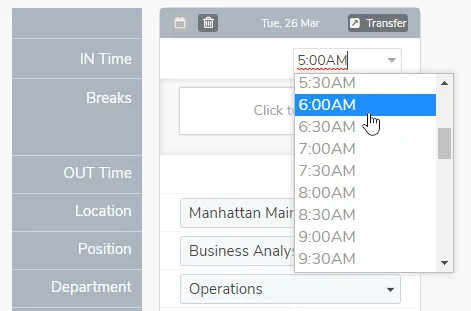
Editing an employee’s time is easy! All you need to do is click on a day that you would like to edit the time for, then select the time field you want to edit.
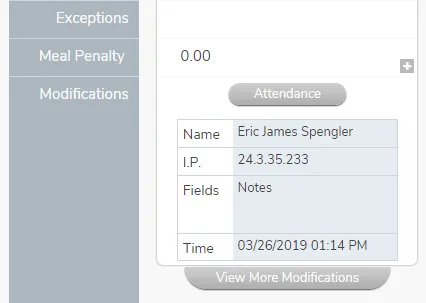
At the bottom of the screen you’ll notice the Modifications section of the table. This keeps track of all edits made to an employee’s time. If an employee clocks in or out via a time clock, you’ll notice that the Name field will say “Web Service.”
Don’t forget to click the Save button in the upper right to save your changes!
A message should appear at the top of your screen that says “Break Information was saved successfully.” It may also say “Attendance Information was saved successfully.” Once you’ve received confirmation, click Close.
To hide or show the shift times an employee was scheduled to work and actually worked, there is a button that appears on top of the chart in the center.
This button will say either:
Hide Scheduled hours: This will hide the amount of hours they were scheduled for and only show the hours the employee worked.
Show scheduled hours: This will show both the hours the employee was scheduled for as well as the hours they worked.
As always, if you need help or have any questions, please contact TimeForge Support. Our awesome support staff will be glad to answer any questions or help in anyway they can.
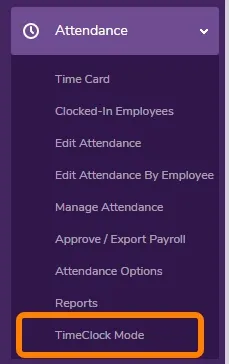
Use TimeClock Mode to allow employees to clock in or out on a shared computer
TimeForge Attendance provides two different and distinct methods for employees to clock in, based on manager preference.
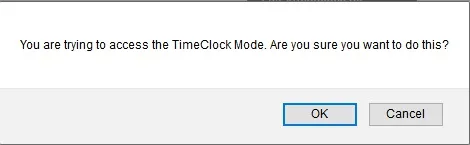
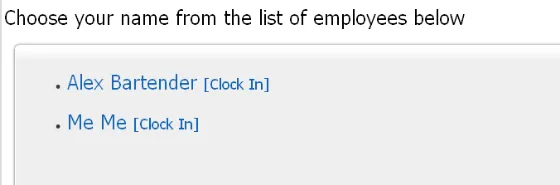
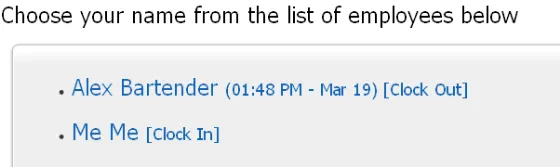
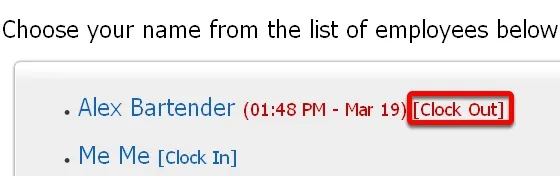
One method, described below, is to use the TimeForge Time Clock Mode, which displays a list of employees (including your name), and you can clock in or out by simply clicking on your name, and entering your password.
This method of clocking in and out is designed for use on shared computer systems.
Before finalizing your Time Clock clock out, you may review your current time card. Specifically, TimeForge Attendance displays how long you have been clocked in during this shift, and what your total is for the week. You may also enter any declared tips, mileage calculations, or notes for management.
Choose Clock Out to complete the clock out process.
Require passwords in TimeClock Mode
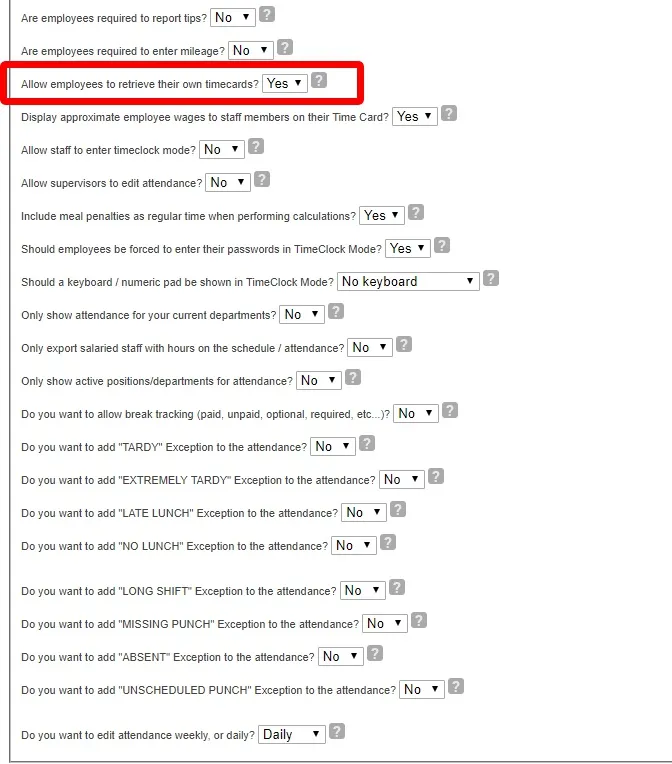
Allow employees to view their timecards
First of all, Yes! Timeforge gives employees the ability to view their own timecards so that the can keep track of their hours each week. This can save the employees time and effort when keeping accurate records of their own hours worked. It can also save managers from having to keep track of attendance in the off-chance that employees think there’s a discrepancy on their check. No need to worry, only managers and some supervisors can make changes to attendance records.
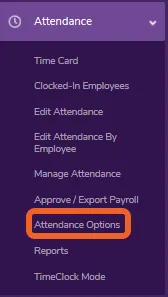
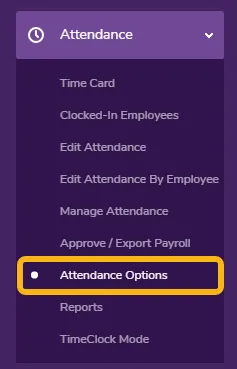
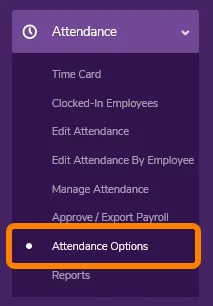
Go to the “Attendance Options” page under the Attendance tab
Don’t forget to click the “Save Company Settings” button at the bottom of the page when you are finished.
Adjust holiday pay for an employee
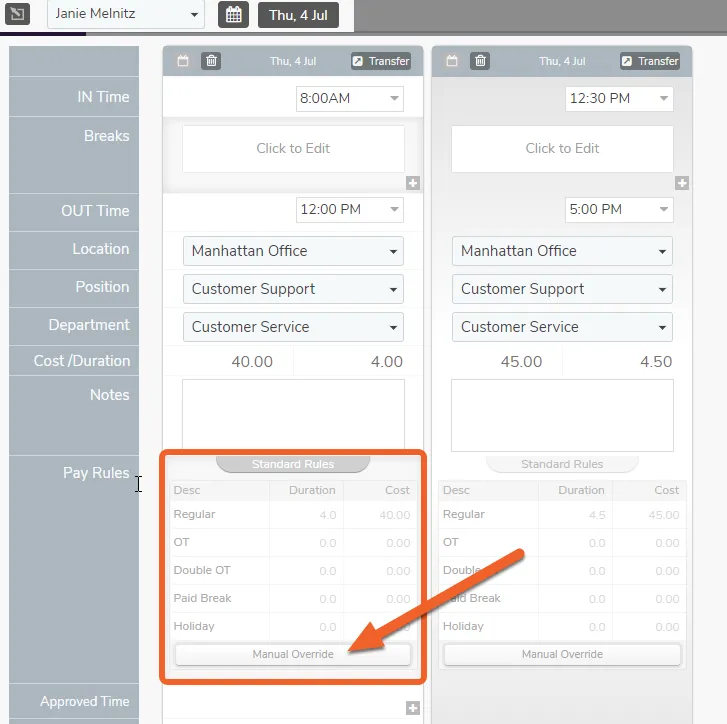
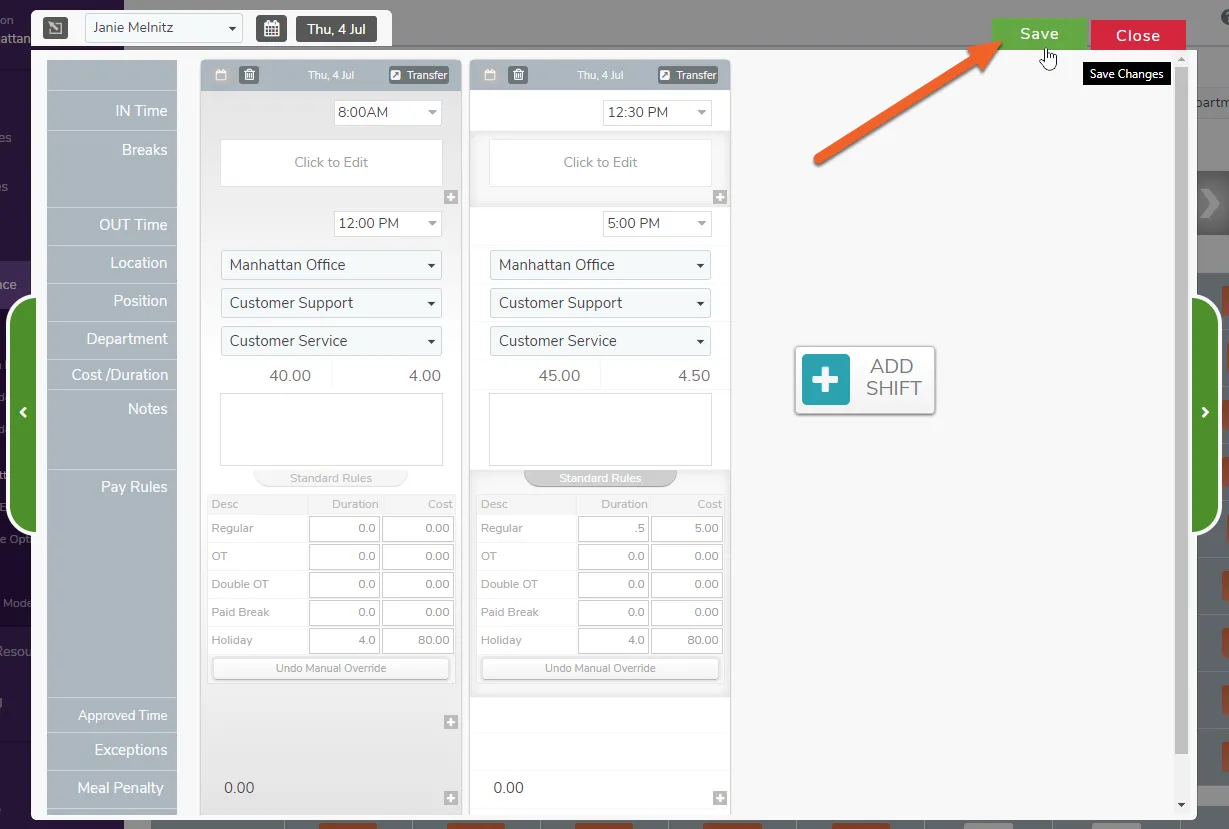
This article will teach you how to manually adjust an employee’s pay through the Manage Attendance screen. This is especially useful, for example, if you need to adjust an employee’s pay rate based on their eligibility for holiday pay.
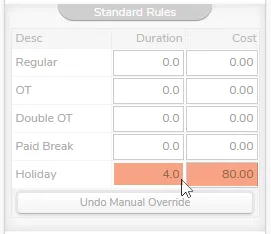
Click the Manual Override button in the Pay Rules row. This will allow you to manually adjust the duration and cost values for various types of pay, such as Regular, OT, and Holiday.
Once you’re finished making any adjustments, don’t forget to click the Save button in the upper right to save your changes.
Show temperature check during clock-ins
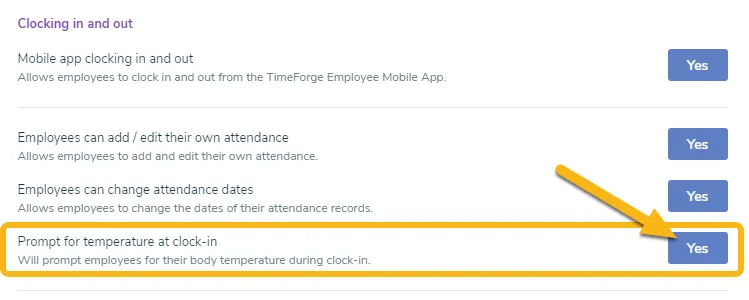
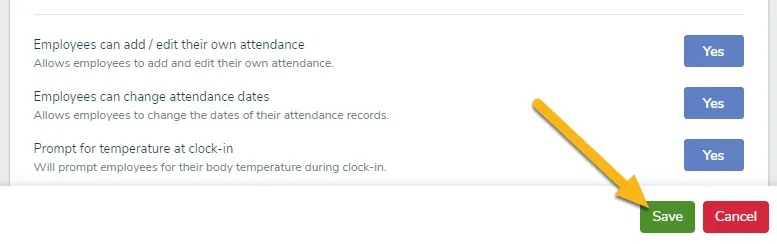
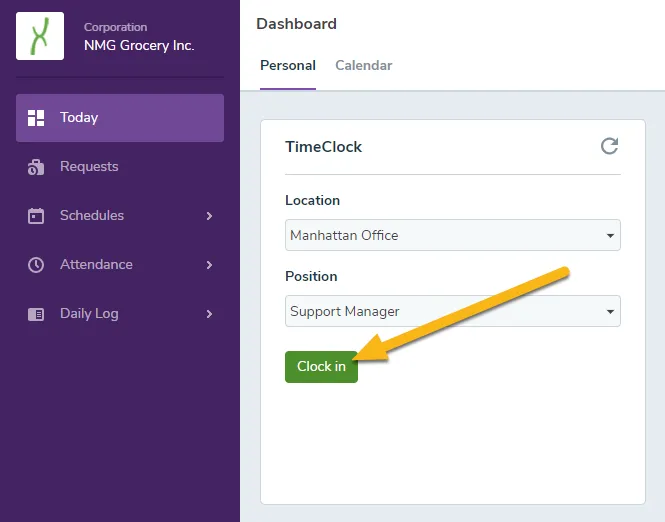
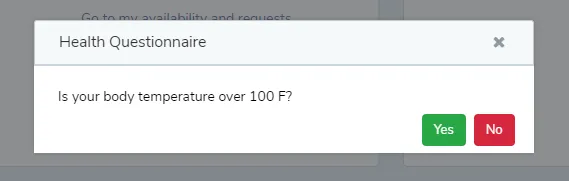
TimeForge allows managers to enable temperature checks at their location. With temperature screening enabled, when an employee attempts to clock in for their shift, they will be prompted to answer the question, “Is your body temperature over 100 F?”
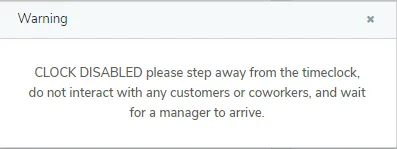
If the employee answers No, they will be clocked in normally. If the employee answers Yes, they will be prevented from clocking in, and instructions will be shown on screen to wait for a manager. TimeForge will automatically send a message to the manager to let them know the employee is waiting.
This feature works on browser-based clock-ins and on our hardware time clocks. It also works alongside our COVID-19 Health Questionnaire, which prompts employees to answer a few quick questions recommended by the CDC.
Don’t forget to click the Save button to save your changes. If you have multiple departments, you may be prompted to choose whether to copy your settings to those departments as well.
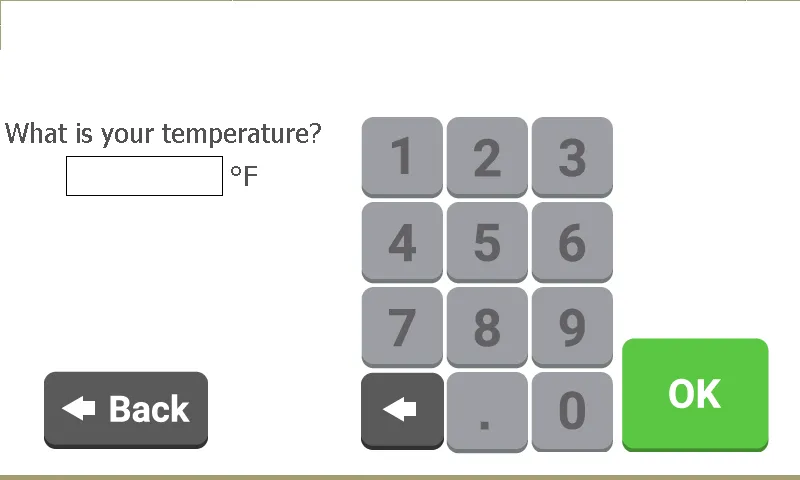
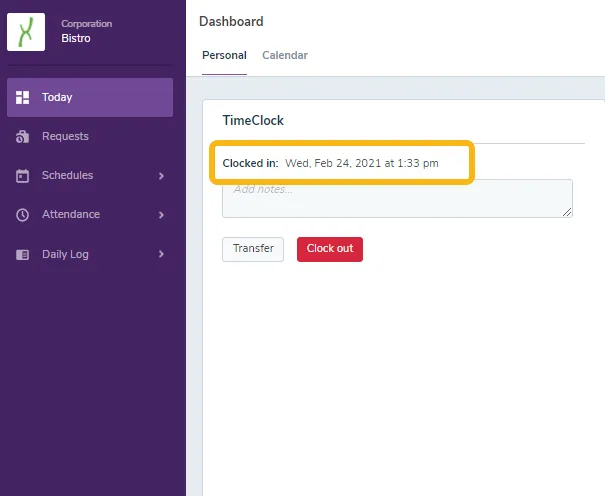
After an employees selects to clock in, the TimeClock will prompt them to enter their temperature as shown below.
If their temperature falls above the threshold set in your attendance settings, the TimeClock will prevent them from completing their clock in.
Show COVID-19 questionnaire during clock-ins
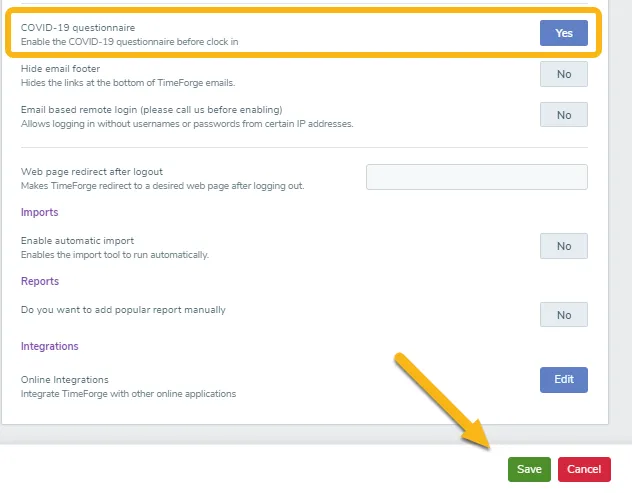
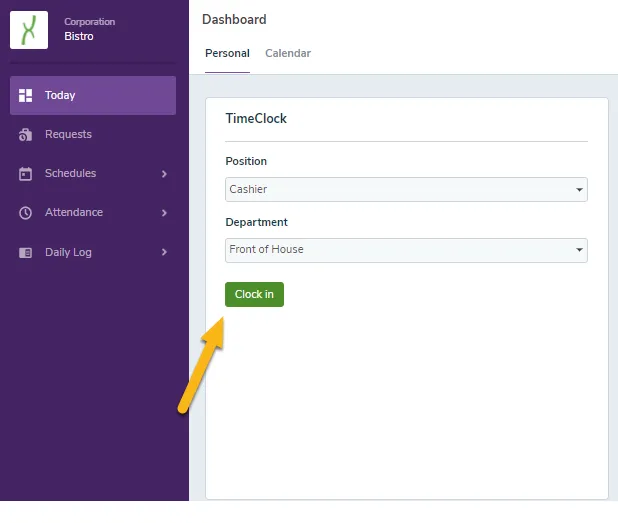
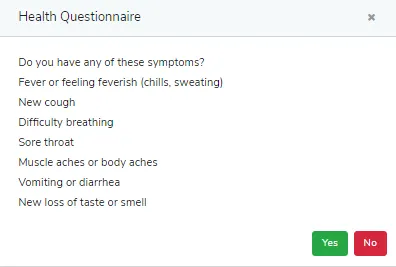
To help prevent the spread of the COVID-19 virus, TimeForge can prompt a health questionnaire during clock-in. The questionnaire presents the employee with a few quick questions similar to those used in the CDC Facilities COVID-19 Screening.
If the employee answers No to all of the screening questions, they will be clocked in normally. If the employee answers Yes to any of the questions, they will be prevented from clocking in, and instructions will be shown on screen to wait until a manager arrives. TimeForge will automatically send a message to the manager to let them know that the employee is waiting.
This feature currently works on our browser based clock-ins at this time. It works alongside our temperature check feature, which can be enabled per location.
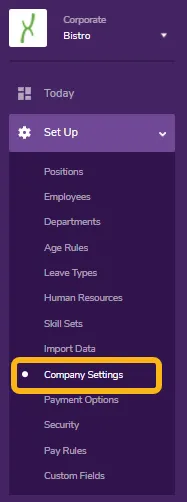
This feature is enabled at the corporate level. If you have an account with more than one location, you can find the Company Settings option at the Corporate level.
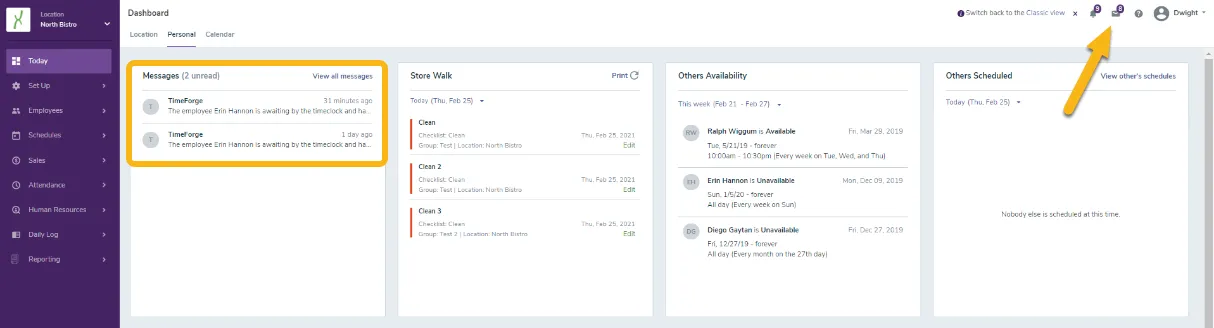
TimeForge sends out a message on TimeForge and an email to a manager if an employees answers Yes to any of the health screening questions.
On the Today page, the Messages widget found on the Personal section will display any recent messages you’ve received.
You can also pull up your recent messages by clicking on the envelope icon on the top right corner of the screen (see arrow in screenshot below).
Enable automatic clock outs
Attendance entries require both a clock in and out time. If an employee fails to clock out, you can manually clock them out from your timeclock or the web portal before fixing an attendance entry. There’s also another option: automatic clock out.
Automatic clock outs can help you keep track of entries where an employee forgot to punch out. Follow the instructions below to learn how you can setup automatic clock outs and how to find auto-clocked out entries.
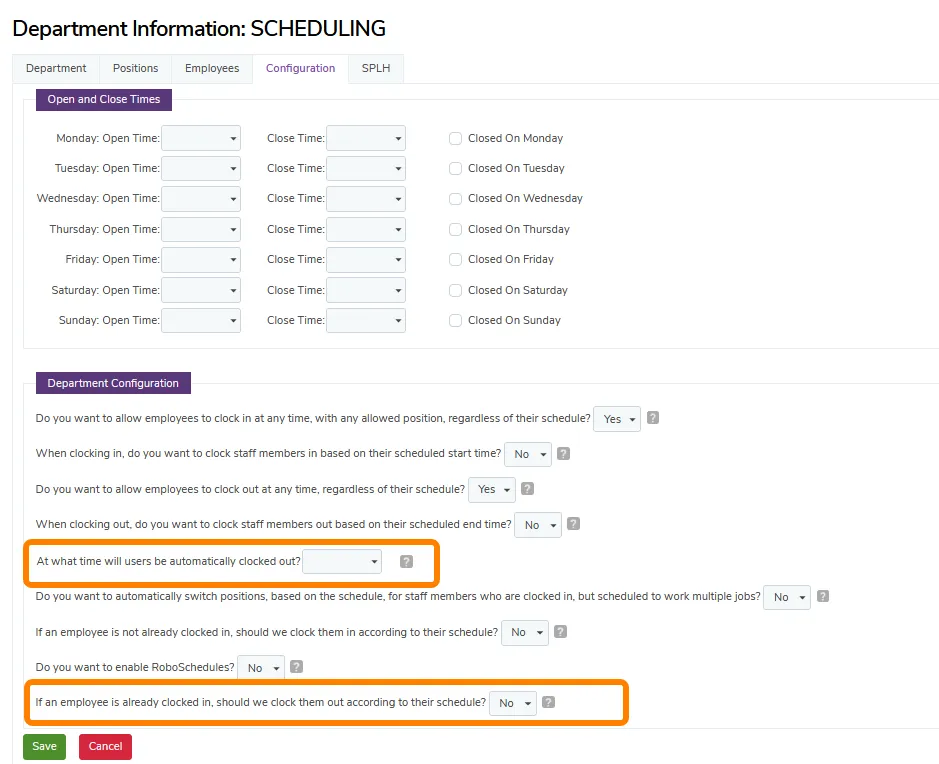
You can automatically clock out employees at a specific time or a number of minutes after their shift’s scheduled end time. Each option has their own advantages.
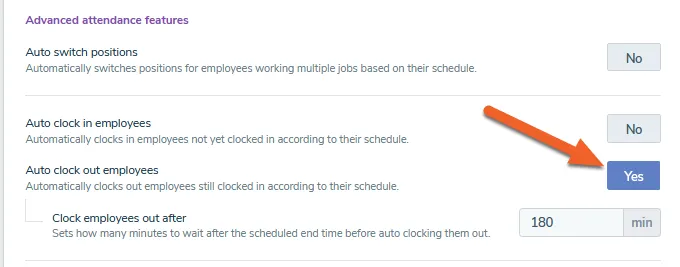
Enable “Auto clock out employees” if your location actively uses TimeForge for scheduling. This feature also works if your employees have varying start times throughout the day. By enabling this feature, the system clocks out employees who do not record a punch out by waiting a specific number of minutes after the employee’s scheduled shift ends.
In the example below, the system would wait 180 minutes (3 hours) after an employee’s scheduled out time before automatically ending their shift:
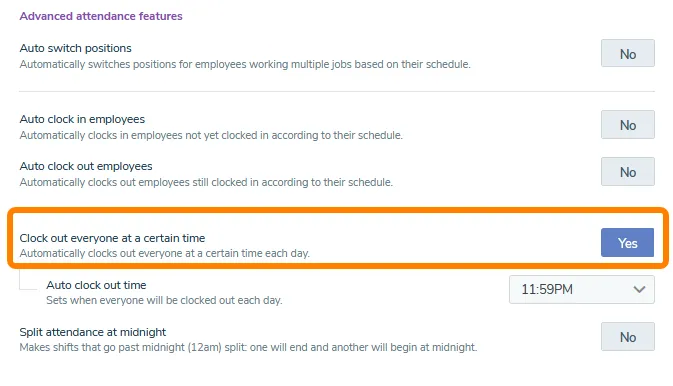
If your location does not have overnight employees and closes its operations at a specific time, enable the “Clock out everyone at a certain time” setting. This setting clocks out an employee if they do not record a punch out by the time you enter.
4. Click the green “Save” button to finalize your changes
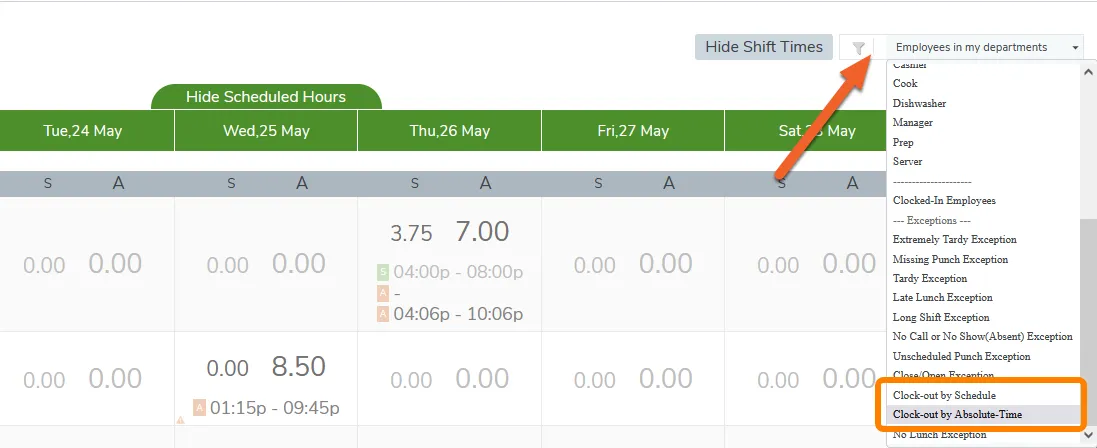
The “clock out by schedule” and “clock out by absolute time” filters in the Manage Attendance page allows you to quickly find entries where an employee did not punch out. You can find these filters by following the next three steps:
Navigate to the Attendance tab and select Manage Attendance
In the top right corner click on the filter drop down menu
Select either “clock out by schedule” and “clock out by absolute time” depending the clock out method your location uses
After you select the filter for the clock out method your location uses, entries which did not have clock out recorded by an employee will appear.